
The Ultimate Guide to Recovering Deleted Photos on Any Device
We know how horrible it feels to lose important photos, which is why we’ve put together this comprehensive guide to help you recover them from any storage device.
Recovering Deleted Photos from an SD Card
SD cards are responsible for more lost photos than any other storage device. Sometimes, their fragile shell is to blame, but, in most cases, users themselves accidentally delete their own photos by not paying enough attention when trying to format a different storage device or delete a file.
While photos from physically damaged SD cards are impossible to recover at home, you can easily undelete all recently deleted photos from any SD card (SD, SDHC, or SDXC) using the methods described below.
Method 1: Remove Virus Infections from an SD Card
If you’ve suddenly become unable to access the content of your SD card, there’s a chance that you’re dealing with a virus infection. Before you try any other ways to recover deleted photos from your SD card, you should remove the infection using antivirus software.
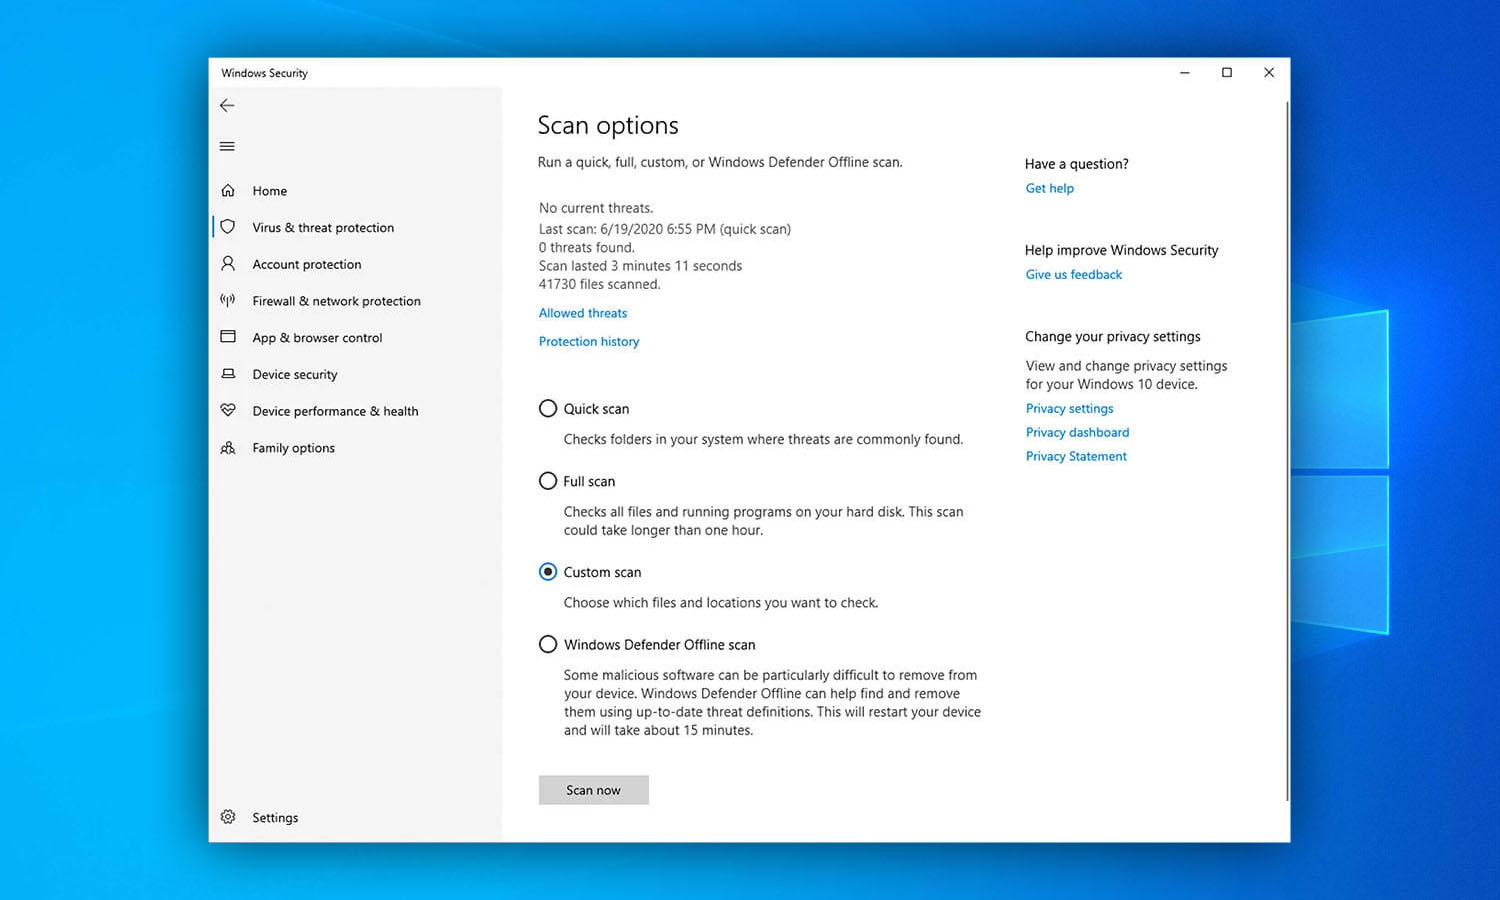
For Windows Users
To remove a virus infection from your SD card on Windows:- Open the Start menu and search for “Windows Security.”
- Launch the Windows Security app and go to Virus & threat protection.
- Click Scan options and select Custom scan.
- Click the Scan now button and select your SD card.
- Click the Select Folder button to confirm and wait for the scan to finish.
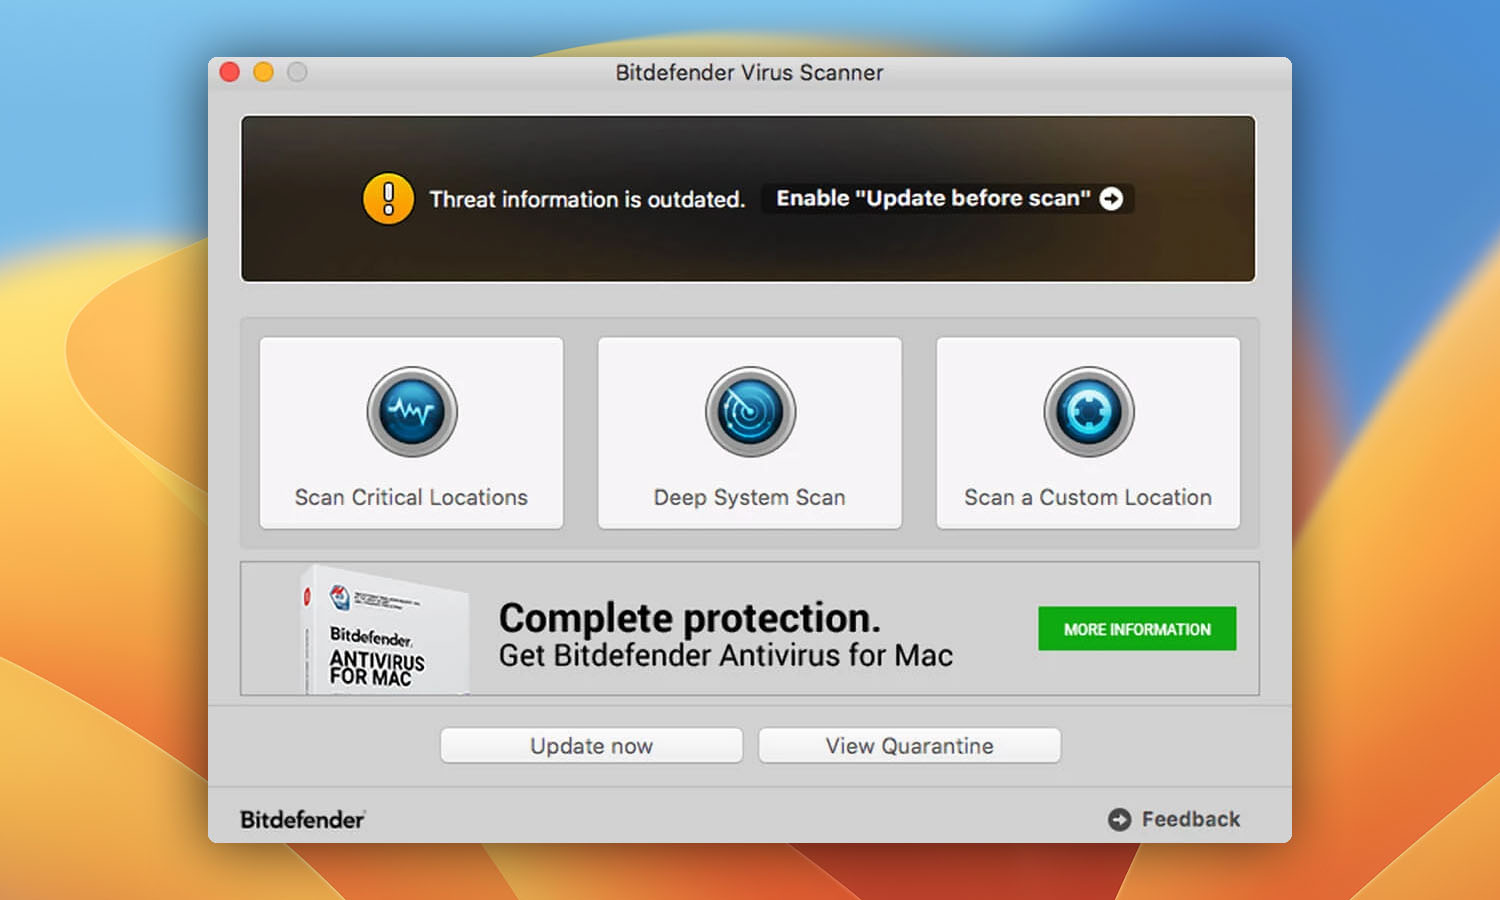
For Mac Users
To remove a virus infection from your SD card on Mac:- Install BitDefender Virus Scanner from the Mac App Store.
- Launch BitDefender Virus Scanner and click Scan a Custom Location.
- Select your SD card and click Scan.
- Wait for the scan to finish.
Method 2: Fix SD Card Corruption
Just because you can’t access any files on your SD card doesn’t necessarily mean the files are gone. The SD card could be corrupted, which can happen when you remove it from a camera or computer without first turning off your device or safely unmounting the SD card. The good news is that SD card corruption is easy to fix using the tools that are already present on your Windows or Mac computer.
For Windows Users
To fix SD card corruption on Windows:- Type cmd in the search box on the taskbar and select Run as administrator.
- Enter the following command (make sure to replace X with the letter assigned to the SD card you want to fix) and press Enter: chkdsk X: /R
- Wait for CHKDSK to finish. The process may take several hours, depending on the size of your SD card.

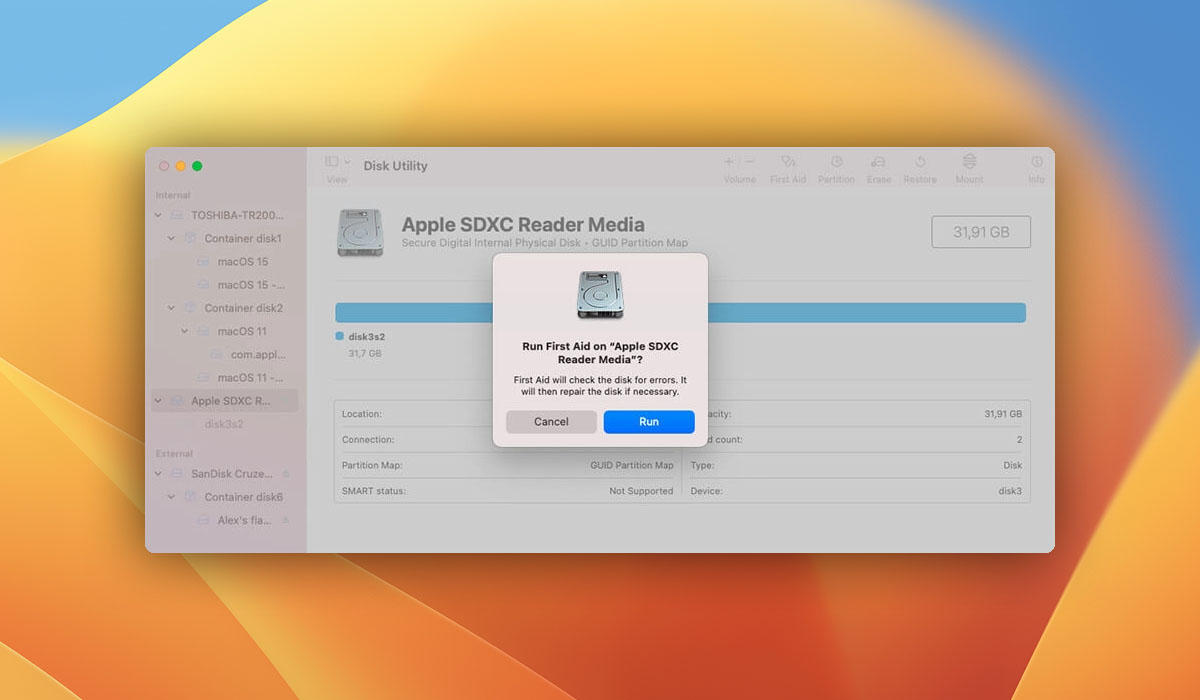
For Mac Users
To fix SD card corruption on Mac:- Launch Disk Utility.
- Select your SD card from the list of devices on the left.
- Click First Aid at the top of the screen.
- Click Run to confirm your choice.
Method 3: Check Temporary Storage on Mac and Windows
Both Mac and Windows have special folders for temporary files, which are created by your operating system and applications to hold data for a limited amount of time, typically until a certain process finishes. Because temporary files are stored on the system drive, they can be accessed quicker than files stored on other storage devices, which leads to better performance.
Oftentimes, temporary files remain on the system drive even when they are no longer needed, which is why you should always check temporary storage on Mac and Windows whenever you accidentally delete an important photo, especially if you’ve been editing the photo in an application like Adobe Photoshop.
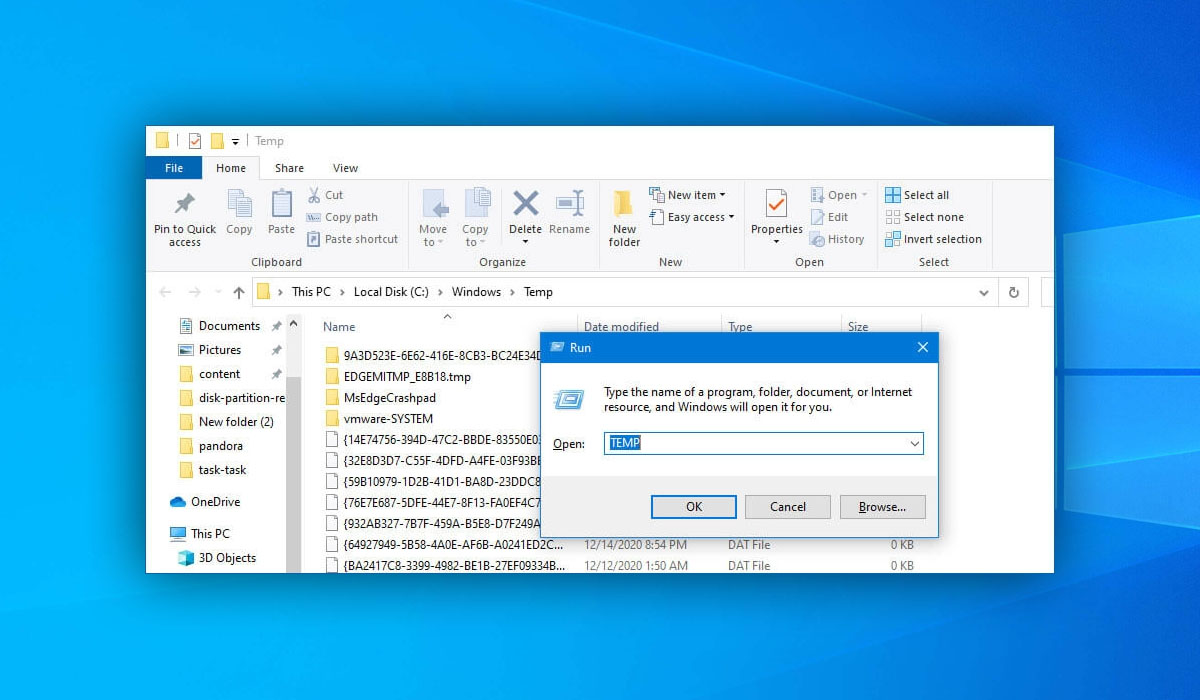
For Windows Users
To check temporary storage on Windows:- Open the Start menu, type run, and hit Enter.
- Enter TEMP and click OK. A new File Explorer window will appear with the “C:\Windows\Temp” folder opened.
- Open the Run application again and enter %TEMP%. Another File Explorer window will appear, this time with the “C:\Users\yourname\AppData\Local\Temp” folder opened.
- Go through the two folders and look for the deleted photo. It helps to sort their content by date and focus only on files and folders that were created around the time you lost the photo.
- Move the deleted photo from temporary storage to your desktop or any other safe place.
For Mac Users
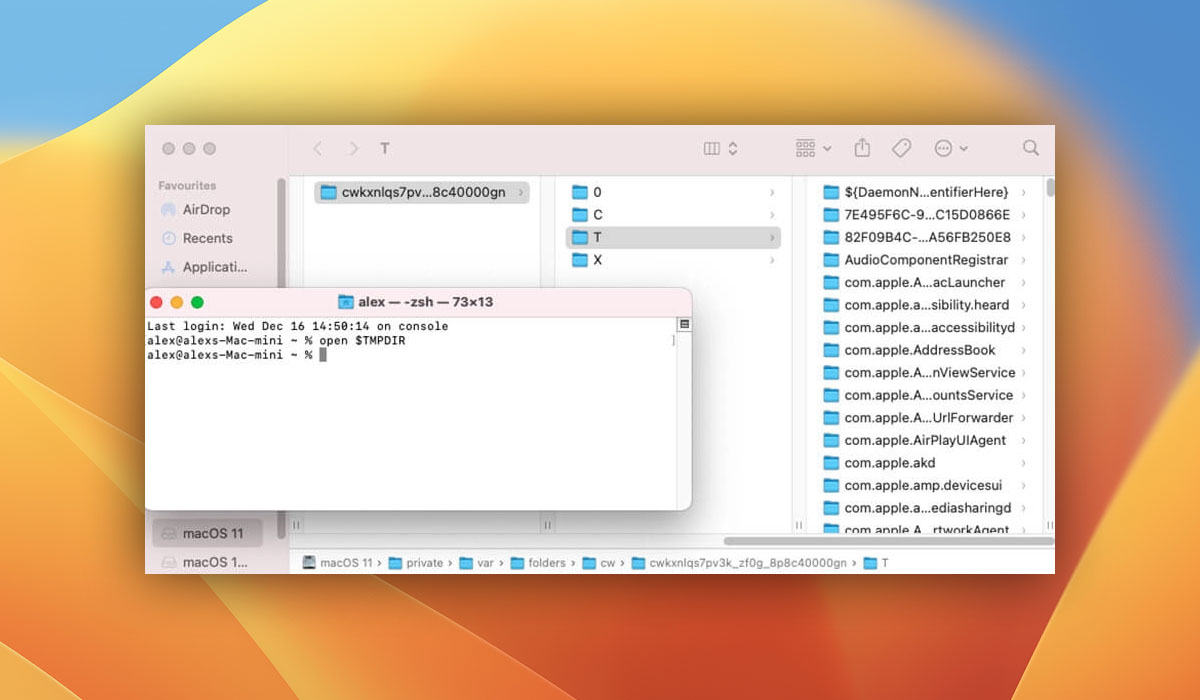
To check temporary storage on Mac:- Open the Terminal app.
- Enter open $TMPDIR and hit Enter. A new finder window will appear with the main temporary storage folder opened.
- Open another Finder window and select Go from the menu bar. Click Go to Folder and enter the following destination: ~/Library/Caches/TemporaryItems/
- Go through the opened folders and look for your photo.
- Move the deleted photo from temporary storage to your desktop or any other safe place.
Method 4: Recover Deleted Photos from a Backup
If you have a backup of your SD card, you’re in luck because you can use it to easily recover all deleted photos. Both Windows and Mac computers come with a handy backup tool, and the chances are that you’d activated it before losing your photos even if you no longer remember doing so.
The backup tool included in the latest version of Windows is called File History, while all Mac computers running macOS 10.5 or newer feature an easy-to-use backup tool called Time Machine.
For Windows Users
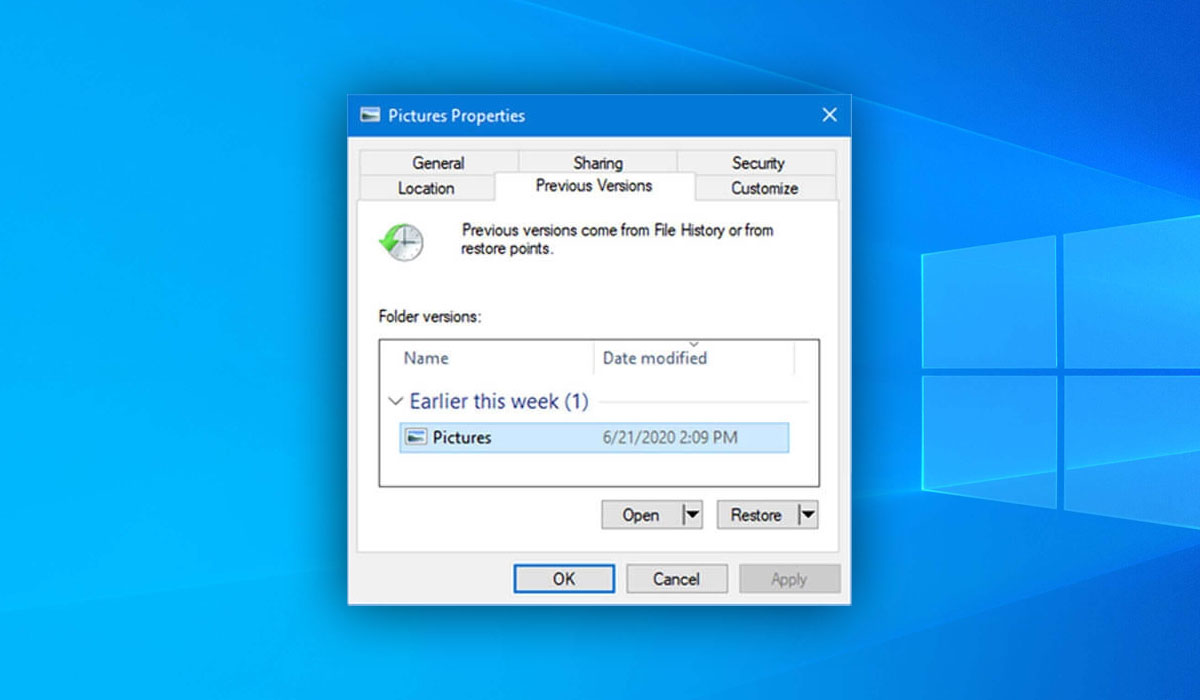
To recover deleted photos from a backup on Windows:- Open Windows Explorer and right-click on the folder where the deleted photos were located.
- Select Restore previous versions.
- Select the most relevant File History backup and click Open to preview its content.
- Select the photo you want to recover and click the green Recover button at the bottom of the preview window to recover it.
For Mac Users
To recover deleted photos from a backup on Mac:- Connect your Time Machine backup disk.
- Launch Finder and open the folder that contained the deleted photos.
- Click the Time Machine icon located in the Menu Bar and choose Enter Time Machine.
- Locate the photos you want to recover using the timeline on the right edge of the screen.
- Click Restore to restore the selected photos.

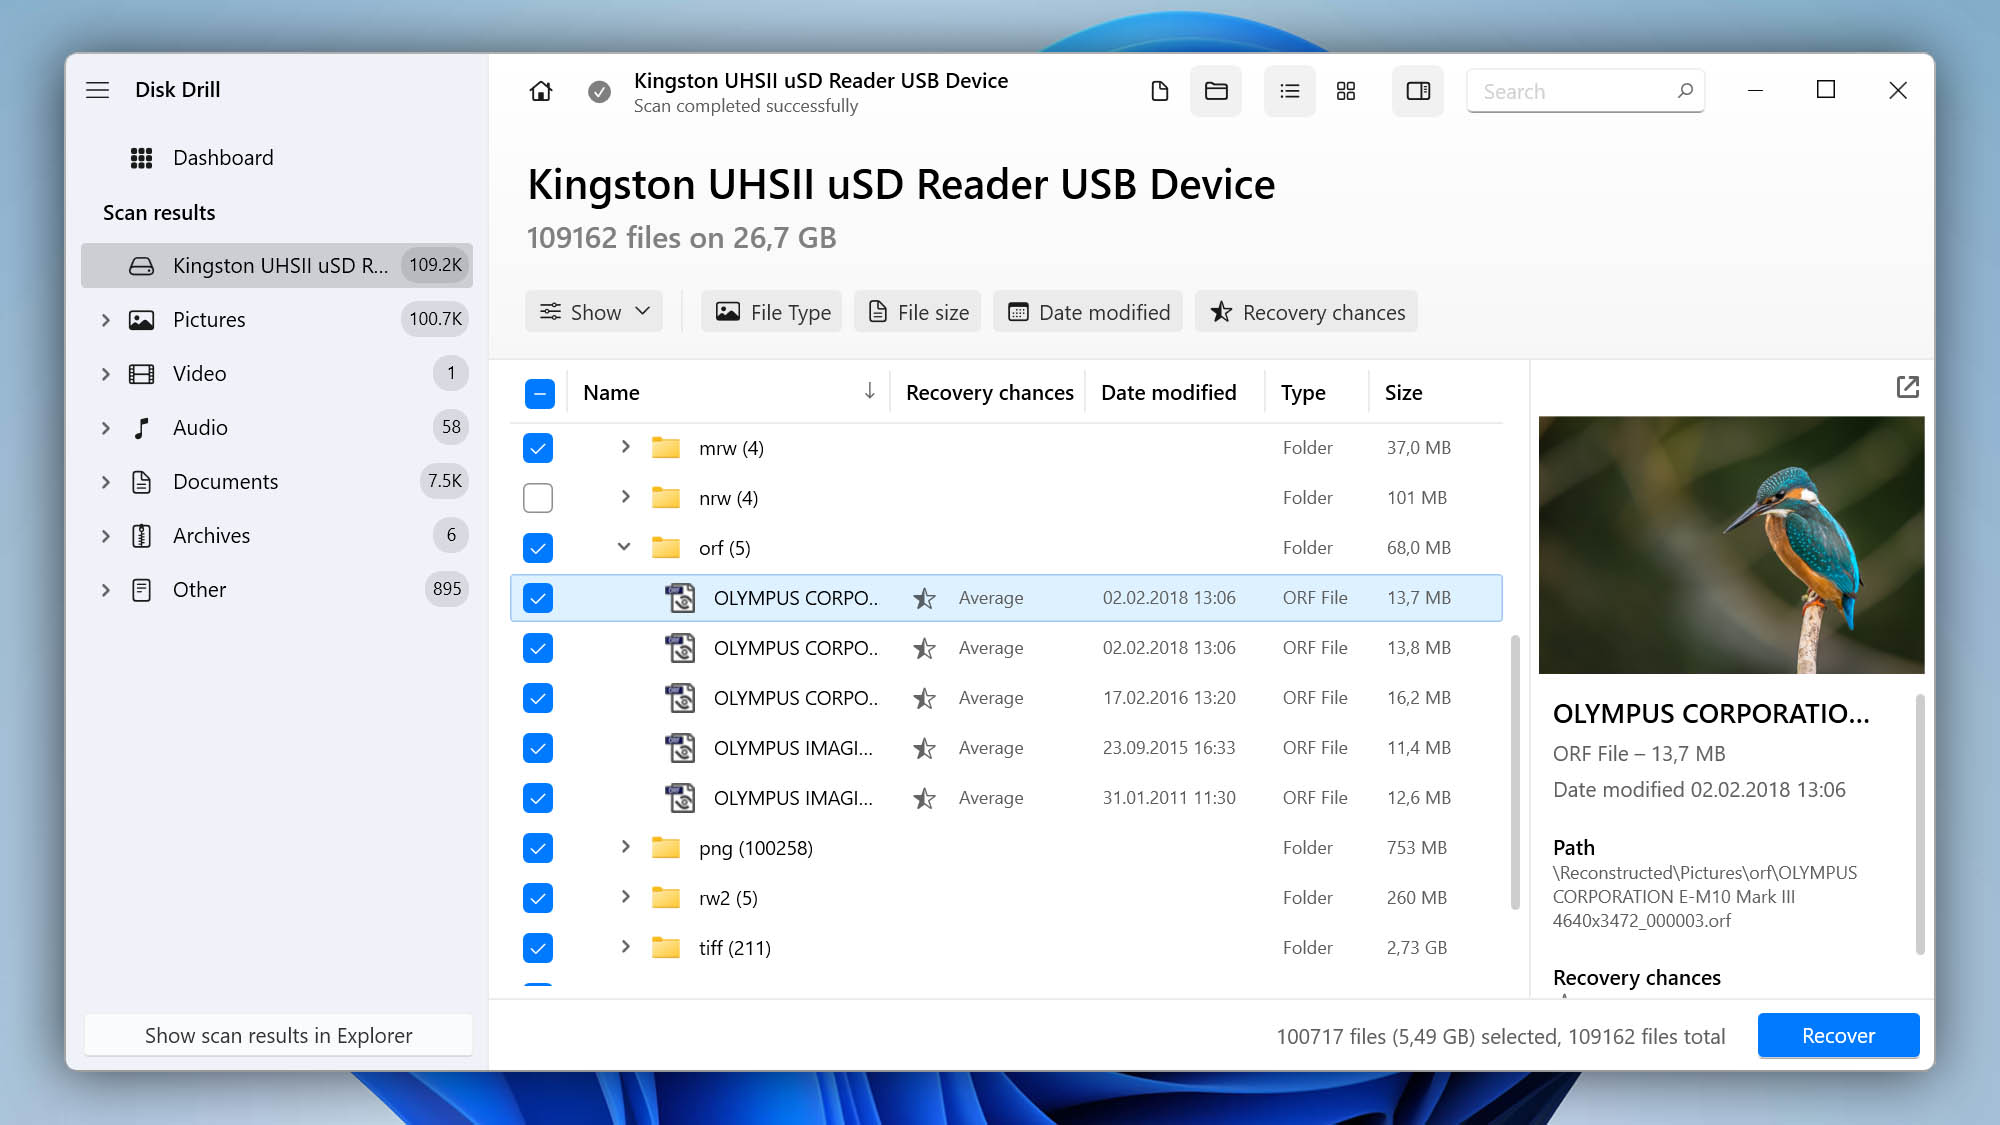
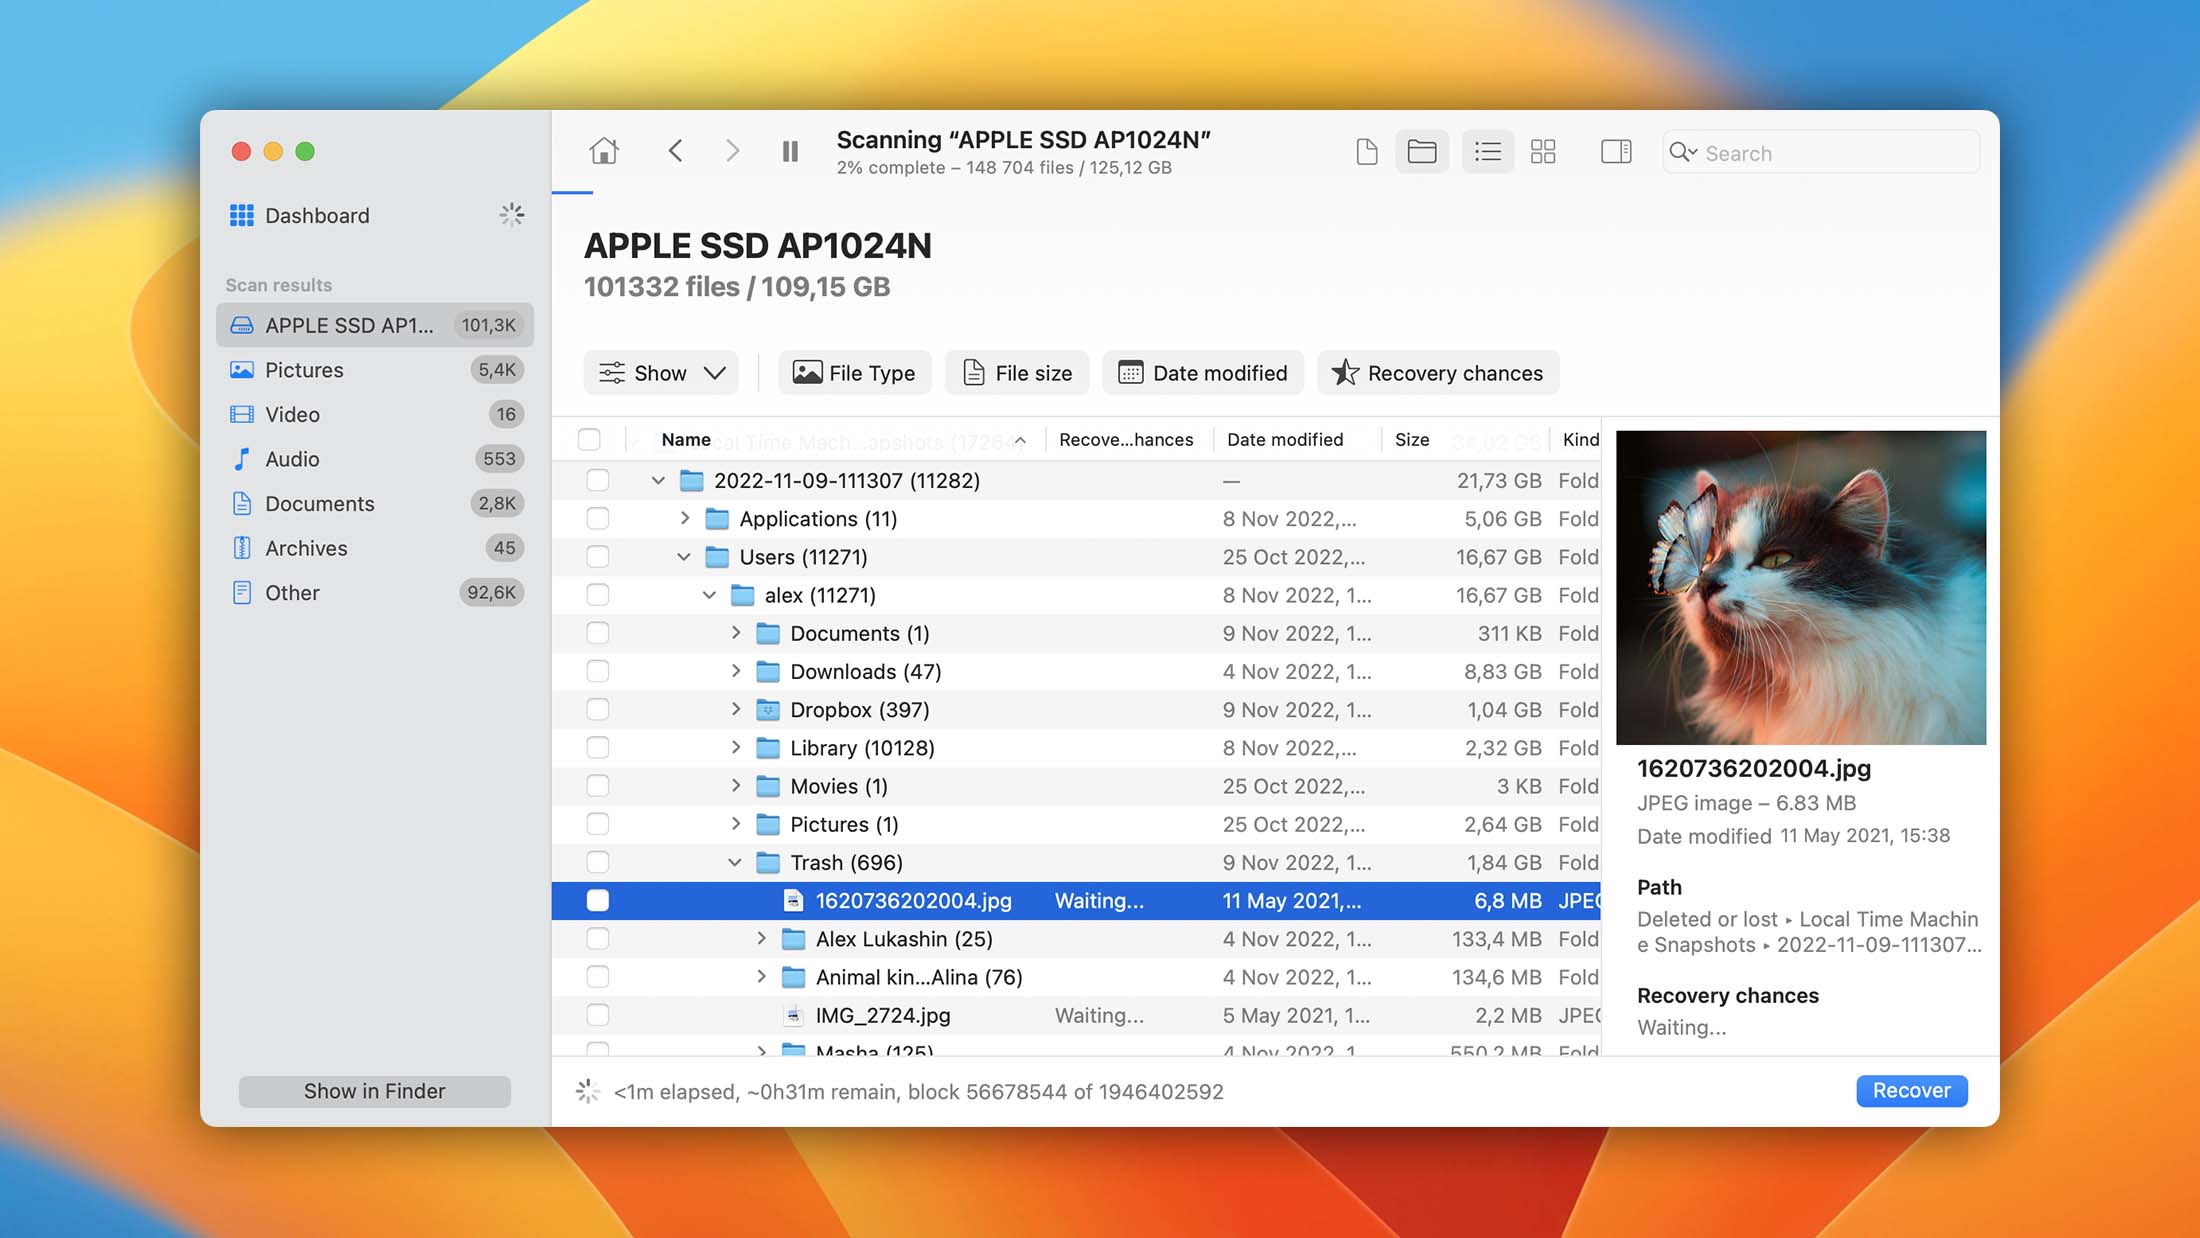
Method 5: Use Data Recovery Software
Even if all previously described photo recovery methods fail to deliver the desired results, there’s still a pretty good chance that you’ll be able to successfully recover all deleted photos. That’s because you can use the best photo recovery software like Disk Drill to perform a deep scan of your SD card and recover photos neither Windows nor Mac can see.
If you’ve never used any photo recovery software application before, you have nothing to worry about. Disk Drill makes the entire recovery process extremely simple, and our step-by-step instructions explain it from start to finish.
For Windows Users
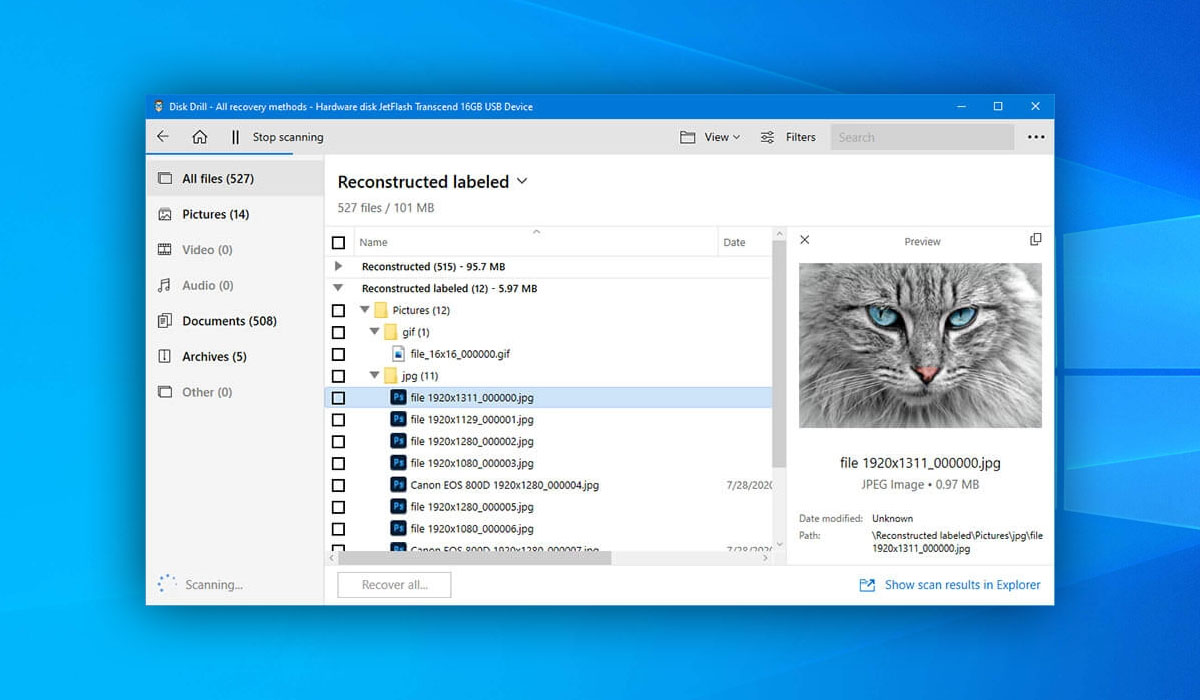
To recover deleted photos with Disk Drill for Windows:- Download and install Disk Drill for Windows.
- Connect your SD card to your computer and launch Disk Drill.
- Select the SD card and click Search for lost data.
- Use the file format filters on the left to narrow down the scan results until you find the photo you’re looking for. Select it to see its preview on the right.
- Click the checkbox next to the photo and click the blue Recover button at the bottom.
- Specify the recovery folder and click OK.
For Mac Users
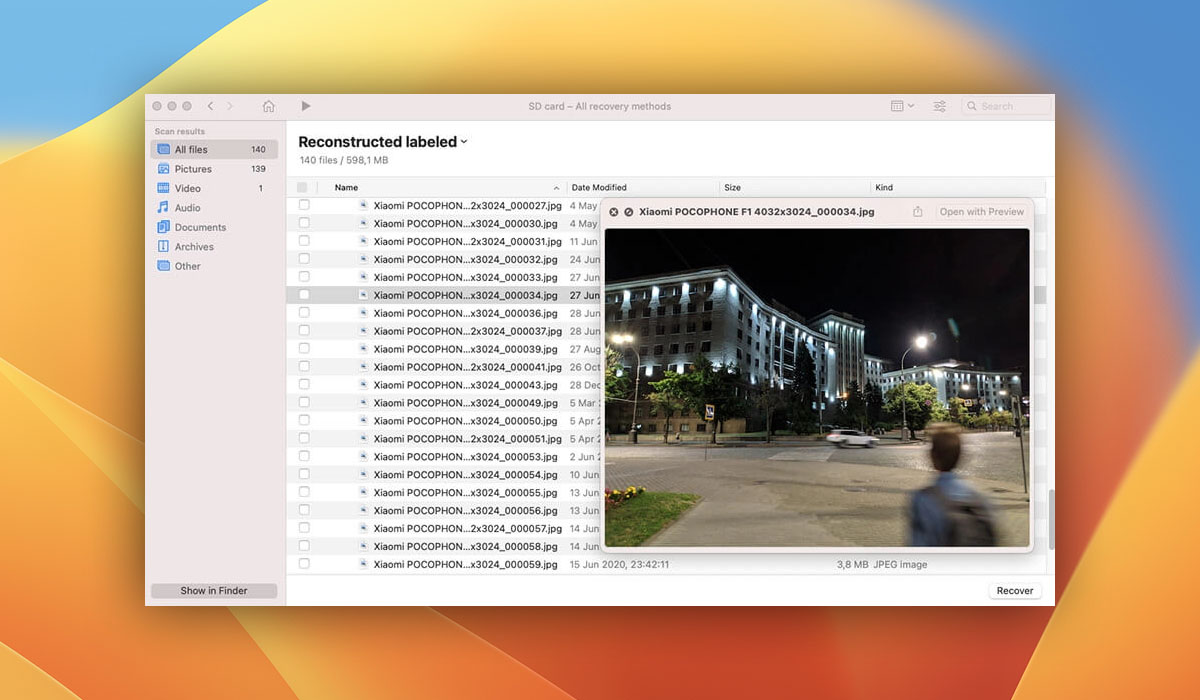
To recover deleted photos with Disk Drill for Mac:- Download and install Disk Drill for Mac.
- Connect your SD card to your Mac and launch Disk Drill.
- Click the Recover button next to the SD card.
- Select the photos you want to recover. Use the preview feature to verify that you’ve selected the right photos.
- Specify the recovery destination and click the Recover button.
Recovering Deleted Photos from a Hard Drive
Hard drives have come a long way since the release of the first commercially sold hard drive in 1956. Today, consumers can choose between affordable spinning hard disk drives (HDDs) and fast solid-state drives (SSDs), both available as internal and external devices.
Unfortunately, even after more than 50 years of development, hard drives still leave a lot to be desired when it comes to reliability. Of course, even if hard drives were perfectly reliable, users would still lose important files due to making mistakes and not paying enough attention when using the computer. For these and other reasons, it’s important that you know how to recover deleted photos from any hard drive.
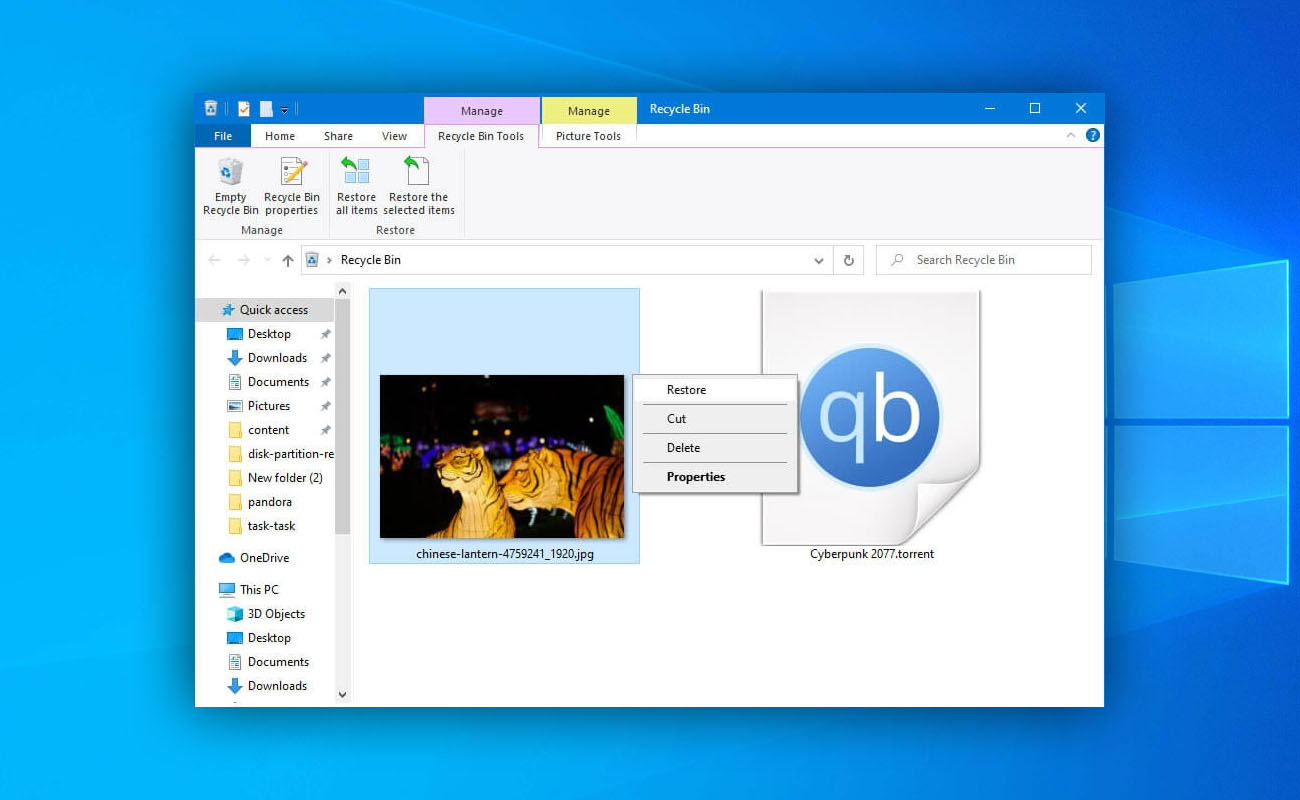
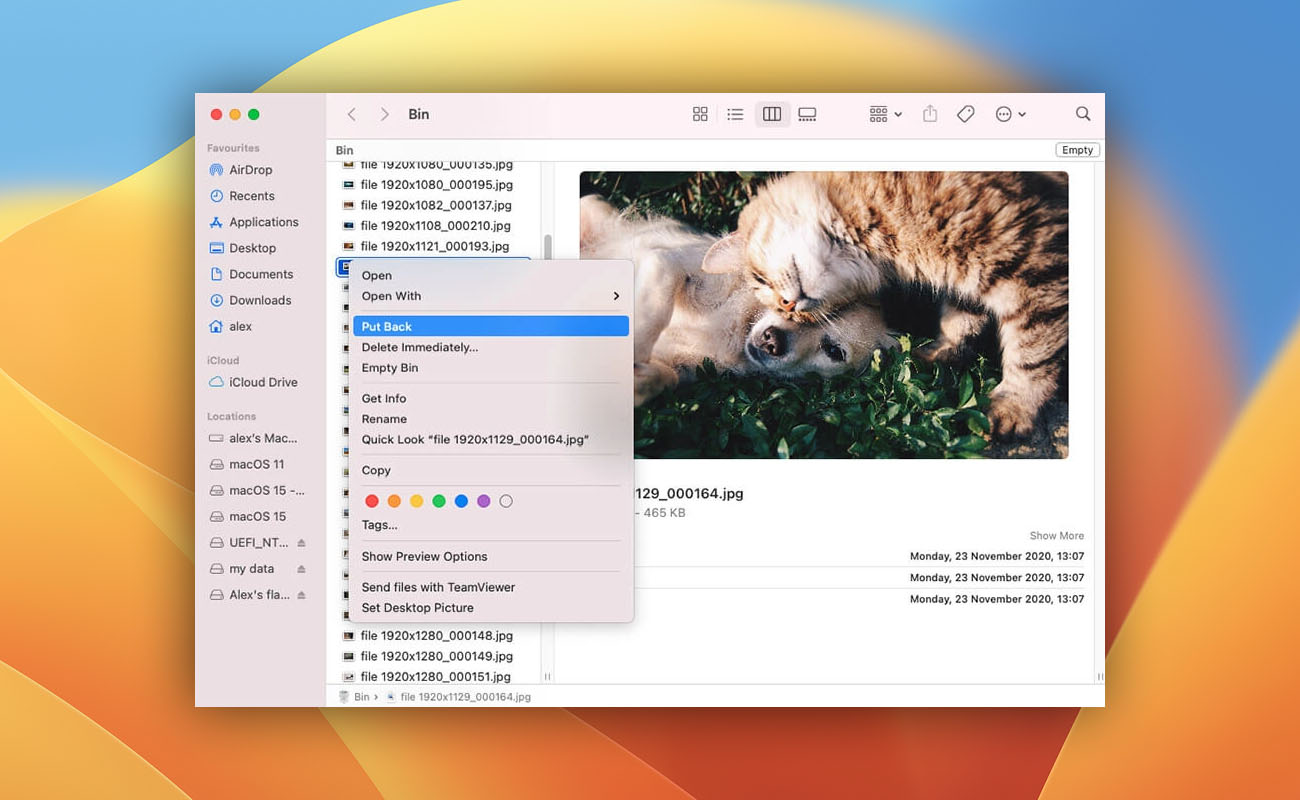
Method 1: Check the Recycle Bin/Trash
Whenever you accidentally delete the wrong photo, you should immediately check the Recycle Bin (Windows) or Trash (Mac). If it is, you’re in luck because recovering it from there couldn’t be easier.
For Windows Users
To recover deleted photos from the Recycle Bin:- Access the Recycle Bin by clicking on its desktop icon.
- Highlight the files you want to recover.
- Right-click on any highlighted file and select the Restore option.
For Mac Users
To recover deleted photos from Trash:- Open Trash by clicking on its icon, located on the right side or bottom of the Dock.
- Go through Trash and look for the photos you want to undelete. Select them by either pressing and holding the command key and then clicking the files or by holding the left mouse click and dragging the cursor around them.
- Click on any of the selected photos, hold the click, and drag your mouse to another folder or your desktop. As soon as you release the mouse, the photos will be moved to the destination.
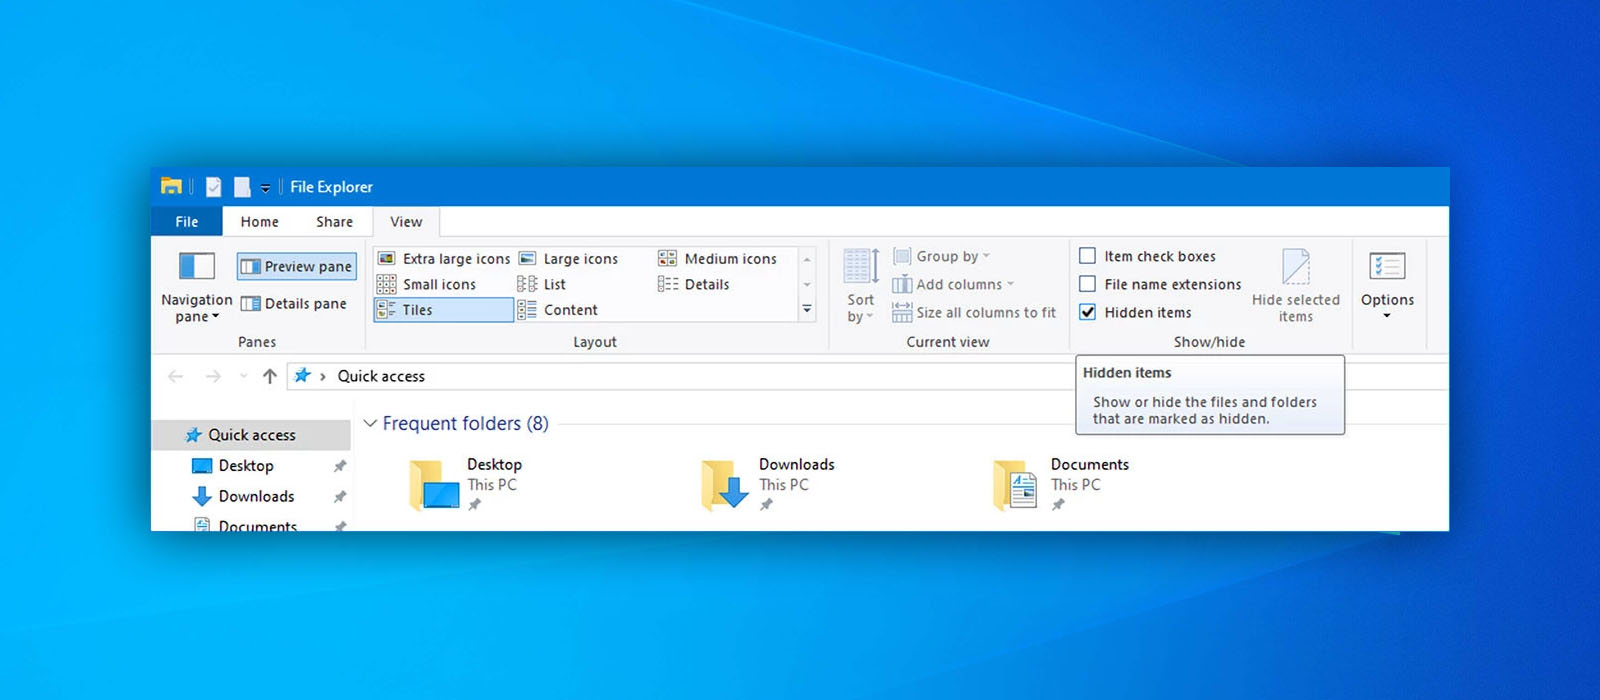
Method 2: Show Hidden Files
Sometimes, users are desperately trying to recover files that were not deleted at all. Instead, they were simply hidden, which can happen due to a user error or malware infection.
For Windows Users
To show hidden files on Windows:- Open File Explorer and navigate to the folder where your photos were located.
- Select the View tab and click Options.
- Go to View and click Show hidden files, folders, or drives.
- Click OK to confirm.
- Look for your photos. If you don’t see them, they were most likely deleted and not just hidden.
For Mac Users
To show hidden files on Mac:- Open Finder and navigate to the folder where your photos were located.
- Press Command + Shift + Dot on your keyboard.
- Look for your photos. If you don’t see them, they were most likely deleted and not just hidden.

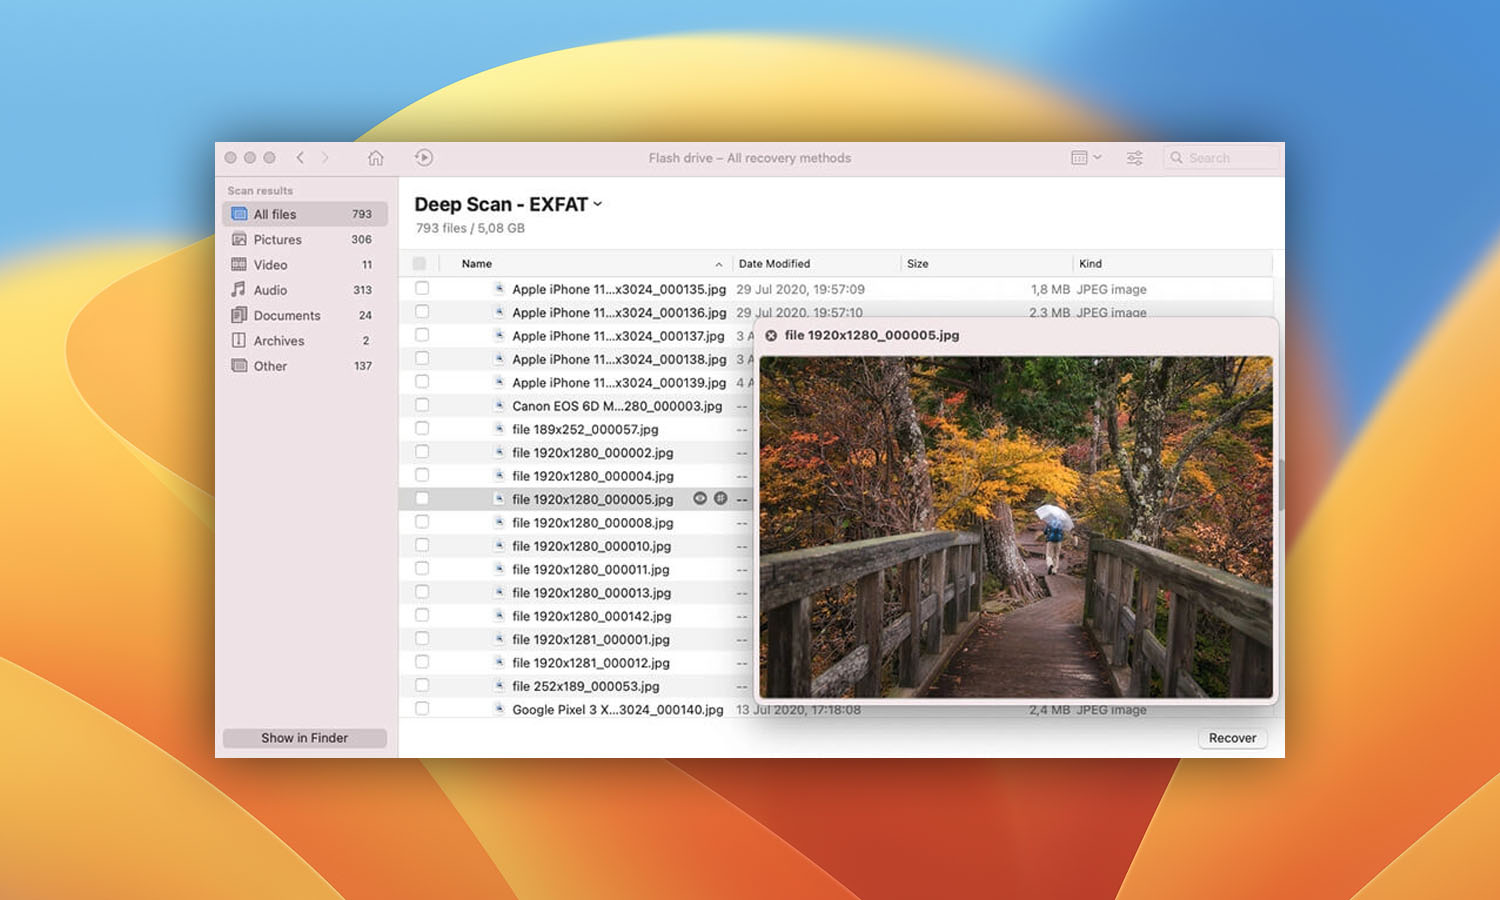
Method 3: Use Photo Recovery Software
Photo recovery software can be a true lifesaver when other recovery methods fail. When it comes to recovering deleted photos from a hard drive, you want to select a photo recovery application with several key features.
First and foremost, the application should be able to scan your hard drive quickly, so that you don’t have to wait for hours to get results. It should also let you pause and resume an active scan at any time because you never know when you might need to shut down your computer or work on a resource-intensive task. Last but not least, it should be easy to use and support all image file formats.
Disk Drill meets all of these criteria with flying colors, and you can use it on both Windows and Mac to recover data from traditional spinning hard drives as well as modern SSDs.
For Windows Users
To recover deleted photos with Disk Drill for Windows:- Download, install, and launch Disk Drill for Windows.
- Select the hard drive on which the deleted photos were stored and click Search for lost data.
- Use the file format filters on the left to narrow down the scan results until you find the photos you’re looking for.
- Check the checkbox next to each photo and click the blue Recover button at the bottom.
- Specify the recovery folder and click OK.
For Mac Users
To recover deleted photos with Disk Drill for Mac:- Download, install, and launch Disk Drill.
- Click the Recover button next to the hard drive on which your photos were stored prior to deletion.
- Look inside the recovery folders and locate the deleted photos using the preview feature.
- Select each photo you want to recover and click the Recover button.
- Specify where you want Disk Drill to recover the deleted photos and click Choose.
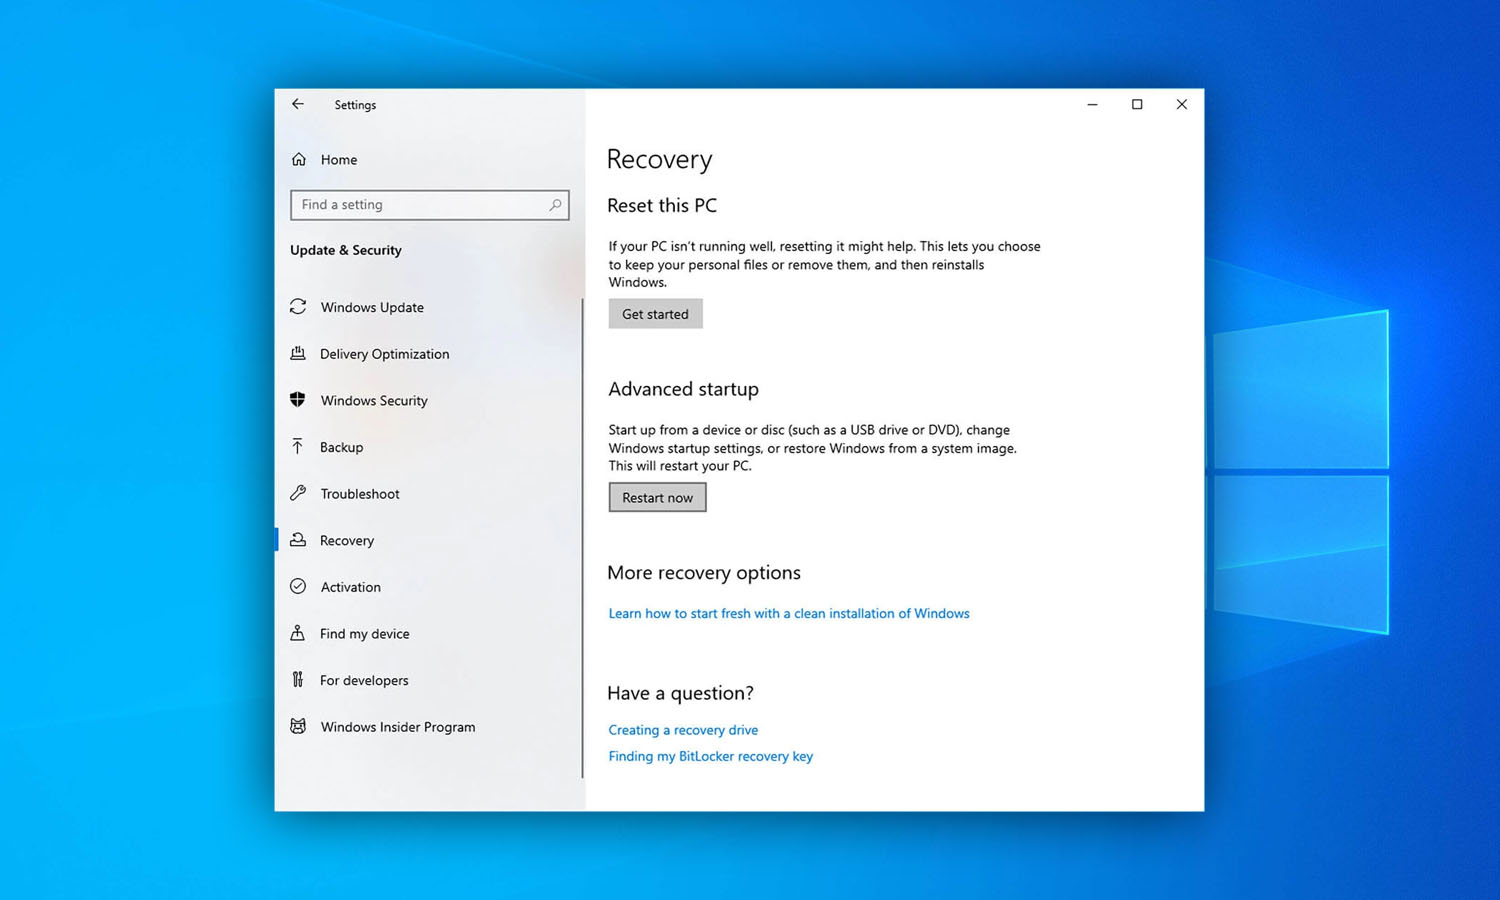
Method 4: Restore the Hard Drive to an Earlier Point
No luck with photo recovery software? In that case, it might be time to consider restoring your hard drive to an earlier point, one where your photos have not yet been deleted. The biggest downside of this method is that you can’t selectively choose which files you want to restore and which you want to keep.
For Windows Users
To restore your hard drive to an earlier point from a System Image backup:- Open Start menu, type settings, and hit Enter on your keyboard.
- Select Update & Security and choose Recovery from the list of options on the left.
- Click the Restart now button under Advanced startup.
- Click Troubleshoot > Advanced Options > See more recovery option > System Image Recovery.
- Select a System Image backup file and click Next.
- Choose additional restore options and click Next.
- Review the system image details and click Finish to begin the restore process.
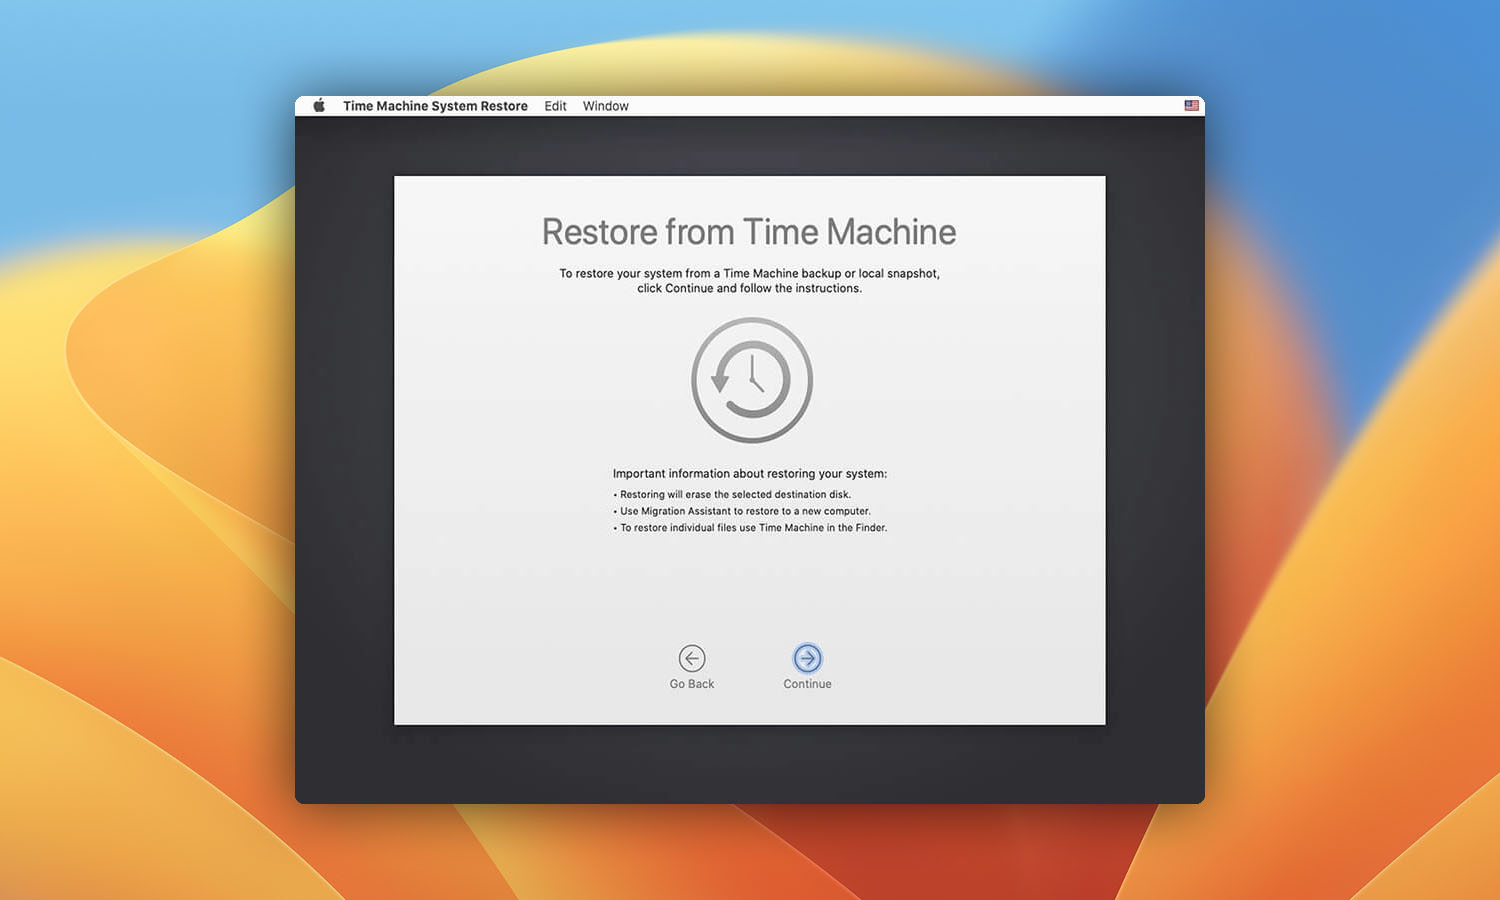
For Mac Users
To restore your hard drive to an earlier point with Time Machine:- Hold down the Command + R during reboot until you see an Apple logo or spinning globe to reboot into Recovery.
- Select the Restore From Time Machine Backup option and click Continue.
- Read the information about restoring from a Time Machine backup and click Continue.
- Select the disk that contains your Time Machine backup and click Continue.
- Select the Time Machine backup you want to restore and click Continue to begin the restore process.
Method 5: Send It to a Professional Data Recovery Center
Hard drives are fragile devices containing many different components that can be damaged by a drop to the ground, water, heat, or electricity. A physically damaged hard drive may completely refuse to work, making it impossible to use photo recovery software to recover lost photos from it.
Skilled data recovery specialists with professional equipment and experience can diagnose and fix the underlying issue to retrieve your data. Several data recovery services are available that can help you recover your lost data. These services offer a high success rate, and many make it easy for customers to get started with the recovery process.
To initiate a data recovery service:- Find a reliable data recovery service provider.
- Initiate a work order.
- Pack and ship your hard drive to the data recovery service provider.
- Wait for your failure report and a guaranteed price quote.
Recovering Deleted Photos from USB Flash Drives
USB flash drives go by many different names: USB drives, pen drives, USB keys, thumb drives, pocket drives, data sticks, and even memory sticks. Regardless of how you call them, they are relatively inexpensive data storage devices with flash memory chips and an integrated USB interface that makes it easy to plug them into any computer.
Because USB flash drives use the USB mass storage device class standard, they are compatible with Windows, Linux, macOS, and other Unix-like systems without any additional drivers or software. As there is no significant difference between USB flash drives and SD cards in terms of recovering deleted photos, you can use any of the five methods described in the first chapter of this article or our article on recovering deleted files from USB flash drives.
Recovering Deleted Photos from Digital Cameras
Modern digital cameras, such as those manufactured by Canon and Nikon, are sophisticated devices with their own internal memory as well as a slot for a memory card. Recovering data from a digital camera may seem to be complicated, but only until you realize that you can access the photos stored on it just as easily as the photos stored on any other storage device.
Method 1: Recover Your Photos from a Backup
If you’d backed up your photos before you deleted them from your digital camera, you’re in luck because you can simply recover them the backup.
We’ve already described how to use File History in Windows and Time Machine in macOS to recover deleted files in the chapter dealing with SD card photo recovery, so please refer it to and follow our step-by-step instructions.
Method 2: Recover Deleted Photos from Camera SD Card
If you have multiple SD cards that you use in your digital camera, it’s much more convenient to recover lost and deleted photos from them directly using a memory card reader. Laptop users don’t even need to purchase a memory card reader because almost all laptops have a built-in memory card slot.
For detailed instructions on how to recover deleted photos from an SD card using photo recovery software, please read the first chapter of this article, in which we describe how to use Disk Drill for Windows and Disk Drill for Mac.
Recovering Deleted Photos from Mobile Phones
Smartphones have essentially replaced point-and-shoot cameras, allowing us to capture everyday moments without having to haul around an additional device. But what if you accidentally delete important photos when using your smartphone for things? Fortunately, there are several ways how you can recover them.
For Android Users
Let’s explore a few methods available to Android smartphone users.
Method 1: Recover Deleted Photos from the Samsung Gallery App
Unfortunately, the Android operating system doesn’t have a folder for deleted files. One notable exception are Samsung smartphones. If you own a Samsung Galaxy device, you can recover deleted photos from the Trash section of the Samsung Gallery app:
- Open the Gallery app.
- Tap the three-dot button in the Pictures tab.
- Select Trash.
- Click Empty Trash to restore all deleted photos at once.

Method 2: Restore Your Deleted Photos from Google Photos
If you have deleted a photo backed up by Google Photos, you can restore it within 60 days directly from your device:
- Open the Google Photos app.
- Tap the hamburger menu and select Trash.
- Touch and hold the photo you want to restore.
- Tap Restore at the bottom.

Method 3: Use Data Recovery Software
Most Android smartphones these days have a slot for an SD card. If you’ve been taking advantage of it, you can simply remove the SD card from your smartphone and use a data recovery software application for Windows or Mac to get back your photos:
- Download and install Disk Drill.
- Remove the SD card from your smartphone, connect it to your computer, and launch Disk Drill.
- Select the SD card and begin the recovery process.
- Select the files you want to recover and click the Recover button.
- Specify the recovery destination and click confirm your choice to begin the recovery of your files.
For Mac/iPhone Users
Apple provides several native ways to recover permanently deleted photos from iPhone, and you can also use a third-party data recovery software application to get back even more files.
Method 1: Recover Deleted Photos from the Photos App
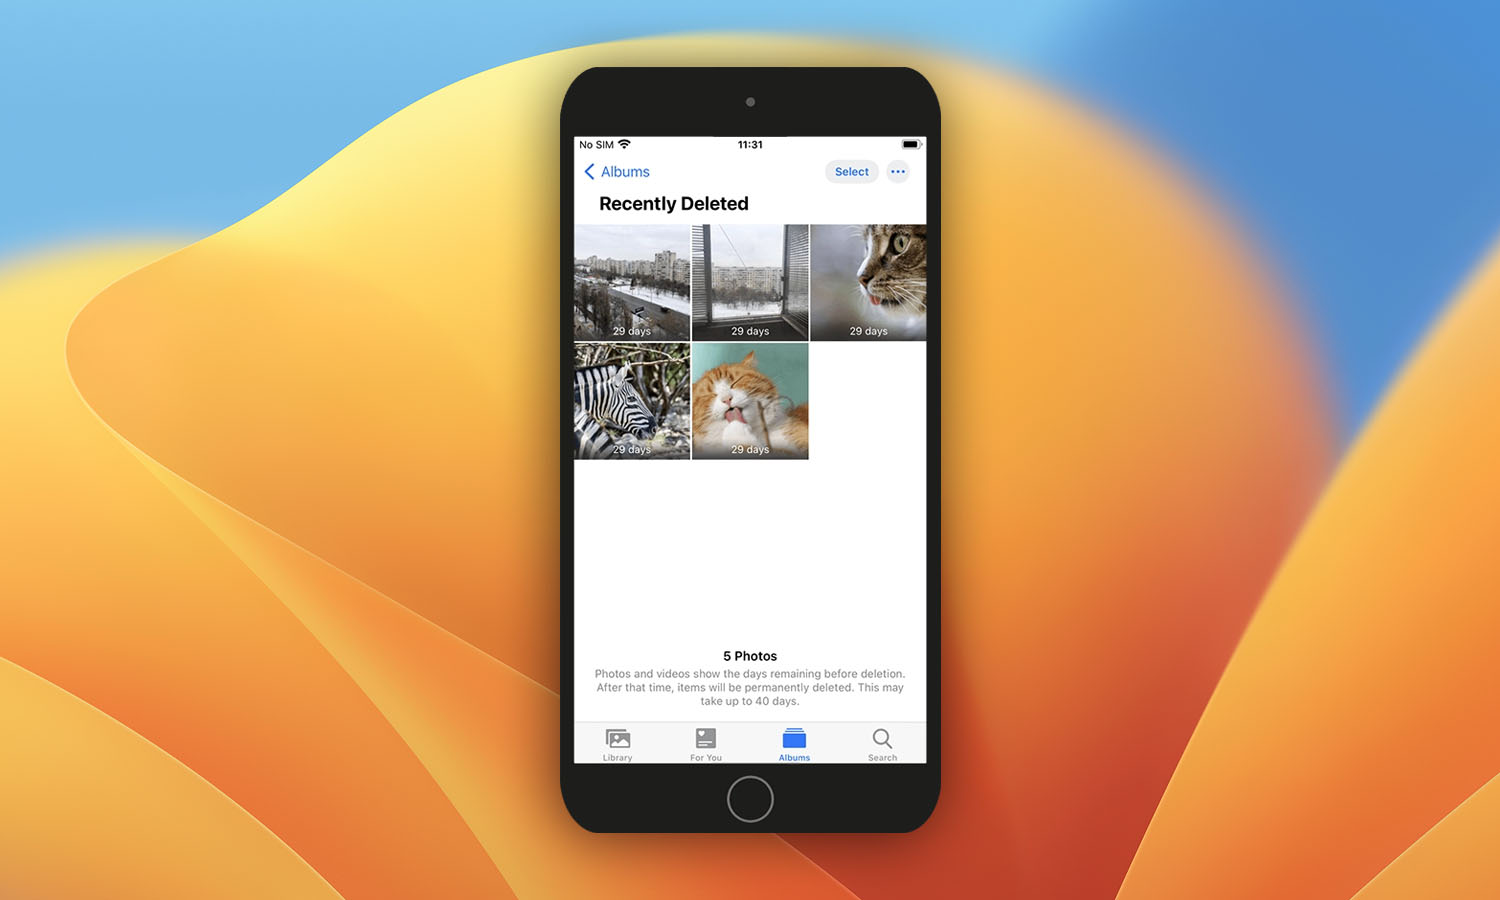
When you delete a photo on an iPhone, it doesn’t immediately disappear from the device. Instead, it goes to the Recently Deleted folder, where it stays for up to 40 days before it’s automatically removed. If you act quickly enough, you can recover it with just a few taps.
- Open the Photos app.
- Go to your Albums and navigate to the Recently Deleted folder.
- Tap the picture we want to recover, then tap Recover.
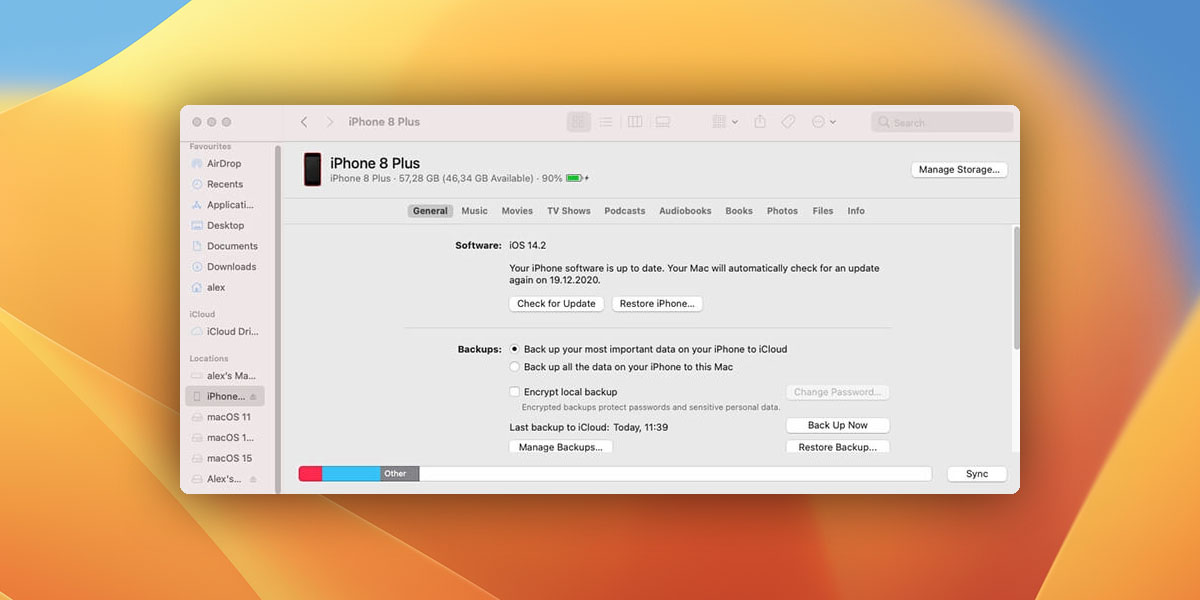
Method 2: Restore an Older iPhone Backup
If you have a backup of your iPhone, you can use it to recover your device to an earlier point in time. Keep in mind that all backup and restore features have been moved from iTunes to Finder in macOS Ventura. If you still have an older version of Apple’s
- Connect your iPhone to your computer.
- Launch Finder.
- Select your iPhone from the list of locations on the left.
- Go to the General tab and click the Restore iPhone button.
- Select the desired iPhone restore file and click Open.
- Confirm that you’re ready to restore your iPhone from a backup by clicking the Restore button again.
Method 3: Use Data Recovery Software
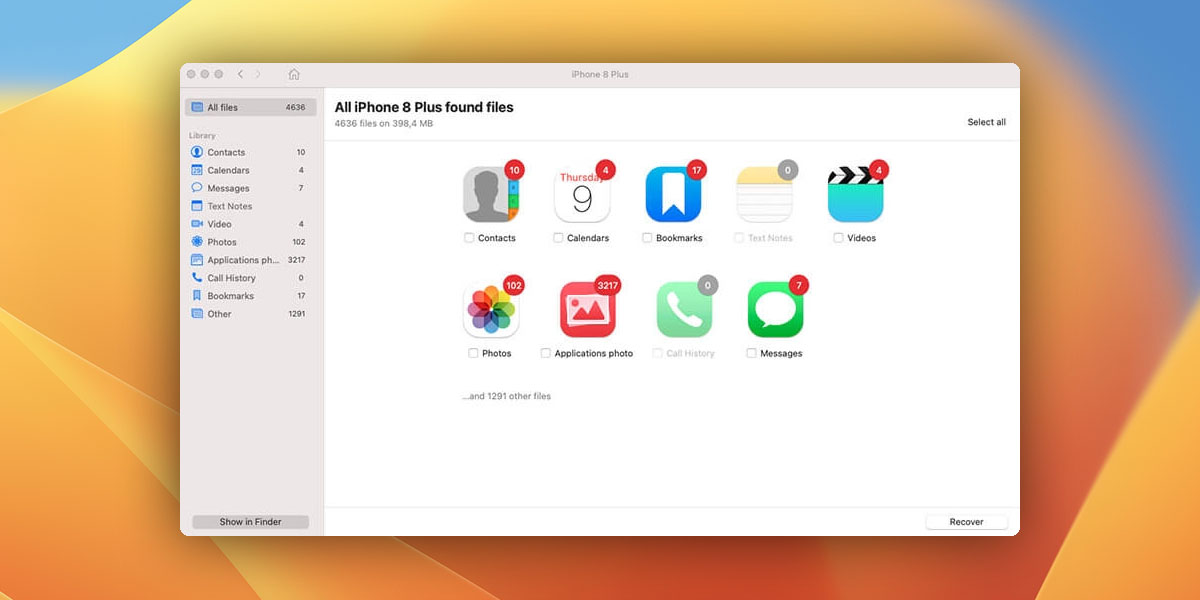
If the previous two methods didn’t help you, it’s time to use data recovery software. We recommend Disk Drill for Mac because it makes the entire data recovery process painless and delivers great results:
- Download and install Disk Drill for Mac.
- Connect your iPhone to the Mac.
- Launch Disk Drill and click the Recover button next to your iPhone.
- Enter the iPhone’s encryption password to unlock your iPhone.
- Review the found files and mark photos for recovery.
- Select where you want to recover your photos and click the Recover button. Alternatively, you can click Mount Found Items as Disk and use Finder to select and recover all deleted photos.
Recovering Deleted Photos from Cloud Storage
Cloud storage services provide a convenient alternative to local backup, and they’re perfect for backing up important photos. Their real-time synchronization feature lets you effortlessly access your entire photo collection from any device, ensuring that your photos are automatically uploaded to the cloud. Most cloud storage services have an alternative to the Recycle Bin, allowing you to undelete photos that are no longer available on your computer or any other device.
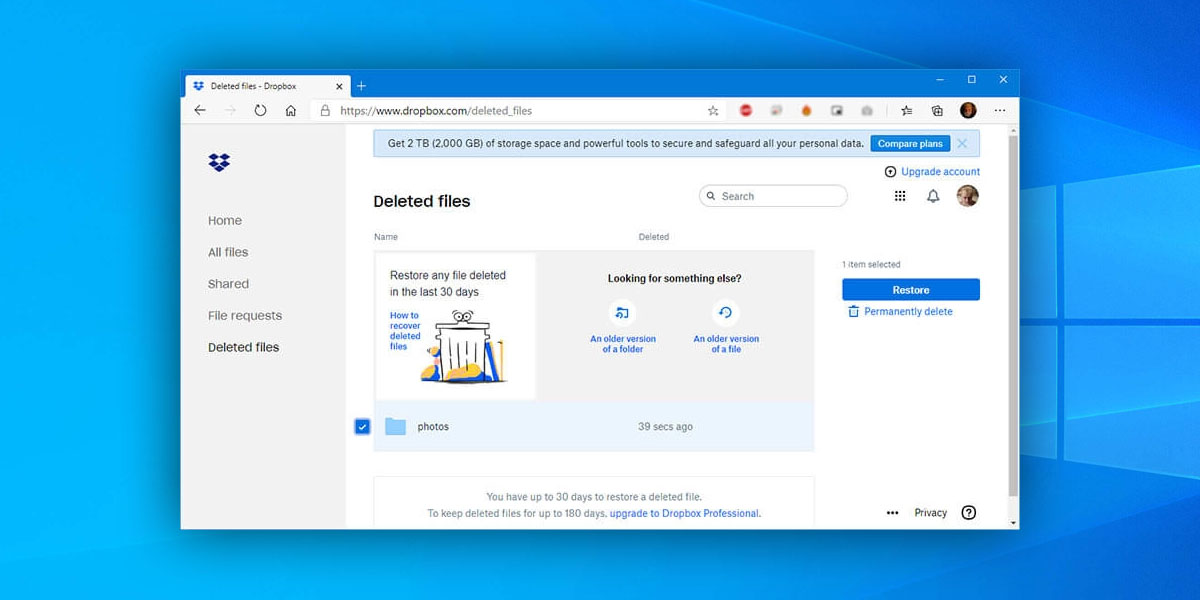
Dropbox
To recover deleted photos from Dropbox:- Go to: https://www.dropbox.com/
- Click Sign In in the top-right corner and enter your email and password.
- Click Files.
- Click the name of the folder where your photos were stored.
- Click Folder history.
- Restore an earlier version of the folder.
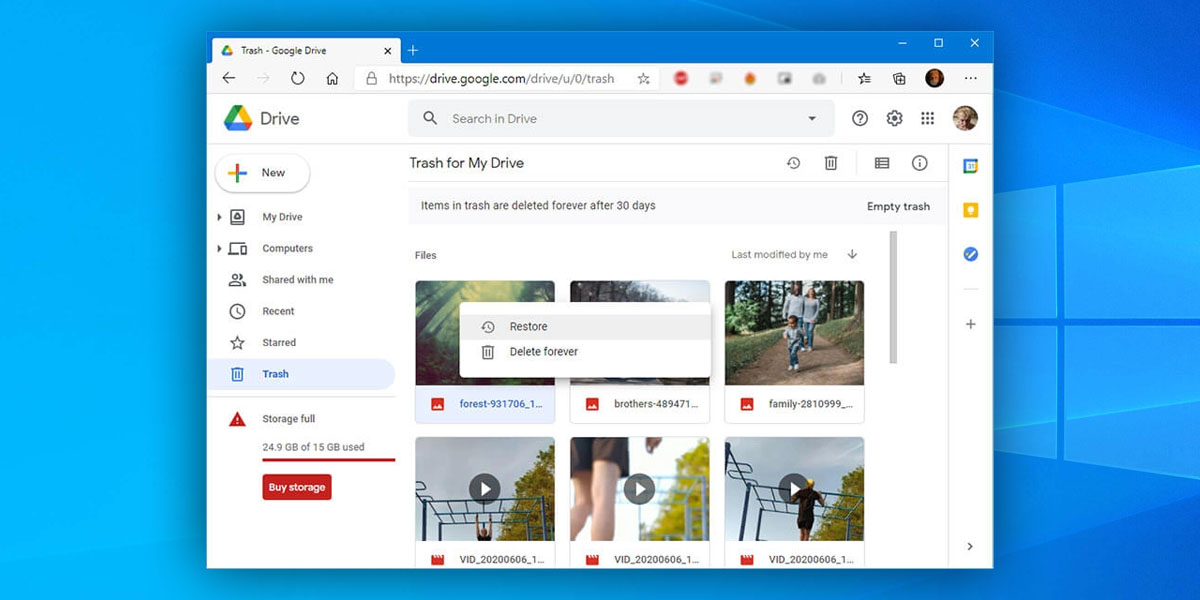
Google Drive
To recover deleted photos from Google Drive:- Go to: https://www.google.com/drive/
- Log in to your Google account.
- Select Bin from the left panel.
- Select all the photos you want to recover. You can select multiple photos using
- dragging mouse or by holding the CTRL key and clicking on them.
- Click the Restore from bin button (a small clock) located in the top menu.
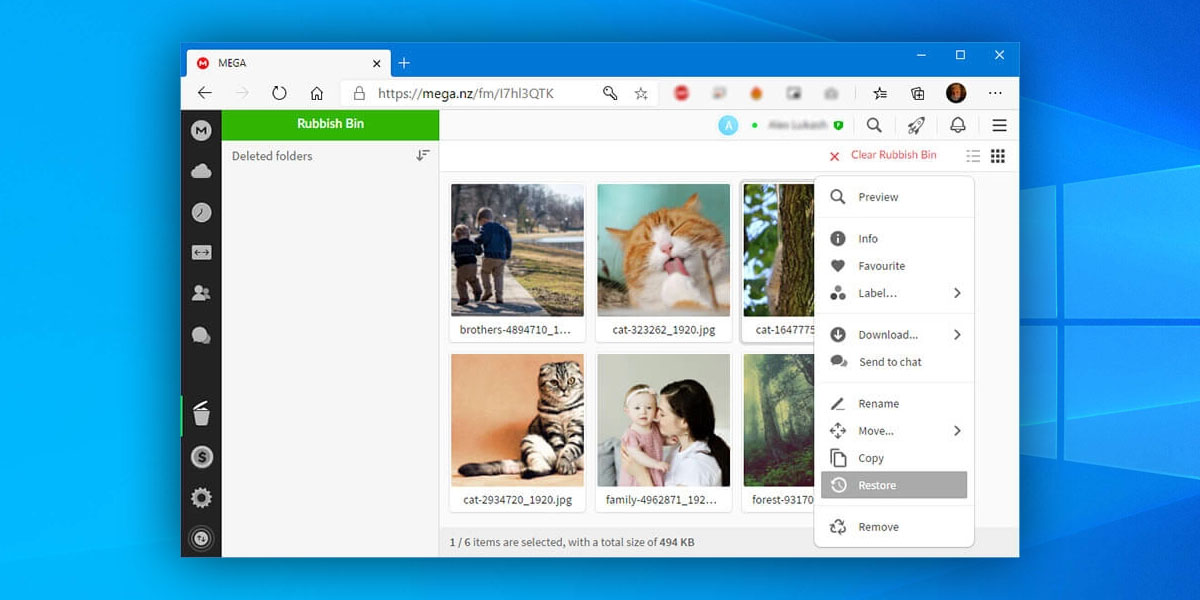
Mega
To recover deleted photos from Mega:- Go to: https://mega.nz/
- Click Login in the top-right corner and enter your email and password.
- Click the Rubbish Bin icon located in the bottom-left corner.
- Select all the photos you want to recover. You can select multiple photos using dragging mouse or by holding the CTRL key and clicking on them.
- Hover your mouse over any of the selected photos and click the three horizontal dots.
- Select Restore.
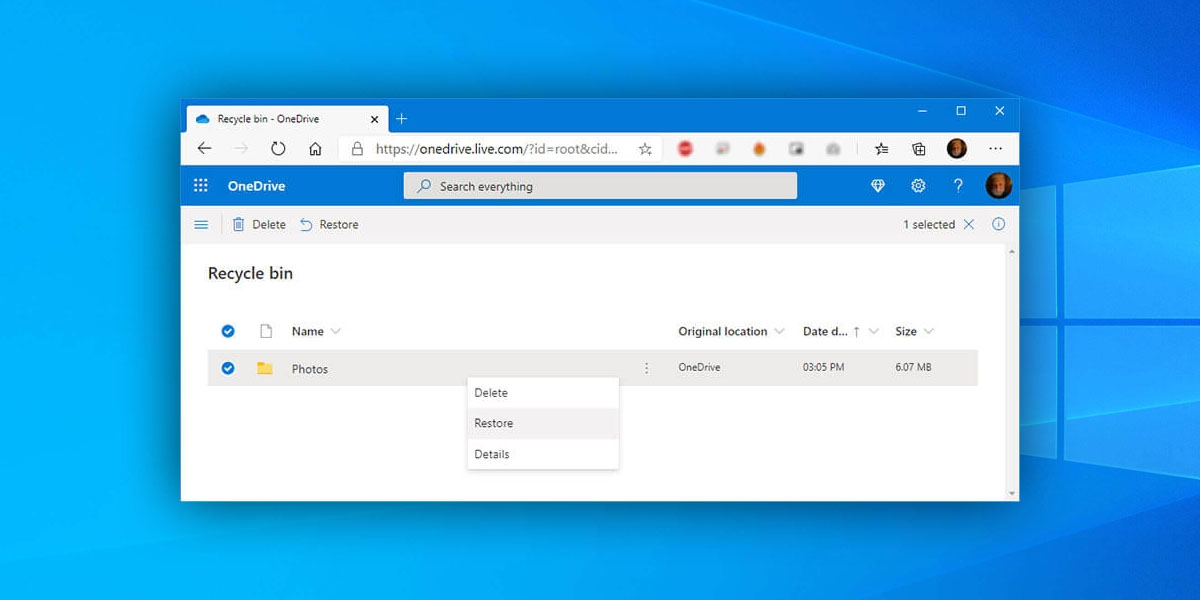
OneDrive
To recover deleted photos from OneDrive:- Go to: https://onedrive.live.com/
- Log in with your Microsoft account.
- Select Recycle bin from the left panel.
- Select all the photos you want to recover by dragging mouse or using the checkbox next to each photo.
- Click the Restore button located in the top menu.
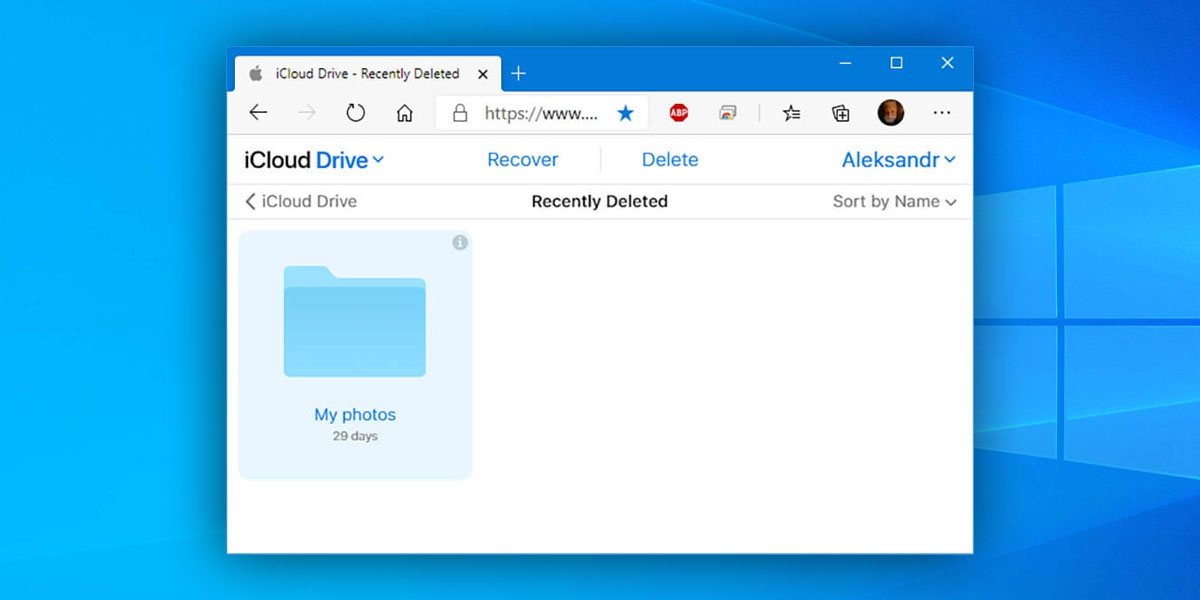
iCloud
To recover deleted photos from iCloud:- Go to: https://www.icloud.com/
- Log in with your Apple account.
- Click Settings.
- Scroll down to the bottom of the page and click Restore Files.
- Select all files you want to recover and click Restore.
Key Points for Successful Deleted Photo Recovery
As we’ve already explained earlier in this article, recovering photos with modern photo recovery software applications is so simple that anyone can do it. But just because it takes only a few clicks to recover lost or accidentally deleted photos doesn’t mean that things can’t go wrong.
By adhering to the key points listed below, you’ll be able to successfully recover all your photos from any storage device and prevent an unfortunate mistake or failure from ruining your day.

Stop Writing Data to the Storage Device
Photo recovery with photo recovery software is possible because most deleted files are still present in their original locations. Why? Because it’s far more efficient to simply mark the space they occupy as empty and let new data overwrite them. Until that happens, you can recover them without much trouble.
How much time you have depends on several factors, mainly on the amount of new data you write to the storage device. If at all possible, stop using the storage device completely. Photos that were stored on the drive where the operating system and other programs are installed are especially at risk of being overwritten, which is why we advise you to disconnect the drive from your computer and recover data from it using a different computer.

Leave Physical Repairs to Professionals
All common reasons for data loss can be split into just two groups: logical problems and physical damage. Logical problems range from file fragmentation to partition deletion to a missing boot sector, and all of them are non-mechanical issues that can be fixed without physically touching the storage device. Physical damage, on the other hand, includes electrical failures, a head crash, or water ingress.
Fixing a storage device that has suffered physical damage is a complicated process that typically requires a dust-free work environment and expensive tools, some of which have to be custom made just for the task. If you have no previous experience with physical repairs of storage devices, we highly recommend you leave them to professionals because you would most likely make the situation even worse.

Act as Soon as Possible
The fact that deleted photos can be recovered only until they become overwritten is just one of several reasons why you should act as soon as possible. Delaying photo recovery could result in minor storage device corruption becoming much for or early signs of hardware failure turning into something much worse.
We understand that photo recovery may be intimidating for you, but we can assure you that there’s absolutely nothing to be scared of. The best photo recovery software applications make it completely painless, allowing even people with little to no technical skills to recover all deleted photos with just a few clicks.

Prepare for the Worst
You never know when you make a mistake and accidentally delete the wrong photos or format a different storage device than you intended. Even worse, your computer could become infected with malware, your hard drive, memory card, or any other storage device could stop working, or your entire laptop or camera could get stolen.
Instead of hoping none of these things happen to you, you should prepare for the worst by regularly backing up your data. An external hard drive that you can connect to your computer using a USB cable is an affordable local backup solution, but you can also store important photos in the cloud using services like Google Photos, Microsoft OneDrive, or Dropbox.

Don’t Install Data Recovery Software on the Same Storage Device
You should never install data recovery software on the same storage device from which you want to recover deleted photos because you could overwrite during its installation or download. If you have only one storage device, we recommend you connect it to a different computer.
Only if that’s not an option, and you need to get your files back as soon as possible should you begin to consider installing data recovery software on the same storage device, knowing what can happen. To avoid this scenario, make sure you always have a reliable data recovery software application installed on all your devices so that you can simply launch it and get your photos back without any delay.

Avoid Defragmentation Until You Recover Your Photos
Storage device defragmentation won’t help you recover your lost photos. In fact, it can make it impossible to recover them because its purpose is to organize the content of a storage device in such a way so that files fit into the smallest number of contiguous regions possible, which means overwriting empty space occupied by recently deleted files.
Besides, flash-based storage devices such as SSDs and SD cards don’t even benefit from defragmentation because they don’t contain any moving parts that need to move to a specific location in order to read data.

Use the Best Photo Recovery Software Available
There are many photo recovery software applications—both free and paid—that promise to recover deleted or lost photos from all kinds of storage devices. Unfortunately, not all photo recovery software applications deliver the same results. The last thing you want to do is lower your chances of successful photo recovery by using dubious photo recovery software applications.
Instead, you should select the best photo recovery software available and get your photos back on the first try. In addition to actually doing what they’re supposed to do, the best photo recovery software applications tend to be easier to use, and they typically come with extra features to help you protect your data.

Never Fill Any Storage Device to 100% Capacity
You can imagine your hard drive (or any other storage device for that matter) as a pantry. Finding a specific item in a pantry that’s filled to its maximum capacity with food can be a huge challenge, whereas finding the same item in a pantry that’s neatly organized so that all items are visible at a glance is much easier.
Your computer needs to have a certain amount of storage space available to store temporary files. If you let your hard drive fill up to its maximum capacity, you’re guaranteed to experience major performance issues, and potentially even application and system crashes.

Jeff Cochin
- 33 publishings
- Atlanta, GA
Jeff Cochin is a data management and recovery professional, who has been with Pandorarecovery for nine years and has always been an essential part of the team. Jeff also works as a technical writer at Macgasm, being a first hand in testing, trying and writing about big and small tech software.
Nikolay Lankevich
- Houston, Texas, United States
Nikolay Lankevich has over 15 years of strong experience in various fields and platform includes Disaster Recovery, Windows XP/7. System analysis, design, application (Inter/Intranet) development, and testing. Provided technical supports on desktop and laptops on Win-XP and Macintosh for about 2000 employees.