How to Recover Deleted Files on Mac
There are several ways to restore deleted files on a Mac computer, some relying on the native capabilities of macOS and some on third-party data recovery tools, and we’re going to cover them all. Depending on your specific situation, you may find that one method delivers superior results compared with other methods. In most cases, that method is recovery using data recovery software.
Best 5 Methods to Recover Deleted Files on macOS
Here are the top 5 best methods to help you recover files even if they currently seem to be lost forever. Please apply them in the order they are listed below.
Step 1. Make Sure Files Were Actually Deleted
We understand that you’ve probably checked the Trash Bin several times already while looking for your deleted file, but have you used the search feature? If not, there’s a chance that you’ve missed it, especially if your Trash Bin contains hundreds or even thousands of files.
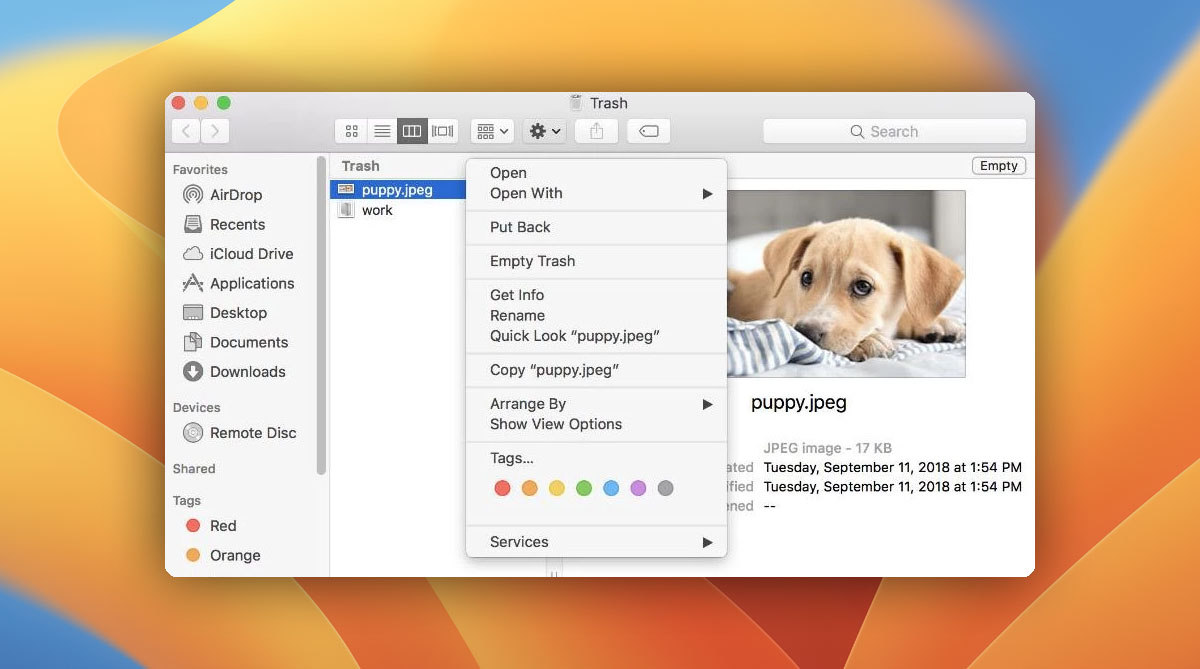
So, open the Trash Bin one last time by clicking on its icon in the Dock and go through the following steps:
- Click the search bar in the top-right corner of the Trash Bin window and enter the name of the deleted file. You can also search for all files with a certain extension by entering general information about their file format, such as Excel or PDF, in the search field.
- Select the file you wish to restore.
- Right-click on the file and select the Put Back option to restore it from the Trash. You can also drag it from the Trash window and drop it to your desktop or any other folder.
If you’re here because you accidentally deleted an important file just a few moments ago, you might be able to get it back with a single click or keyboard shortcut. That’s because macOS lets you easily undo the last action by:
- Selecting the Undo command from the Edit menu.
- Pressing Command-Z on your keyboard (which is just a handy shortcut for the Undo command).
Step 2. Restore from a Time Machine Backup
Once you have determined that the deleted file is no longer in the Trash Bin and is not possible to recover using the Undo command, you should try to restore it from your Time Machine backup. Time Machine is included with all recent versions of macOS, and it’s possible that you have activated it in the past even if you don’t remember it.
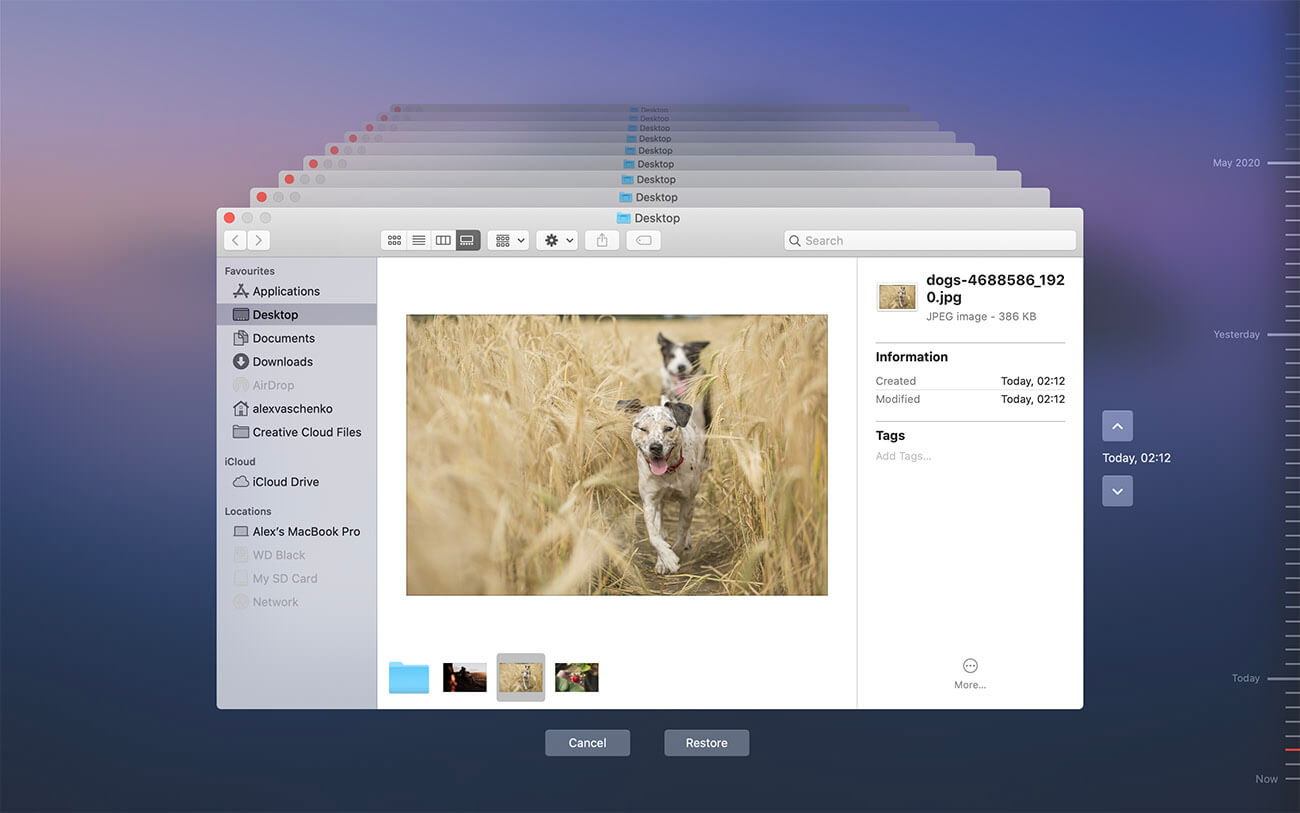
When activated, Time Machine monitors your hard drive activity and quietly backups all new and modified files to a backup drive. You can then simply open Time Machine in the folder where your deleted files were last located and quite literary go back in time to display and older version of the folder, one where the lost files are still present. Follow these steps to recover deleted files from a Time Machine backup:
- Connect the storage device containing your Time Machine backup.
- Open the folder where your files were last located in Finder.
- Click the Time Machine icon located in the Menu Bar and choose Enter Time Machine.
- Scroll back through Time Machine until the file appears in the Finder window.
- Select the file and click Restore to recover it.
Step 3. Use Third-Party Data Recovery Software
If you’ve exhausted the file recovery solutions described above and still haven’t been able to get back your files, then it’s time to use third-party data recovery software. Unlike file recovery solutions that rely on native operating system features, third-party data recovery software can restore even permanently deleted files, and it can do so without relying on previously created backups. One of the most popular third-party data recovery software applications for macOS is Disk Drill. This reliable data recovery software can undelete files from all commonly used Mac, Windows, and Linux file systems, and its user-friendly nature makes it perfect for regular Mac users who have limited previous experience with file recovery.
To restore permanently deleted data on your Mac, you need to:
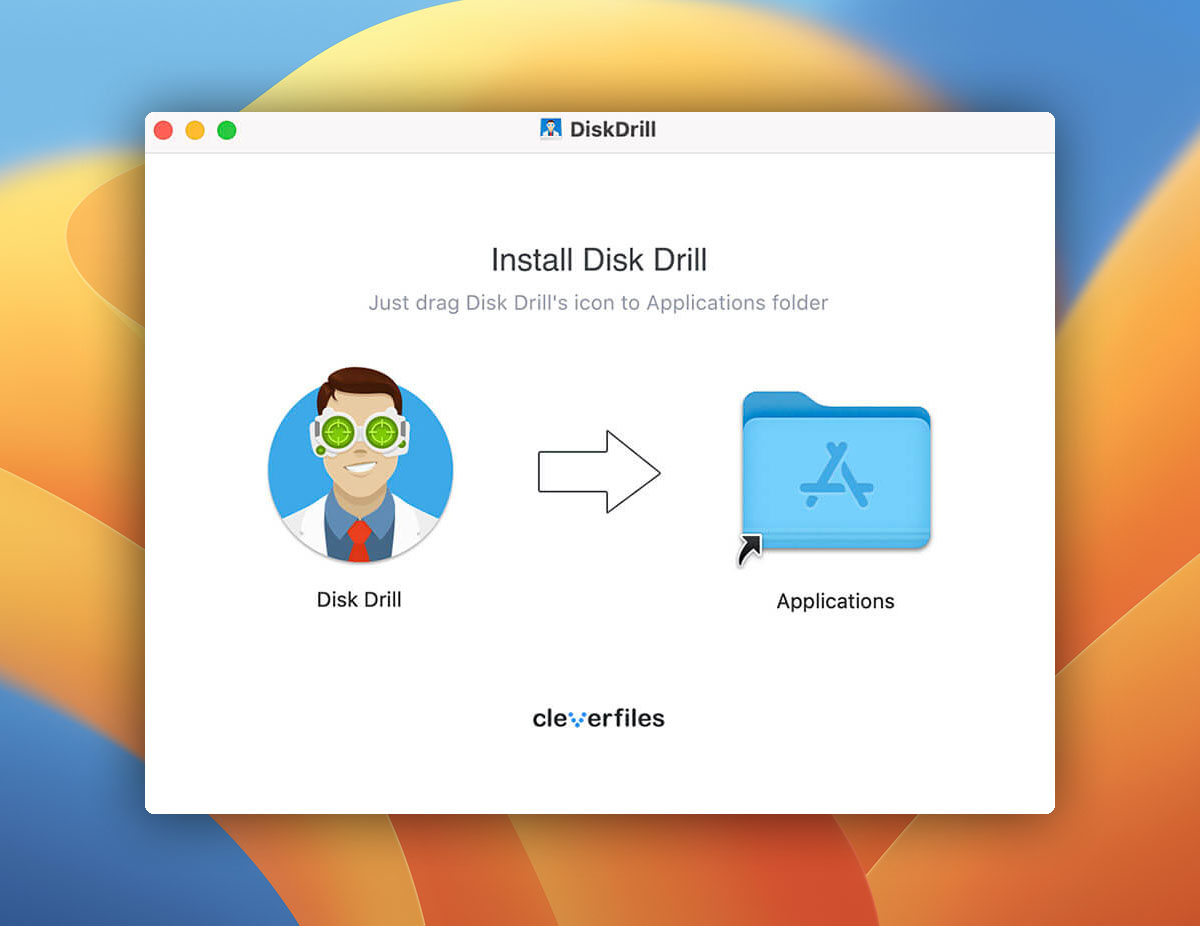
Download & Install Disk Drill for Mac
To install Disk Drill, simply go to its official website, download the installation file, and drag it to the Applications folder. Warning: Do not download Disk Drill to the same device from which you want to recover your files. You could overwrite the very same files you’re trying to recover, which is the last thing you want to do because then it would be impossible to ever get them back. Likewise, you should install Disk Drill on an external hard drive if you want to recover files from the internal one.
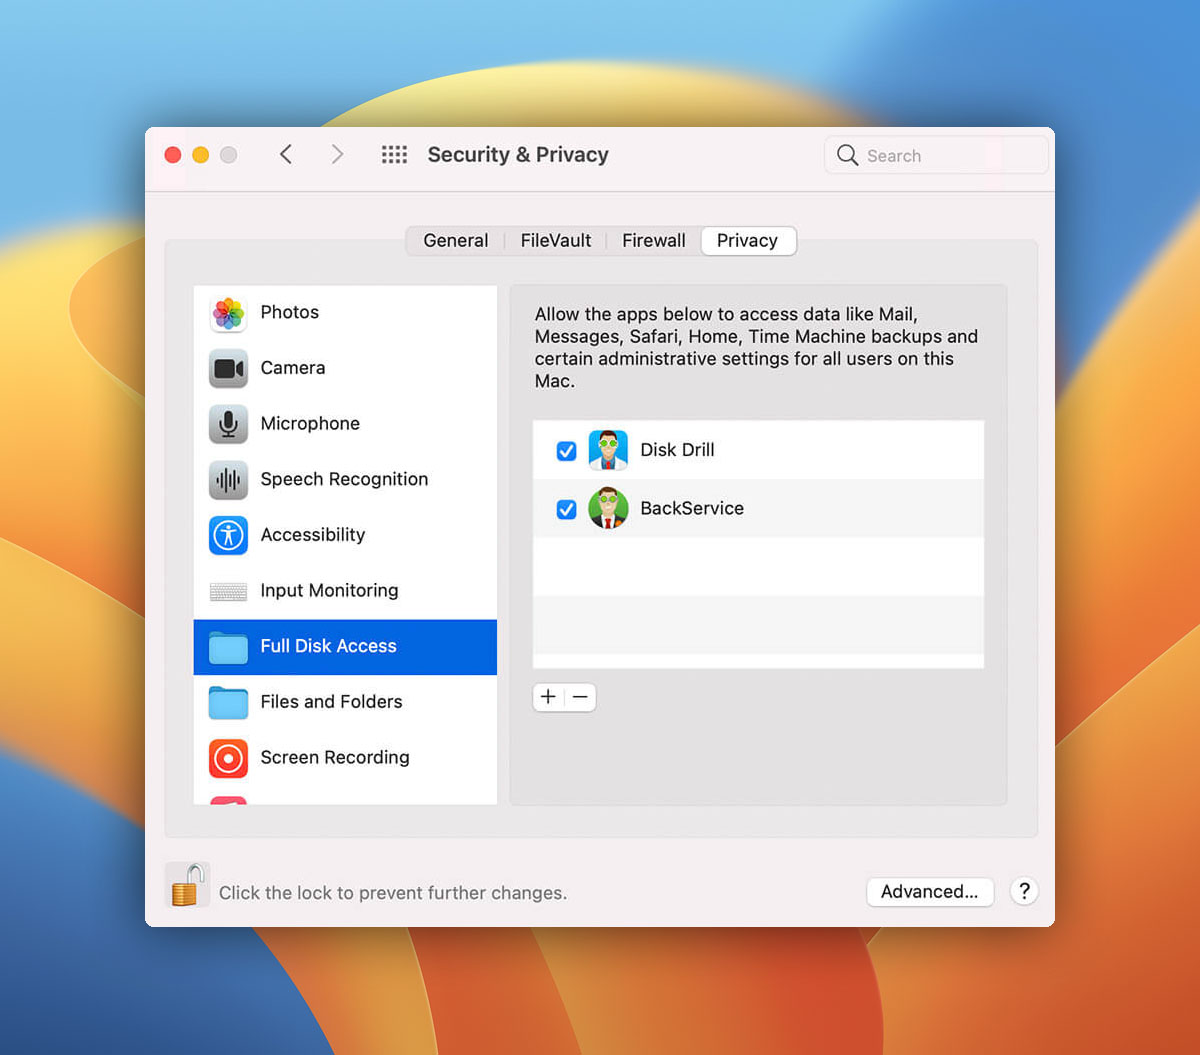
Grant Disk Drill Full Disk Access
Before you can start the data recovery process, you need to grant Disk Drill unrestricted access to your storage devices. This is necessary because of the restrictions imposed by Apple. First, open System Preferences and click Security & Privacy. Navigate to the Privacy tab and click the Lock icon in the bottom-left. Select Full Disk Access from the left pane. Finally, drag and drop Disk Drill’s application icon into the Full Disk Access list.
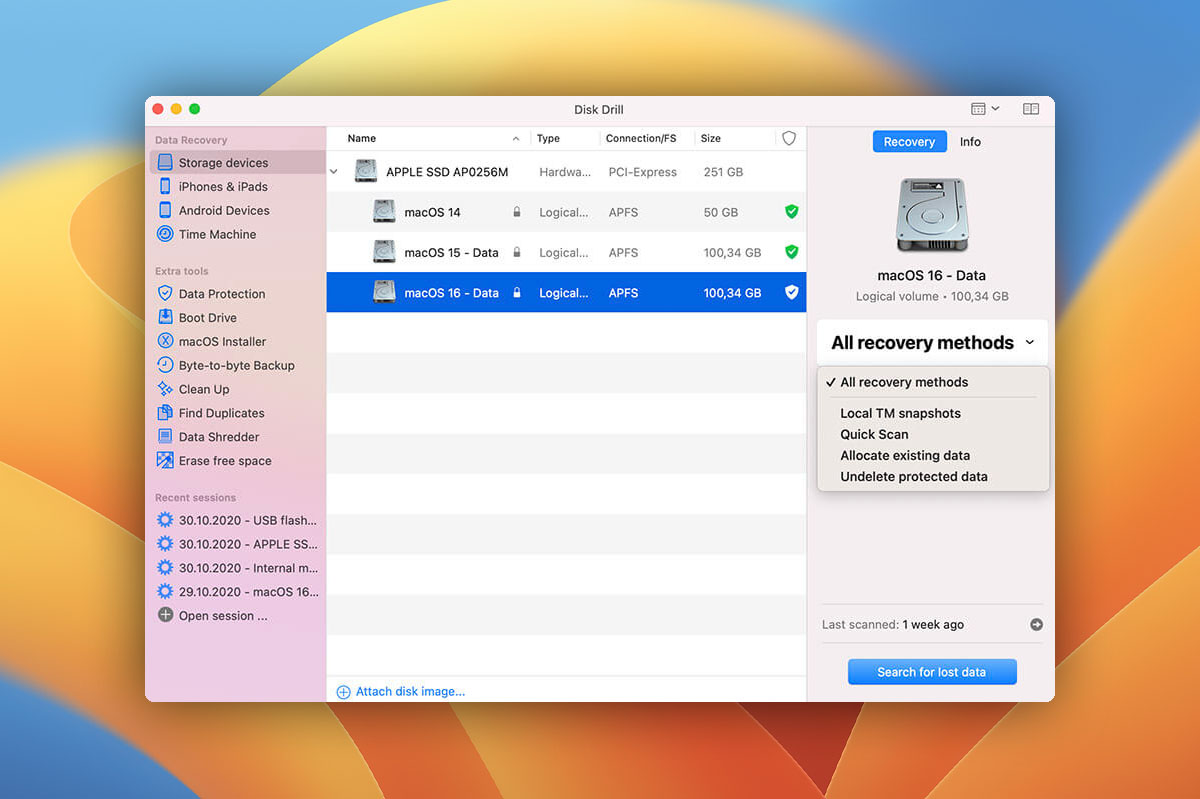
Run Disk Drill & Select the Drive You Want to Scan
Launch Disk Drill and look at the list of available storage devices, including internal and external hard drives, memory cards, USB flash drives, and even mobile phones and digital cameras. The storage device from which you want to recover the lost files should be among them, and all you need to do to scan it is click the Recover button right next to it. Disk Drill automatically runs its data recovery algorithms in the optimal order, looking for over 400 different file formats, including all commonly used image, video, audio, document, and archive extensions.
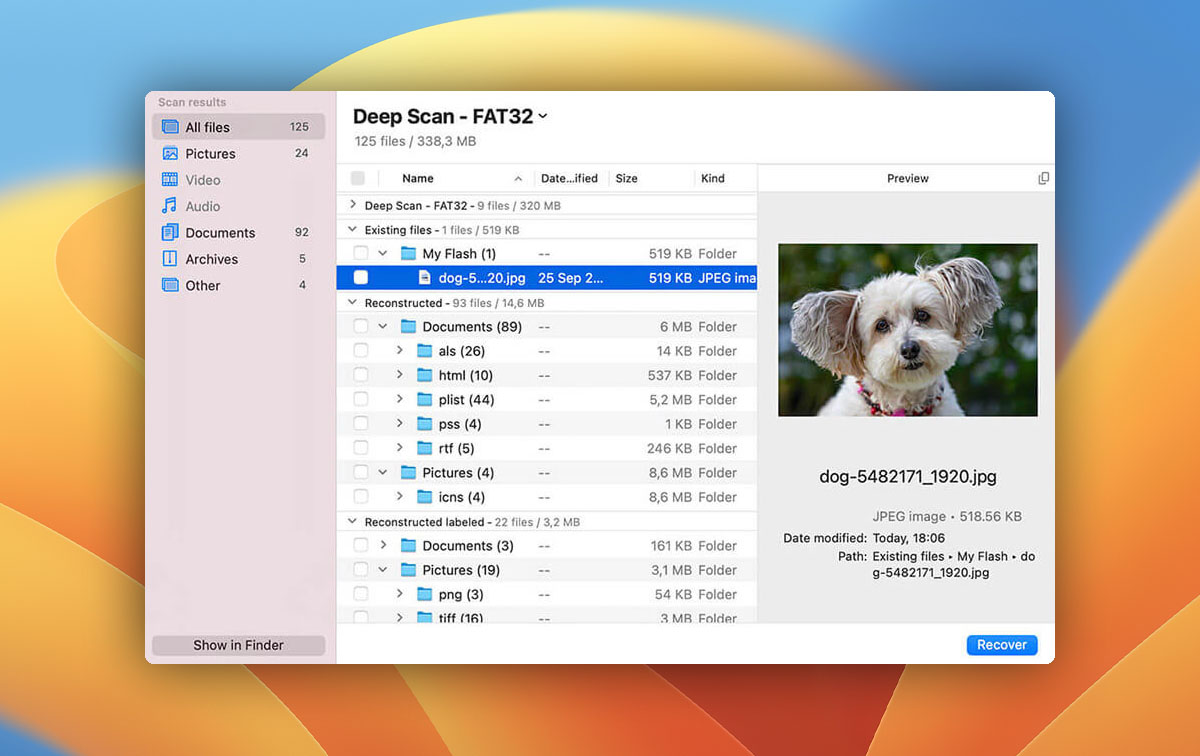
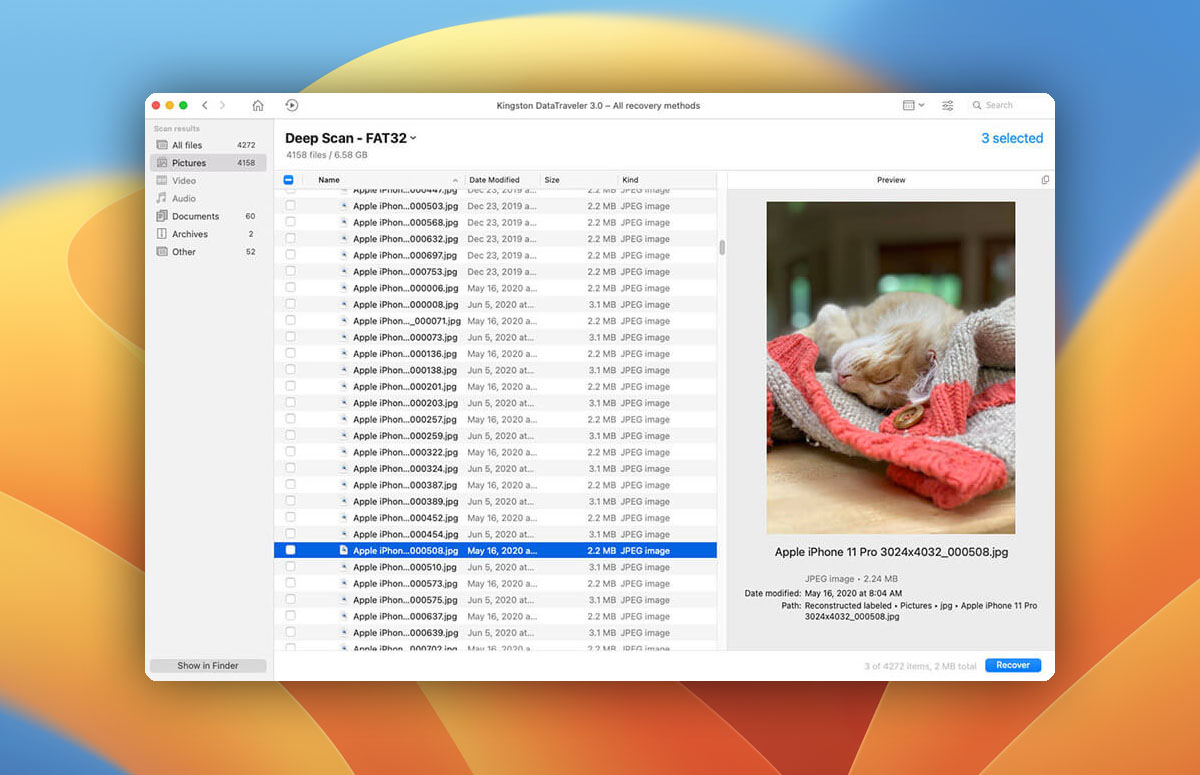
Preview Files & Recover Your Data
When you click the Recover button, Disk Drill will begin scanning the selected storage device and looking for your files. Depending on how large and fast the storage device is, the process may take some time, so be patient and don’t interrupt it. Once the scan is over, you’ll see all recoverable files, and you’ll be able to preview most of them by clicking on the little preview icon. To tell Disk Drill that you want to recover a particular file, simply click the checkbox next to it. You can also use the filters in the toolbar to narrow down the scan results. When you’re done selecting files for recovery, click the Recover button again.
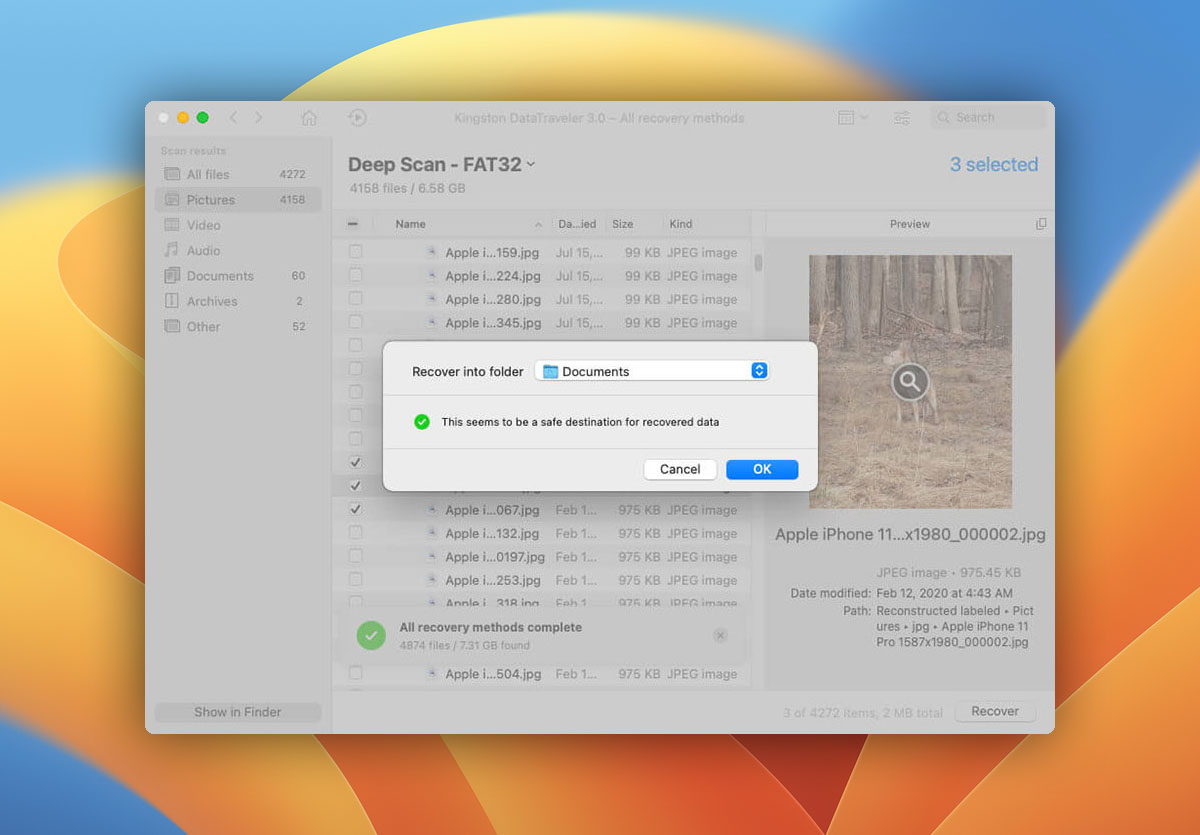
Specify the Recovery Location
Finally, you need to specify the recovery location. Don’t try to recover your files to the same storage device from which you’re recovering them because you could overwrite them. Instead, recover them to an external hard drive, USB flash drive, or some other removable storage device.
Disk Drill was developed by the data recovery professionals at CleverFiles, and it has been helping Mac users get back lost files for over 10 years now. Here are some reasons why Disk Drill has received so many raving reviews:
- Modern, intuitive user interface that greatly simplifies the file recovery process.
- Multiple scanning algorithms to cover a variety of different data loss scenarios.
- The ability to recognize & recovery over 400 file formats.
- Support for all commonly used Mac, Windows, and Linux file system.
- Integrated data protection tools that eliminate the possibility of accidental file deletion.
Disk Drill Free
- Free data protection: Recovery Vault & Guaranteed Recovery
- Create byte-to-byte backups of failing disks
- Preview all recovery methods
Disk Drill Pro
- Unlimited recovery
- 1 user, up to 3 activations
- Data recovery for home users: Quick & Deep Scan, Rebuild HFS+, Lost
- Partition Search & more
- All storage types and file systems
Technical Specifications
Regardless of which of the two versions you select, you can always enjoy support for a broad array of devices, file systems, macOS versions, and file types:
- Supported Devices: Internal and external hard drives (HDD and SSD), USB flash drives (USB 1/2/3), memory cards (SD, SDHC, SDXC, MMC, and more)
- Supported File Systems: NTFS, FAT, FAT32, exFAT, EXT3/EXT4, HFS, APFS
- Supported OS: Mac OS X 10.8 Mountain Lion, 10.9 Mavericks, 10.10 Yosemite, 10.11 El Capitan, macOS 10.12 Sierra, 10.13 High Sierra, 10.14 Mojave, 10.15 Catalina, 11 Big Sur, 12 Monterey, 13 Ventura
Supported File Types
- Videos: AVI, MKV, MOV, MP4, MPG, TS, WEBM, WMV, and more
- Audio: AAC, ASF, FLAC, M4A, MP3, OGG, RA, VOC, WAV, WMA, and more
- Images: BMP, CR2, DJVU, ICO, JPG, JP2, PNG, GIF, TIFF, SVG, and more
- Documents: DOCX, NUMBERS, PAGES, PPTX, TXT, RTF, XLSX, PDF, and more
For more information about Disk Drill for macOS, you should read our detailed review.
Step 4. Recover Deleted Files from iCloud Drive
iCloud Drive is Apple’s cloud storage service, and many Mac users use it to back up their photos, videos, documents, and other files.
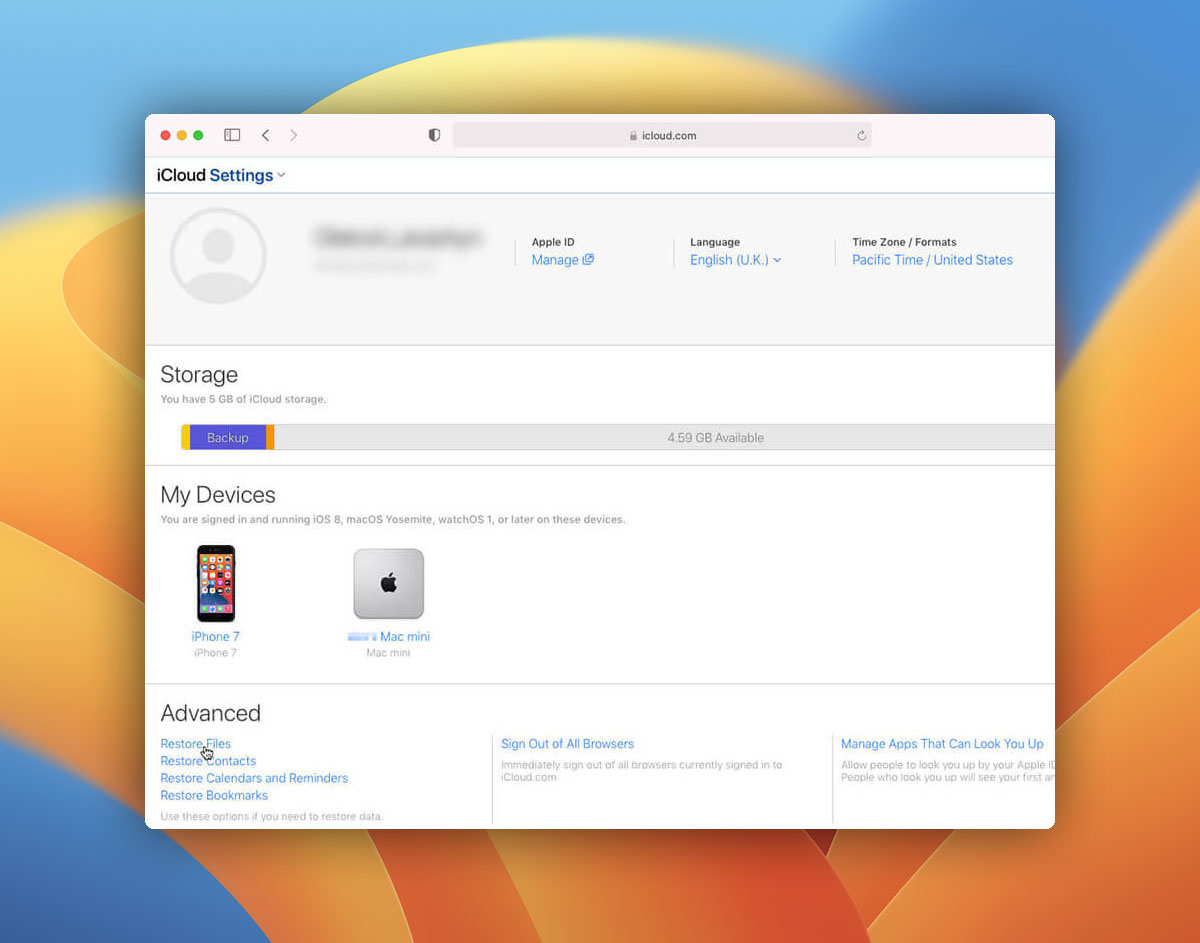
What’s great about iCloud Drive is that files that were previously saved in it and then deleted can be recovered for up to 30 days after deletion. However, you need to perform the recovery via iCloud.com. Here’s how:
- Log in to iCloud.com.
- Click the Settings button.
- Click Restore Files at the bottom, under Advanced.
- Click the checkbox next to each file you want to restore.
- Click the Restore button to get them back.
iCloud will display a confirmation message once the selected files have been successfully restored.
Step 5. Recover Deleted Files Using Mac Terminal
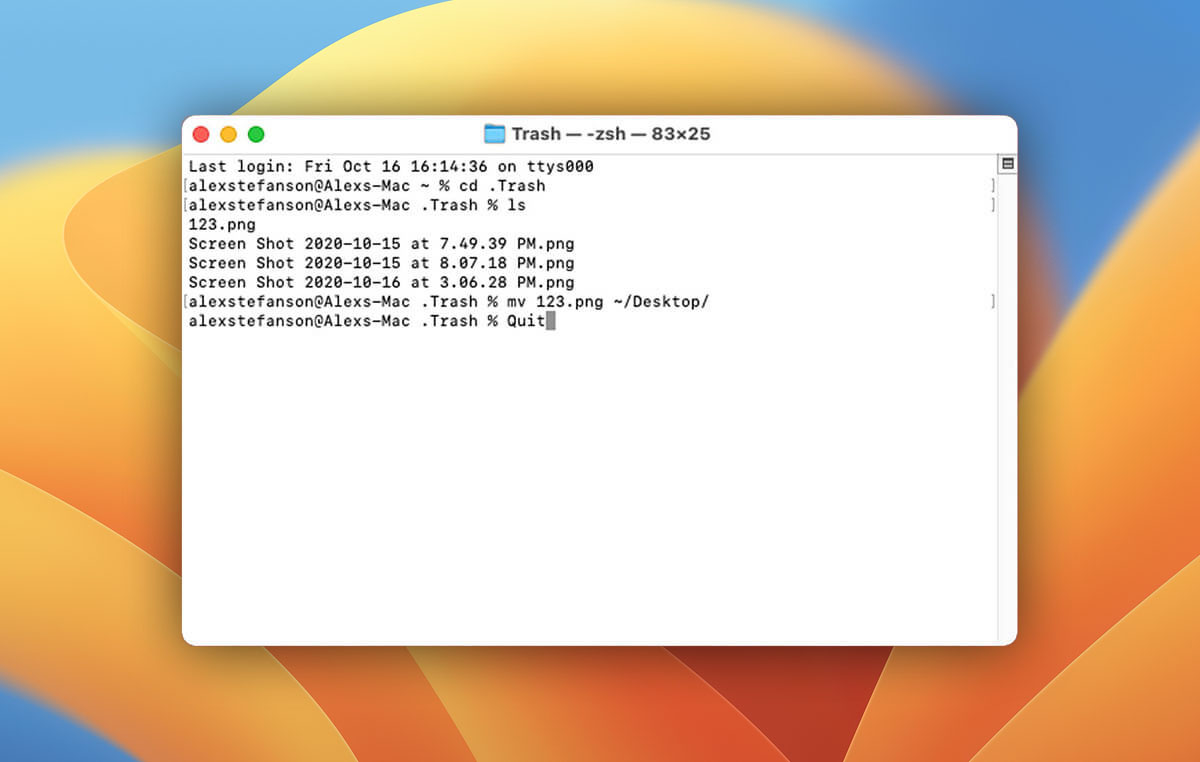
If for some reason you’re unable to open the Trash folder in Finder and undelete your files by following the instructions described in the first section of this article, then you can access your Mac’s Trash using the Terminal app and get them back with just a few simple commands:
- Launch the Terminal app.
- Enter the cd .Trash” command to navigate to the Trash folder.
- Enter the ls command to list all files in the Trash folder.
- Type mv xxx.xxx ~/Desktop/ to move a file to the Desktop folder. Make sure to replace xxx.xxx with the actual name of the file. You can, of course, move the file to any folder you want by changing the path.
- Type Quit and hit Return to exit the Terminal app.
- Open the Desktop folder in Finder, and you should see the recovered file.
Bonus: Professional Data Recovery Service
The DIY data recovery solutions described on this page make it possible for anyone to recover lost files from all kinds of storage devices with little to no special knowledge and technical skills. But just because such solutions are readily available and highly effective doesn’t mean that you have to use them.
If you would rather let professionals recover your data for you, then you can do so thanks to professional data recovery services.
When you choose a professional data recovery service, you can enjoy the peace of mind that comes with knowing that your files are in the hands of experts with state-of-the-art equipment and many years of experience.
The cost of professional data recovery services varies based on the cause of data loss (it’s considerably more difficult to recover data from physically damaged devices than devices that have suffered logical damage) and the number and size of files that need to be restored. You can expect to pay between a few hundred to a few thousand dollars for most data recovery jobs.
How Does Data Recovery Work?
When a file is deleted under macOS it is not permanently removed from its storage media. It is simply logically marked as deleted and its space made available for future use by the operating system. The Trash Bin is where recently deleted files are logically stored when first deleted.
Deleted files remain in the Trash until the bin is emptied. At the point that the bin is emptied the OS can use it for other purposes. Until the actual sectors of the physical disk that held a logically deleted file are used to store a new file, it can be recovered.
The Main Reasons for Data Loss
Data loss can occur for a variety of reasons. Here are three of the most common causes that data is accidentally deleted or lost from computers and storage devices.

Human error
The number one cause of data loss is human error. This can range from inadvertently formatting the wrong drive or partition to emptying the Trash Bin and permanently deleting its files. It is impossible to totally protect your data from accidental deletion by well-meaning users.

Malware infection
Malicious software in the form of a virus or malware can result in data loss. In cases of ransomware, your only solution may be to resort to a backup version of your files.
Extreme conditions
Exposing your computer or storage devices to high temperatures or levels of moisture can lead to corruption and data loss. Keep them in a temperature-controlled and dry environment to ensure the best performance and avoid data loss.
Tips on How to Prevent Data Loss
Here are some steps you can take to reduce the chances that you will experience a data loss scenario.

Make backups
Make regular backups of your system. This is a basic best practice that should be followed by all computer users who value their data. Mac users can easily use Time Machine for this purpose. If you are not currently backing up, do yourself a favor and buy a removable USB drive and start creating backups today. It offers protection against data loss for your precious information.

Employ an antivirus
Employing a professional-grade antivirus application can help keep your system free of malware and viruses. Other precautions include not opening suspicious email attachments and refraining from connecting strange devices to your machine. Malicious code can be introduced into your system through contact with other infected equipment.

Avoid risks
Avoid taking unnecessary risks like using your laptop by the pool or leaving a removable hard drive in a parked car in the sun. Don’t expose your data to the elements as they may destroy it.
Frequently Asked Questions
How to recover deleted files on Mac without software?
There are several different ways to recover deleted files on Mac without additional software. You can:
- Recover deleted files from Trash.
- Use the Undo command to bring back recently deleted files.
- Launch Time Machine and restore deleted files from a backup.
How to recover deleted files from an SD card on Mac?
Files deleted from an SD card most likely won’t be present in the Trash folder, and it’s also very unlikely that you’ll be able to recover them using Time Machine since it typically backs up only the main hard drive. You can, however, recover them using third-party data recovery software like Disk Drill, PhotoRec, or R-Studio.
How to recover deleted files from an external hard drive on Mac?
From the technical point-of-view, recovering deleted files from an external hard drive isn’t much different from recovering deleted files from internal hard drives. As a Mac user, you can simply download and install a third-party data recovery application or Disk Drill, DiskWarrior or Data Rescue, connect your external hard drive to your Mac, and recover deleted data from it with a simple click.
What is the best software to recover deleted files on Mac?
Mac users can choose from many different data recovery software solutions, each offering a different set of features and capabilities. We recommend Disk Drill for Mac because of its simple and intuitive user interface, powerful data recovery algorithms, and attractive price, among other things.
How to recover deleted Word files on Mac?
If you need to recover deleted Word files on Mac, you should first look for them inside the Trash folder. It’s also a good idea to check the AutoRecover folder, which is where Word stores copies of documents to prevent their loss in the event of a sudden crash. To find any AutoRecovered files on your computer, open Finder, press Shift + Command + G, and enter:
/Users/%USERNAME%/Library/Containers/com.Microsoft/Data/Library/Preferences/AutoRecovery

- 33 publishings
- Atlanta, GA
Jeff Cochin is a data management and recovery professional, who has been with Pandorarecovery for nine years and has always been an essential part of the team. Jeff also works as a technical writer at Macgasm, being a first hand in testing, trying and writing about big and small tech software.
- Frisco, Texas, United States
Yevgeniy Tolkunov is Hardware Engineer at ACE Data Recovery. Yevgeniy has a Master's Degree in Physics, Information Technology; 15+ years of experience.