
How to Recover Deleted Photos From a Sony Camera
Mistakes happen, and it’s easy to accidentally delete important photos from your Sony camera’s SD card or unknowingly format it. But are these photos gone forever? In most cases, no. Third-party data recovery tools can help you recover deleted photos from your Sony camera. But, time is of the essence when it comes to data recovery. In our in-depth guide, we’ll walk you through the photo recovery process and how to prevent such mishaps in the future.
| Sony Camera Types | Popular Models |
| Mirrorless cameras | Sony A7R V, Sony A7 III, Sony A9 Mark II, Sony A1, Sony A7 IV, Sony A7R Mark IVA, Sony A7C, Sony ZV-1, Sony ZV-1, Sony ZV-E10, Sony A6400, Sony A6100, Sony A6000. |
| Vlog and compact cameras | DSC-HX99, ZV-1F, Alpha ZV-E1, Sony ZV-1, RX100 VII Compact Camera, RX100 VI, W800 Compact Camera, HX99 Compact Camera, W830 Compact Camera. RX0 II 1”, RX100 V, Cyber-Shot. |
| Camcorders | CX405 Handycam, AX53 4K Handycam, AX43 4K Handycam, FDR-AX700 4K HDR Camcorder, AX100 4K Expert Handycam, AX43A 4K Handycam. |
Essential Actions to Take If You Accidentally Delete or Format Data on a Sony Camera
SD card data recovery begins as soon as you discover that photos are missing from your SD Card. The actions you take (or don’t take) after discovering data loss, significantly impact the success rate of the data recovery procedure.
Here are some things you should do to maximize the chances of recovering all your photos from a Sony camera:
- 🛑 Stop using your Sony camera. When you delete photos from your camera’s SD card, they’re technically still there, but the space they occupied is marked available for use. It becomes difficult to predict the chances of data recovery after you write new files to the SD card. This is because these new files can overwrite the whole, or a part of your previous files. The only way to find out is to run a data recovery scan. If you want to maximize your chances of data recovery, DON’T write new files to the SD card.
- ⏏️ Remove the SD card from your camera. Again, this is to minimize the chances of new data being written to the SD card. Avoid connecting it to any other device to transfer photos as well.
- ❌ Do not format the SD card. Many times, your OS may prompt you to format your SD card if it detects corruption or other issues on it. Do not press Yes/OK on this prompt. While it’s possible to recover your data even after formatting an SD card, we advise you to recover your data first. Modern data recovery programs can scan malfunctioning memory cards that have a problematic file system or no file system at all (RAW).
- ✅ Arrange for a good quality SD card reader. If connected directly, your PC and the Sony camera will use MTP to communicate with each other. While it has its advantages, you won’t be able to perform data recovery if your camera is connected using the MTP protocol. Instead, remove the SD card from your camera and connect it to your computer directly if it has an SD card slot, or use a good quality SD card reader.
- 👩⚕️ Use trustworthy data recovery software. There are plenty of data recovery programs that claim to recover all of your data. But, it’s important to choose one that is a good fit for your particular data loss scenario. In this case, it’s recovering photos from a Sony camera. So, you should look for the best SD card recovery programs that are easy to use, support photo formats such as .arw, .sr2, and .srf, and let you preview photos before recovery. The first data recovery scan is usually the most successful, so pick a good program from the get-go.
How to Recover Deleted Photos from a Sony Camera
Data recovery programs present themselves as a convenient and pocket-friendly way to recover photos from a Sony camera. There are innumerable data recovery apps on the web, each with its unique strengths and weaknesses. So, how do you pick the right one?
In our tutorial on Sony photo recovery, we decided to go with two data recovery programs–PhotoRec, and Disk Drill. Both programs met the following criteria:
- ✔️ Trustworthy, with a proven track record: Disk Drill and PhotoRec have been around for a while, and are trusted names in the data recovery industry. Numerous users have used the programs to great success. However, Disk Drill has a more robust and formal customer support system in place, while PhotoRec’s customer service exists only in the form of a user-run forum, and technical documentation.
- 🔍 Ability to recognize and recover Sony-specific RAW photo formats: The images you lost most likely used the .arw, .sr2, or .srf format. Both Disk Drill and PhotoRec recognize these formats (except the .SRF format in the case of PhotoRec). Disk Drill even lets you preview these photos before recovery.
- ♾️ Support for SD cards and a wide range of file systems: Both PhotoRec and Disk Drill support SD card data recovery, and work with a range of file systems including FAT32, exFAT, and NTFS. They even work with drives that have no file system at all (RAW).
Option A: Disk Drill
![]() Disk Drill has all the bells and whistles you would expect from a cutting-edge data recovery program. The data recovery process is simple, and the steps remain the same, regardless of the type of storage device you’re using. It eliminates any compatibility issues with support for over 300 file formats (including ARW, SRW, HEIF, etc.), recoverable from SD cards, CF cards, HDDs, SSDs, USB drives, and more. All these features make Disk Drill a fantastic Sony camera data recovery software.
Disk Drill has all the bells and whistles you would expect from a cutting-edge data recovery program. The data recovery process is simple, and the steps remain the same, regardless of the type of storage device you’re using. It eliminates any compatibility issues with support for over 300 file formats (including ARW, SRW, HEIF, etc.), recoverable from SD cards, CF cards, HDDs, SSDs, USB drives, and more. All these features make Disk Drill a fantastic Sony camera data recovery software.
Windows users can take advantage of the program’s free trial that lets you recover up to 500 MB of data at no cost.
Let’s see how you can retrieve deleted photos from a Sony camera, using Disk Drill:
- Download Disk Drill and install it.
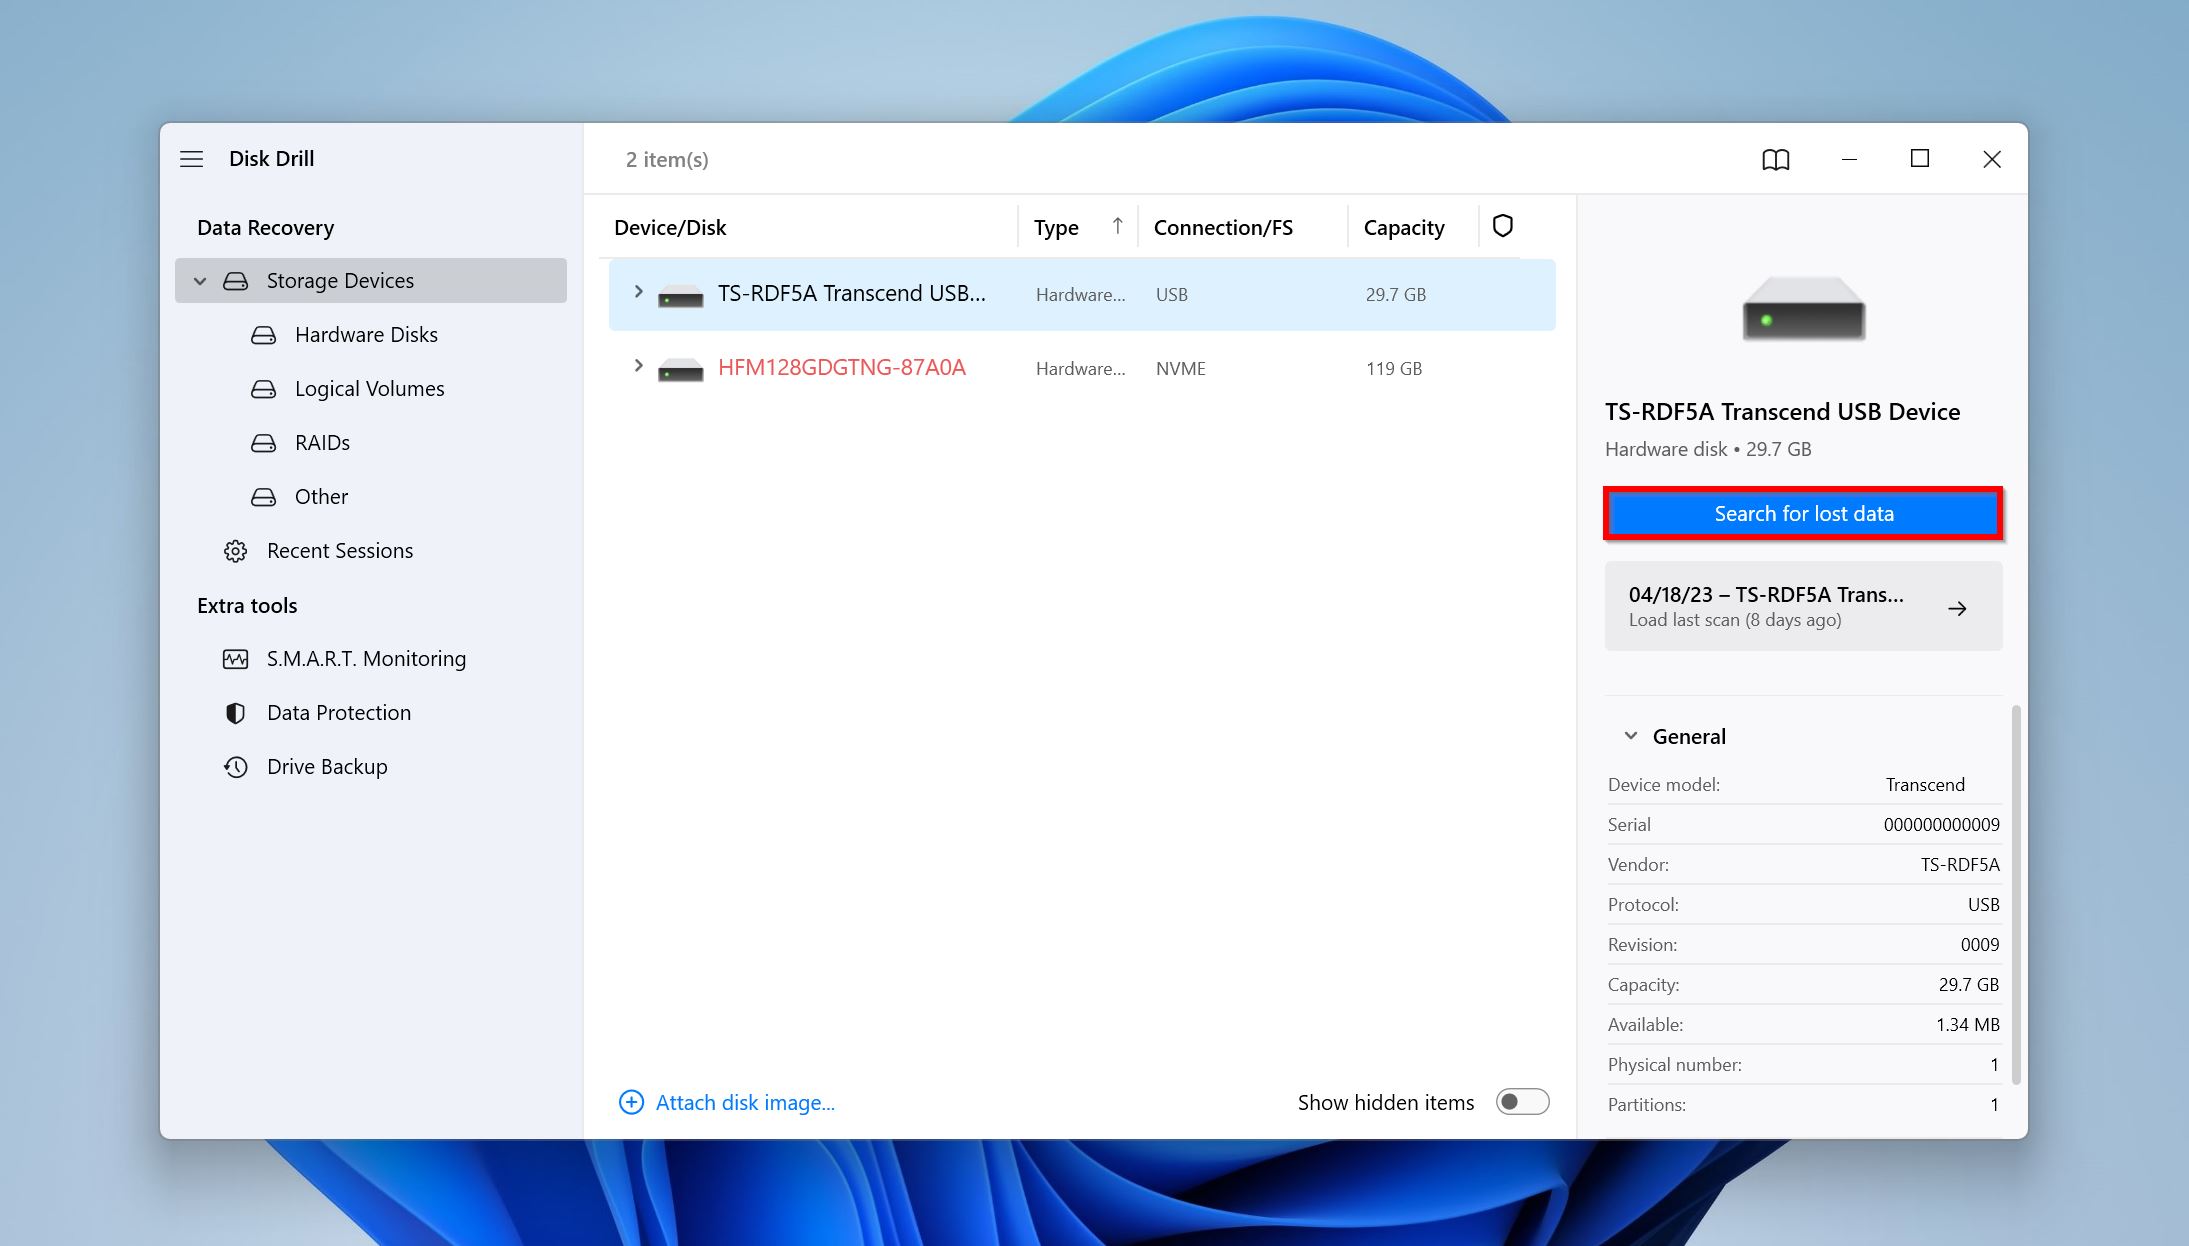
- Open the program, select the SD card that you used in your Sony camera, and click Search for lost data.
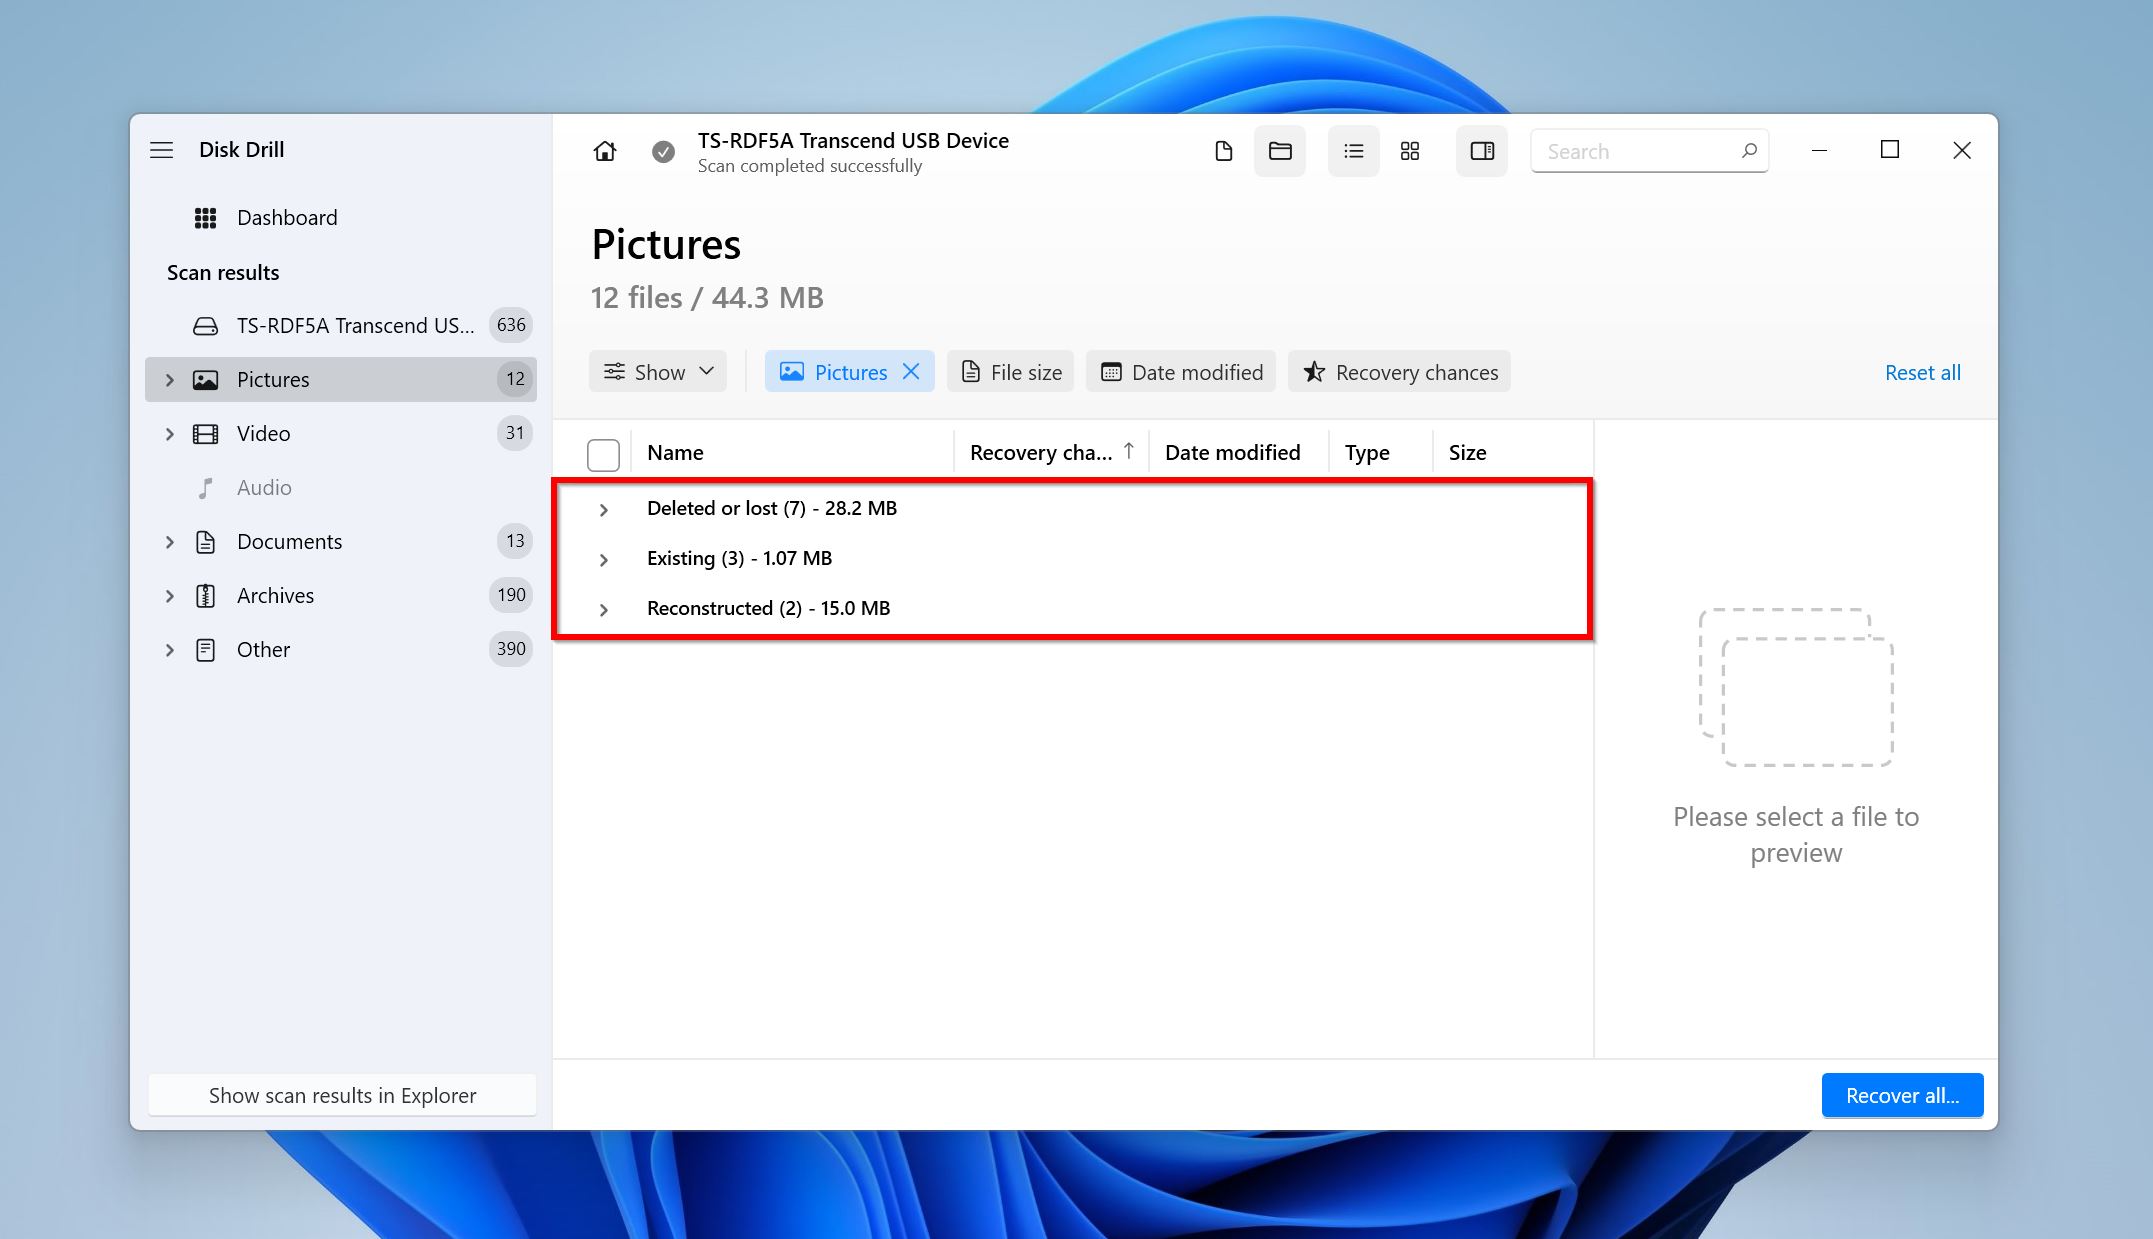
- Once Disk Drill has finished scanning, click on Review found items. Alternatively, you can directly click on the Pictures option on this screen to filter out the results and only display photos.

- Expand the Deleted or lost as well as the Reconstructed sections.
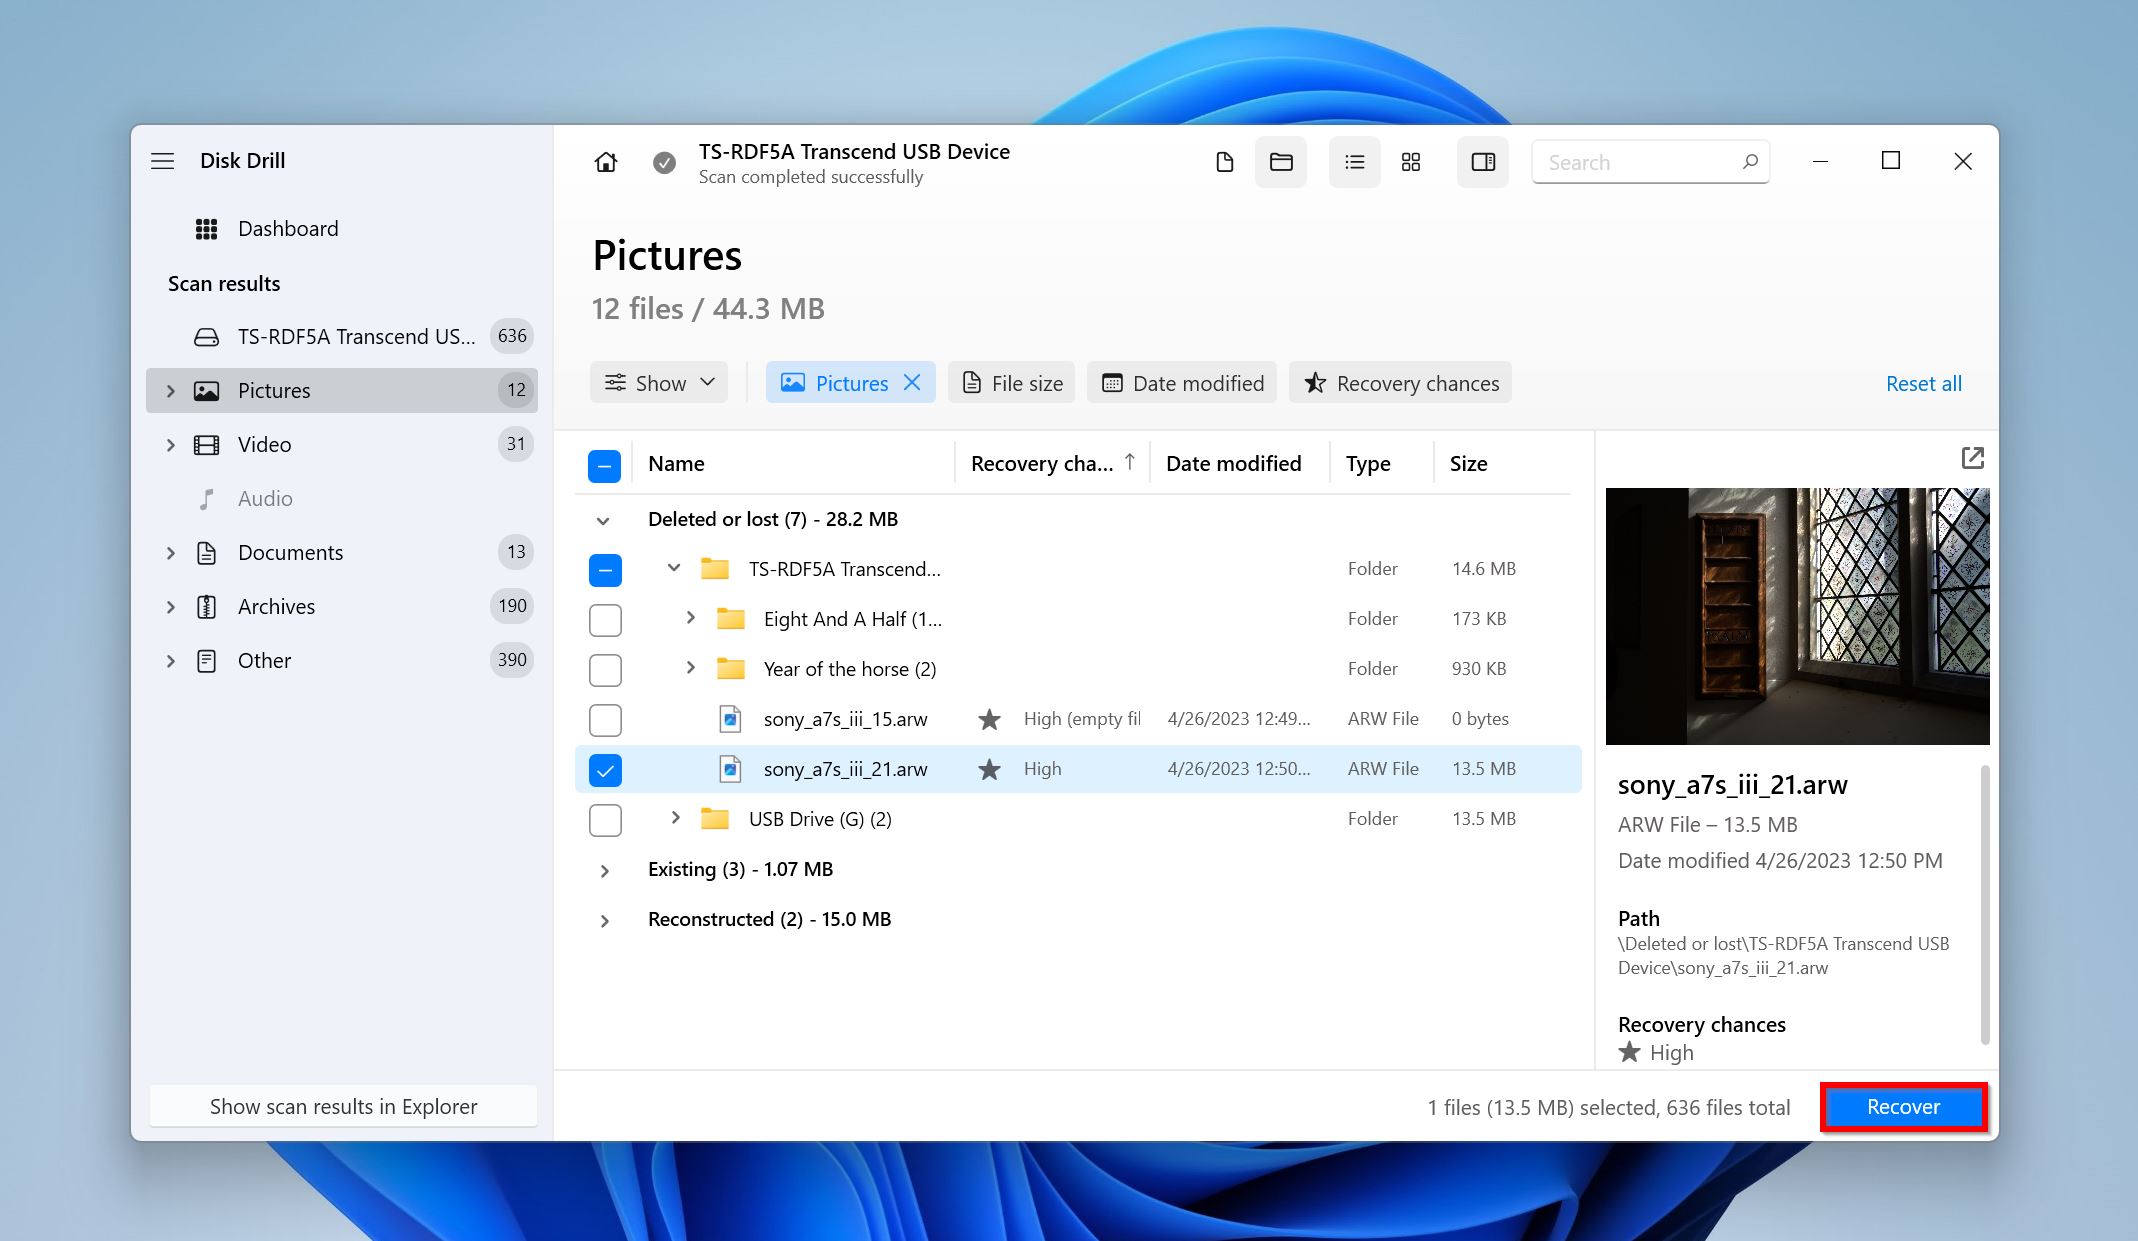
- Use the checkboxes to select the photos you wish to recover. Click on the eye icon next to the filename to see a preview of the selected file. Click Recover after you’ve finished selecting the photos.
- Choose a recovery destination. Click Next.
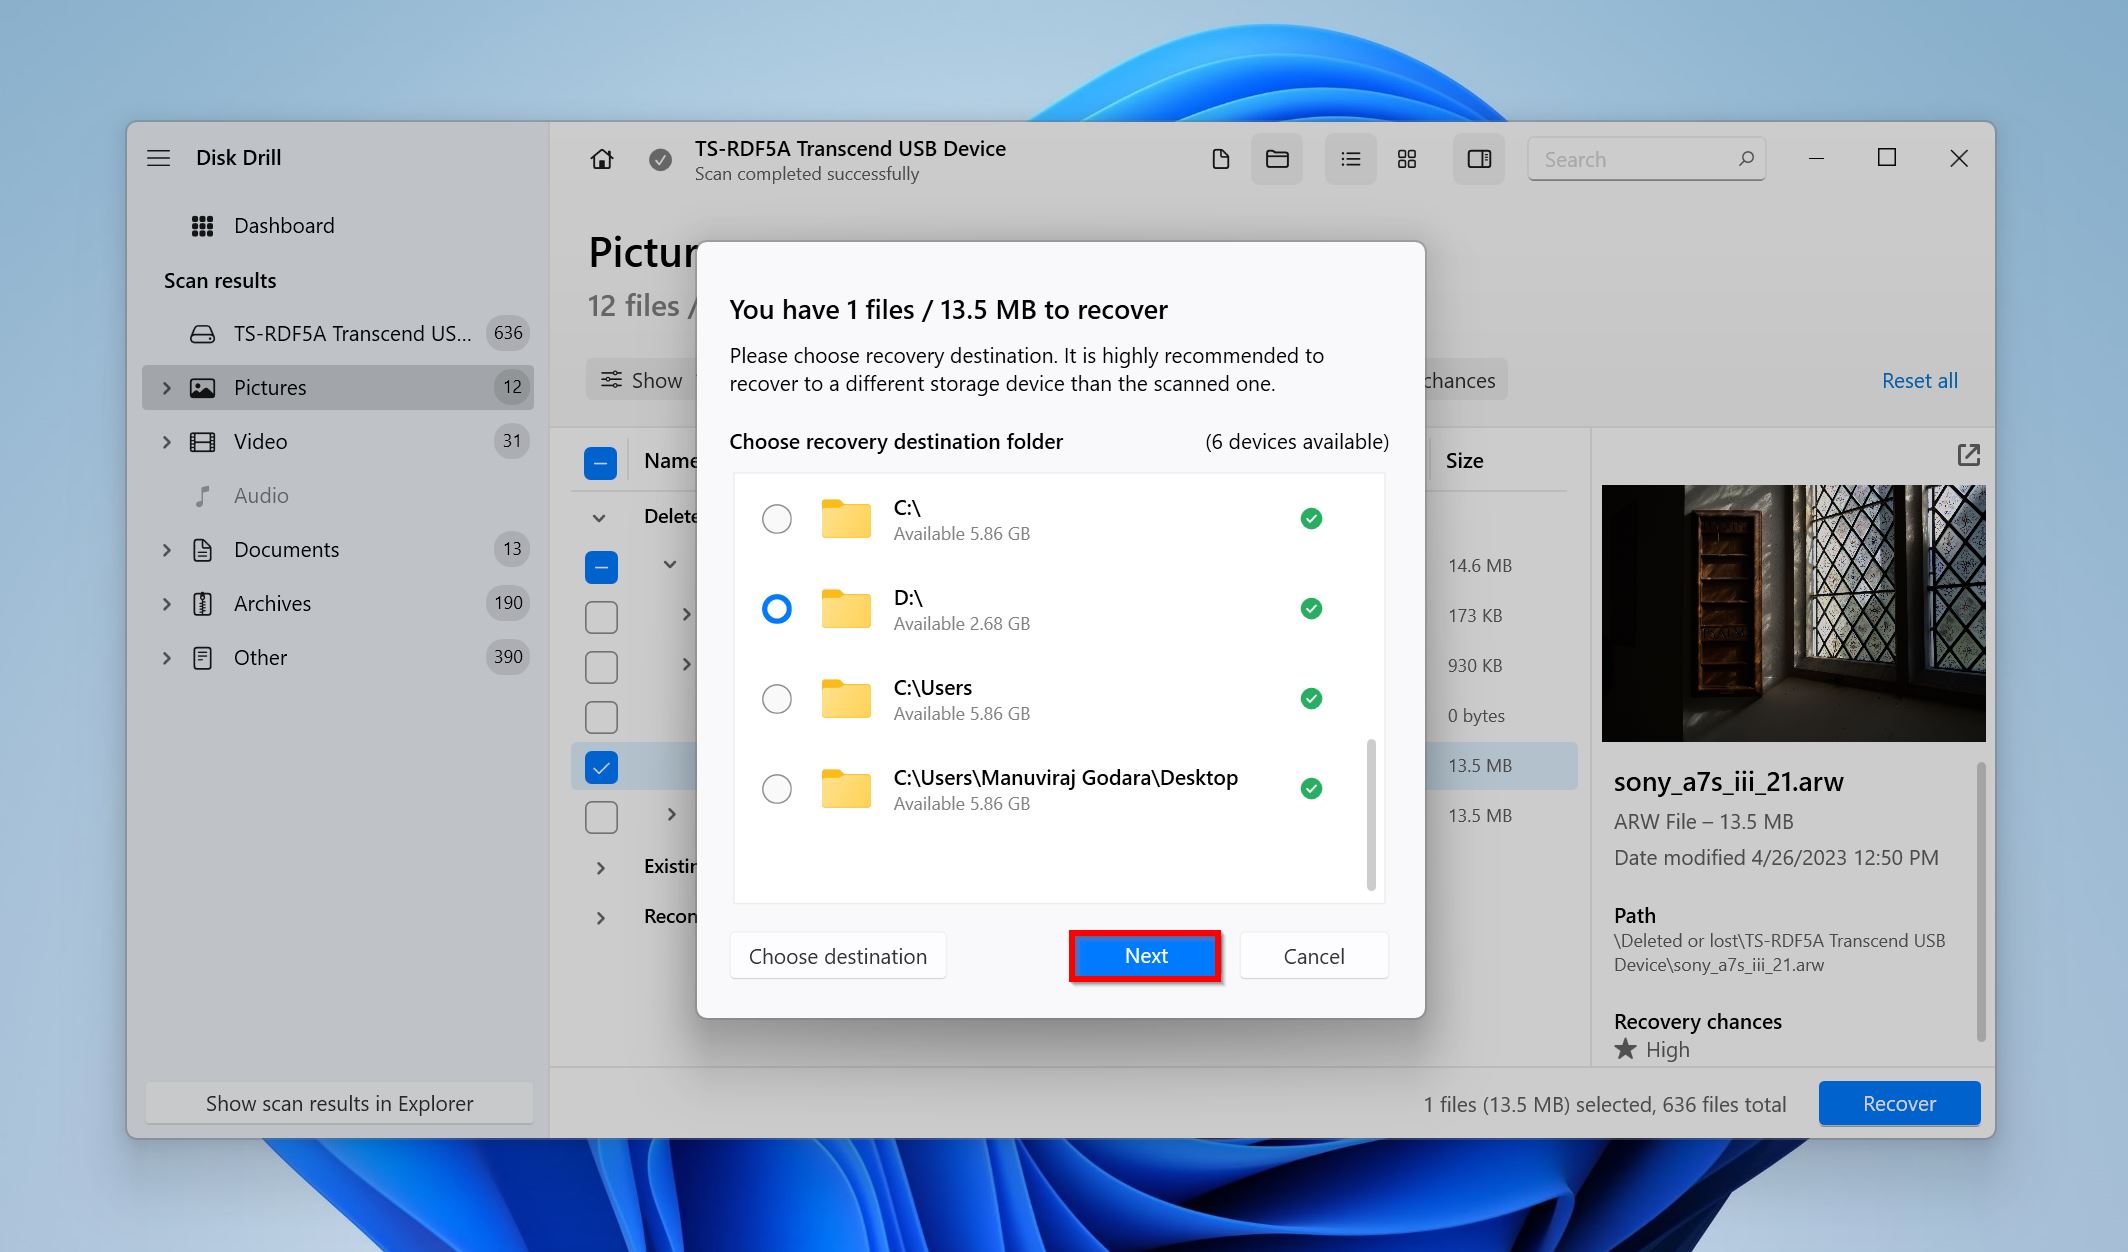
- Disk Drill will recover the selected photos.
Option B: PhotoRec
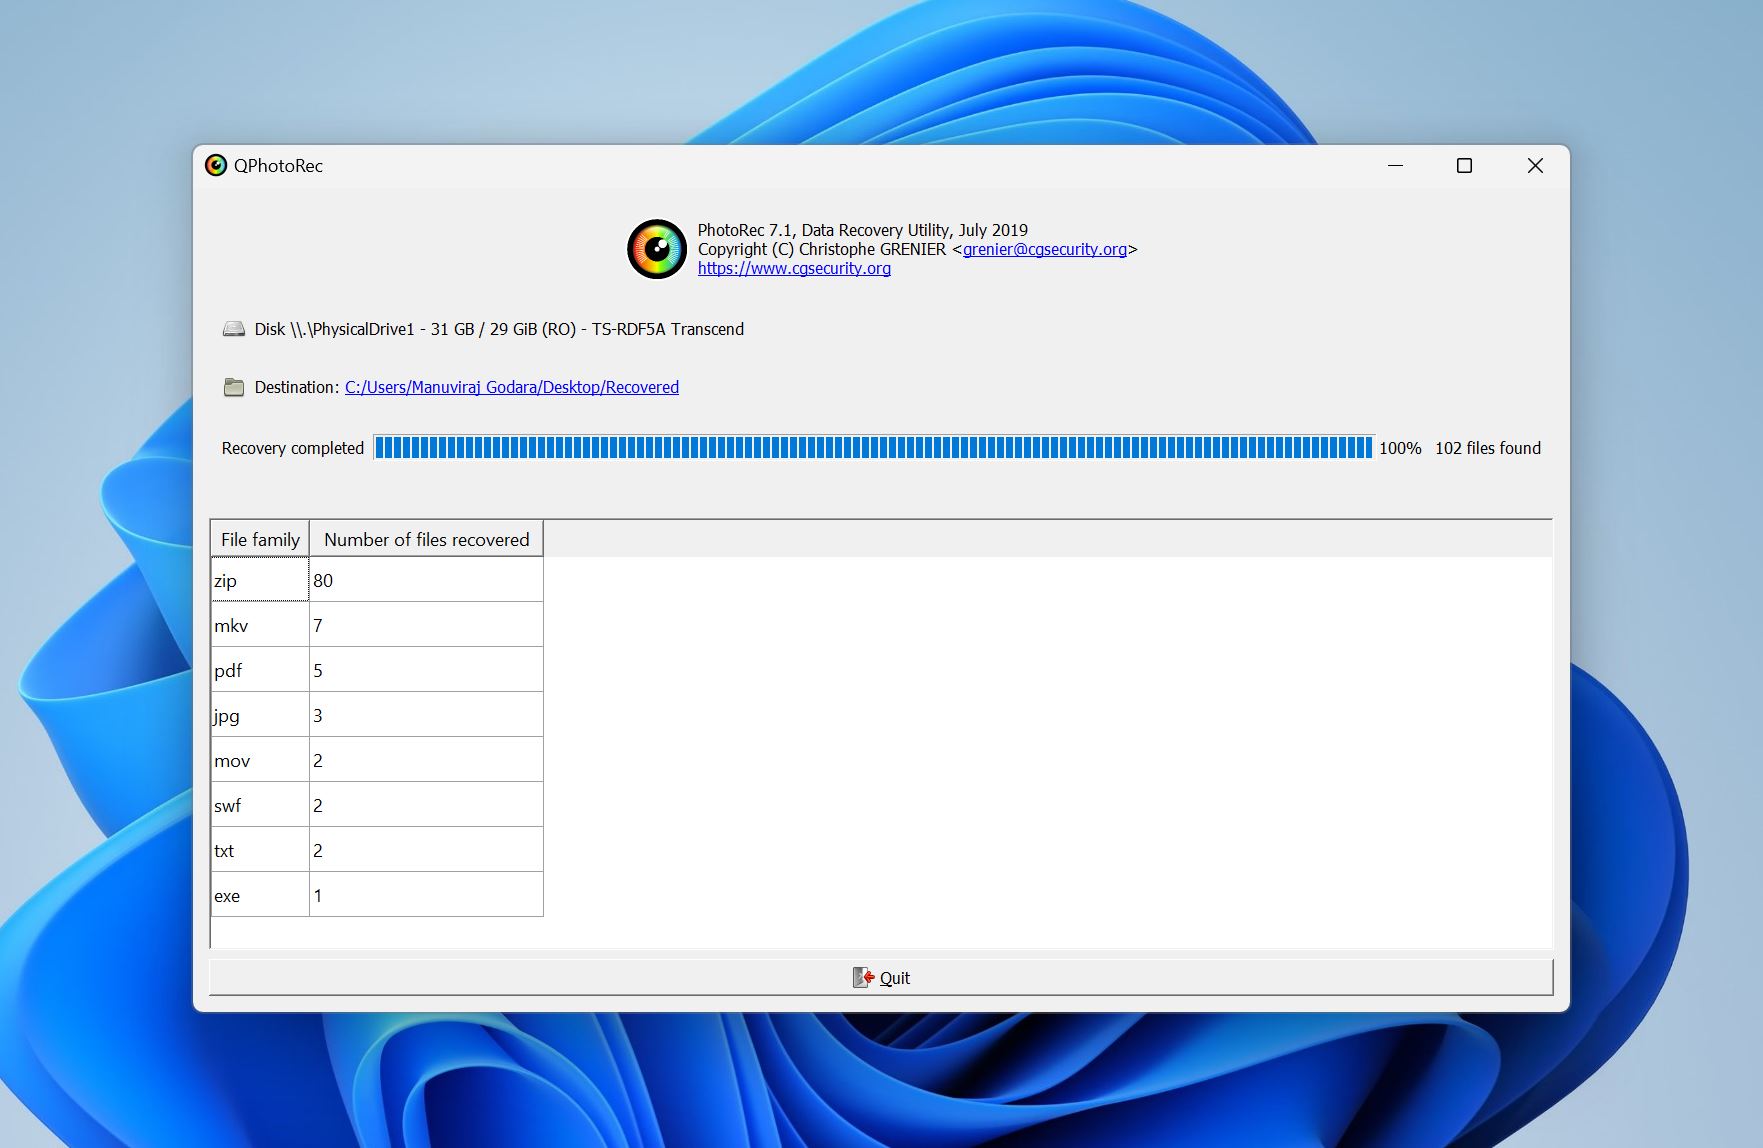
![]() PhotoRec is open-source, completely free, and was created with a singular goal–to recover photos. While PhotoRec is an excellent Sony photo recovery software, using it is not as easy as other options. Earlier, PhotoRec only had a command-line interface, but now it also comes with a GUI option for Windows users. Still, the GUI is nowhere as modern as other data recovery apps and is missing a preview feature.
PhotoRec is open-source, completely free, and was created with a singular goal–to recover photos. While PhotoRec is an excellent Sony photo recovery software, using it is not as easy as other options. Earlier, PhotoRec only had a command-line interface, but now it also comes with a GUI option for Windows users. Still, the GUI is nowhere as modern as other data recovery apps and is missing a preview feature.
Here’s how you can use PhotoRec to recover deleted photos from your Sony camera’s memory card:
- Download PhotoRec. Extract the downloaded archive, and run qphotorec_win.exe.
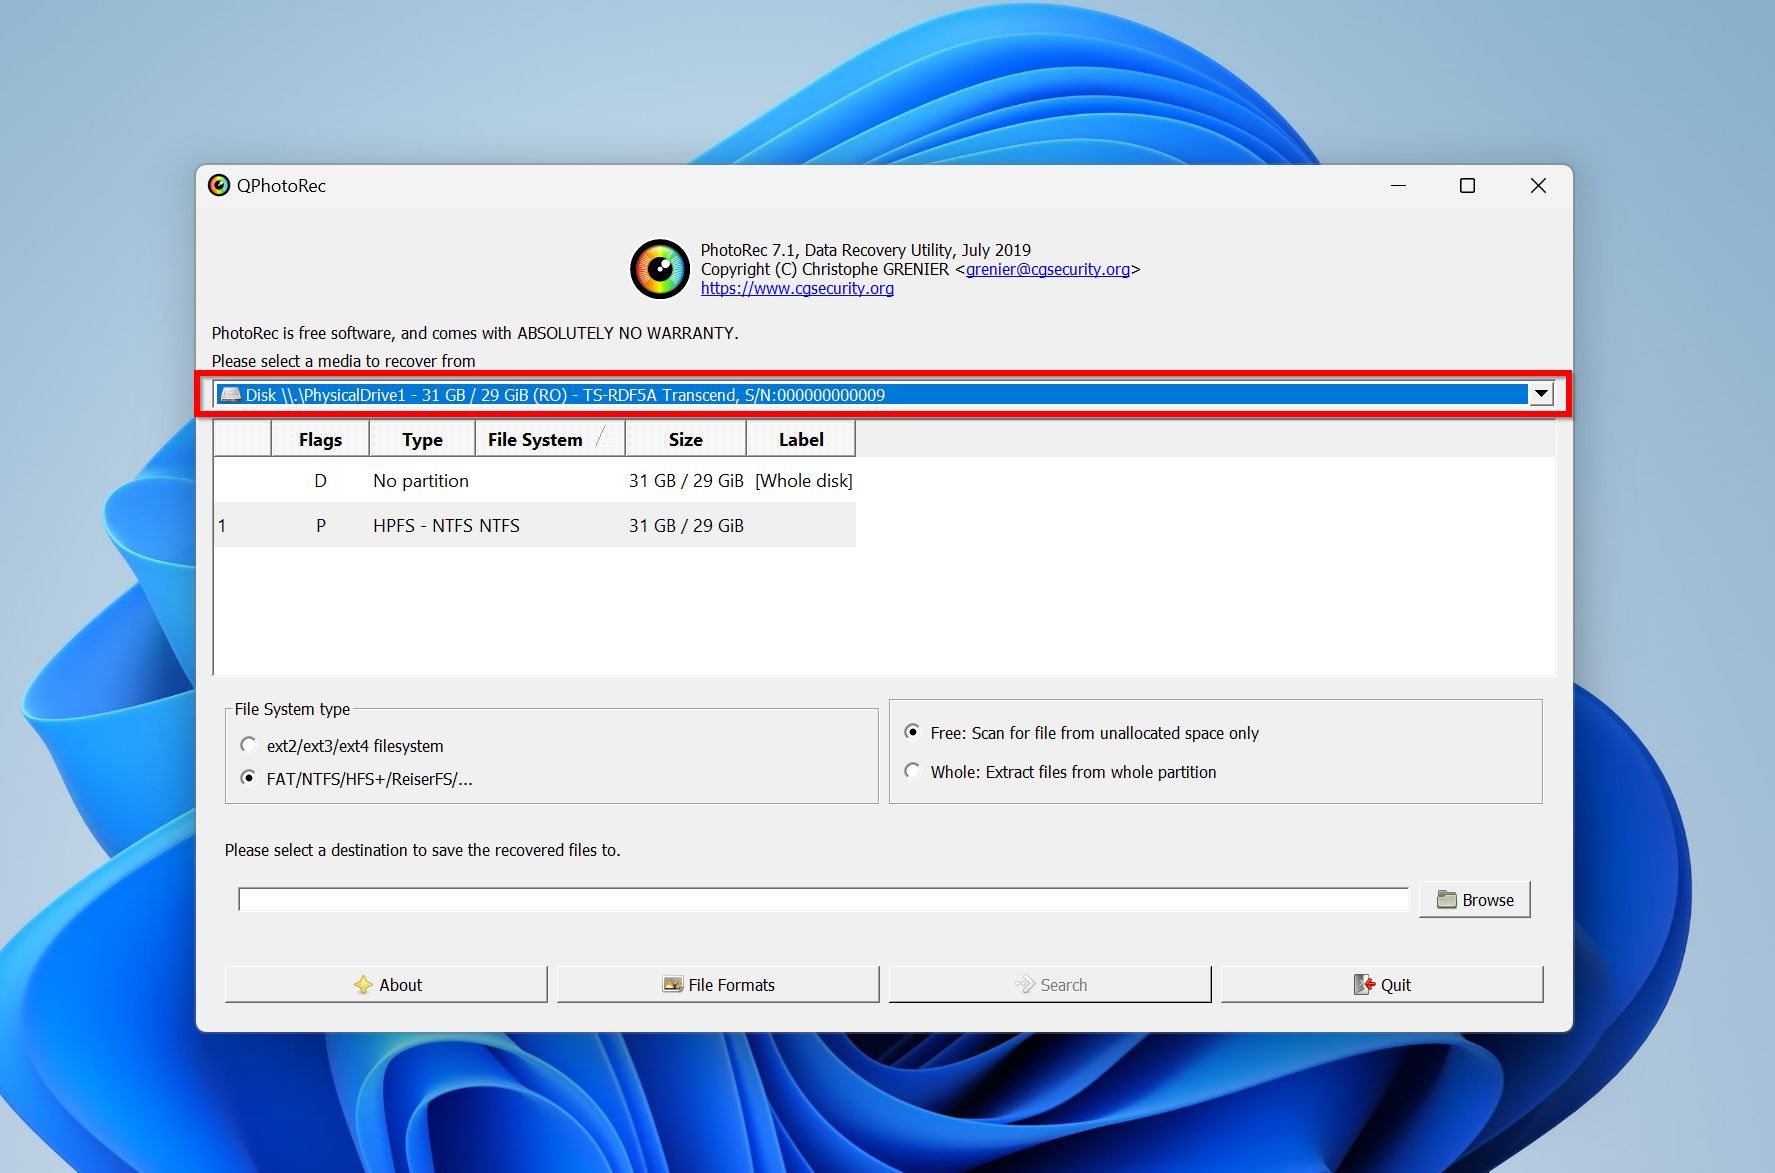
- Select your Sony camera’s SD card using the device selection drop-down menu right at the top.
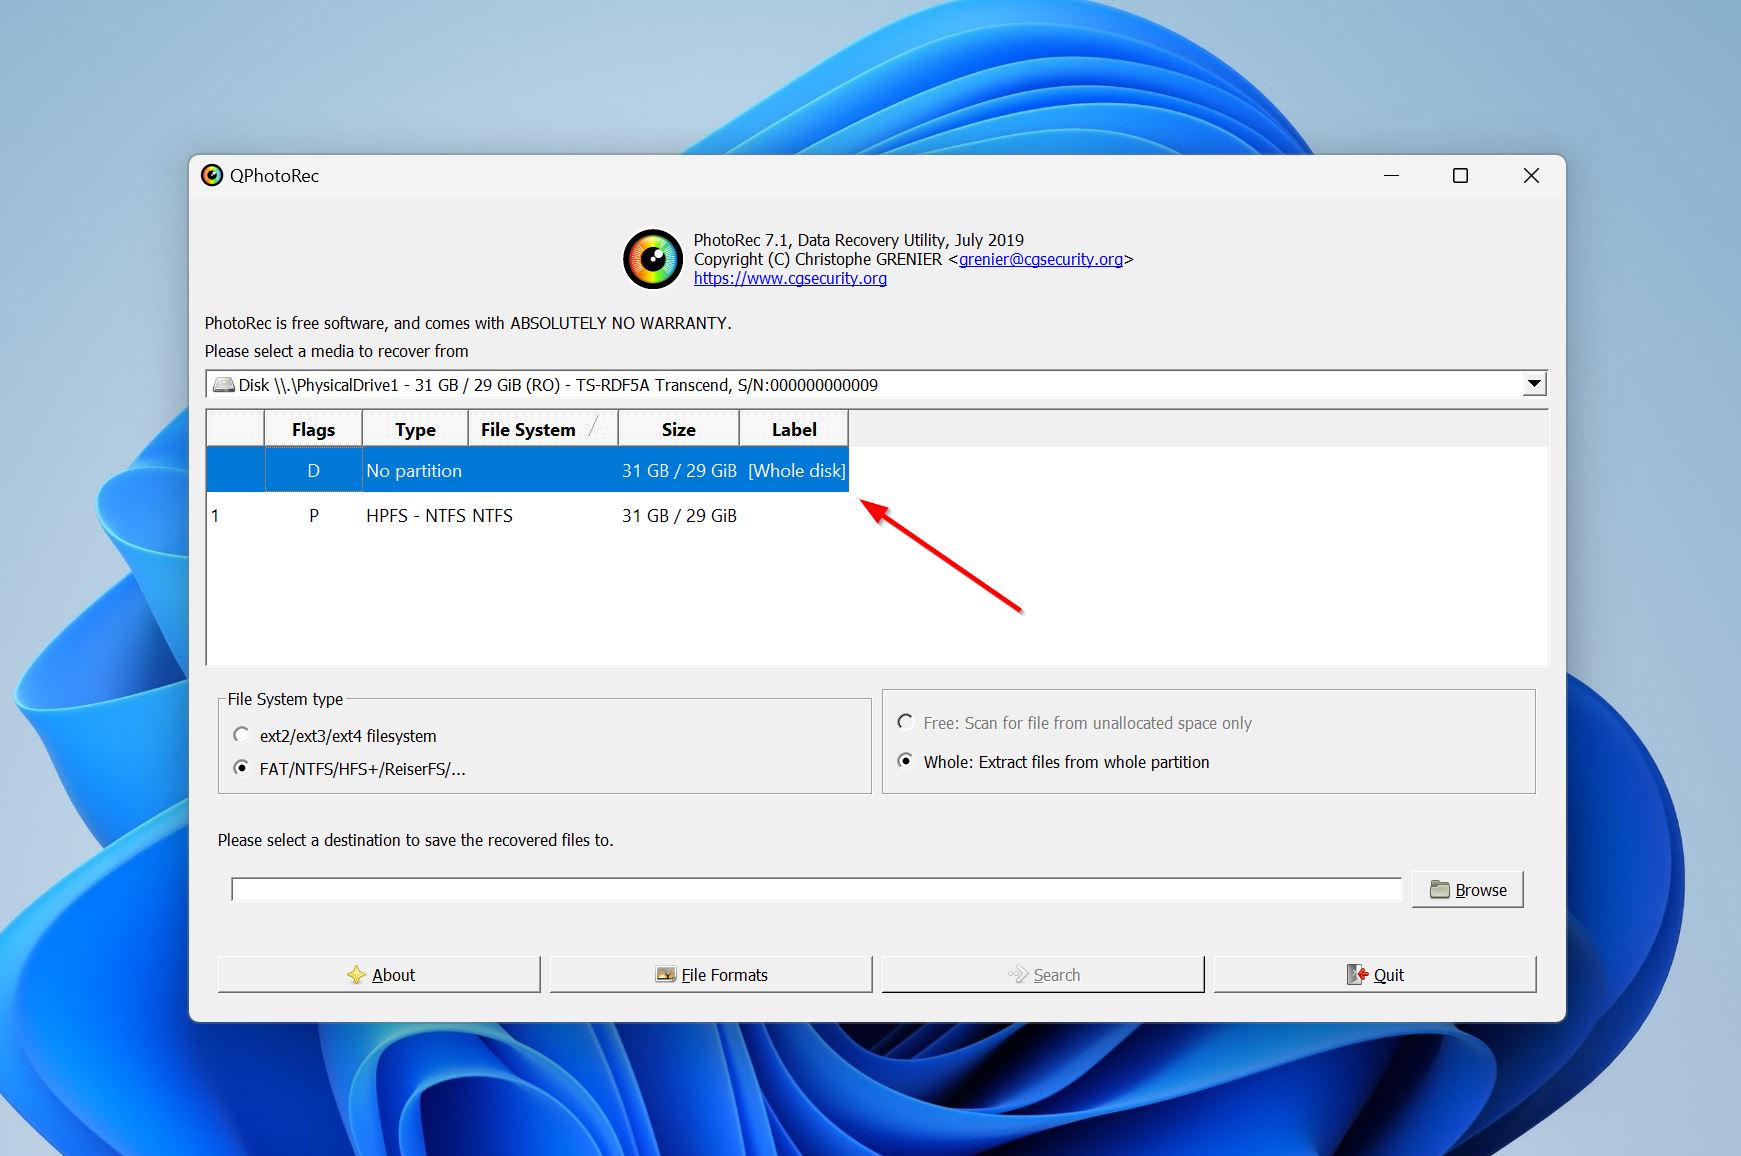
- In the partition selection area, we recommend you select the option which has [Whole disk] in the Label column.
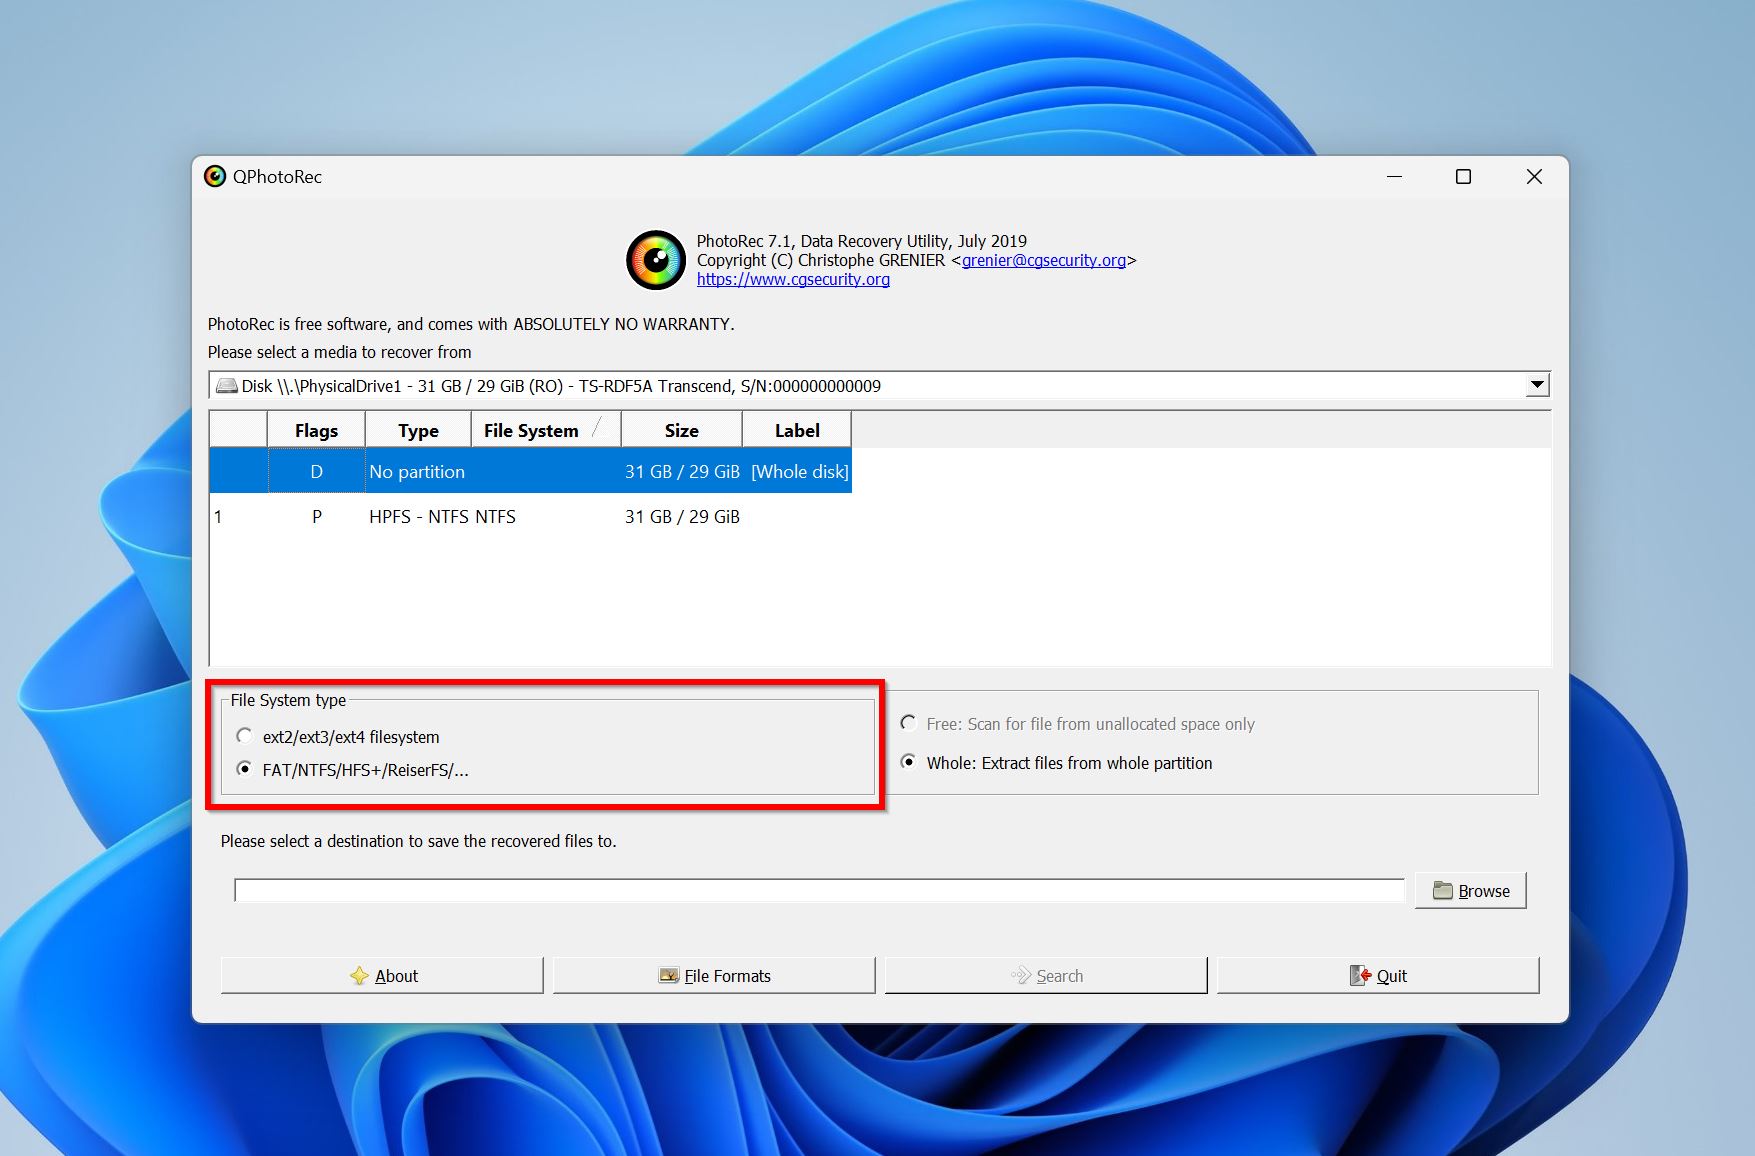
- Select the FAT/NTFS/HFS+/ReiserFS/… option in the File System type column.
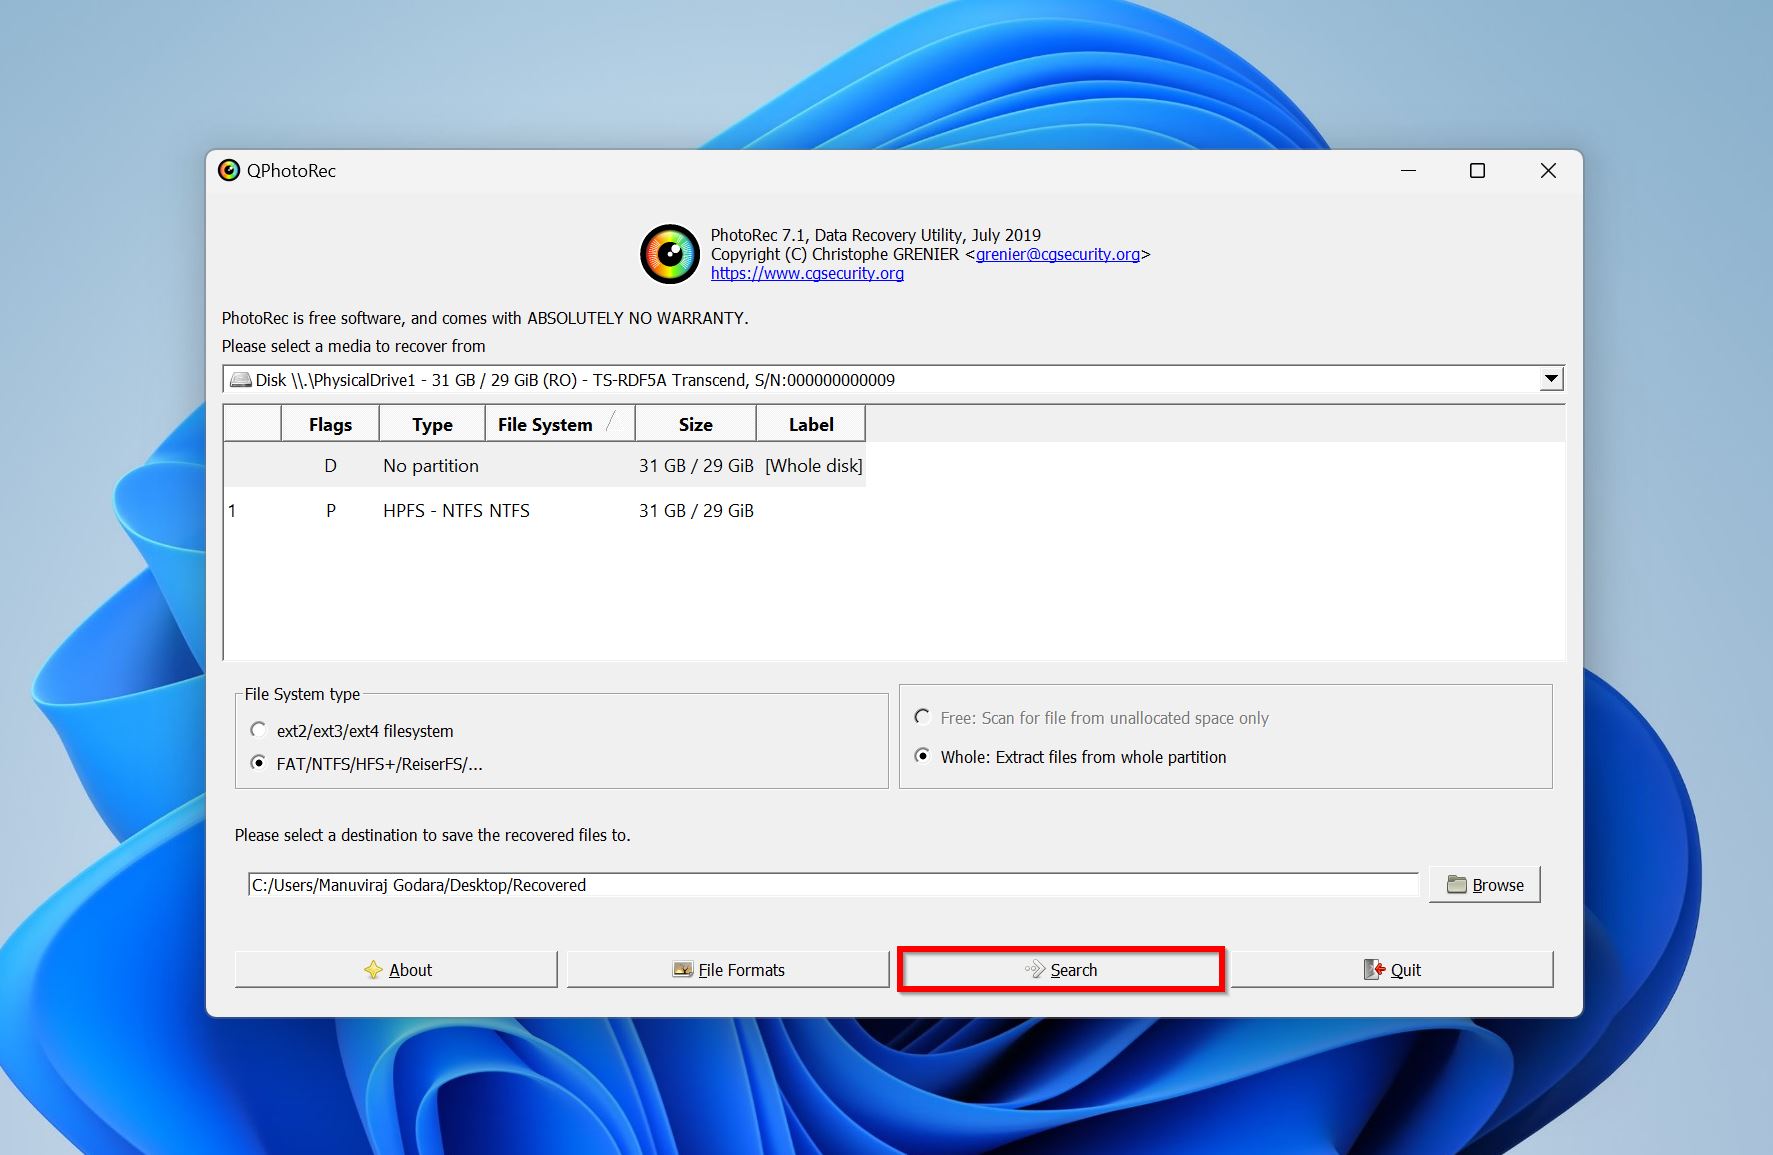
- Click on Browse to choose a recovery destination. We recommend you pick a directory on your computer’s internal storage drive or any other destination except the affected SD card.

- Click on Search to begin the data recovery scan.
- Once the scan progress bar reaches 100%, you can click Quit to exit PhotoRec.
Best Practices to Prevent Data Loss on Your Sony Camera
A few thumb rules can help prevent data loss and save you the time, money, and effort spent in recovering your missing files. These practices are easy to follow, and you don’t need to be a technical wizard to apply them.
Let’s take a look at some ways to prevent data loss from your Sony camera in the future:
- 🕒 Create regular backups. Data loss occurs unexpectedly, and keeping regular backups is the only way you have a 100% chance of getting back all your files. We recommend you back up important photos at least once a week to an external storage device and the cloud.
- 🧪 Use a high-quality memory card. SD cards have a limited lifespan, and investing in a good-quality SD card is worth it because it will last longer than cheaper options. Never procrastinate replacing your SD card if you notice that it’s performing slower than usual, your photos appear and disappear randomly, or there are evident signs of physical damage. As a thumb rule, replace your SD card every 2-3 years if you use it regularly.
- 🛠️ Protect your SD card from physical damage. SD cards need to be handled with care. Invest in an SD card case that you can use when transporting the memory card. Don’t expose the SD card to extreme heat, and moisture.
- ⏏️ Eject the SD card safely. Depending on your Sony camera, you may have to first unmount the SD card from within the user interface before physically removing it from your camera. If your SD card is slotted into your PC, first eject it using the Safely Remove Hardware and Eject Media option before physically removing it. This ensures that nothing is being written to or read from the memory card at the time of removal.
- 📷 Format your SD card in the camera. Each camera manufacturer stores photos and videos differently on your SD card. Formatting your SD card within the camera will ensure you’re using the correct file system for the specific camera model.
Frequently Asked Questions
How to recover Sony RSV files?
You’ll need to use specialized data recovery software to recover RSV files, as many popular options don’t recognize this file type. If cost is not an issue, you can contact a professional data recovery service to get back RSV files.
Can Recuva recover deleted files from a Sony camera’s memory card?
This will depend on how much time has elapsed since deletion. If the files were deleted very recently, Recuva’s quick scan could recover them. But if the files were deleted a long time ago, Recuva may not be of help. That’s because its Signature scan can’t detect Sony ARW, SR2, and SRF file formats. So, we only recommend you use Recuva if the photos are in a recognized format like JPEG or PNG.
We also have a full-fledged review of Recuva for further reading.
How to recover data from a formatted Sony camera?
To recover data from a formatted Sony camera, use Disk Drill:
- Download Disk Drill and install it.
- Connect the Sony camera’s formatted SD card to your PC.
- Open Disk Drill, select the SD card and click Search for lost data.
- Click Review found items.
- Select the files and click Recover.
- Choose a recovery destination. Click Next.
How to recover deleted photos from a Sony Cyber-Shot camera for free?
You can use PhotoRec to recover deleted photos from a Sony Cyber-Shot camera for free.
What is the best Sony SxS card recovery software?
Disk Drill is, by far, the best choice to recover data from a Sony SxS card. It offers a fantastic blend of functionality, usability, and features. Other good options for Sony SxS card recovery are:
Conclusion
Data recovery software makes it possible for you to recover photos from your Sony camera, right at home. But it shouldn’t be an excuse to not back up your photos and videos regularly. Additionally, if your data is crucial, and you need to recover it at any cost, we recommend you contact a professional data recovery service instead of going the DIY route.

- 4 publishings
Manuviraj Godara is a professional content writer with over four years of experience, specializing in technology and data recovery topics. His passion for technology began when he got his first computer, sparking a fascination that has never ceased to amaze him. He is also an avid gamer who enjoys spending his free time exploring his favorite music albums and reading. Apart from writing, Manuviraj has a penchant for gaming, motorcycling, and listening to Steely Dan. With his ever-growing expertise in technology, Manuviraj consistently delivers engaging content, helping readers make the most out of their devices and computers.
- Frisco, Texas, United States
Yevgeniy Tolkunov is Hardware Engineer at ACE Data Recovery. Yevgeniy has a Master's Degree in Physics, Information Technology; 15+ years of experience.