How to Recover Data from an Uninitialized Hard Disk
An uninitialized disk is not what you want to see after booting up your computer. It means that something has happened to your drive that may have resulted in some of your data becoming lost.
If you’re unsure what an uninitialized disk is, we’ll explain everything you need to know. Read on to find out how to recover data from an uninitialized hard disk, as well as how to fix it.
Understanding the Reasons Behind Hard Drive Uninitialization
Before you jump straight into troubleshooting your drive, you must first understand what has caused your HDD or SSD to become uninitialized. You’ll first notice your drive is uninitialized by checking it in Disk Management, likely after you realize the drive letter has disappeared.
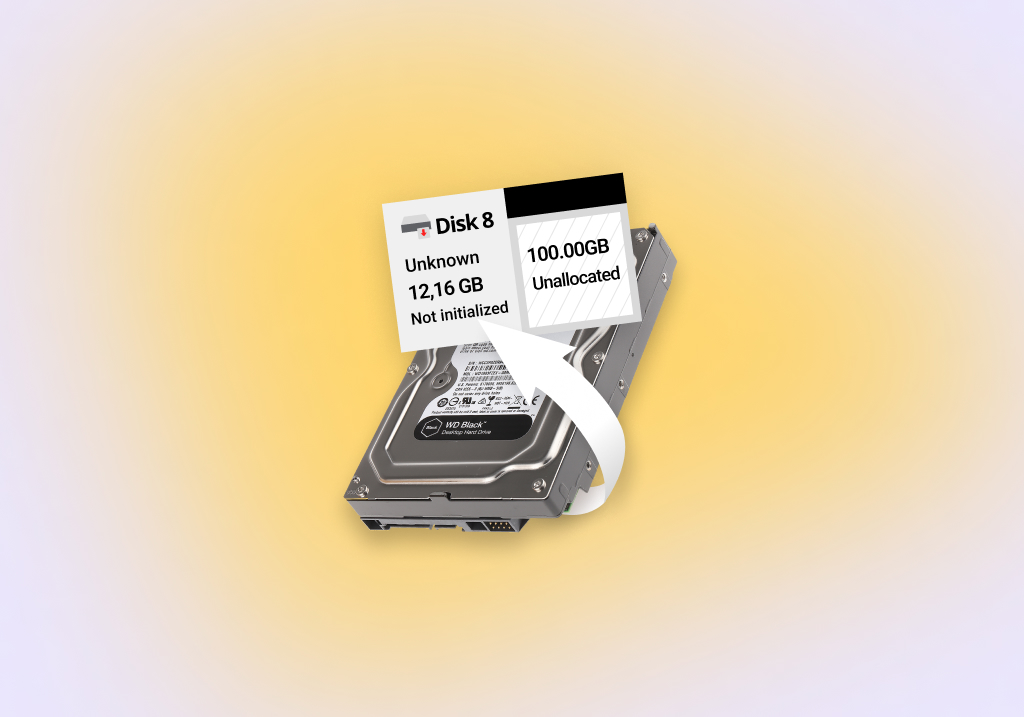
An uninitialized disk will not have a file system. Instead, it will have one large volume of unallocated space. This doesn’t mean that your data is gone, it’s just inaccessible for the time being. This can happen to any hard drive, even popular ones like WD My Book, Seagate Backup Plus Ultra Touch, and FireCuda Gaming Hub.
Here are some common reasons that cause hard drives to become uninitialized:
- 🏭 Factory new drive – Brand new hard drives are sometimes shipped without a partition table. If your hard drive is brand new, you will need to initialize it yourself. Not sure how? See how to initialize your hard drive.
- ⚠️ Corrupted partition table – The partition table is an essential part of your drive. Without it, your operating system won’t know where to find your data. Until it is fixed, your data will still remain on the hard drive but remain inaccessible.
- 💥 Operating system failure – In rare instances, your operating system might become damaged or corrupted. This can result in your disk becoming uninitialized. It can happen as a result of a bad update, sudden power failure, or hardware failure.
- 🦠 Malware infection – Malware comes in many forms, but arguably the most common form is a virus. Viruses can be designed to attack your partition table or file system, causing your disk to become uninitialized.
- 🙅♂️ Human error – Humans make mistakes. In mere moments, your partition table could be accidentally deleted, or you may format the wrong disk, causing it to become uninitialized.
No matter what caused the hard drive to become uninitialized, the simple fact remains that your data is currently in a vulnerable state until recovered. You should perform data recovery at your earliest convenience and avoid using the hard drive until this is done.
How to Restore Data from Not Initialized Hard Drive
In a perfect world, you’d be able to restore lost data from a backup. But, even without a backup, there’s still hope to recover data from an uninitialized disk. Data recovery from a hard drive that’s not initialized can be done using hard drive recovery software.
Here at Pandora Recovery, our intention is to help you recover as much data as possible by suggesting recovery software that can handle the task. To do this, we review the numerous data recovery tools on the market and put each one through an intense testing process to gather a full understanding of what it’s capable (and incapable) of doing. This way, we can make suggestions with confidence knowing that we have the data to back them up.
You can compare data recovery solutions yourself using our comparison tool. Or, for a suggestion tailored to your specific situation, check out our software picker.
Here’s what we were looking for when picking data recovery tools that could recover data from uninitialized disks:
- Unformatted and RAW recovery – There’s no guarantee that the underlying file system can be used to find data. Therefore, support for unformatted and RAW disks using a good signature scanner is essential for recovering data based on file signature.
- Good usability and quick scan times – A disk that has become uninitialized can be unstable. Therefore, it’s important that the data recovery tool be easy to use and quick at scanning to minimize the time spent on recovery.
- Support for multiple file types – The addition of a signature scanner is only useful if a lot of file signatures are known. Knowing more file patterns increases the number of file types that can be recovered.
Without further ado, here are our two top picks: Disk Drill and DiskGenius.
Option A: Disk Drill
![]() Disk Drill is our recommended choice when you need to recover data from a not initialized disk. In our Disk Drill review, we found that the program excelled in recovering data in many situations. The program includes an effective signature scanner, so it doesn’t need to rely solely on the file system to find and recover your data. With support for over 400 file types, it was also able to recover a wide range of our files, including 100% of our raw photos.
Disk Drill is our recommended choice when you need to recover data from a not initialized disk. In our Disk Drill review, we found that the program excelled in recovering data in many situations. The program includes an effective signature scanner, so it doesn’t need to rely solely on the file system to find and recover your data. With support for over 400 file types, it was also able to recover a wide range of our files, including 100% of our raw photos.
Recovering our files was no issue either. From the moment the app was installed, Disk Drill made everything a breeze. Recovery was straightforward and scan times were very fast.
Here’s what data recovery looks like from an uninitialized disk using Disk Drill:
- Download and install Disk Drill.
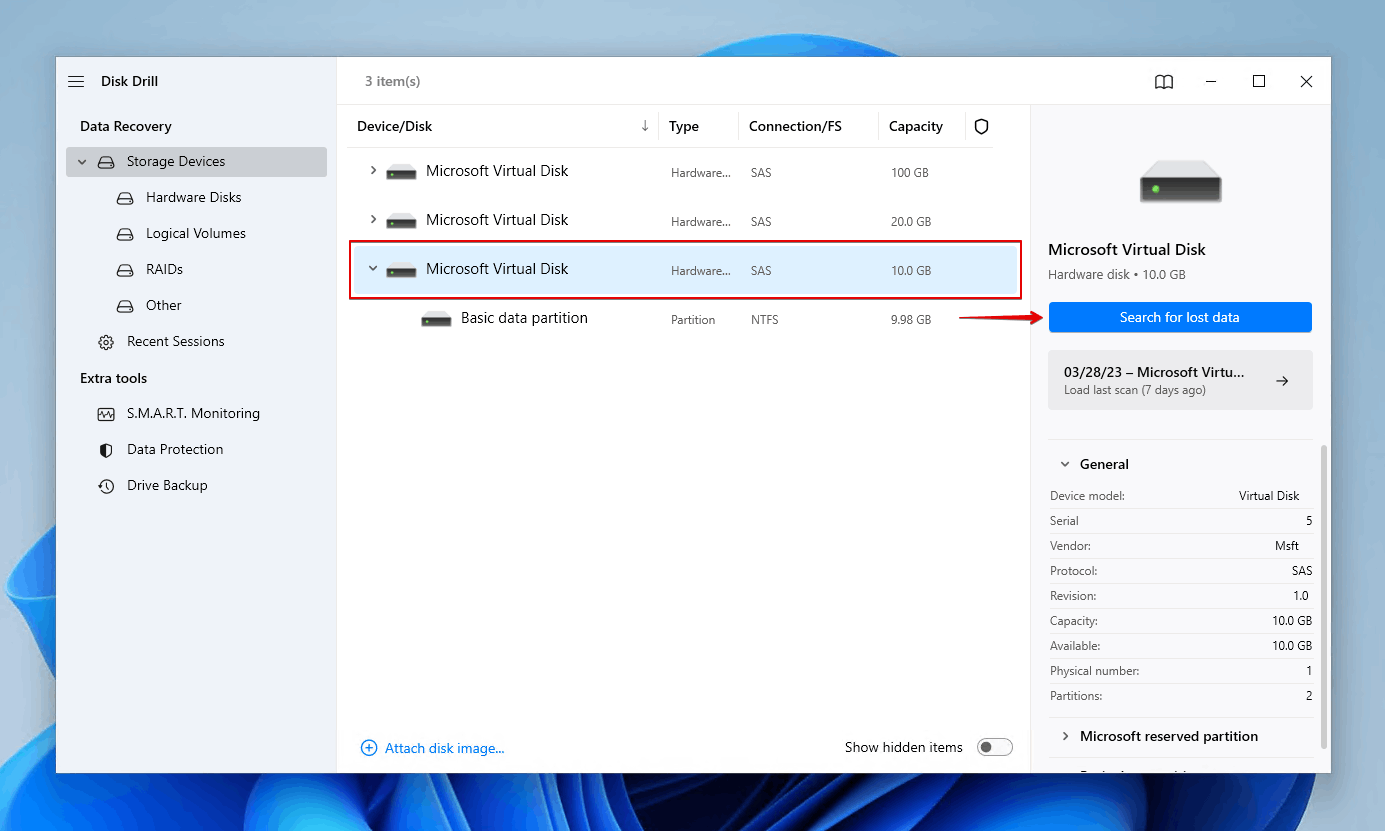
- Select the uninitialized disk from the device list and click Search for lost data.
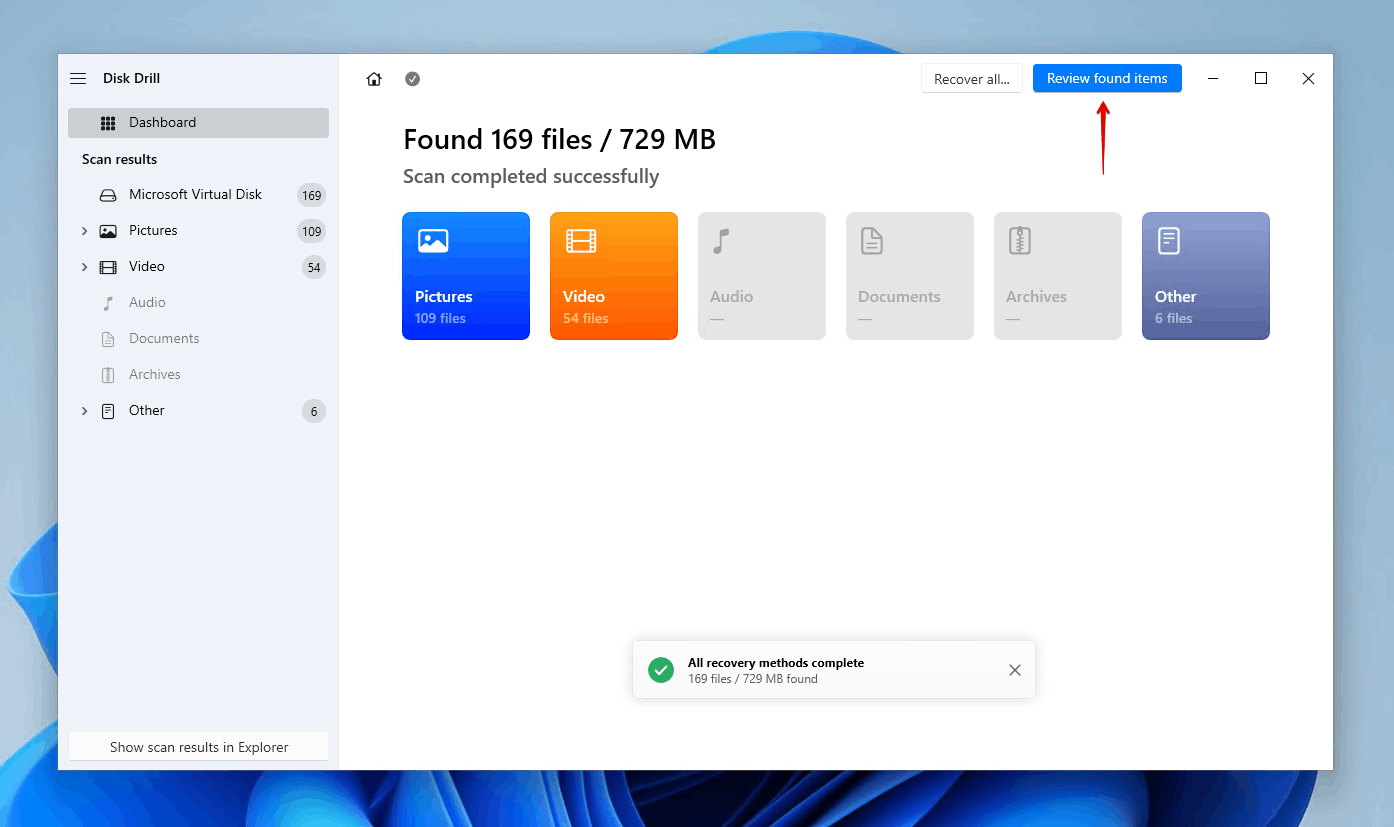
- Click Review found items once Disk Drill’s scan is complete. You can also click one of the colored icons to filter the results based on file type. Or, recover everything by clicking Recover all.
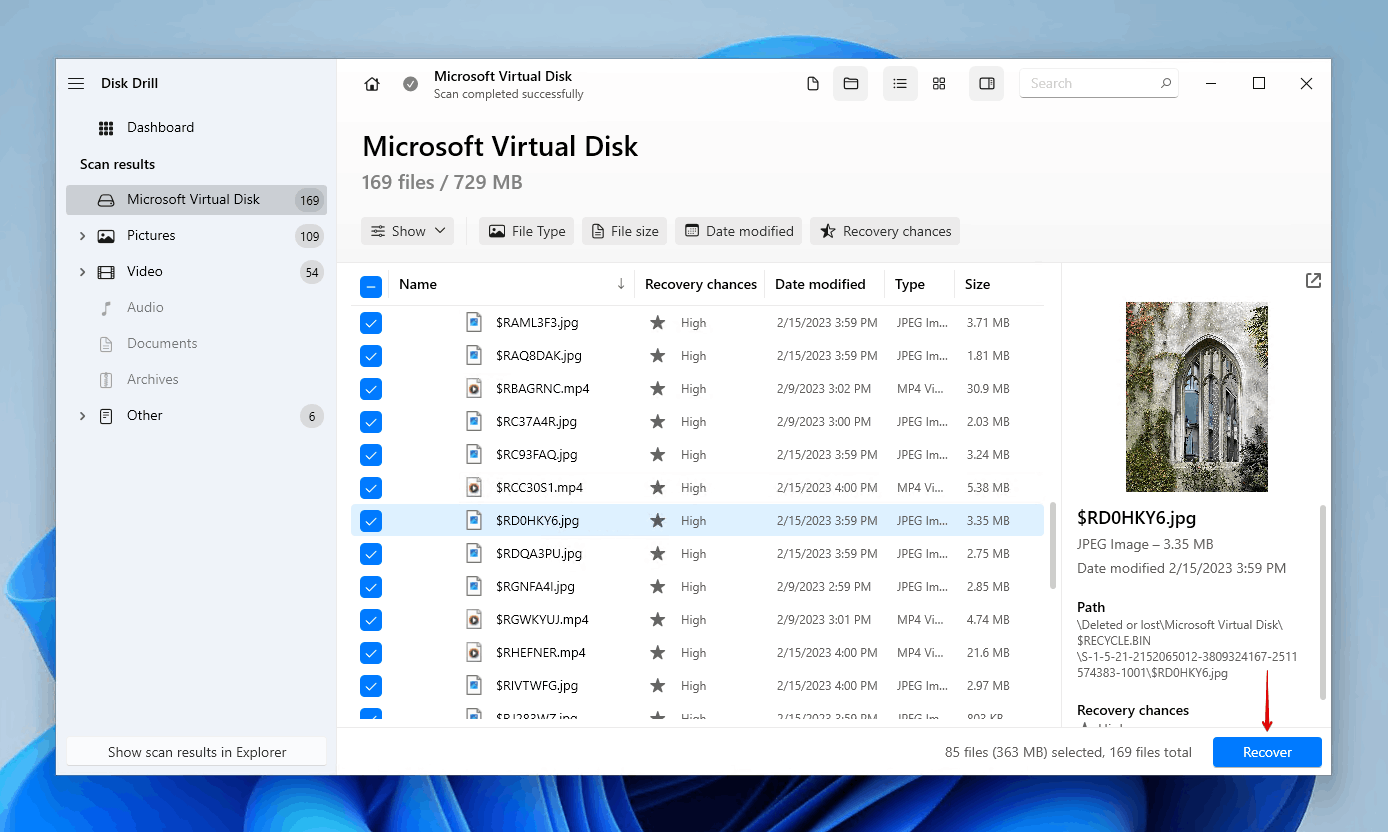
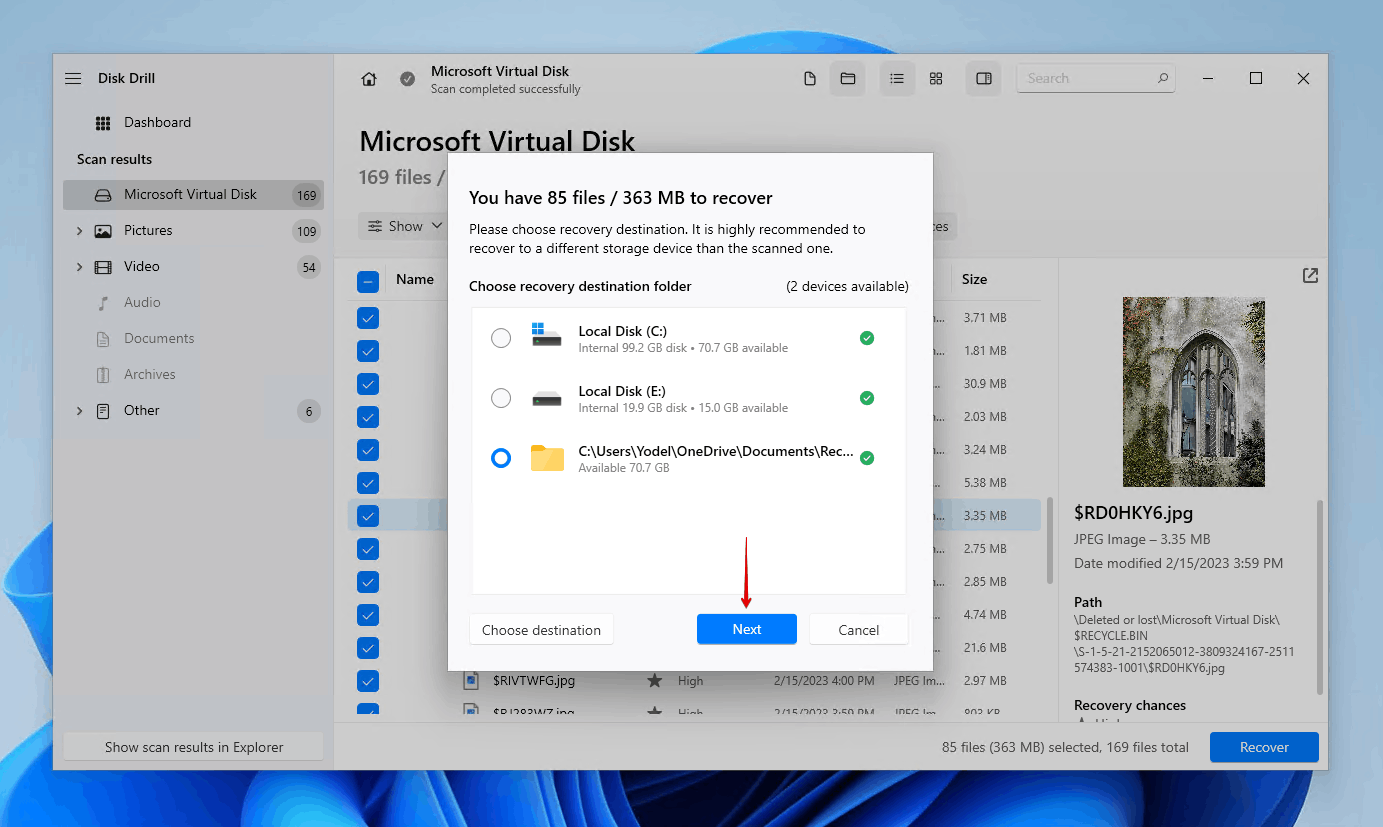
- Select the files you want to recover from the uninitialized disk. The recovery chance indicators and preview panel will be useful here, as they help easily determine what files have the best chance of being recovered. When you’re ready, click Recover.
- Select an appropriate recovery location and click Next.
Option B: DiskGenius
![]() DiskGenius is another recovery tool that’s able to recover data from a not initialized hard drive. It also doubles as a disk management tool, allowing you to perform such tasks as managing partitions, repairing bad sectors, and fixing corrupted hard drives. Our review of DiskGenius points out that the program has a decent signature scanner that is capable of recovering a wide range of files, but not to the same degree as Disk Drill as evidenced by the 59% recovery performance score.
DiskGenius is another recovery tool that’s able to recover data from a not initialized hard drive. It also doubles as a disk management tool, allowing you to perform such tasks as managing partitions, repairing bad sectors, and fixing corrupted hard drives. Our review of DiskGenius points out that the program has a decent signature scanner that is capable of recovering a wide range of files, but not to the same degree as Disk Drill as evidenced by the 59% recovery performance score.
The program’s user interface is a little chaotic at first glance. Being a hard drive recovery and repair tool, it’s easy to get lost in the abundance of features at your disposal. However, navigating the application becomes easier as you familiarize yourself.
This is how you recover data from an uninitialized disk using DiskGenius:
- Download and open DiskGenius.
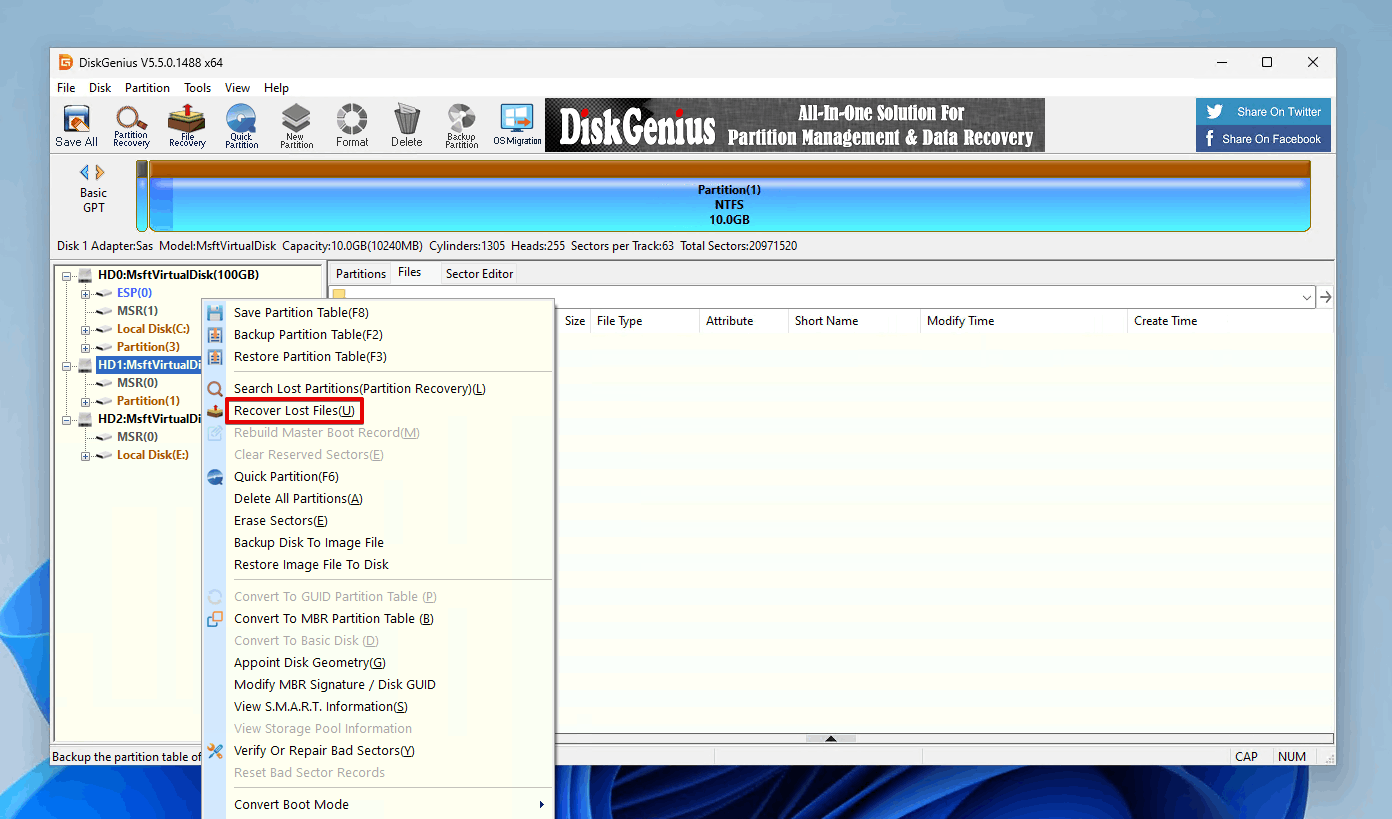
- Right-click the uninitialized disk and click Recover Lost Files.
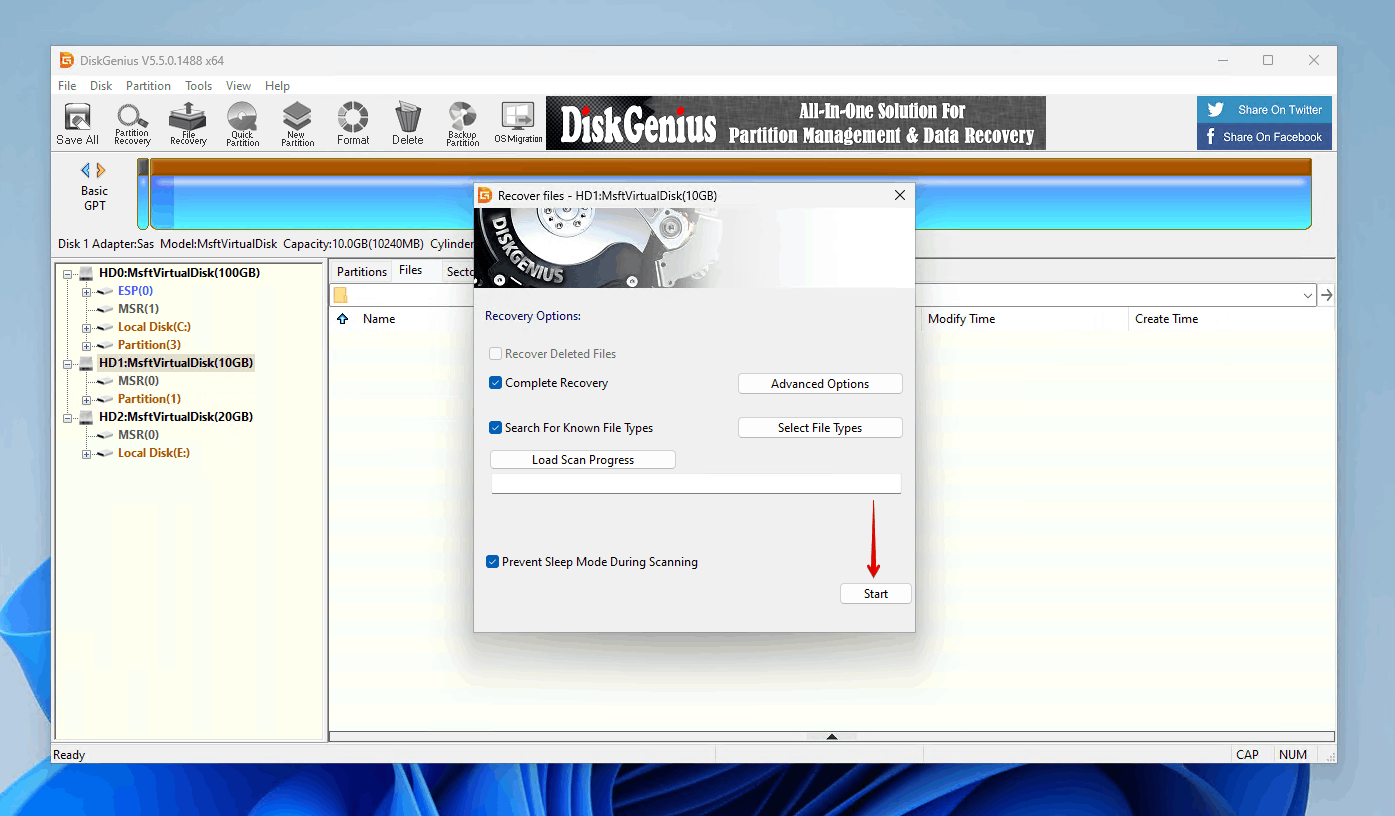
- Click Start.
- Select the files you want to recover, then right-click them and click Copy To.
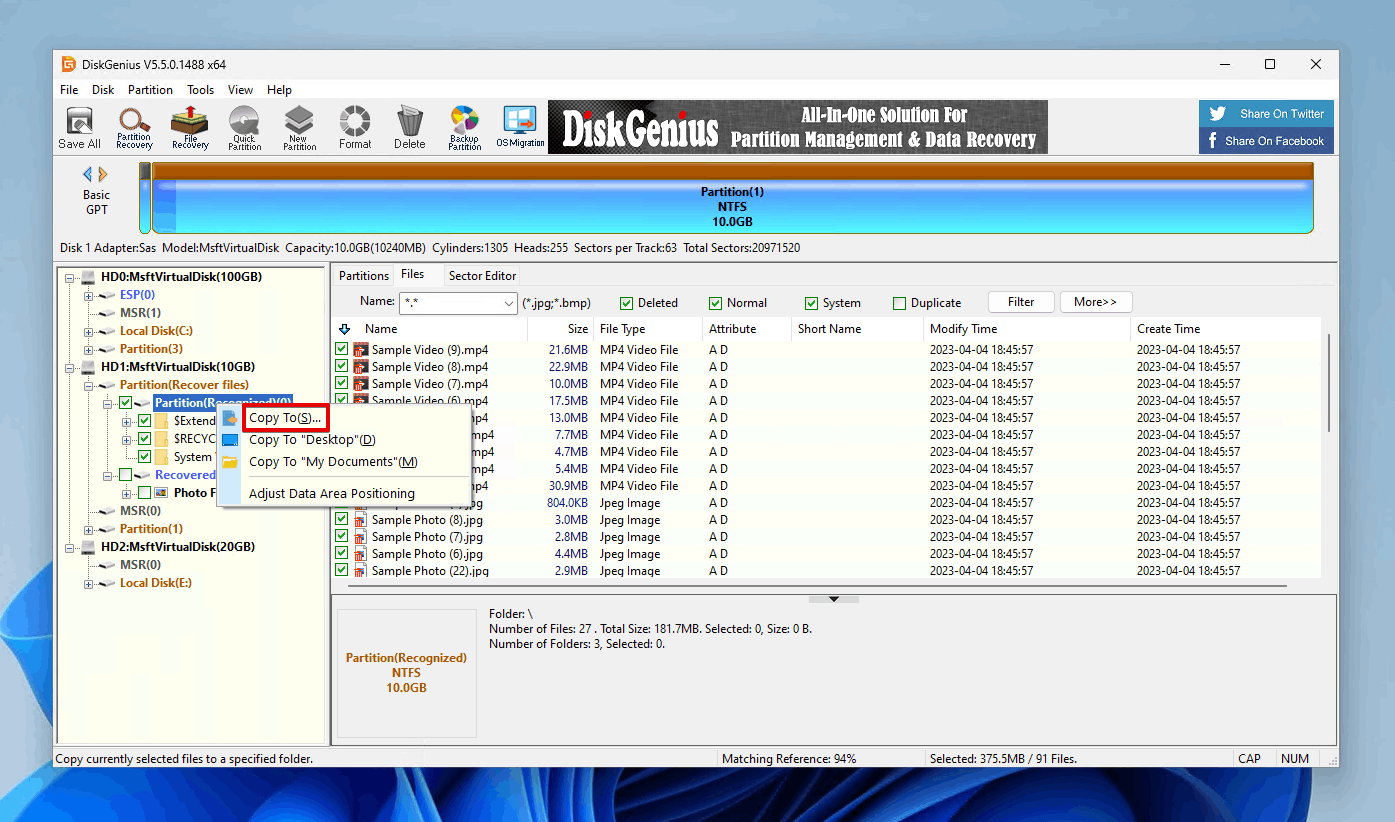
- Select a recovery location.
Additional Methods to Recover Uninitialized Disk
After recovering your data, you can start implementing fixes to recover the uninitialized disk. We’ve included three proven solutions below that can help get your uninitialized disk back up and running.
Method 1: Reconnect the Hard Drive to Your PC
The hard drive may be appearing uninitialized due to a loose connection, especially with external hard drives. In order to recover data from an external hard drive that is not initialized, the hard drive must at least be visible in Disk Management and read the correct size.
If your internal hard drive is the issue, try reconnecting it to the motherboard. If it’s your external hard drive, try connecting it to a USB port on your motherboard rather than the case. You can also try replacing the cables.
Method 2: Restore Partition Tables to Fix an Uninitialized Hard Drive
Restoring your partition table may be enough to fix the issue with your uninitialized hard drive. Your partition table is stored in the boot sector. If your boot sector becomes damaged, you won’t be able to access your disks like normal. FAT32 and NTFS file systems carry a backup of the boot sector which you can restore using TestDisk, a partition recovery tool. If you recover a not initialized hard drive using TestDisk, there’s a chance that you will recover the deletion partitions along with it.
Here’s how you restore the partition table using TestDisk:
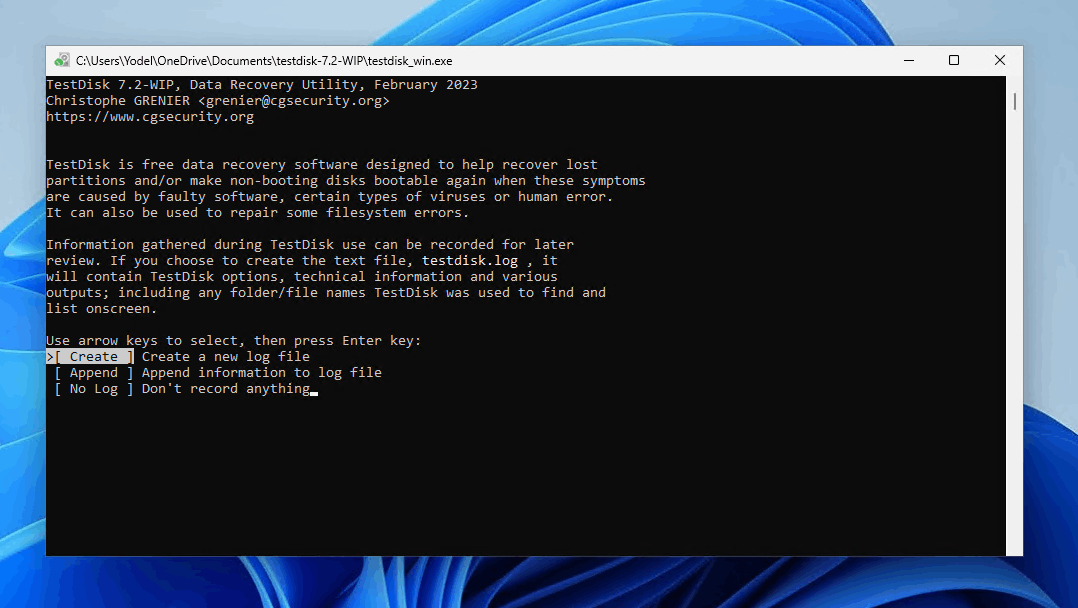
- Download and unzip TestDisk. Open testdisk_win.
- Select Create and press Enter.
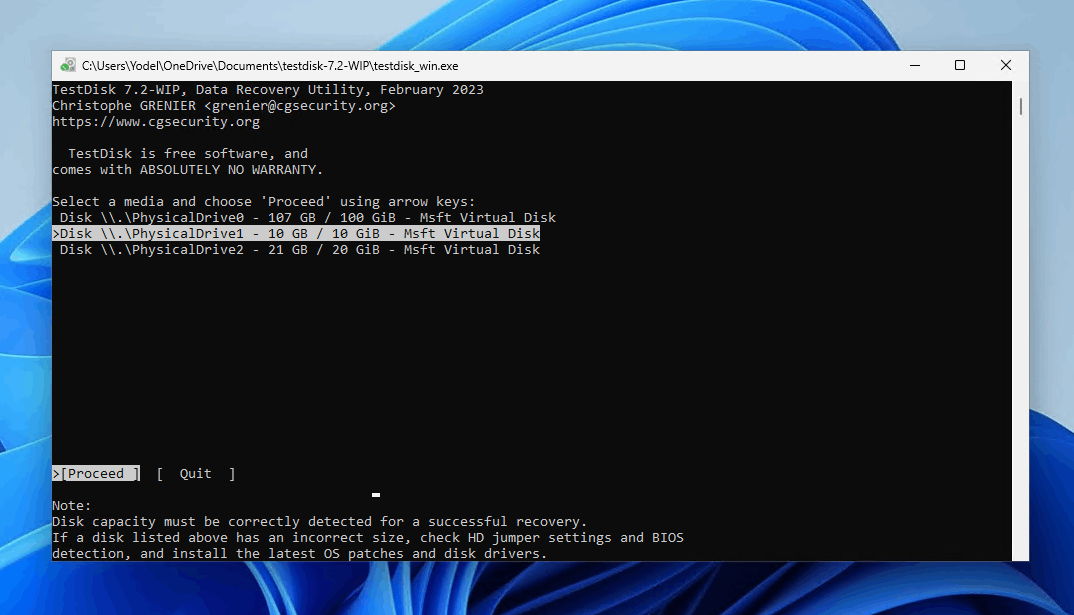
- Select the uninitialized disk and press Enter.
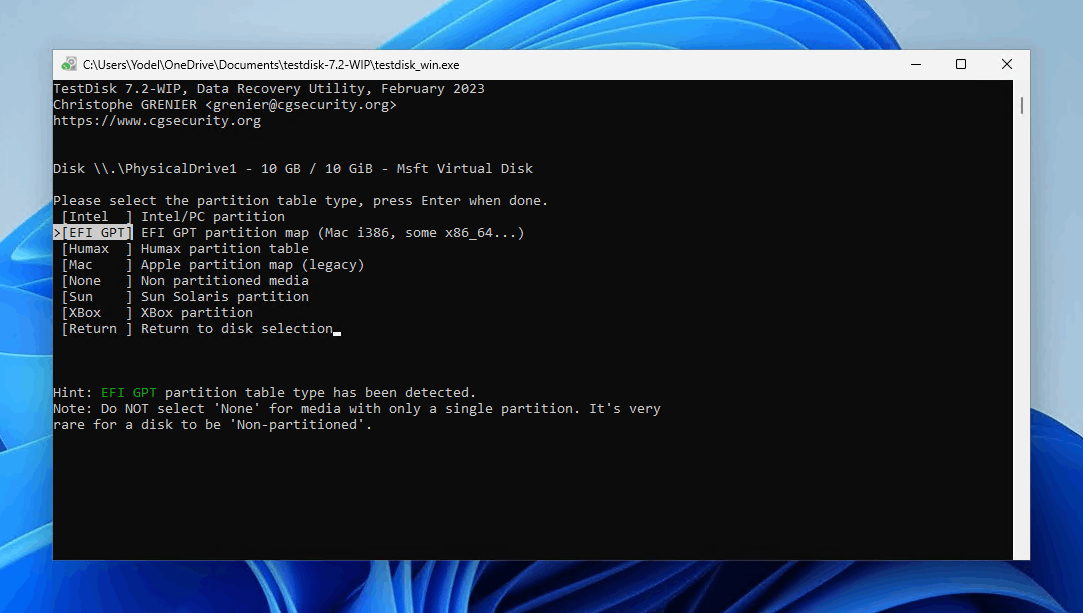
- Select the partition table type and press Enter.
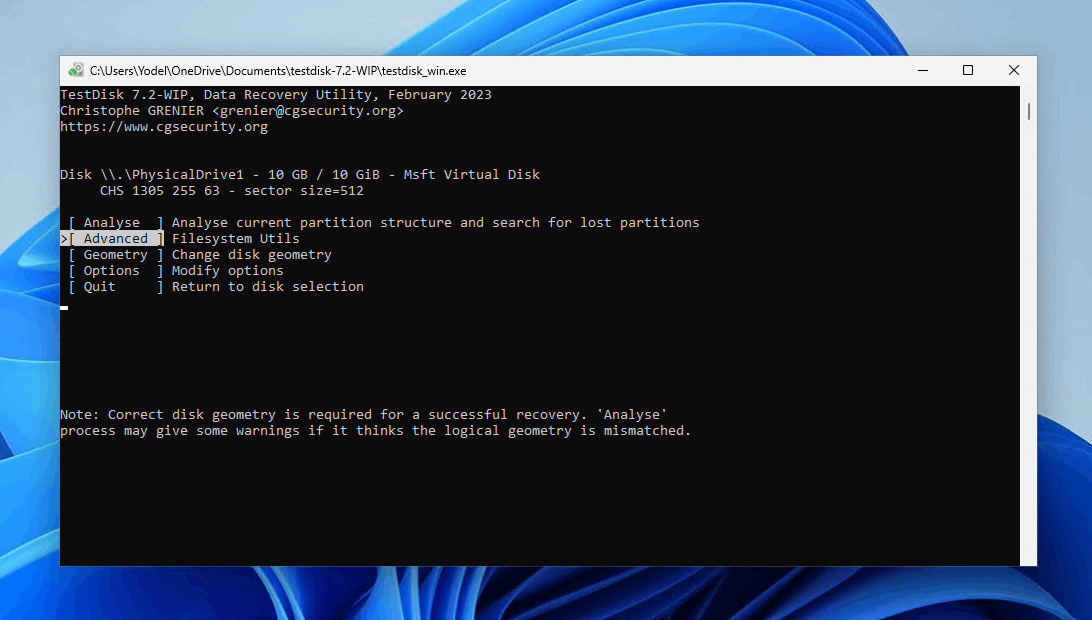
- Select Advanced and press Enter.
- Select the partition, then choose the Boot option. Press Enter.
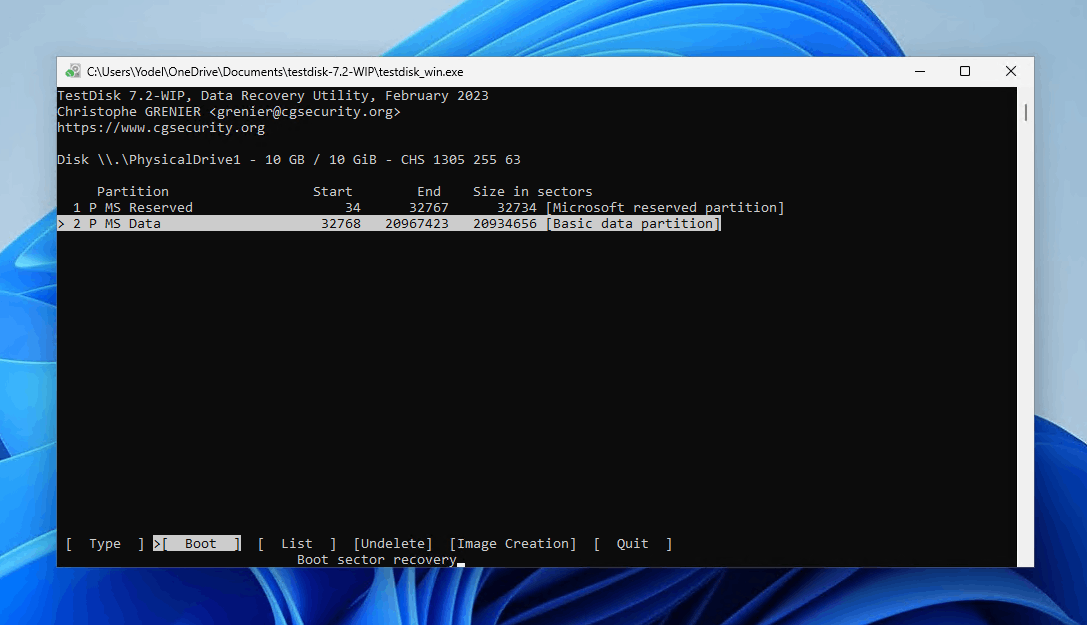
- Select BackupBS and press Enter.
- Confirm the choice
- Quit TestDisk and restart your computer.
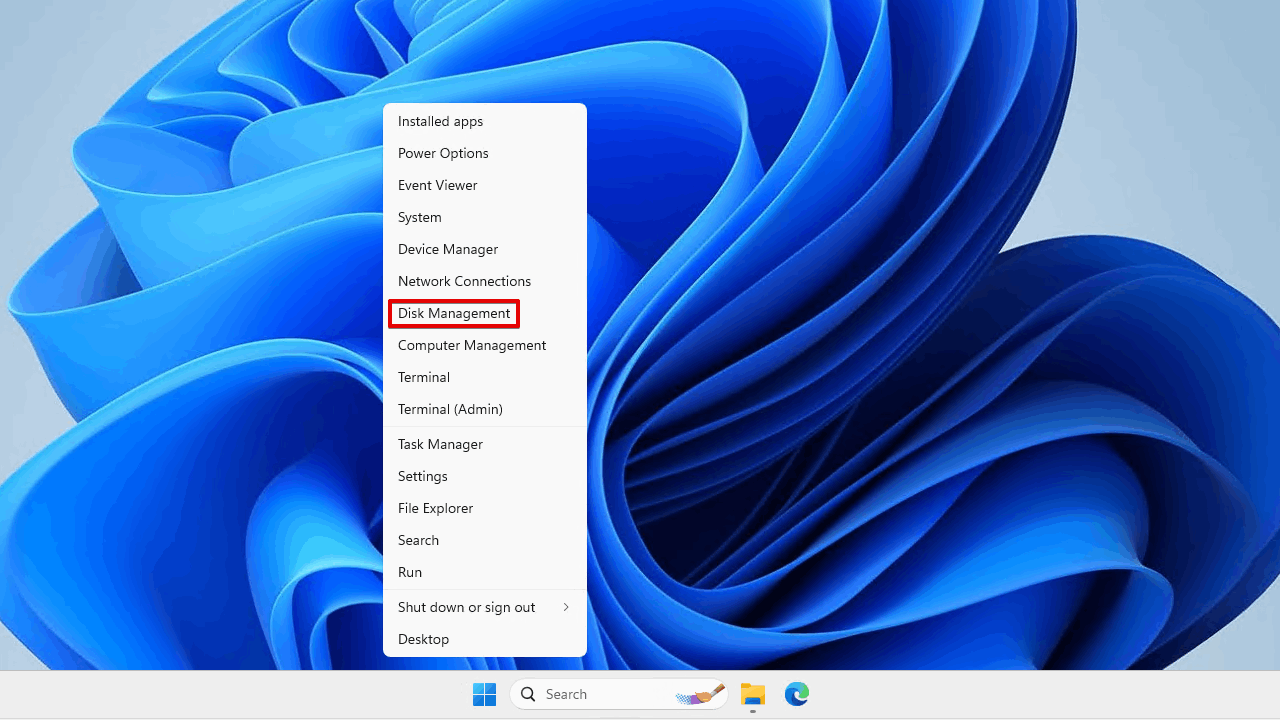
Method 3: Initialize Your Hard Drive in Disk Management
Of course, you can simply get your hard drive up and running again by initializing it. Initializing the disk again will not restore the data that was once there. Instead, it will allow you to format the volume with a file system so you can store data on it once again.
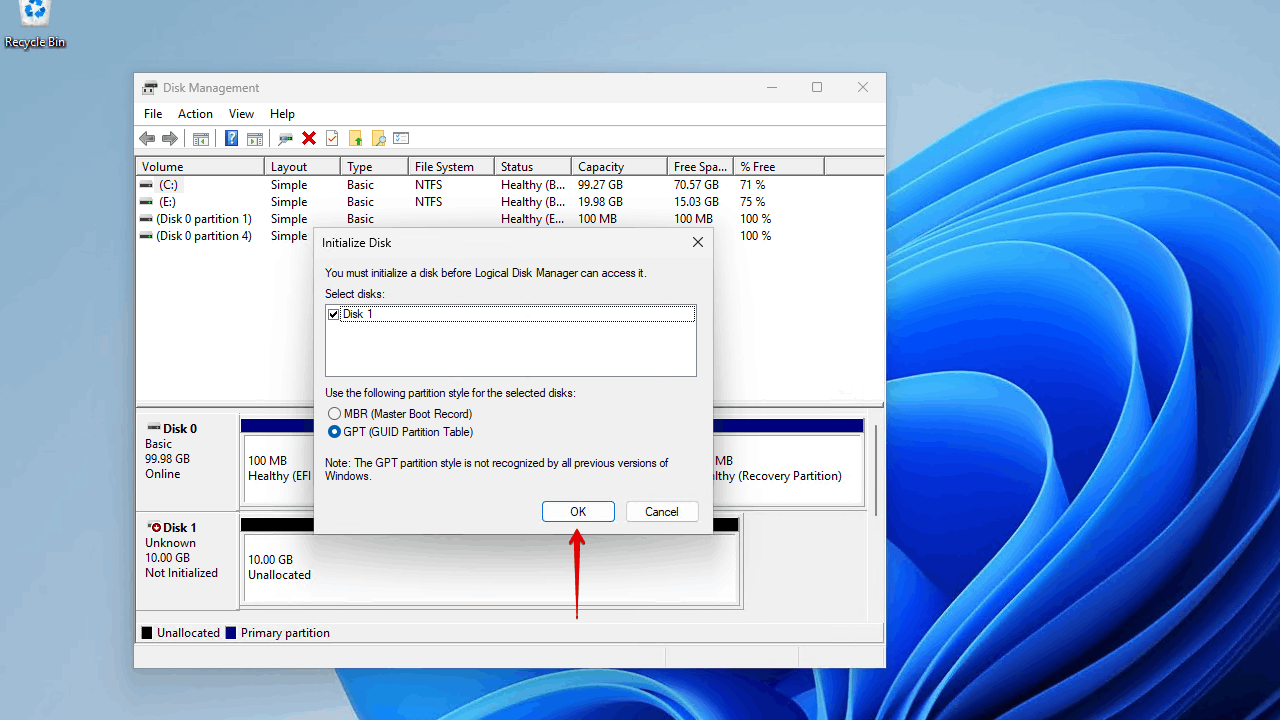
- Open Disk Management.
- When opened, you will receive a prompt asking you to select a disk to initialize (e.g. Disk 0, Disk 1). Click OK after selecting the partition style you want to use.
- Right-click the volume and click New Simple Volume.
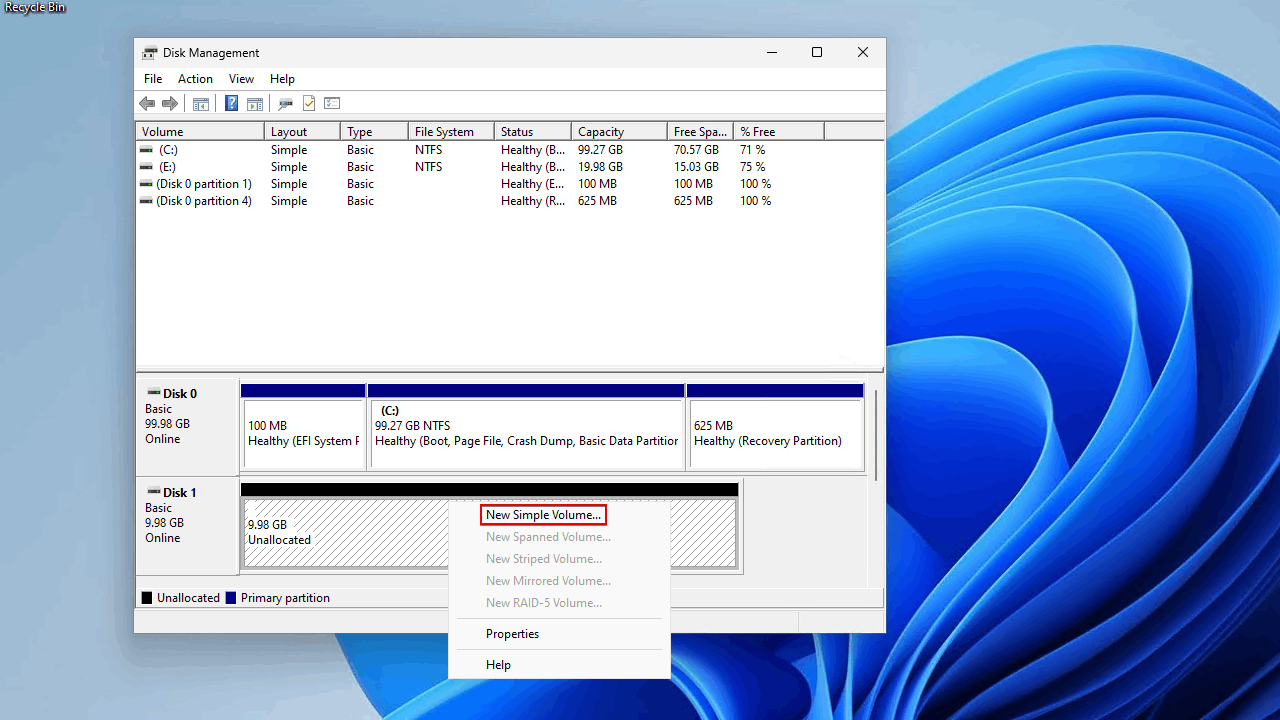
- Follow the on-screen instructions.
Frequently Asked Questions
How to reinitialize a hard drive without losing data?
The best way to reinitialize a hard drive without losing data is by recovering the data first. You can do this with a data recovery tool like Disk Drill:
- Download and install Disk Drill.
- Select your uninitialized disk from the list of storage devices.
- Begin the Disk Drill scan.
- Review and select the files you want to recover from the uninitialized disk.
- Select a safe location to store the files, then recover them.
Will I lose my data if I initialize a disk?
Yes, initializing the disk will require the volume to be formatted. If you had data on the drive before it become uninitialized, perform data recovery first and then initialize it.
Should I initialize with MBR or GPT?
It really comes down to the size of the drive. MBR is intended to be used with disks up to 2 TB. Anything above 2 TB will not be usable with MBR. If you have a hard drive that is above 2 TB, use GPT.
How to format an uninitialized hard drive?
Follow these steps to format an uninitialized hard drive:
- Right-click Start and click Disk Management.
- Select the partition style you want to use and click OK.
- Right-click the unallocated space and click New Simple Volume.
- Follow the instructions to create a new volume and format it.
If you have a hard drive and can’t format it because it still contains data, be sure to perform data recovery first. For those with an external hard drive, you can check out our guide on how to recover data from an external hard drive without formatting.
Conclusion
When your disk becomes uninitialized, you won’t be able to access the files stored on it. You should perform data recovery using a data recovery tool like Disk Drill or DiskGenius as soon as possible. Once your data is recovered, you can troubleshoot the disk and resolve the problem by reconnecting the hard drive, restoring the partition table with TestDisk, or simply reinitializing the disk.
- 46 publishings
- Auckland, New Zealand
Jordan Jamieson-Mane is a content writer with a focus on technology-related content. He has spent much of his life studying and working with all types of technology. During his time as a writer, he has written countless articles in the field of data recovery, breaking down complex topics into articles that are easy to understand.
When he's not writing articles on data recovery, Jordan enjoys traveling the world, reading books, and building websites.
- LC Tech FILERECOVERY Professional Review – Can It Compete with Modern Recovery Tools?
- UFS Explorer Review – A Powerful Recovery Tool With Lots to Offer
- Cisdem Data Recovery for Windows Review – A Capable Copy
- AnyRecover Data Recovery Review – A Polished Solution for Basic Users
- iBoysoft Data Recovery Review: Not Much to Offer
- Frisco, Texas, United States
Yevgeniy Tolkunov is Hardware Engineer at ACE Data Recovery. Yevgeniy has a Master's Degree in Physics, Information Technology; 15+ years of experience.