How to Fix a Corrupted Hard Drive on a Windows PC
Has your hard drive become corrupted and your files inaccessible? Don’t let the fear of losing them permanently paralyze you! Using the tools and techniques described in this article, you can quickly fix hard drive corruption even if you’re just a regular Windows PC user.
Signs of Hard Drive Corruption
Before we explain what it takes to fix a corrupted hard drive, let’s dive into the most common signs of hard drive corruption to help you understand what’s going on behind the scenes:
Signs of HDD corruption | Likely causes | Recovery chances |
File system appears to be RAW or asks to be formatted | This sign of HDD corruption often appears as a result of a malware infection. That’s because malware may tamper with your files or even damage the file system itself, leading to extensive corruption. Some malware targets critical system files whose corruption can make it impossible for your computer to boot up properly. | Average |
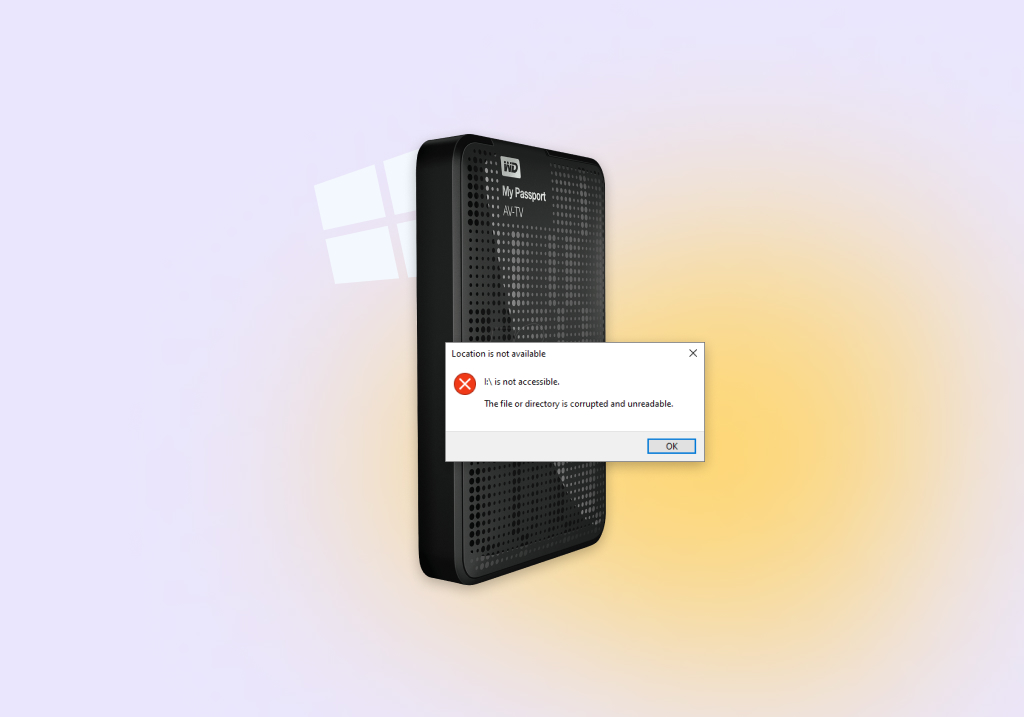
Hard drive is not accessible | Direct physical damage can manifest itself gradually over time by increasingly extensive corruption, but it may also cause the hard drive to instantly become inaccessible. Common causes of this kind of corruption include physical shocks, extreme temperatures, malfunctioning internal components, or bent connectors. | Poor |
Lost or inaccessible files | A power surge caused by a lightning strike or faulty electrical wiring may lead to a sudden shutdown of a computer and the interruption of running read/write processes, which is one of the most common reasons behind data corruption and the inability to find or open files. | Average |
The presence of bad sectors on the disk | According to Backblaze, an American cloud storage and data backup company, a reasonable estimate of the median life expectancy for hard drives is six years and nine months. By using a hard drive past its expected lifespan, you risk the accumulation of bad sectors on the disk. | Good |
Performance slowdown | Your hard drive plays a huge role in how snappy your Windows PC is. A corrupted hard drive with bad sectors, file system errors, or, for example, malware, often negatively impacts the performance of the entire computer, causing noticeable slowdowns. | Good |
You get BSOD and other error messages | There are several ways user errors can lead to BSOD and other error messages. For example, users can misconfigure their Windows PC, install unknowingly install malicious software or poorly written drivers, accidentally delete important system files, or improperly remove a connected external hard drive while it’s still in use. | Good |
How to Check If the Hard Drive Is Corrupted
The above-described signs of HDD corruption can fairly reliably indicate if your hard disk is corrupted, but there’s an even better way to check if the disk structure is corrupted and unreadable, and its name is Self-Monitoring, Analysis, and Reporting Technology (or S.M.A.R.T. for short).
In many ways, S.M.A.R.T. works just like the On-Board Diagnostics (ODB) interface that enables modern cars to report the status of the various vehicle sub-systems. The technology constantly records and monitors a wide range of attributes to evaluate hard drive health. The monitored attributes include:
- Read error rate
- Throughput performance
- Spin-up time
- Reallocated sectors counts
- Seek error rate
- Reported uncorrectable errors
There’s a certain threshold value associated with each S.M.A.R.T. attribute. When the threshold value is crossed, your hard drive is likely to become corrupted or even fail completely.
To get a quick overview of your current S.M.A.R.T. status, you can do the following:
- Open Windows 10/11 Terminal or CMD. To do this, open the Start menu, type windows terminal or cmd, and select the corresponding search result.
- Type wmic and press Enter.
- Type diskdrive get status and press Enter.
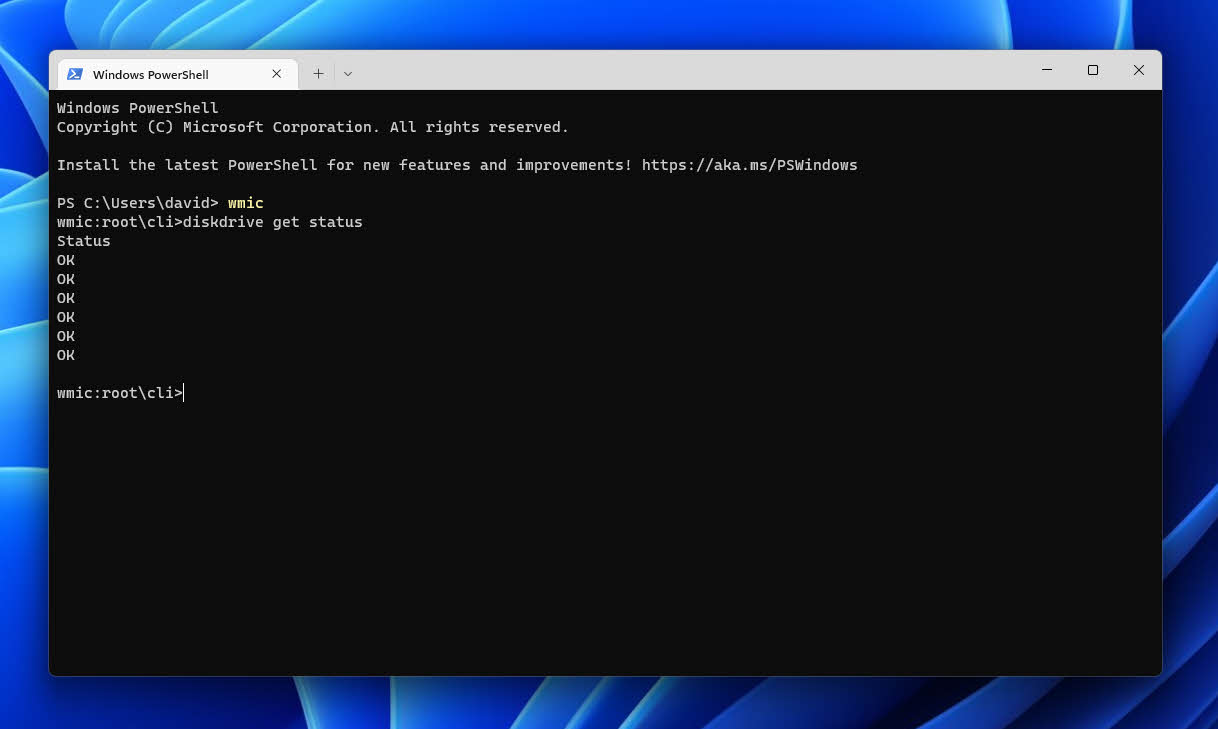
One of four possible self-explanatory results will be displayed: “OK,” “Bad,” “Caution,” or “Unknown.”
If you would like to see a detailed breakdown of each S.M.A.R.T. attribute, then you should use a hard drive diagnosis utility like CrystalDiskInfo. This specific utility is completely safe, and it works with HDDs, SSDs, and Intel RAIDs. Just know that it won’t help you repair a corrupted hard drive—but the hard drive repair software described later in this article will.
How to Retrieve Data from a Corrupted Hard Drive
The biggest problem with fixing a corrupted hard drive is that corruption often becomes worse the more the hard drive is used.
That’s why we strongly recommend you create a full byte-to-byte backup of the corrupted hard drive first. You can then use hard drive data recovery software to recover lost data from the backup image to avoid scanning the corrupted hard drive directly. Once your data is recovered, you can move on to fixing the drive without having to worry about it failing completely.
Let’s take a look at two software applications that make it easy to back up a corrupted hard drive and recover lost data from the backup image. We’ve selected the applications below based on our extensive multi-day data recovery software tests, which take into consideration a wide range of factors, including recovery performance, features, value, and usability.
Option A: Disk Drill
Disk Drill is our favorite software to retrieve data before fixing a corrupted hard drive. Even though it has been a while since we first reviewed it, it still ranks as the best data recovery app for Windows and macOS alike.
Here’s why we can wholeheartedly recommend it as a corrupted hard drive recovery solution to Windows users:
- Ability to recover data from a corrupted hard drive. Disk Drill can recover data even from corrupted hard drives that trigger various error messages (such as “You need to format the disk in drive before using it”) or have become RAW (don’t have a file system). This means that you can avoid formatting and greatly increase your data recovery chances.
- Ready to recover all kinds of storage devices. Disk Drill can scan all main file systems supported by the Windows operating system (NTFS, FAT32, exFAT), allowing you to recover any corrupted internal or external Windows hard drive.
- Ease of use. Recovering data from a corrupted hard drive on a Windows PC with Disk Drill is just as easy as recovering data from a healthy drive thanks to the application’s intuitive user interface with numerous scan results filters and a convenient step-by-step recovery process. With the free version of Disk Drill, you can get back up to 500 MB of data.
- Extra tools included for free: Disk Drill can read S.M.A.R.T. data of all connected hard drives that support the feature, so you can use it to verify if corruption is really the cause of your problems. It can also create full byte-to-byte backups, making it easy to minimize the use of the corrupted drive when recovering lost data.
Now that you know why Disk Drill is the right tool for the job, let’s take a look at the steps you need to follow to create a complete backup of your corrupted hard drive and then recover lost data from it so that you can later safely fix your corrupted hard disk.
Use Disk Drill to Create a Complete Hard Drive Backup
To create a complete hard drive backup with Disk Drill in order to fix a corrupted hard drive without any risk of data loss:
- Download Disk Drill from its official website.
- Install the data recovery software on a non-corrupted storage device.
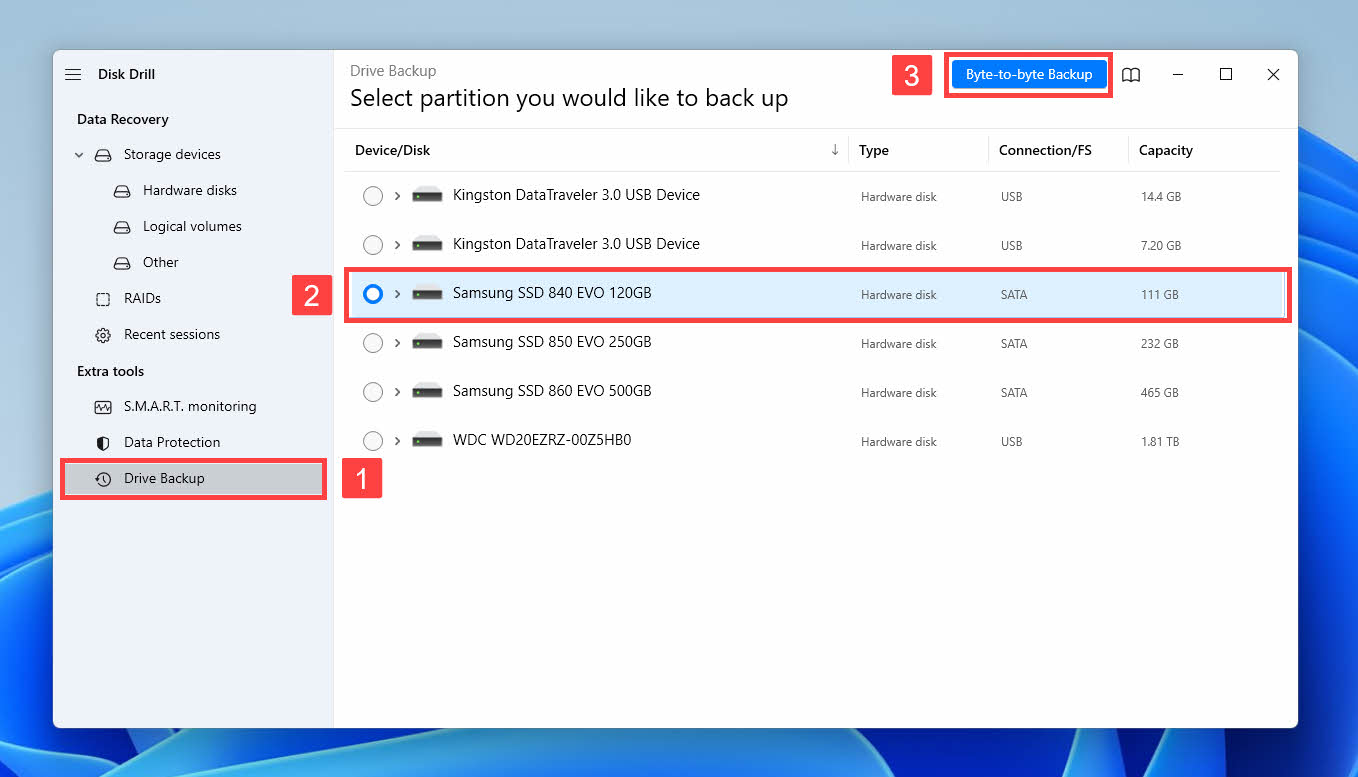
- Launch Disk Drill and choose the Drive Backup tool from the left pane.
- Choose the corrupted hard drive from the list of available storage devices.
- Click the blue Byte-to-Byte Backup button in the top-left corner.
- Click the three horizontal dots next to Path and tell Disk Drill where it should store the hard drive backup image. Click OK to start.
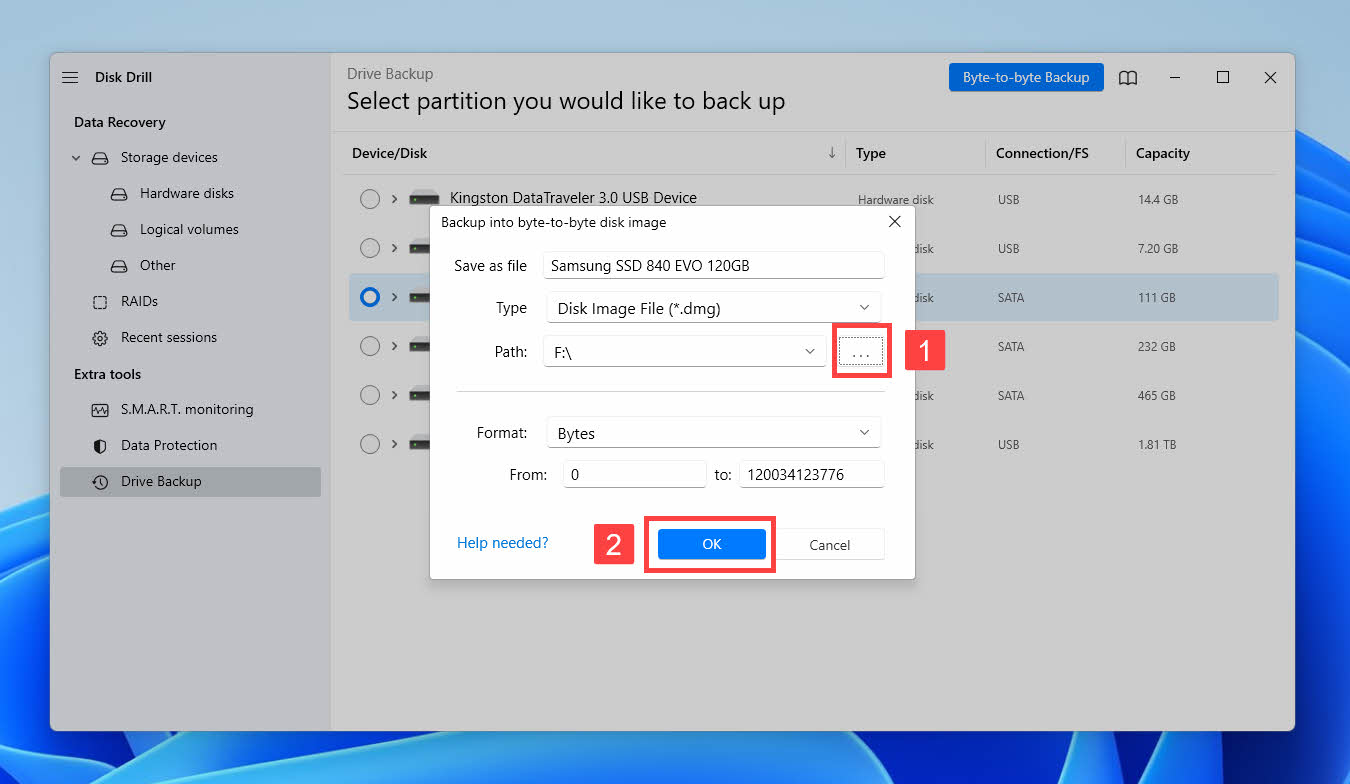
- Wait for the backup image to be created.
Use Disk Drill to Recover Lost Data from the Backup
To recover lost data from your newly created backup, you need to do the following:
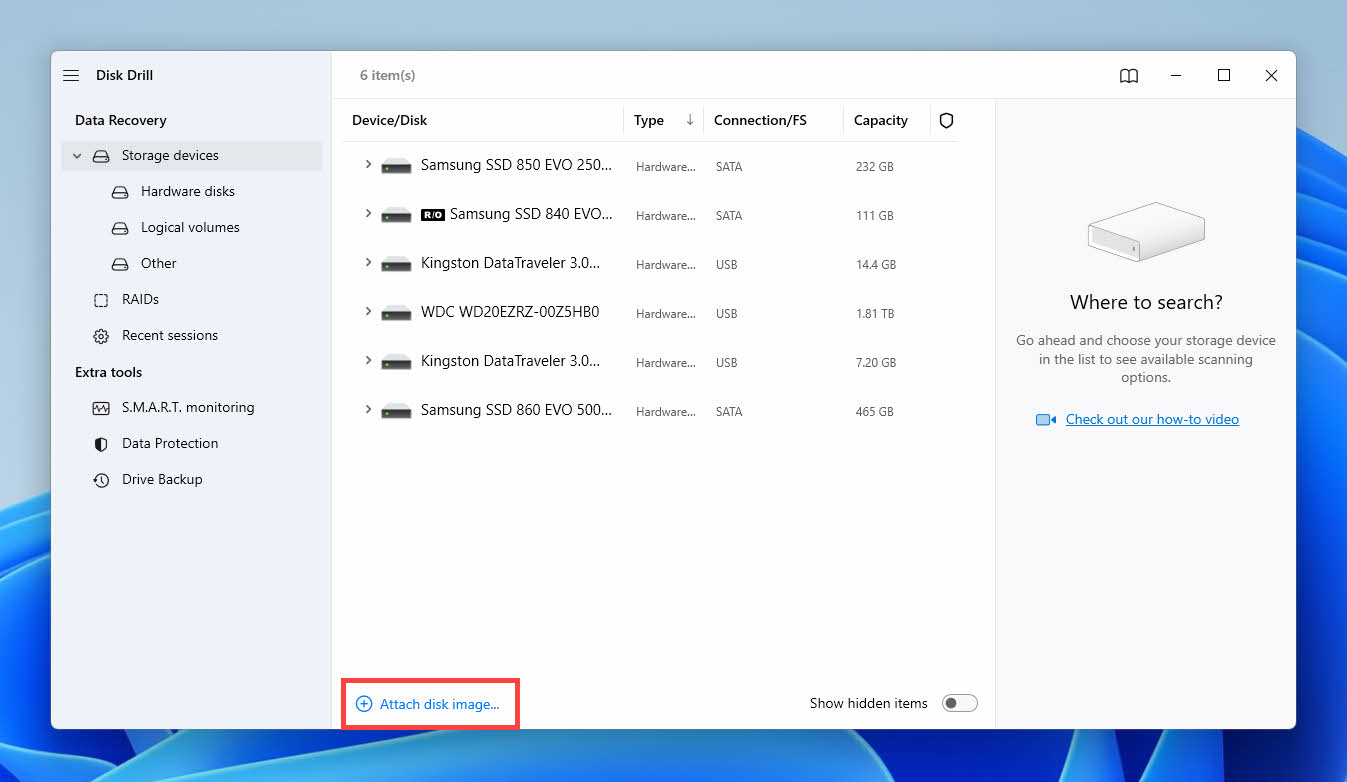
- Launch Disk Drill and make sure the Storage devices tab is selected. You can find it in the left pane. This tab lists all connected storage devices, and it displays the type, connection, and capacity of each device.
- Click the Attach disk image button below the list of available storage devices. Disk Drill can mount a number of disk image formats, including dmg (which Disk Drill for Windows uses by default when backing up storage devices), raw, dd, img, iso, dsk, bin, dat, vmdk, vhd, and vhdx.
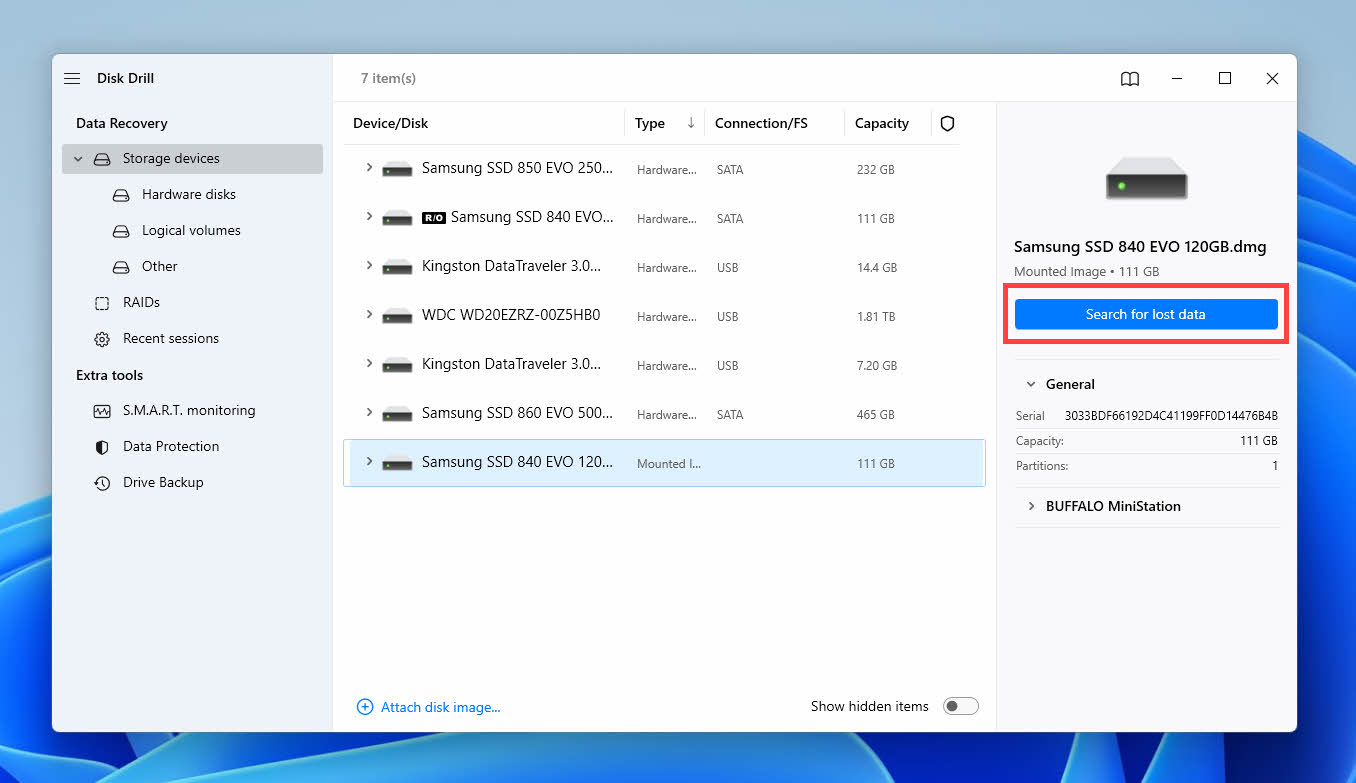
- Select the backup image of your corrupted hard drive and click Open. You can now choose the backup image from the list of available storage devices and click Search for lost data.
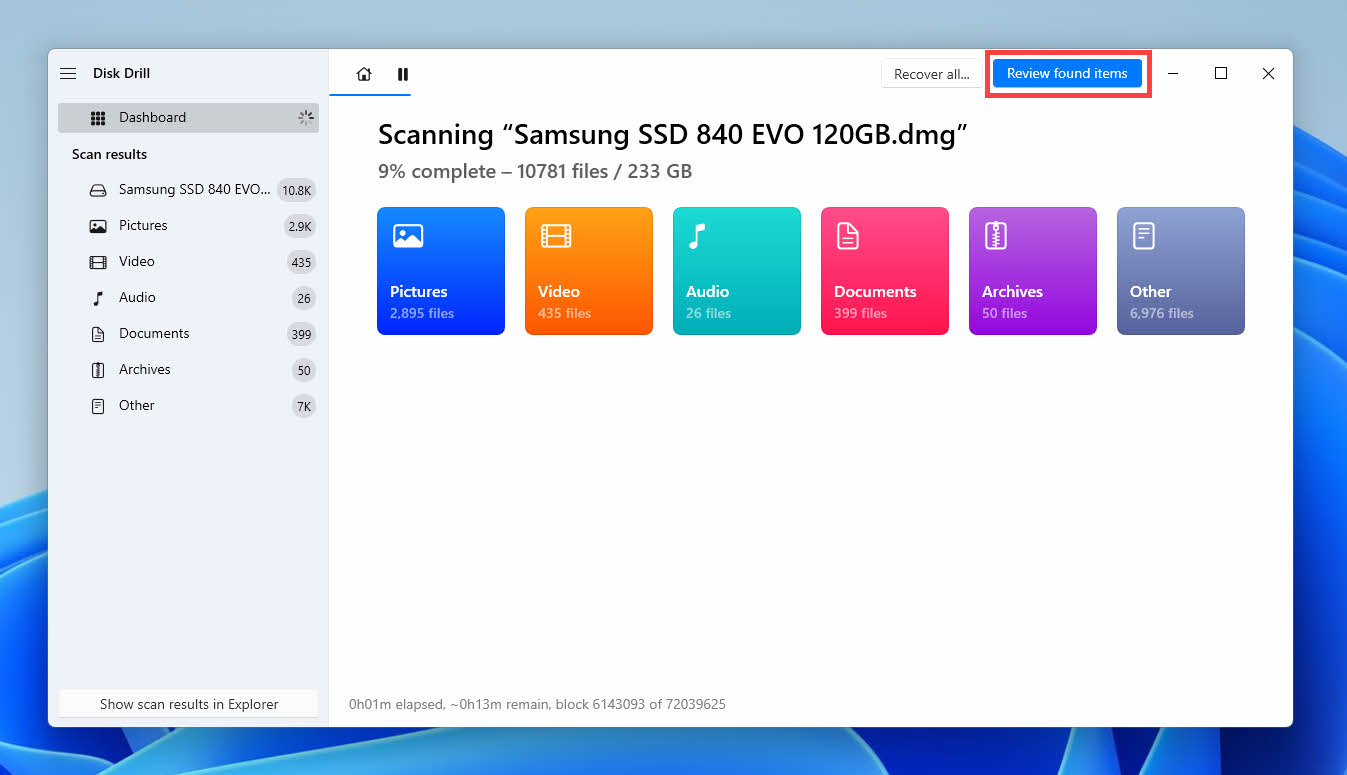
- Wait until Disk Drill finishes scanning the backup image. As you wait, Disk Drill will display a detailed progress report, telling you exactly how many pictures, videos, audio files, documents, archives, and other data it has found. You can pause the scan at any moment to free up system resources if you need to use your computer for other things. Alternatively, you can click Review found files and see recoverable files immediately.
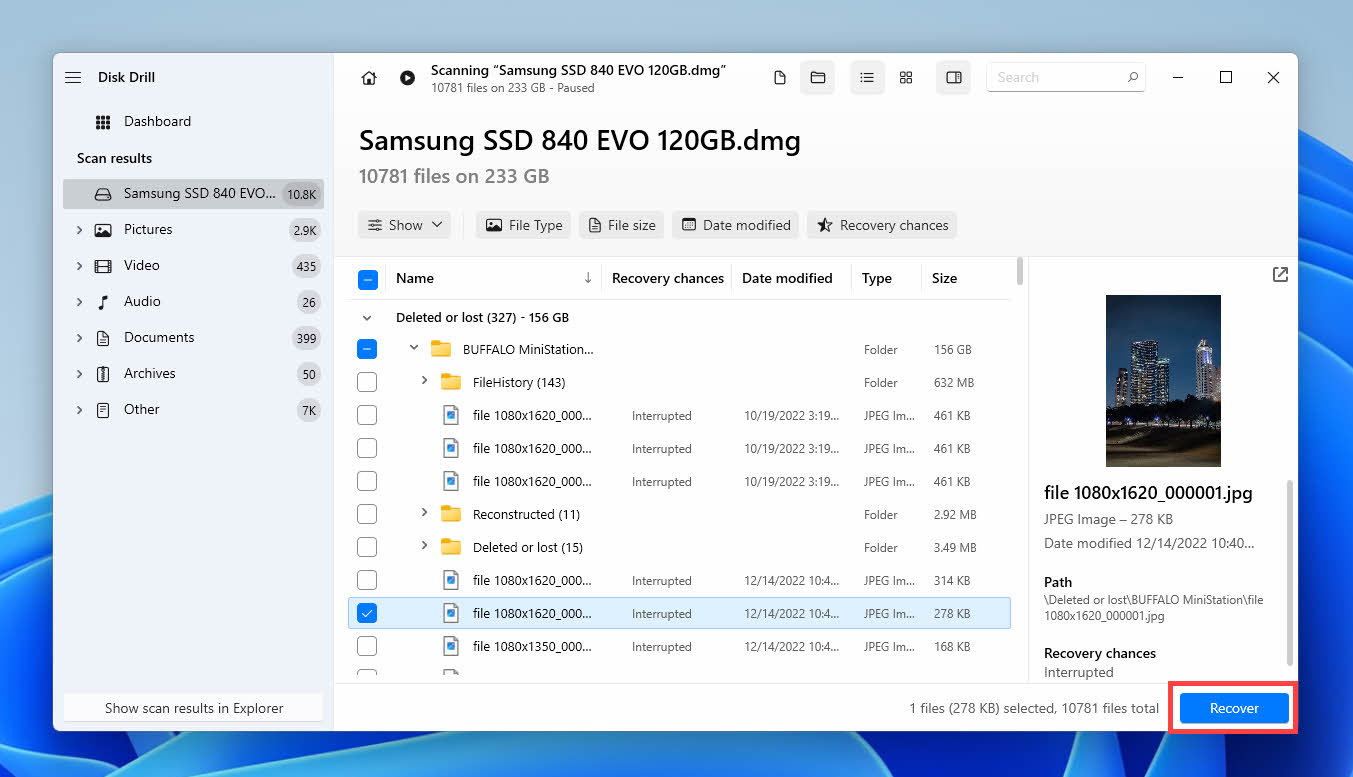
- Proceed to review found files and add those you would like to recover to the recovery queue by clicking the checkboxes next to them. Take advantage of Disk Drill’s filters and preview capabilities to find what you’re looking for.
- Click the Recover button and tell Disk Drill where you want it to recover the files you’ve selected. Finally, finish the recovery process and review the recovered files by manually opening them using File Explorer.
Option B: DiskGenius
It’s always good to have more than one data recovery option to choose from just in case you don’t achieve the desired results with the first solution. As an alternative to Disk Drill, we’ve decided to pick DiskGenius.
Let’s take a look at some of the reasons why DiskGenius is a solid alternative to Disk Drill:
- Impressive value for money. Even though its review score is far from perfect, the application does offer a great bang for your buck thanks to its lifetime licenses.
- Detects and fixes bad sectors. DiskGenius supports all features you need to safely recover lost data from a corrupted hard drive. Namely, it can scan your disk for bad sectors and fix them—a truly useful feature when working with corrupted hard drives.
- Hard drive cloning capabilities. Just like Disk Drill, DiskGenius can create byte-to-byte backups of corrupted hard drives. You can then mount the resulting backup image and scan it instead of the corrupted hard drive to minimize its wear and tear.
Just know that the free version of DiskGenius is far more limited than the free version of Disk Drill because it can recover only files that are 64 KB in size or smaller. Larger files can only be previewed.
Use DiskGenius to Create a Complete Hard Drive Backup
Let the following steps help you create a complete hard drive backup using DiskGenius to recover lost data and fix hard drive corruption without risking anything:
- Download DiskGenius from its official website and install it on a non-corrupted storage device.
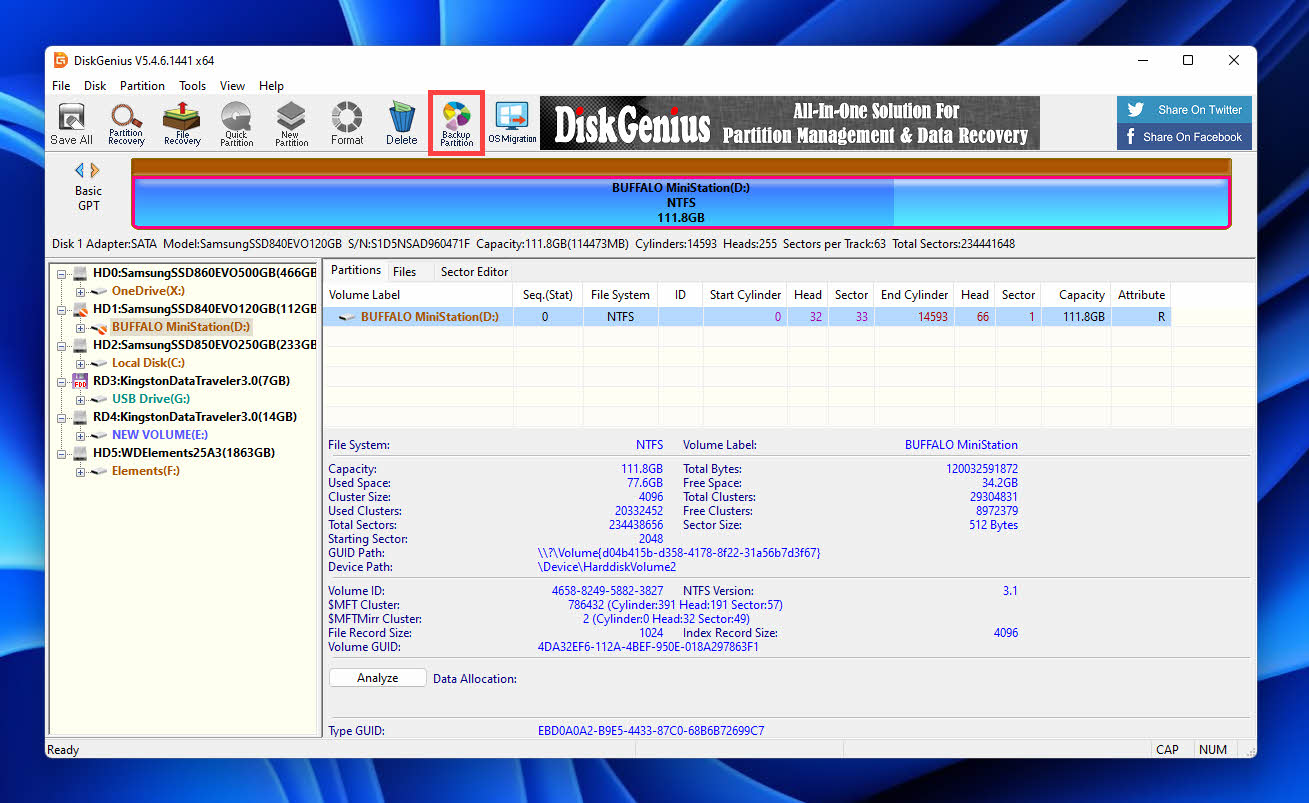
- Launch DiskGenius and select the corrupted hard drive.
- Click the Backup Partition button in the top toolbar.
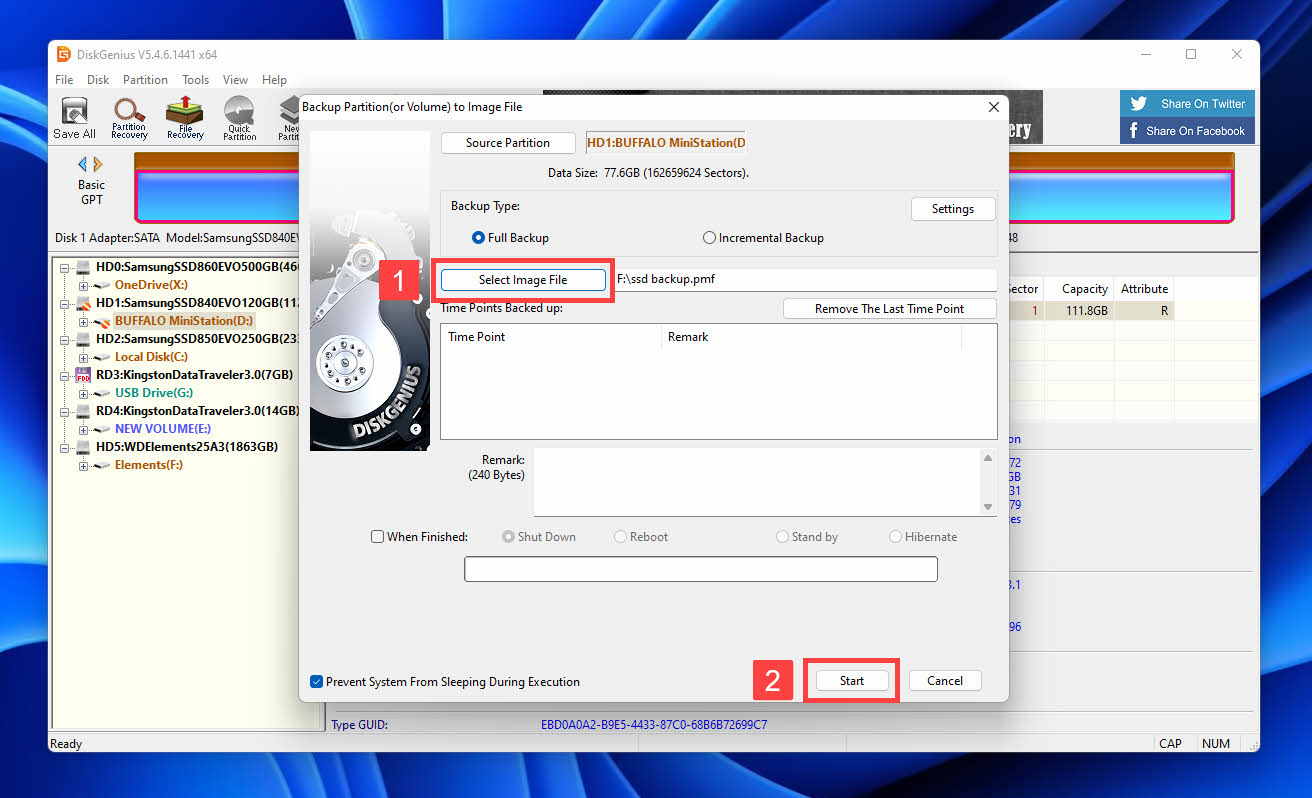
- Make sure the Full Backup option is selected.
- Click the Select Image File button and tell DiskGenius where it should save the backup image.
- Click the Start button and wait for the backup image to be created.
Use DiskGenius to Recover Lost Data from the Backup
Follow these steps to recover lost data from your backup image using DiskGenius:
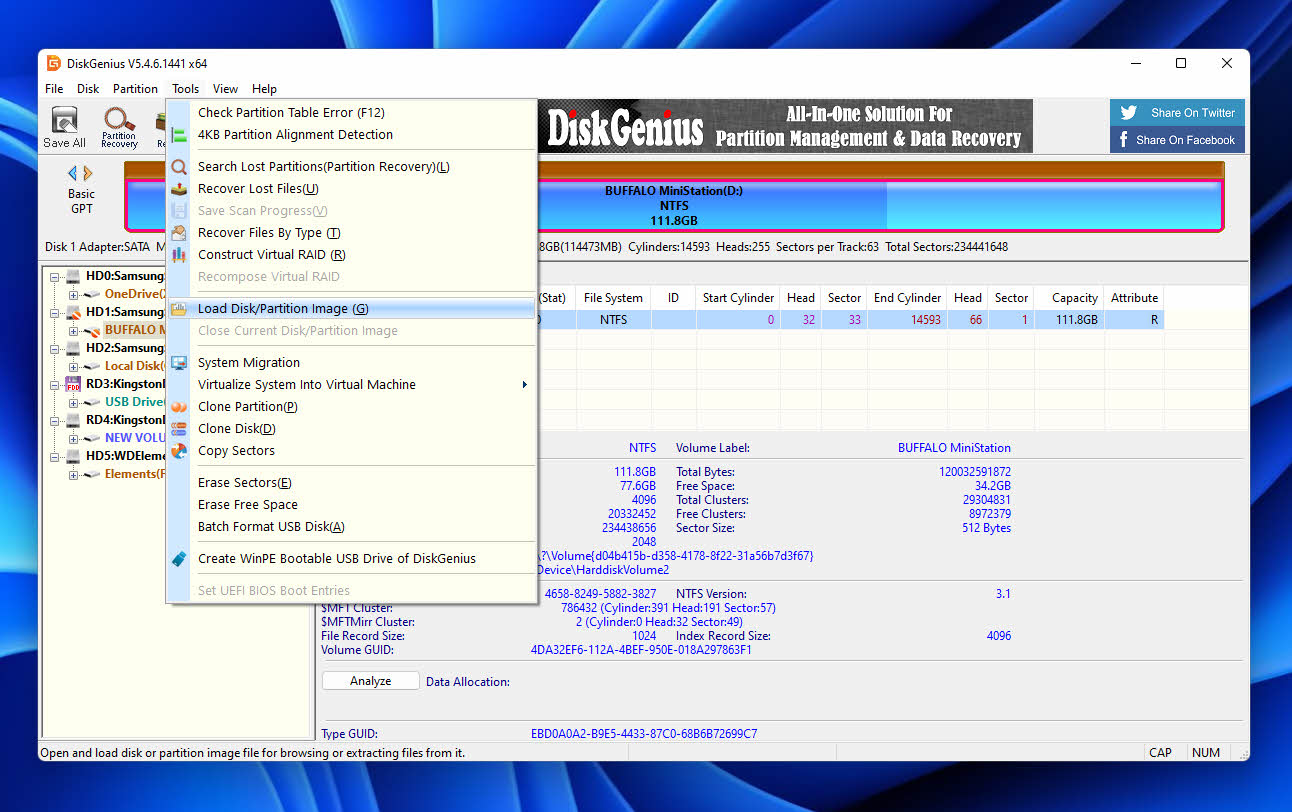
- Launch DiskGenius, open the Tools menu, and select the Load Disk/Partition image option.
- Browse to the location where the backup image of your corrupted hard drive is stored, select it, and click Open.
- Specify a time point you want to recover and click Start button.
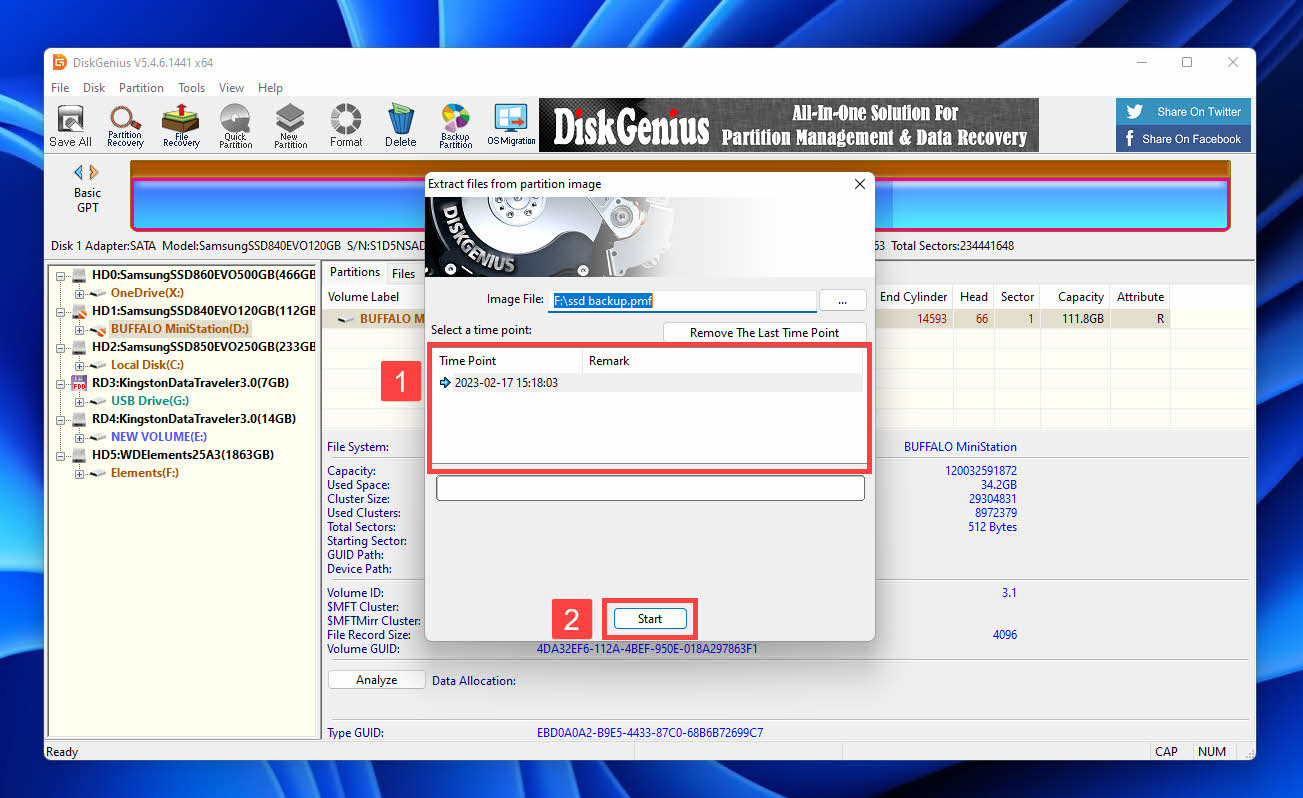
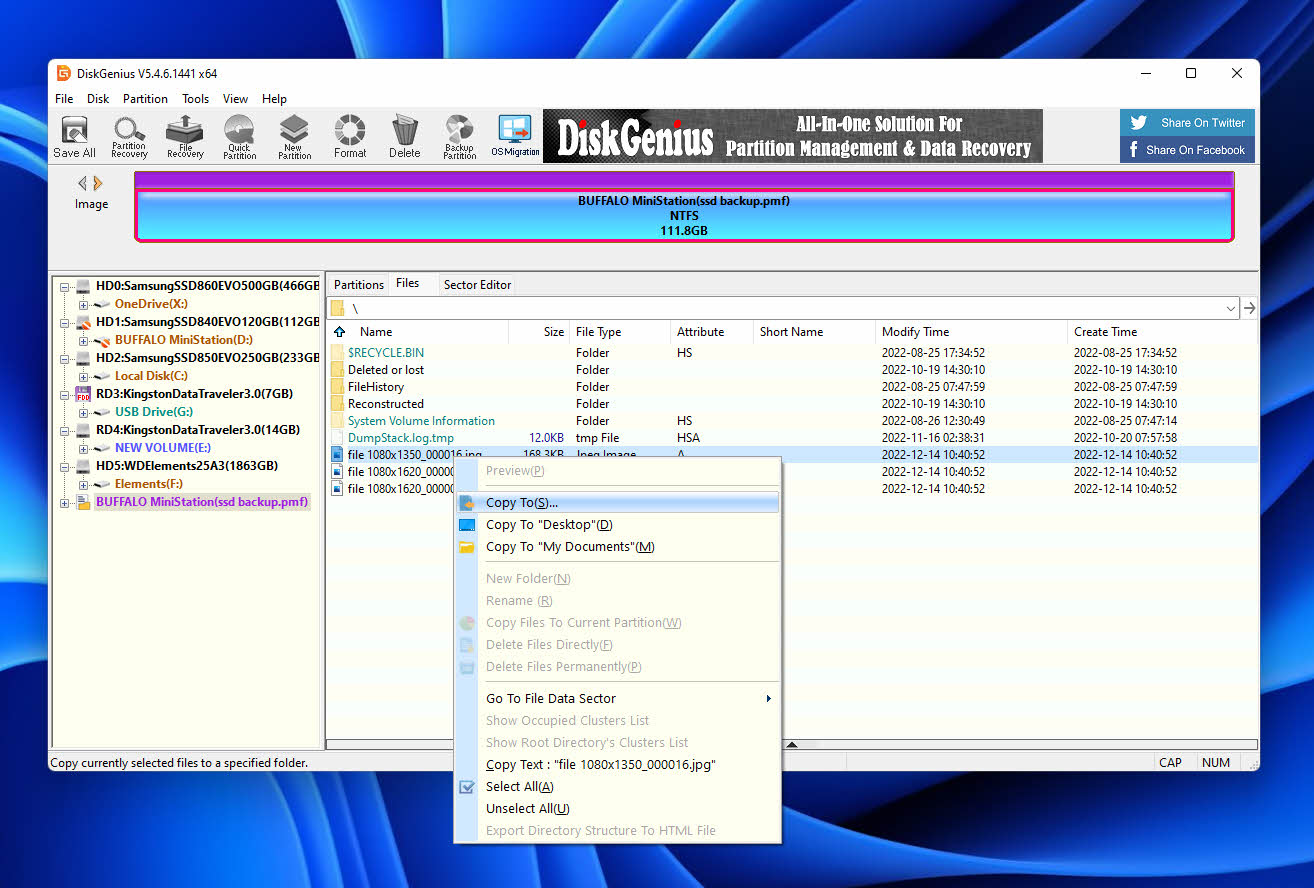
- Choose the files you want to retrieve from the backup image.
- Right-click any of the selected files and use the Copy To option to copy them to a desired location.
How to Fix a Corrupted Hard Drive Without Formatting
Now that your valuable data is safely recovered using Disk Drill or DiskGenius, you can finally start fixing your corrupted hard drive using methods that don’t require you to format it.
Method 1: Use the Error Checking Tool
Because hard drive corruption is such a widespread issue, the Windows operating system comes with a handy Error Checking tool that you can use to effortlessly scan any disk for corruption. If corruption is detected, the tool will attempt to repair it.
- Launch File Explorer. To do this, open the Start menu, type “file explorer,” and select the corresponding search result.
- Navigate to This PC. You can find it in the left navigation pane.
- Right-click the corrupted hard drive you want to scan using the Error Checking tool and select the Properties option.
- Navigate to the Tools tab and click the Check button.
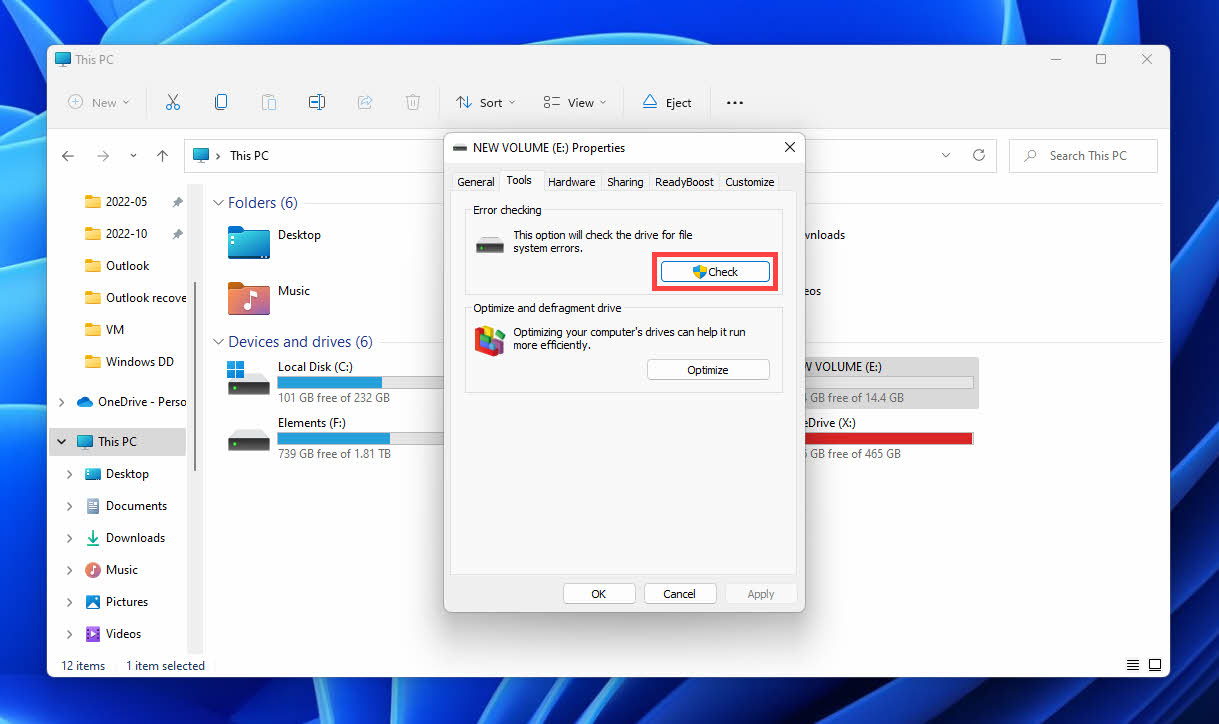
- Confirm your decision to scan the drive and wait for the process to finish.
Alternatively: Repair Corrupted Hard Disk Using CMD (chkdsk)
The Error Checking tool is really just a graphical user interface for chkdsk. Since chkdsk is a self-contained command-line software application, you can also repair your corrupted hard drive using CMD or Windows Terminal. Here’s how:
- Launch CMD or Windows Terminal as administrator.
- Enter the following command and press Enter: chkdsk <drive letter>: /r
- Wait for chkdsk to locate bad sectors and recover readable information.
Method 2: Scan the Corrupted Hard Drive With Anti-Malware Software
As we’ve explained in the introduction to this article, hard drive corruption can occur as a result of a malware infection. If you suspect malware could be the cause of your issues, then you need to scan the corrupted hard drive using capable anti-malware software.
Luckily for you, recent versions of Windows ship with Microsoft Defender, one of the best-rated anti-malware solutions currently available. Here’s what you need to do to scan your corrupted hard drive with it:
- Launch File Explorer. To do this, open the Start menu, type “windows security,” and select the corresponding search result.
- Navigate to the virus & threat protection section.
- Click Scan options.
- Choose to perform a Custom Scan and click Scan now.
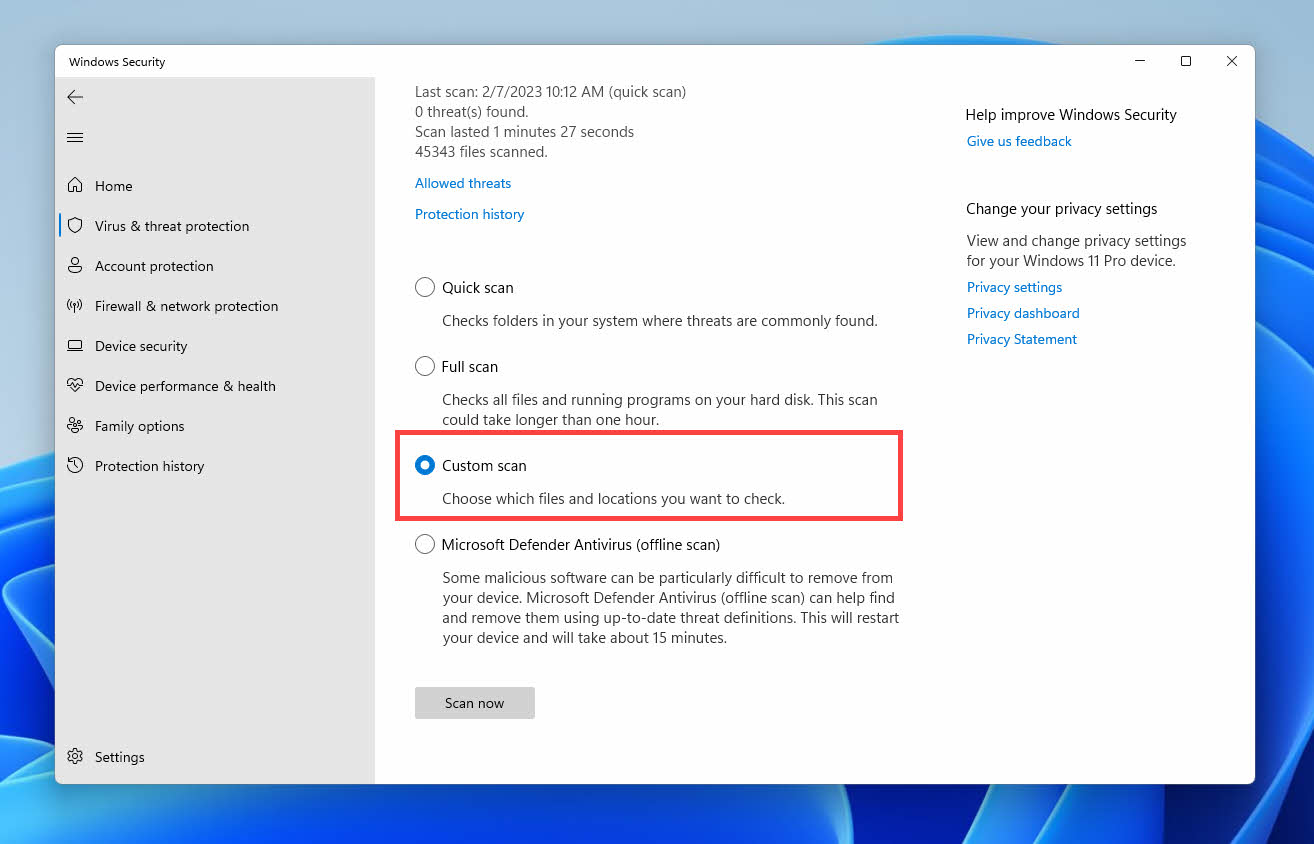
- Select the corrupted hard drive and click Select Folder.
- Wait for Microsoft Defender to finish scanning the corrupted hard drive.
- Review the scan results and follow Microsoft’s recommendations on how to address any detected threats.
Method 3: Fix Corrupted Windows System Files
Have you determined that some Windows system files have become corrupted? Then you need to get your operating system back in shape by replacing them with healthy copies, and that’s exactly what you can do using the following two tools:
- Deployment Image Servicing and Management (DISM): Repairs corrupted system files using a Windows image file.
- System File Checker (SFC): Replaces corrupted system files with their cached copies.
According to Microsoft, the DISM should always be used before SFC to verify the Windows Component Store, which plays a critical role when it comes to Windows updates, among other things. The good use is that you can combine the two tools using a single straightforward command:
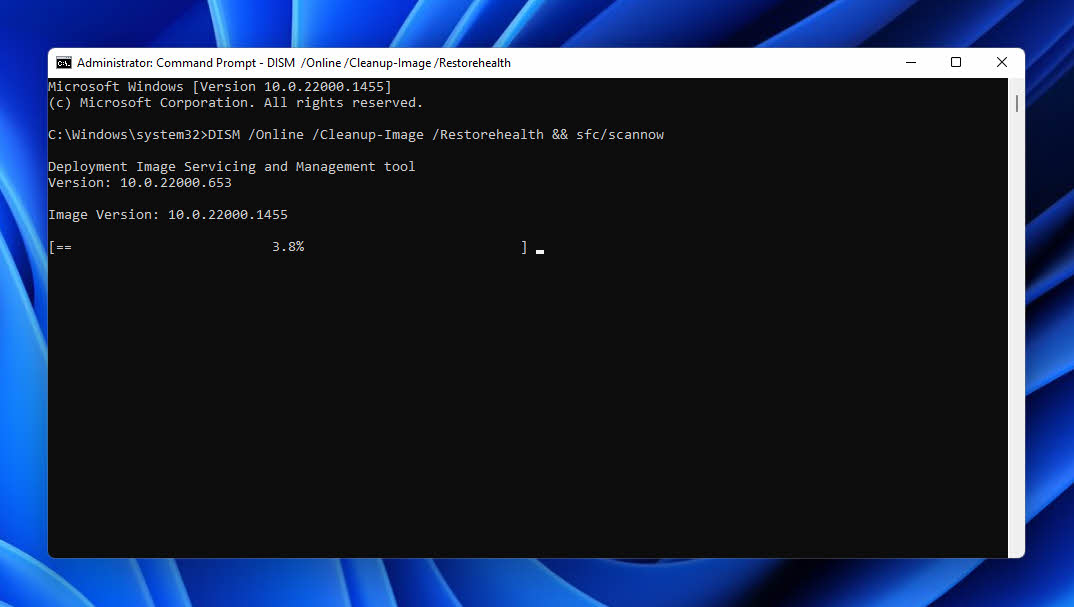
- Launch CMD as administrator.
- Type in the following command and press Enter: DISM /Online /Cleanup-Image /Restorehealth && sfc/scannow
- Wait for DISM and SFC to repair corrupted Windows system files.
Method 4: Remap Bad Sectors on the Corrupted Drive Using a Repair Tool
A hard drive is divided into a large number of sectors. You can think of these sectors as tiny boxes where data can be stored. Just like a real cardboard box can become damaged and useless, hard drive sectors can become corrupted and impossible to store data on. In fact, it’s only a matter of time before some sectors go bad.
Luckily for hard drive users, manufacturers always include some spare sectors to compensate for potential failures. When a sector becomes unusable, the hard drive attempts to automatically remap it, drawing from the pool of spare sectors. While this process should be triggered automatically, you can also trigger it manually using a tool like Victoria SSD/HDD, which can be useful if you don’t want to wait for sectors to really become unusable:
- Download Victoria SSD/HDD from a software hosting service like Softonic (its official website is in Russian).
- Extract the downloaded archive and double-click the Victoria.exe executable.
- Open the Language menu and switch to English.
- Select the HDD you want to remap.
- Open the Actions menu and select the Quick surface scan with graph option.
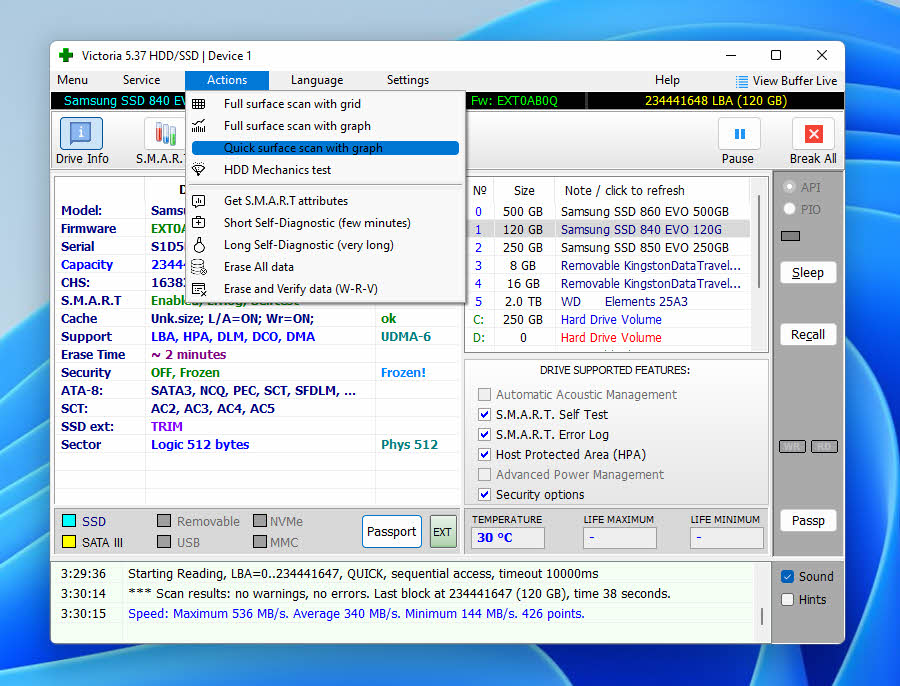
- Wait for the scan to finish.
- Activate the Remap checkbox and click the Scan button.
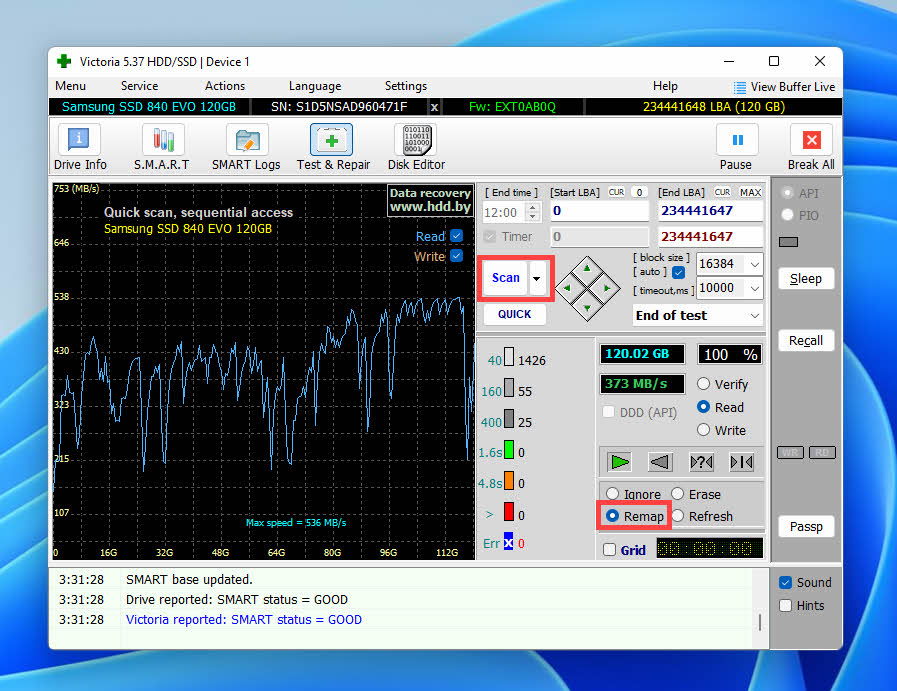
- Give some Victoria SSD/HDD some time to thoroughly scan your HDD and remap bad sectors.
Method 5: Repair a Corrupted HDD Partition Using TestDisk
Hard drive corruption can make entire partitions inaccessible, together with all files they contain. Fortunately, there is special software designed specifically to recover deleted partitions: TestDisk.
TestDisk is free and open source, and it runs on Windows 11/10/8.1/8/7/Vista/XP, Windows Server 2016/2012/2008/2003, and DOS (both real and emulated). Its poor usability due to the lack of a graphical user interface is its greatest downside, but our detailed step-by-step instructions are here to help you:
- Download TestDisk from its official website.
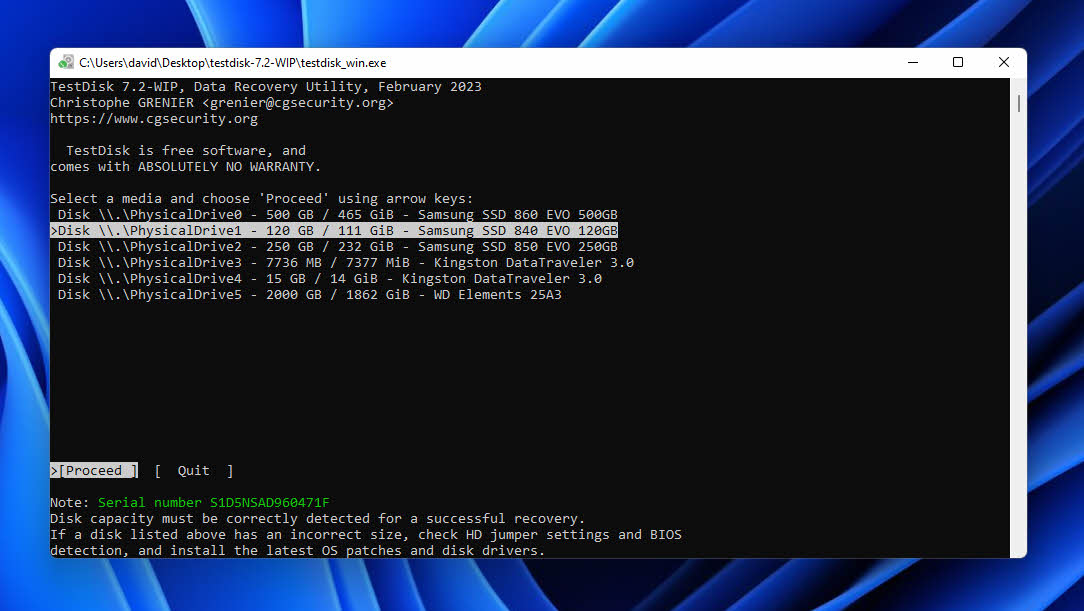
- Extract the downloaded archive and launch the file testdisk_win.exe as administrator.
- Use the arrow keys to select the No Log option and press Enter to continue.
- Select the corrupted HDD and press Enter.
- Choose the correct partition table type. In most cases, TestDisk can suggest the correct type automatically.
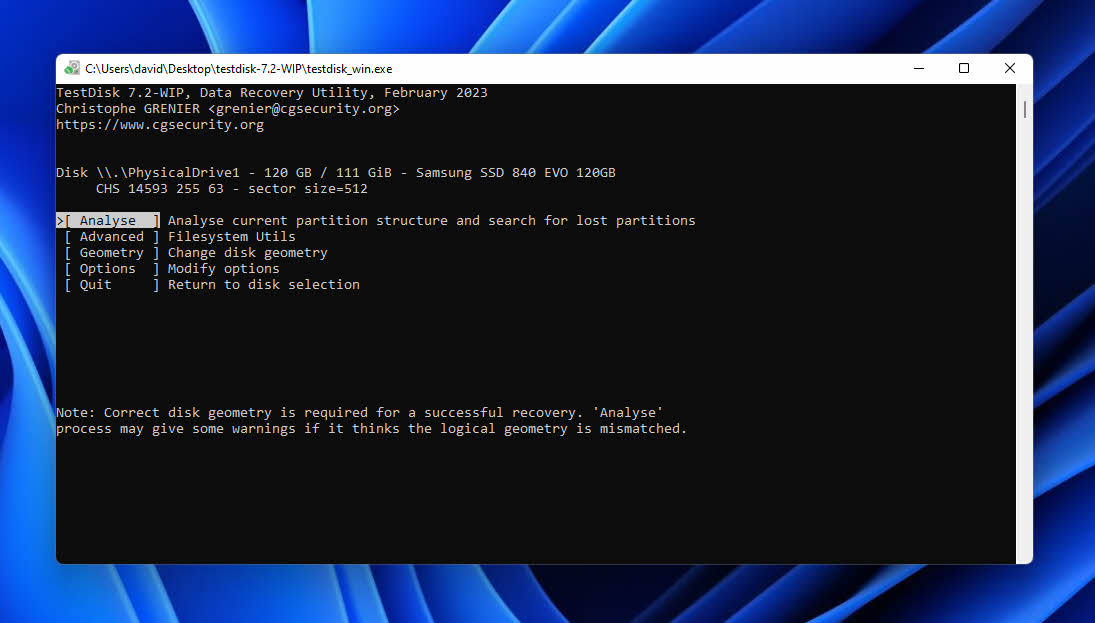
- Choose to analyze the current partition structure of your corrupted HDD and search for lost partitions.
- Select the recovered partition (if found) and press Enter.
- Write the new partition structure if your corrupted HDD partition has been found, or use the Deeper Search option to look for additional partitions.
How to Format a Corrupted Hard Drive
Imagine you’ve spilled a glass of water on a paper journal you use to record your daily thoughts and observations, causing the ink to become blurry and difficult to read and the pages to become difficult to write on. Instead of continuing to use the water-damaged journal and worsening its state, it’s much better to buy a new one and start from scratch.
Similarly, you can save yourself a lot of frustration by skipping the repair process and simply formatting the entire hard drive to restore it back to its original, uncorrupted state. Obviously, you want to back up your data first so that you can transfer them back later.
To format a corrupted hard drive in Windows:
- Launch File Explorer, navigate to This PC, and right-click the corrupted hard drive you want to format.
- Select the Format option from the context menu.
- Choose the desired file system and make sure the Quick Format option is unchecked.
- Click Start to begin.
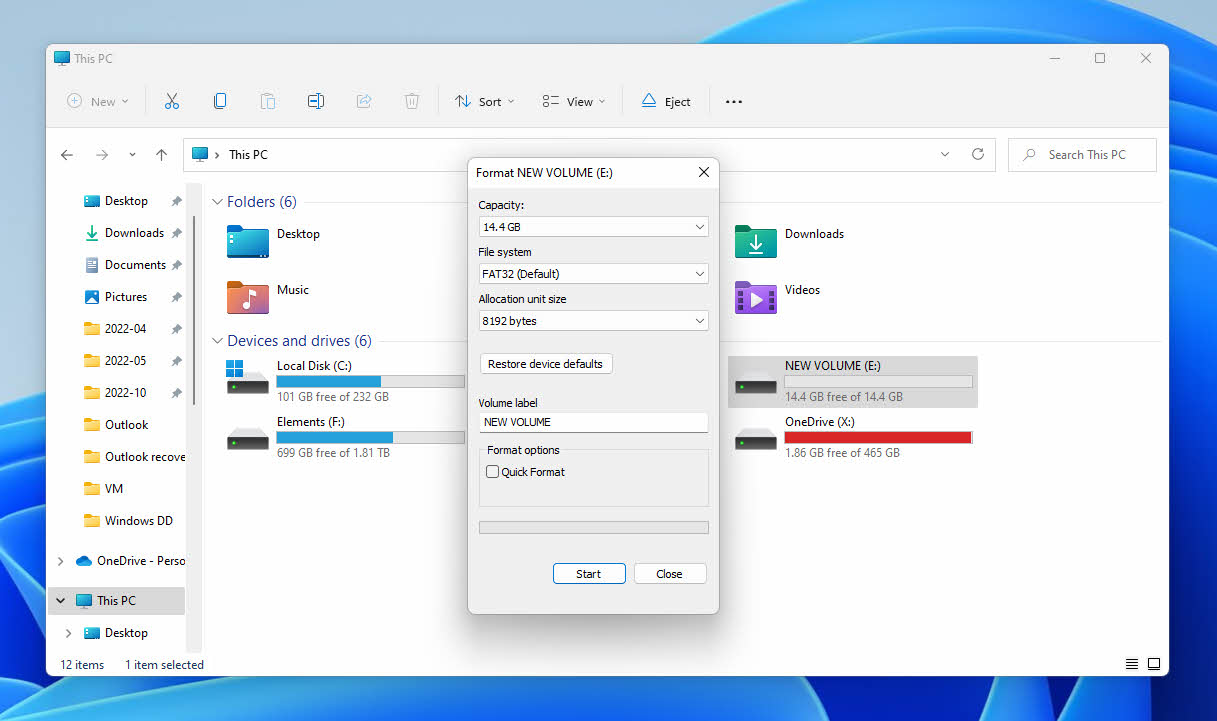
The reason why you don’t want to perform Quick Format is that it doesn’t really delete any files (by overwriting them with zeroes)—it only recreates the file system. While that may be enough in some situations, it’s better to take the time it takes to perform Full Format instead, which also includes error checking.
Conclusion
A corrupted hard drive can be a major roadblock in the life of any Windows PC user. While internal system drive and external hard drive corruption has many possible causes, it also has many solutions, the most effective of which we’ve described in this article. Hopefully, they’ve made it possible for you to fix your corrupted hard drive and restore access to your data.
Frequently Asked Questions
How to repair a hard disk that is not detected?
If your hard disk is not detected at all by your computer, then you should check if it’s connected correctly. Don’t forget to try a different cable and port. If that doesn’t help, it may be time to send the hard drive to a professional data recovery center because it’s likely dead and impossible to recover at home.
How to fix a corrupted hard drive that won't boot?
A corrupted hard drive that won’t boot can often be fixed using a specialized file system repair tool like TestDisk, which is open source and completely free.
How to fix a corrupted hard drive on Mac?
If you need to fix a corrupted hard drive on Mac, you should start by using the First Aid feature of the Disk Utility tool. This feature can uncorrupt your laptop or desktop hard drive and fix other errors.
David Morelo is a professional content writer with a specialization in data recovery. He spends his days helping users from around the world recover from data loss and address the numerous issues associated with it.
When not writing about data recovery techniques and solutions, he enjoys tinkering with new technology, working on personal projects, exploring the world on his bike, and, above all else, spending time with his family.
- Klennet Recovery Review (Formerly Zero Assumption Recovery)
- iBeesoft Data Recovery Review – A Likable Clone With Limited Features
- DMDE Review – A Data Recovery Powerhouse or a Usability Nightmare?
- Cisdem Data Recovery for Mac Review – A Clone in Disguise
- Tenorshare 4DDiG Review – All That Glitters Is Not Gold
- Houston, Texas, United States
Nikolay Lankevich has over 15 years of strong experience in various fields and platform includes Disaster Recovery, Windows XP/7. System analysis, design, application (Inter/Intranet) development, and testing. Provided technical supports on desktop and laptops on Win-XP and Macintosh for about 2000 employees.