How to Recover a Wiped Hard Drive & Get Erased Data Back
Unlike the classic and much-beloved series whose name sounds the same, nobody wants to deal with The Ex-Files. And yet, you might have just realized you actually needed the files you deleted mere hours ago. Or that “that problem” (ranging from a misbehaving storage device to a virus attack) wasn’t trivial as you initially thought after all.
The result is the same: your files have become ex-files, giving way to empty space where you’d prefer to see your data. Is it possible to bring your data back? Can you recover a wiped hard drive? Can you undelete any file that’s “gone”? The short answer is “quite probably”, as we’ll see in this article.
Can a Wiped Hard Drive be Recovered?
Your chances to bring your data back depend on the scenario you’re facing. Sometimes it’s easy to recover your data from a wiped hard drive. Still, we wouldn’t want to offer false hope, for that’s not always the case.
| The Case | Description | Recovery Chances |
| Accidental or intentional deletion of files | You deleted some files yourself | High |
| Hard drive formatting | You formatted your HDD | Medium |
| Hard drive wiped itself | Your data doesn’t show up on your HDD | Medium |
| Viruses or malware infection | Your files disappeared after a virus or malware infection | Medium |
| Data loss caused by hard drive corruption | Your HDD appears corrupted, empty, or RAW | Medium |
| Factory Reset | You performed an OS/PC reset “to its original condition” without backing up your data first. | Medium |
| Data erased from the SSD | You deleted your files from an SSD/NVMe drive | Low |
| Fully Formatted/Secure Erased Storage | You performed a full format or completed a secure erase of a storage device | Very Low |
How to Recover Data From a Wiped Hard Drive on Windows & Mac
When you can’t find your files anymore on a storage device, or you’ve accidentally wiped a hard drive, the best way to get your data back is to use a data recovery solution.
Thankfully, we’ve checked the best data recovery apps comprehensively to locate all their pros and cons, considering factors like their results, thoroughness, speed, and price. We’ve also compared them to find not only those that excel but also when and how.
Thanks to this extensive testing, we believe you can’t go wrong with the following three options as far as wiped hard drive recovery goes.
Option A: Disk Drill
Although dozens of apps specialize in data recovery, only a few are optimal for retrieving data from a wiped hard disk drive. And according to our extensive tests, Disk Drill is at the top of this list.
That’s because Disk Drill is available on both Windows and Macs and not only supports all their primary file systems (NTFS, exFAT, APFS, HFS, etc.) but can even recover data from wiped storage devices with no file system at all that show up as RAW.
However, there’s an even more critical factor that renders Disk Drill the best tool for the task at hand. Using its Clever Scan/Quick Scan (compatible on Windows with FAT32, exFAT, NTFS, and EXT4 partitions), Disk Drill can also recover the original folder structure and file names of any erased data it locates. When most alternative apps would “dump” all recovered data in a target folder, letting the user make sense of it, Disk Drill manages to preserve the way folders and files were originally organized.
Also, Disk Drill can practically find and restore any file, no matter its type, size, filename, or extension. Even better, Disk Drill can analyze and facilitate recovery even from misbehaving disks that are detected by the computer, but you can’t access with a file manager. As long as they show up in Disk Management without a “No media” mark, Disk Drill can “see” and work with any disk. Plus, thanks to its comprehensive but user-friendly interface, filters, support for previewing files, and accurate estimation of their recovery chances, it’s easy to locate and selectively save your most crucial data. That can be a lifesaver when a hardware issue causes a disk to appear wiped as it’s rapidly deteriorating.
That’s why we chose it as our primary solution in this article for recovering data from an erased hard disk volume. To learn more about the app, check our reviews of both Disk Drill’s Windows version and its equally impressive macOS variant.
The process of recovering your files with Disk Drill on both Windows and macOS is almost identical and as simple as the following:
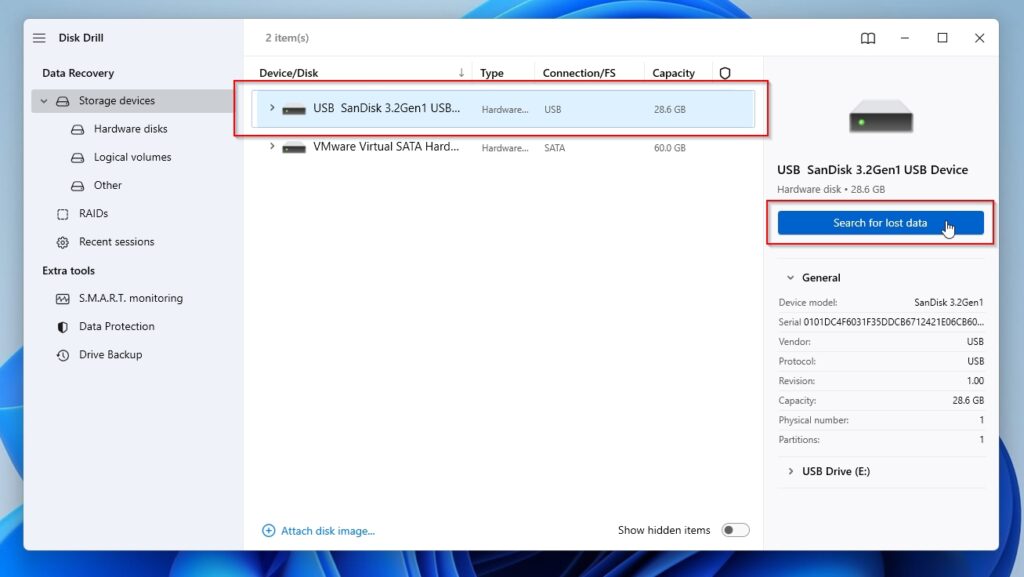
- Download Disk Drill from its official site. Then, install the app, run it, and choose the wiped hard disk you want to scan from Disk Drill’s Device/Disk list. Click on Search for lost data to have Disk Drill scan your selected device for lost files.
- The scanning process can take a while, and you can “break” (Home icon) or pause (Pause icon) it at any time. You can also click on Recover all to save everything Disk Drill already found or on Review found items to select what to restore. However, it’s best to let the scan run its course for Disk Drill to find all lost data.
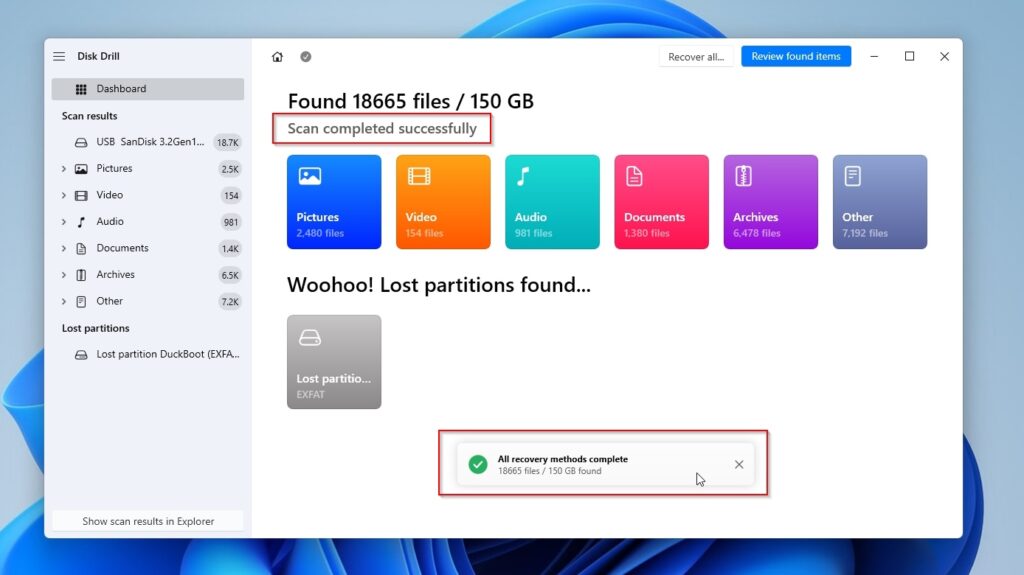
- Disk Drill will inform you when it completes its scan. As stated above, click on Recover all to have it save everything, or on Review found items to select what you want to save. With the second option, you can also preview the files before recovering them to ensure they’re the ones you want.

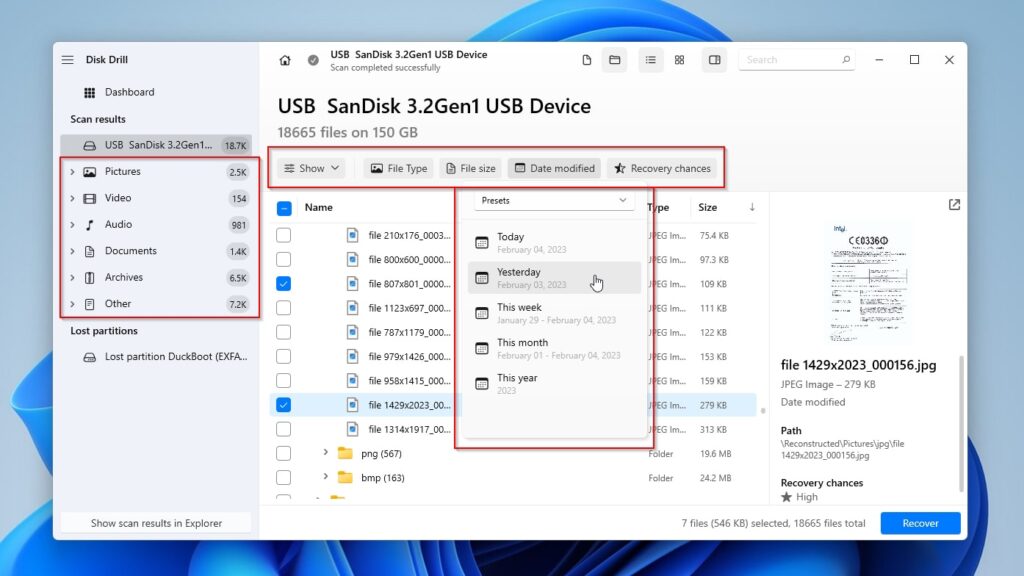
- If you get lost among the thousands of files Disk Drill might have located, use its filters (from the menu above the file list) or file categories (on the left of its window, under Scan results) to narrow down the results.
- After you select all files you want to get back, click on Recover on the bottom right of Disk Drill’s window. In the next window, choose where you want to store the recovered files. Then, click Next to begin the recovery process.
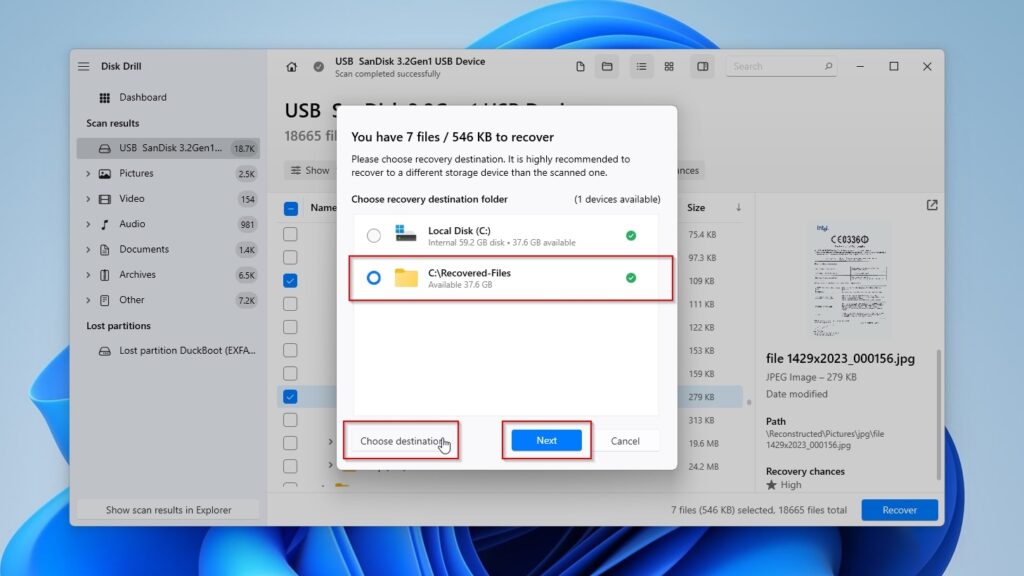
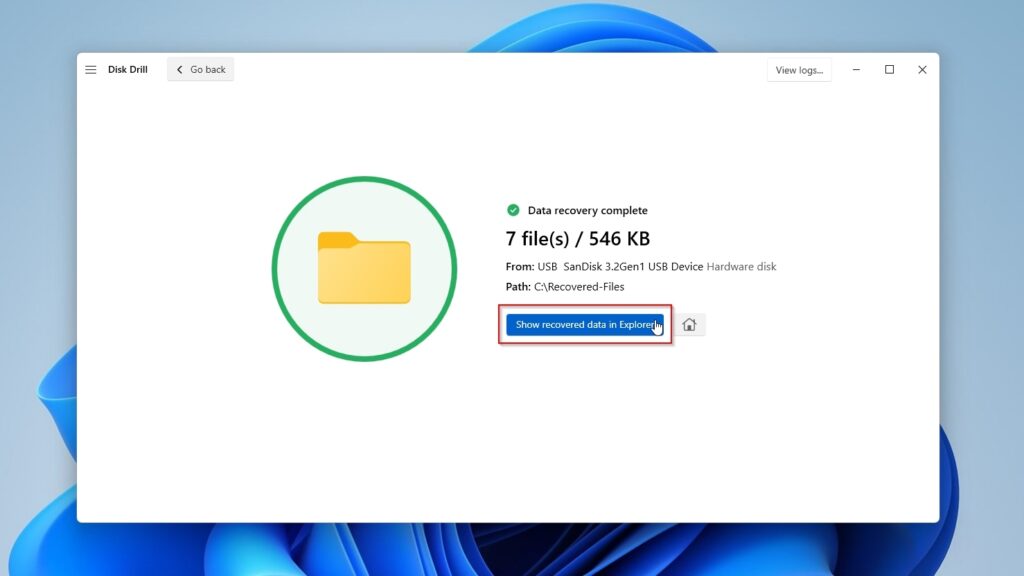
- Depending on the number and size of your files, their recovery might take a while. When the process completes, Disk Drill will present a report of the results. You can click on Show recovered data in Explorer to see the files it recovered in your default file manager.
Option B: R-Studio
One of the most feature-rich and comprehensive data recovery solutions, R-Studio manages to impress with all the options it offers. However, it also looks quite complex for the same reason.
We’ve covered both the Windows version and the macOS variant of R-Studio in the past, so, you can check those reviews to learn more about the app. We’ll be using the Windows version for wiped data recovery in this article, but they’re practically identical. Thus, you can follow along even if you accidentally erased your hard drive in Disk Utility on your Mac.
If you’re not afraid of finding your way through R-Studio’s relatively complicated interface and recovery process, one way to get your files back with it after wiping out your hard drive, is this:
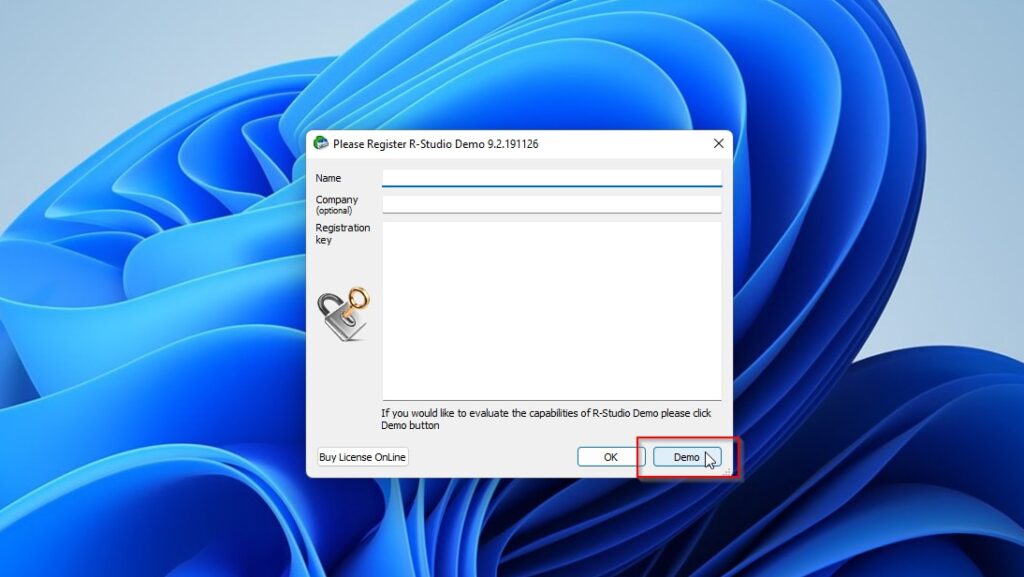
- Download R-Studio from its official site, install and run it. You’ll have to acknowledge you’re going to run it in demo mode.
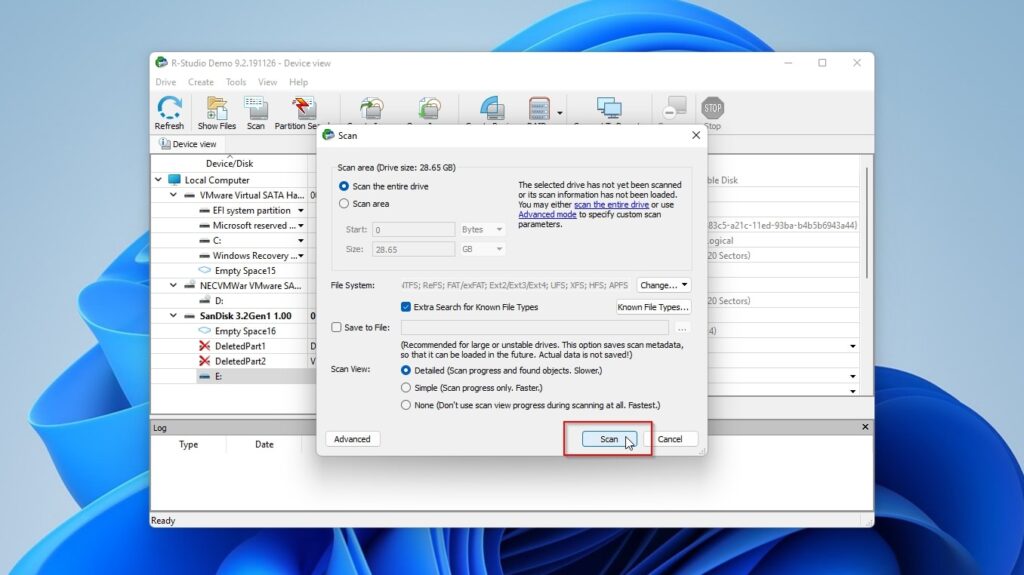
- Find the wiped drive you want to scan on the app’s main Device/Disk list, “expand” it, and then select the volume to scan. Click on the Scan button.
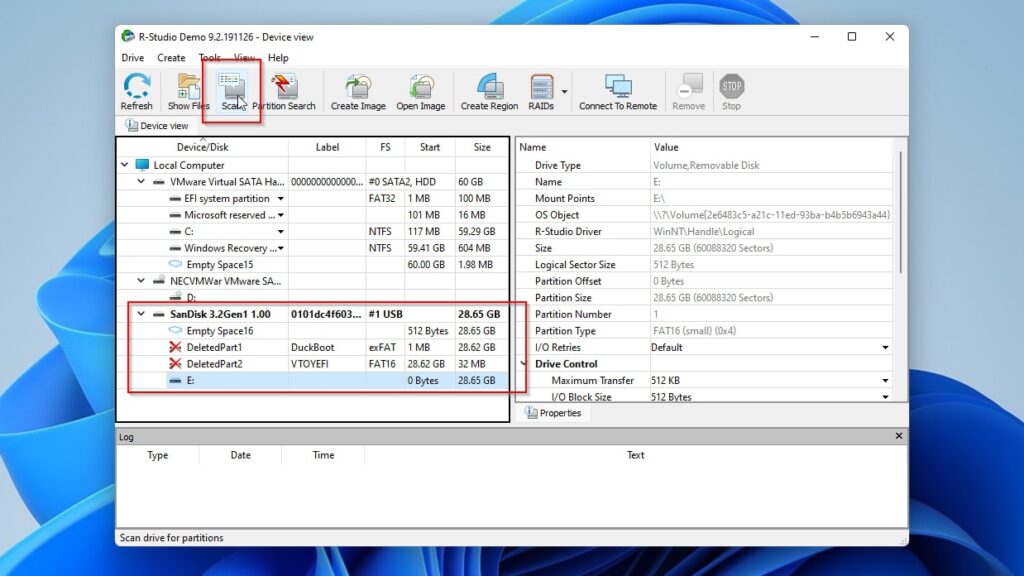
- Leave everything at the default values (or prepare for an even more complicated experience) and click on Scan on the new window that shows up.
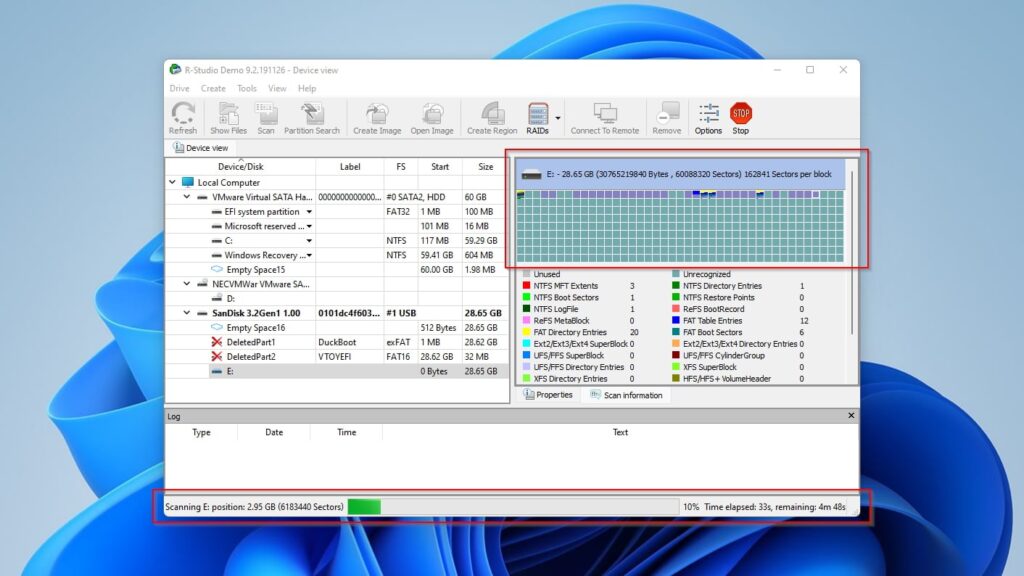
- Let R-Studio’s scan process run its course.
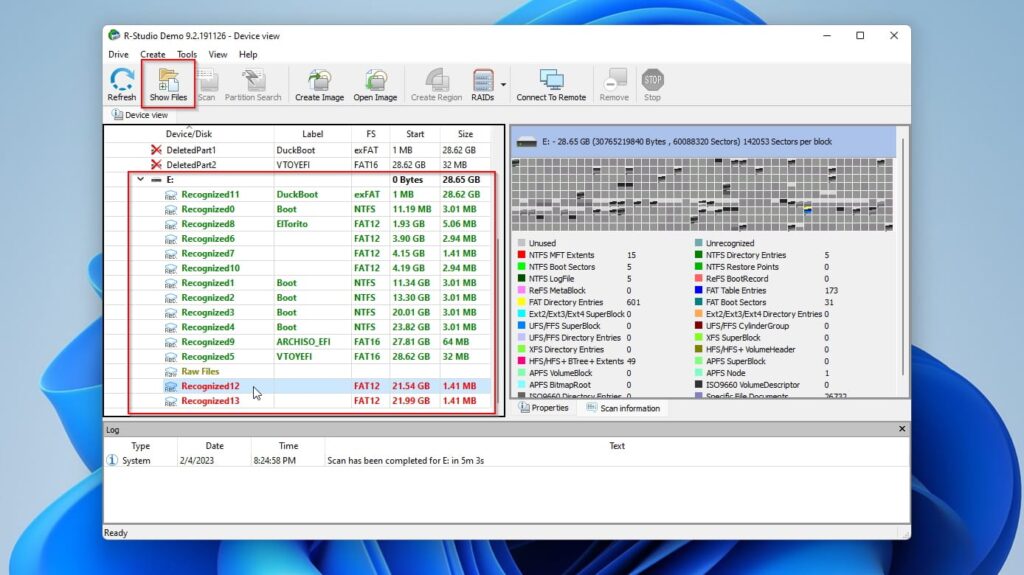
- R-Studio might find and present multiple groups of files under your selected drive. Choose one of them and click on Show Files to see the data within that group that R-Studio found.
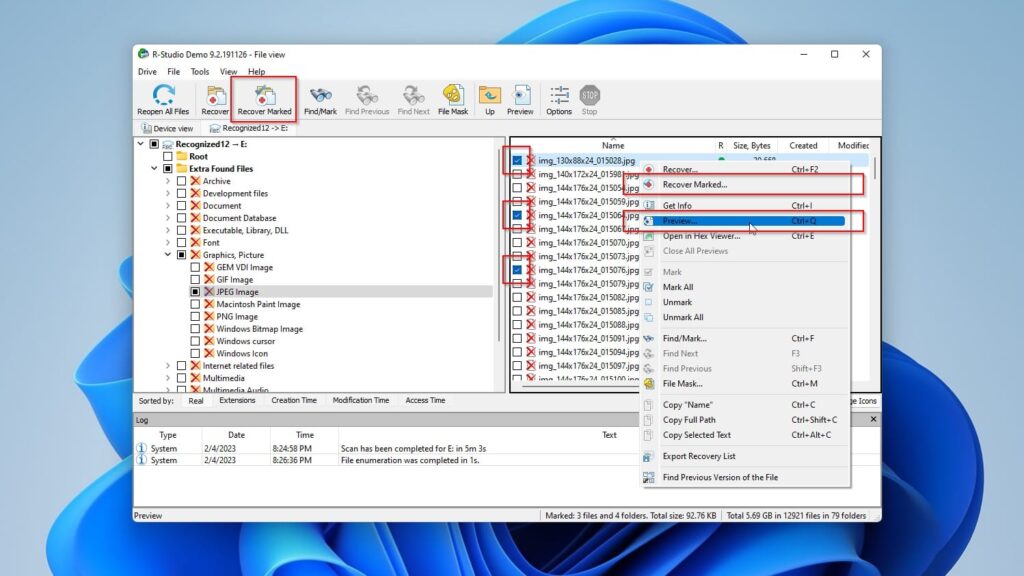
- You can right-click on any file and choose Preview to check it out before recovering it (among many more options). Place a checkmark on the left of the erased files you want to get back. If you can’t find them in R-Studio’s results, return to the previous window and select another group of files, then rinse and repeat. When you’ve found and marked the files you want to recover, click on Recover Marked.
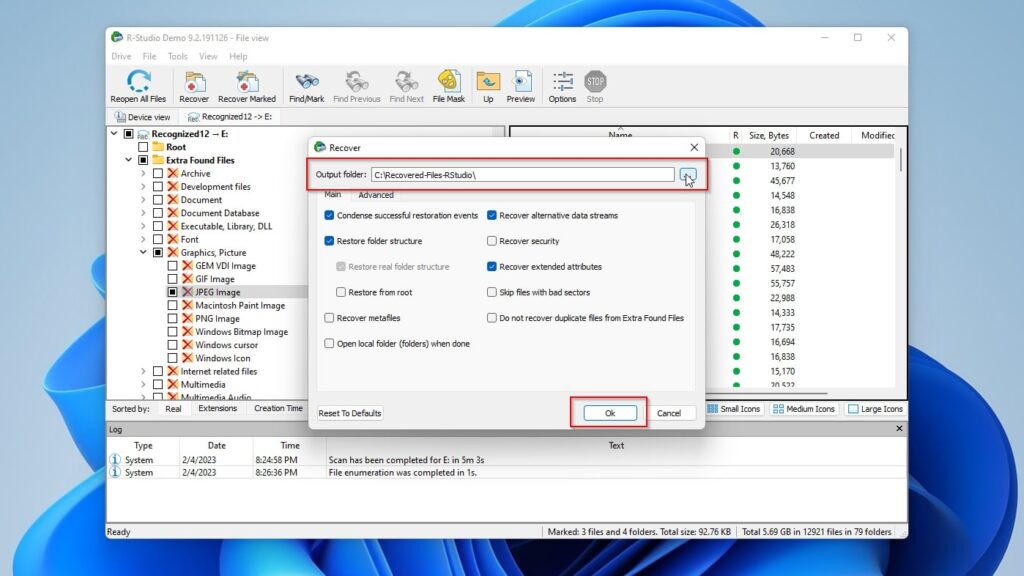
- R-Studio will ask you what’s your desired Output Folder (among other stuff). For simplicity’s sake, select where to store the recovered files, ignore everything else, and click OK.
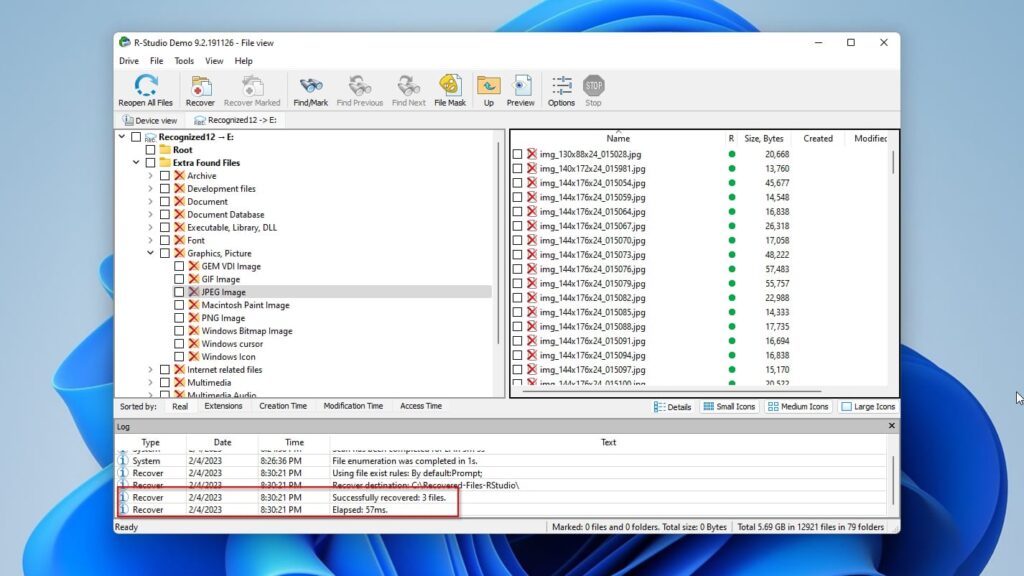
- After a while, depending on your storage device’s speed and the number of files to be recovered, you’ll see a message about the outcome of the process on R-Studio’s log.
Option C: PhotoRec
Recovering data from a wiped hard drive feels complex if you’re using Photorec’s terminal version. Strangely, when using the almost identical in functionality QPhotoRec variant that comes with a GUI, the process seems much more straightforward.
And yet, as we’ll see in action, although the app is quite powerful – and free, it also lacks user-friendly features, as you can see in our extensive review of its Windows version.
To recover your erased data from a wiped drive with PhotoRec, follow the next steps:
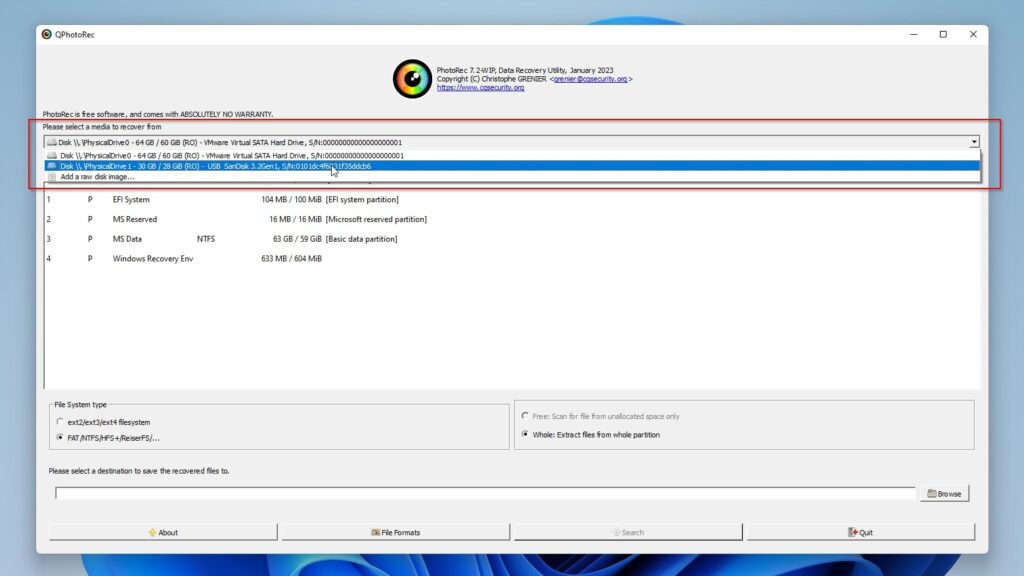
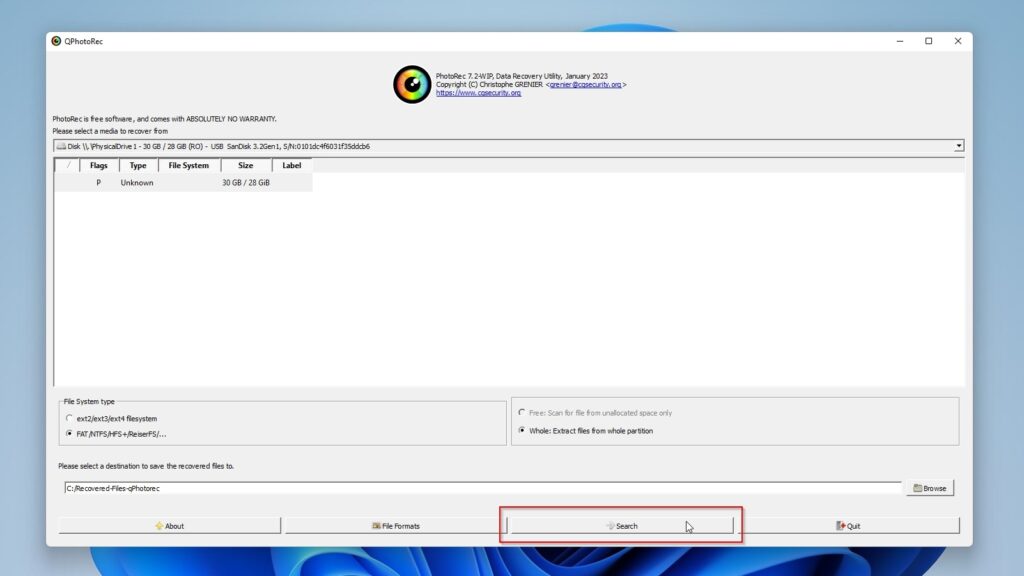
- The process begins counterintuitively since to use QPhotoRec, you must download another app’s archive – TestDisk. PhotoRec and QPhotoRec are included in that. Extract the archive’s contents in a folder, “enter” it with a file manager, and find and launch QPhotoRec. Then, select the erased/wiped drive you want to scan from the drop-down menu at the top of its window.
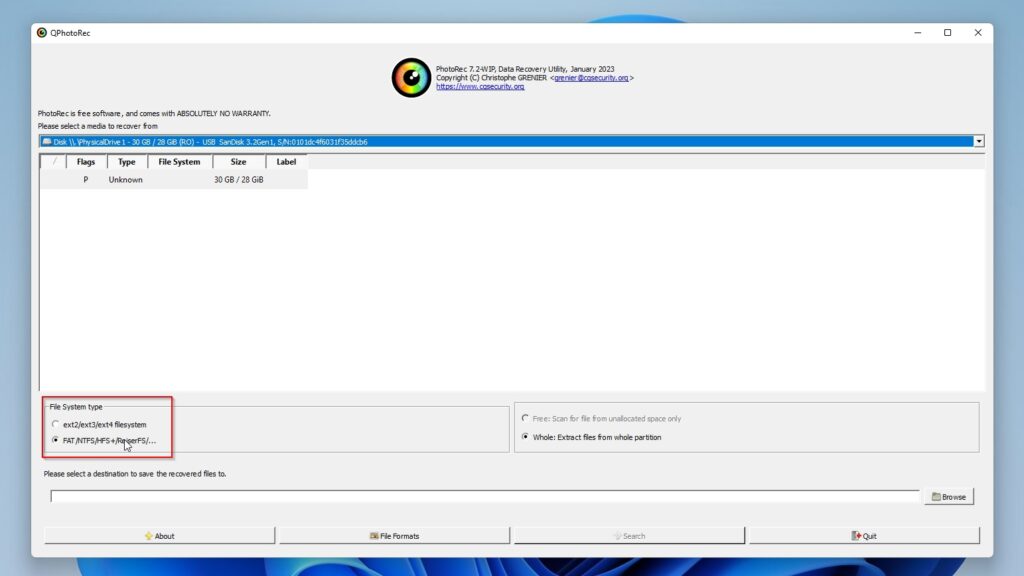
- Choose the correct file system for the selected drive, or QPhotoRec might fail to find anything. Thankfully, you only have two options. The first one (the “ext” family of file systems) is usually used only on Linux-compatible OSes. Thus, in most cases, go for the second option.
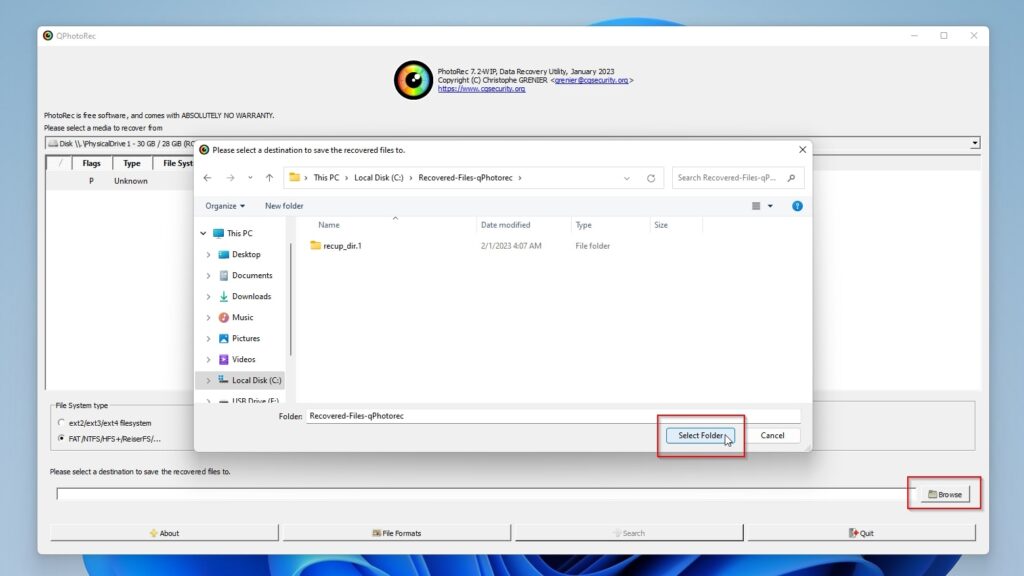
- Click on Browse and choose where to save the recovered files.
- Click on Search to begin QPhotoRec’s scan and recovery process. Yes, you don’t have (nor can) select “what to recover”.
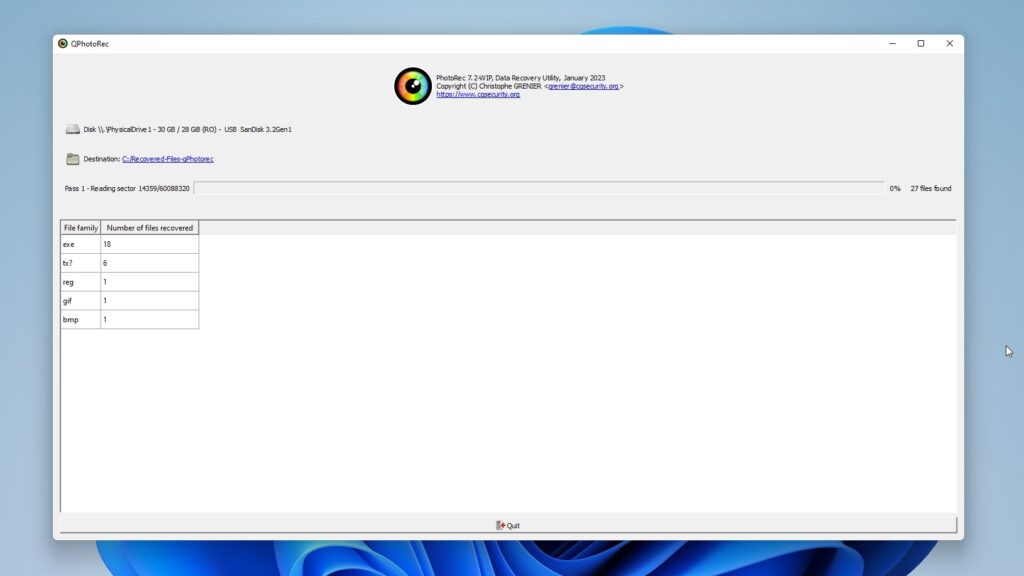
- Let QPhotoRec’s scan complete. When it’s done, you’ll find all files it found and recovered from the selected drive. And yes, since you can’t selectively choose what to recover, that might mean that it may have recovered terabytes of files, among which you’ll have to search to find the ones you need in your chosen target folder.
Uncommon Wiped Disk Scenarios
Sometimes you might not have to use a recovery app to get your wiped data back. Either because you’d have an even better option, or the opposite, because you’d end up wasting your time trying and would be better off skipping trying altogether.
The following are four such scenarios, beginning with the more optimistic one.
Scenario 1: Wiped Drive Recovery From Backups
The best solution for retrieving your data from a wiped hard disk drive or other storage device is “pulling it out” from a backup. It could be a backup created with the tools that come with your OS, with a dedicated backup solution, or even with an extra tool included in a multi-purpose app, like Disk Drill’s byte-to-byte feature.
Still, that implies you’d already planned to have such a backup handy beforehand.
Scenario 2: Erased SSD Data Recovery
If your wiped data resided on an SSD or an NVMe drive that uses similar technology, your chances of getting your data back diminish by the second.
The memory chips in such drives only support a limited number of writes. To minimize accumulated damage from repeated writes, they rely on a feature called TRIM or similar wear-leveling/garbage collection techniques (learn more about them in this article by Kingston).
You should act before those features re-organize the space on your drive, and consult your disk manufacturer’s instructions on how to disable TRIM (or any similar tech) on your drive. Most of the time that’s possible from an app from your disk’s manufacturer (like Samsung’s Magician). Then, use a trusted recovery solution like Disk Drill or R-Studio to get your files back.
Scenario 3: Wiped System Drive Recovery
If the wiped files on a drive were part of your operating system, recovering it might still be possible, but also a highly complex affair without guaranteed results.
That’s because even if you manage to recover all of the system-related files, even if they show up again back at their original spot, even the slightest inconsistency on one of them might render your operating system unstable. You’ll then have to waste even more hours trying to “fix” it (for example using Microsoft’s DISM tool).
In such scenarios, it’s best to recover your personal files to a secondary drive or from a backup and reinstall the OS from scratch.
Scenario 4: Secure Wipe Recovery
Did you accidentally or intentionally perform a full format of your drive? Even worse, did you go for what’s known as a “secure wipe” or “secure erase”? In such a case, there’s no point in trying to then recover your data from it.
If you chose to perform a full format on Windows, a full or secure format on macOS, used a specialized app for securely erasing data, or the secure deletion feature built into the firmware of many HDDs/SSDs/NVMe drives (like Instant Secure Erase on Western Digital’s enterprise drives), all data on that drive is completely gone. Those apps/features exist to ensure that, after you use them, all data they overwrite or “shred” will be gone beyond recovery. It will be hard – if not outright impossible – to undelete lost files yourself.
Still, there’s a chance the professionals at one of the best data recovery services could help, thanks to their expertise and specialized equipment.
Frequently Asked Questions
How to recover deleted/wiped Windows operating system?
You can use a data recovery solution, like Disk Drill or PhotoRec, to recover most of your lost files from a wiped drive. However, it’s almost impossible to recover a wiped operating system. Even if you restore all of its files, and perform additional time-consuming checks and “fixes” on them, the operating system might still be unstable afterward.
How to tell if a hard drive has been wiped?
You can’t see any files on a storage device, or the OS doesn’t allow you to access it, and it shows as unpartitioned empty space or RAW? In that case, you can safely assume it’s been completely wiped.
Is it possible for a hard drive to wipe itself?
A drive in good working condition won’t randomly “wipe itself”. However, a malfunctioning storage device might appear as wiped if the file system or the partition tables on it got corrupted.
What is the best wipe data recovery software?
There are many data recovery solutions worth checking out. We prefer the performance, features, and price combination offered by Disk Drill. Still, you can check out our lists of the best Windows and macOS data recovery solutions if you’d like more alternatives, like EaseUS Data Recovery Wizard or DiskGenius if you’re on Windows, and Wondershare Recoverit or Stellar Data Recovery if you’re on a Mac.
A Wiped Hard Drive Is Not an Irreversible Catastrophe
As we saw in this article, recovering some or even all of your lost data from a wiped Hard Disk Drive or other storage device is possible.
Even if you didn’t plan for such a catastrophe, keeping backups, or the ones you have are old and don’t include your most recently updated files, an advanced data recovery tool may be able to help.
Make sure to choose a trustworthy and performant solution, though, for if you’re dealing with a malfunctioning storage device that rapidly deteriorates, or an SSD or NVMe drive, your time to get your files out of it might be limited.

Odysseas is a geek with over three decades of experience in tech who occasionally lost vast amounts of data. “Data” he managed to recover most of the time using various recovery solutions.
Eventually, he joined our team to write about such data loss and recovery scenarios and all related software and methods.
Despite having written thousands of articles and tutorials for various popular outlets, he considers his data-recovery adventures an ongoing learning experience.
- Frisco, Texas, United States
Yevgeniy Tolkunov is Hardware Engineer at ACE Data Recovery. Yevgeniy has a Master's Degree in Physics, Information Technology; 15+ years of experience.