
How to Recover Data From an Unallocated Drive
Your files seem gone, the storage that used to be their “home” acting up. Is it possible to recover data from unallocated drives that show up as empty storage devices? Can you save your files from what looks like a data void?
The answer’s “yes”, but we’ll have to go into more detail to also answer “how”.
What Causes a Hard Drive to Be Unallocated?
We’ve covered various ways you can fix a corrupted hard drive in the past. What, though, if you’re dealing with a drive that appears “unallocated”, empty, but without any other signs of problems?
Although there’s some overlap in the methods and tools used, sometimes you have to take a different approach to recover unallocated hard drive data. Let’s see some of the reasons you might find yourself on such an adventure and the best solutions for each. With those, you’ll be able to retrieve lost files or to fix the disk, depending on the method you choose.
Of course, you can also go for a solution that tries to achieve both goals or mix and match your preferred approaches.
| Reasons | Solutions |
| Hard drive corruption because of improper hard drive ejection, power surge, or wear and tear. |
|
| Accidental deletion of the partition |
|
| The space wasn’t allocated after Windows installation or update |
|
| Viruses or malware infection |
|
| Formatting errors |
|
| Improperly resized partition |
|
How to Recover Data from an Unallocated Hard Drive
There are various ways you can try to fix a storage device that appears empty, but there is no guarantee you’ll be able to fix an unallocated disk without losing data.
It’s best first to try to salvage any files you can from your disk before you attempt to fix it and render it usable again. Thankfully, there are many ways you can get back your files. Let’s see two of them.
Method 1: Recover an Unallocated Partition Using a Recovery Tool
When a drive appears as empty, unallocated space, it seems as if all your data is lost. Data recovery apps can be an effective and safe solution for such issues, but they’re not all equal.
Thankfully, we’ve excessively analyzed and tested most of them to find their pros and cons. Based on that data, we can suggest the best for the task.
Since, for this article, we need the best tool to recover data from an unallocated drive, our chosen app should:
- 👓 Support the required file formats to recognize and recover them.
- 🚀 Speedy scanning and recovery engine that can maximize the amount of recovered files from failing storage devices.
- 💾 S.M.A.R.T. monitoring that can alert if underlying hardware problems made a disk appear unallocated.
- 📁 User-friendly interface with filtering capabilities to assist in locating the desired files among a scan’s results quickly and effortlessly.
Based on those criteria, Disk Drill‘s test results, which you can see in our extended review of the app, rendered it the optimal choice for recovering data from an unallocated drive.
The process can be as simple as this:
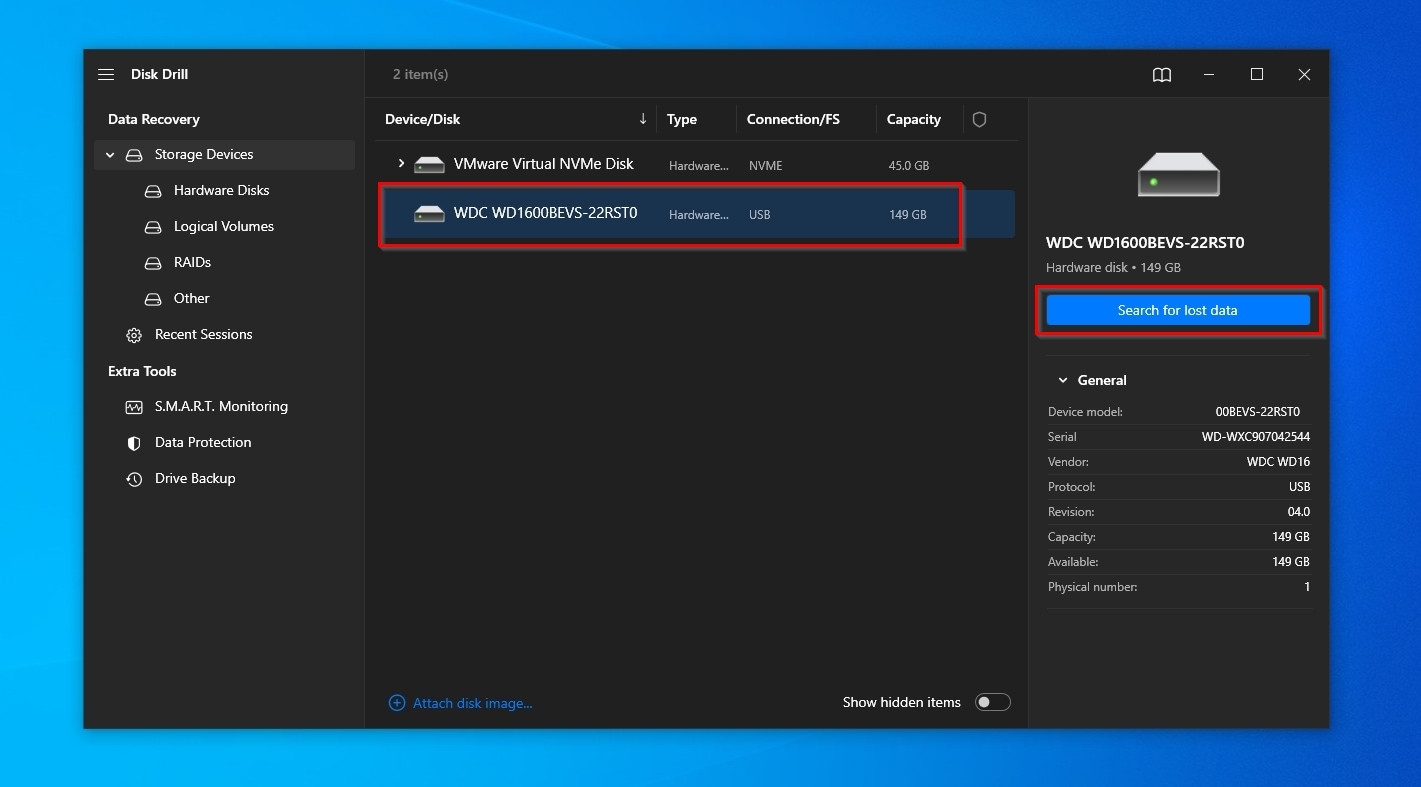
- Download the app from Disk Drill’s official site, install it, and run it. Then, select the disk you want to scan from its Device/Disk list and click on Search for lost data.
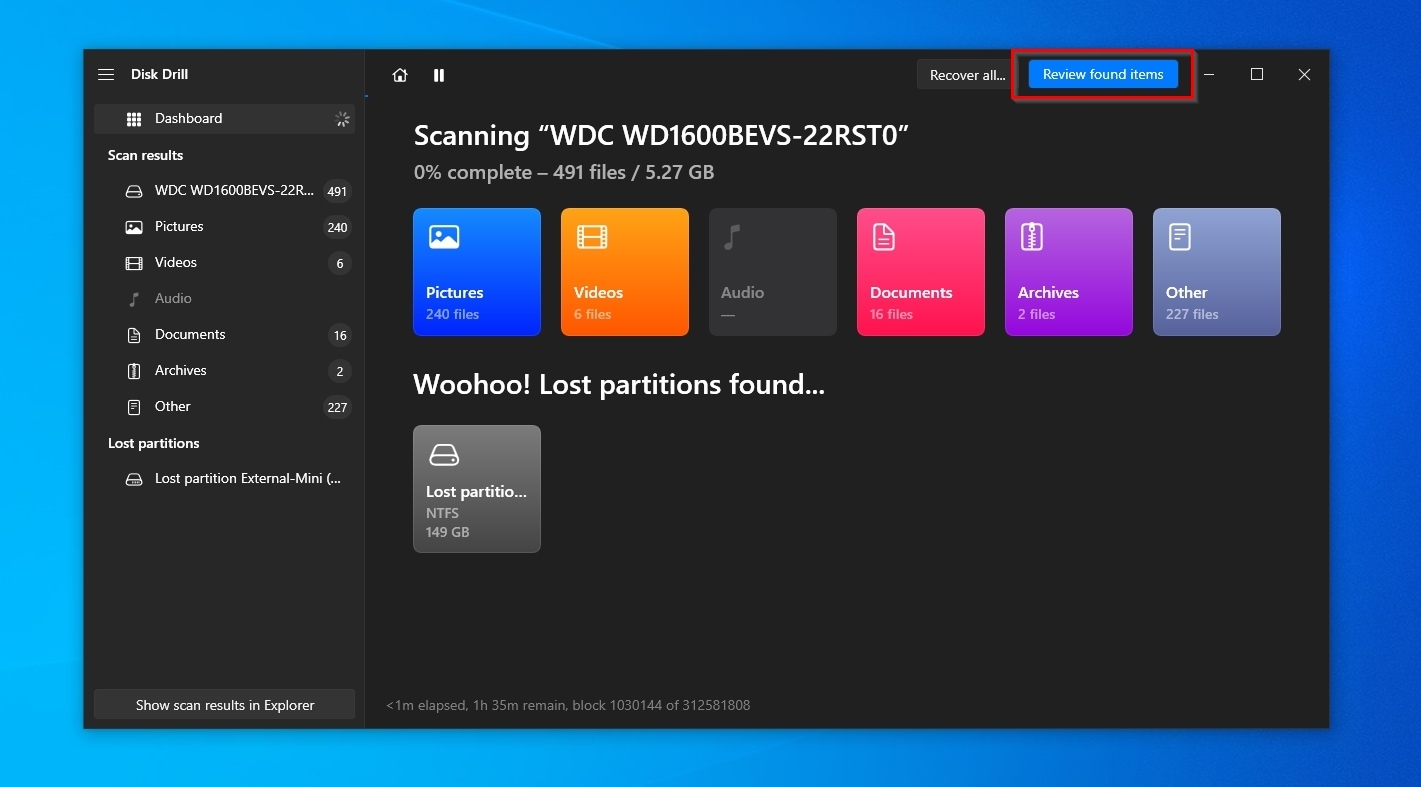
- Disk Drill will start scanning the disk you selected. It’s best to let the scan complete to find as many files as possible. When done, click on a Review found items on the top right of Disk Drill’s window.
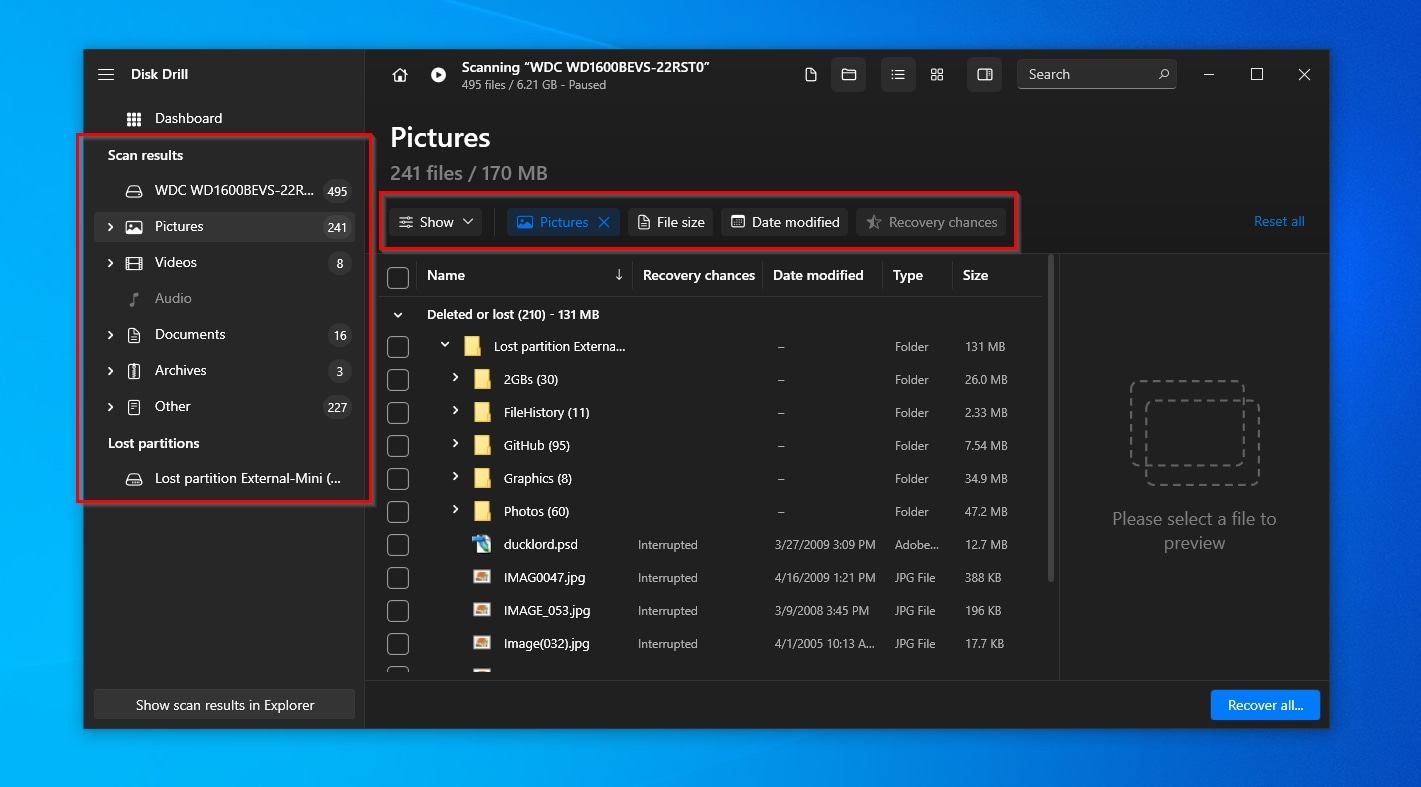
- Disk Drill will probably show you hundreds of files it located. To easily find the ones you want among them, use the categories on the left and the filters above its list.
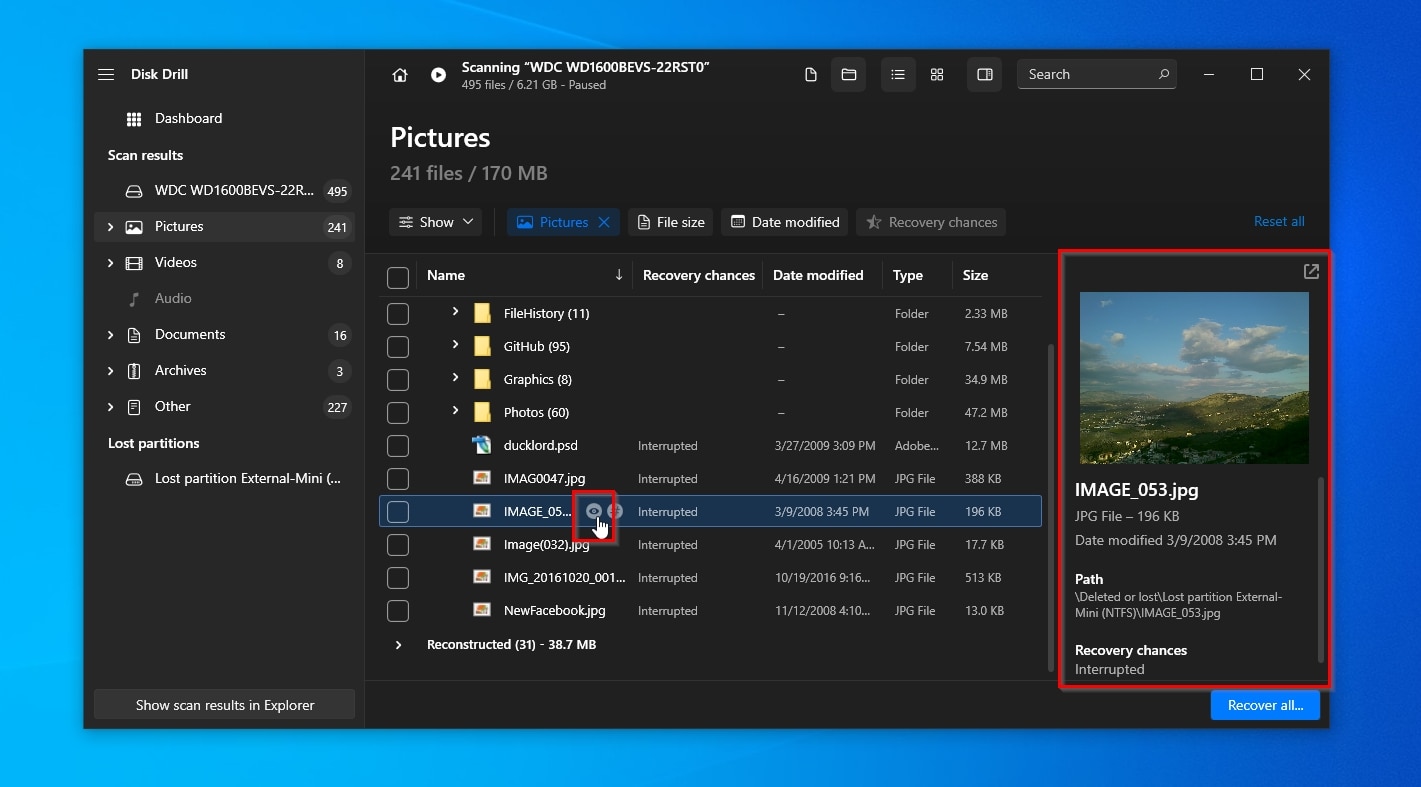
- DiskDrill also allows you to preview various types of files, like images and documents, to ensure they’re worth recovering. Click on a file, and you should see its preview on the right side of Disk Drill’s window. If not, enable the preview pane by pointing at a file and clicking the little button with the eye icon.
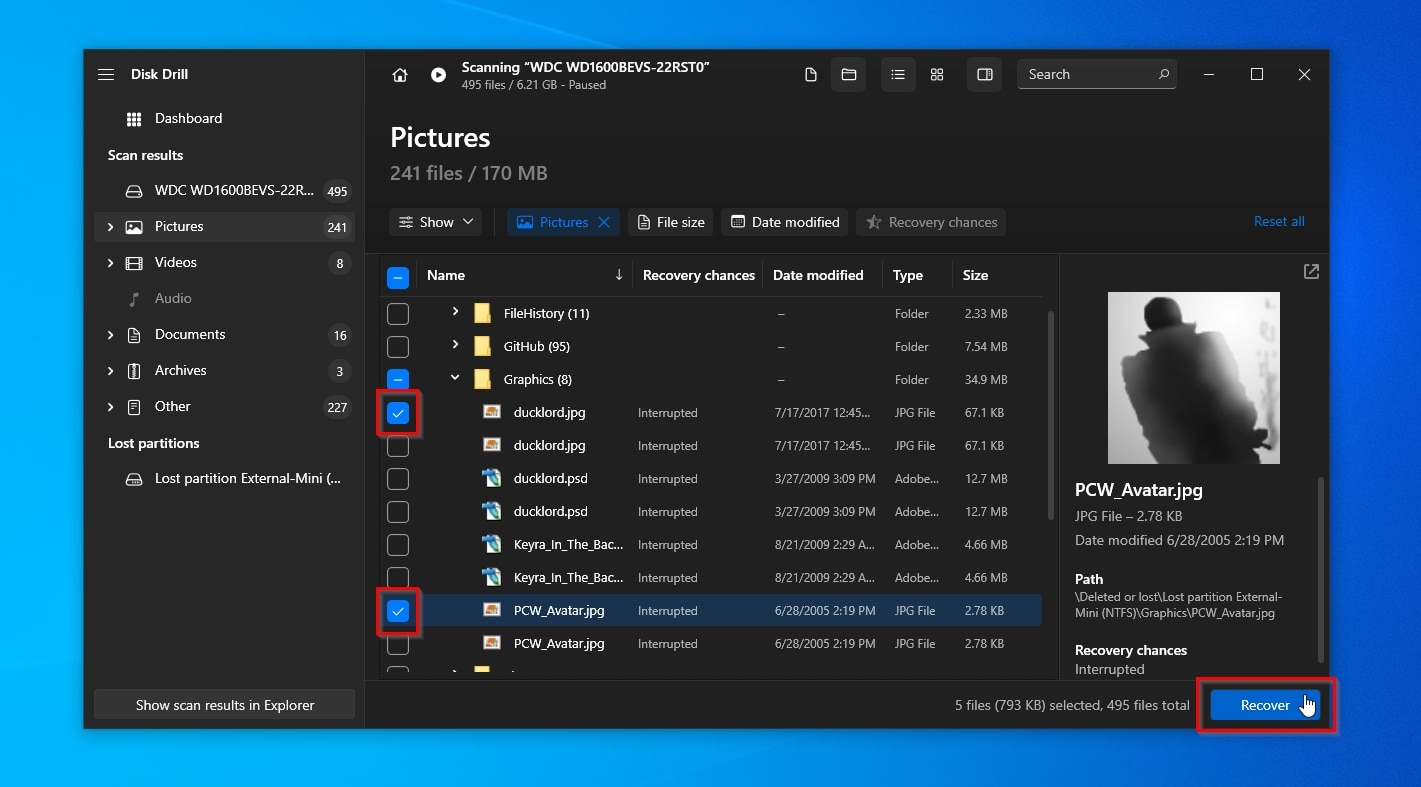
- Place a checkmark on the left of all the files and folders you want to recover from your unallocated disk. Then, click on Recover on the bottom right.
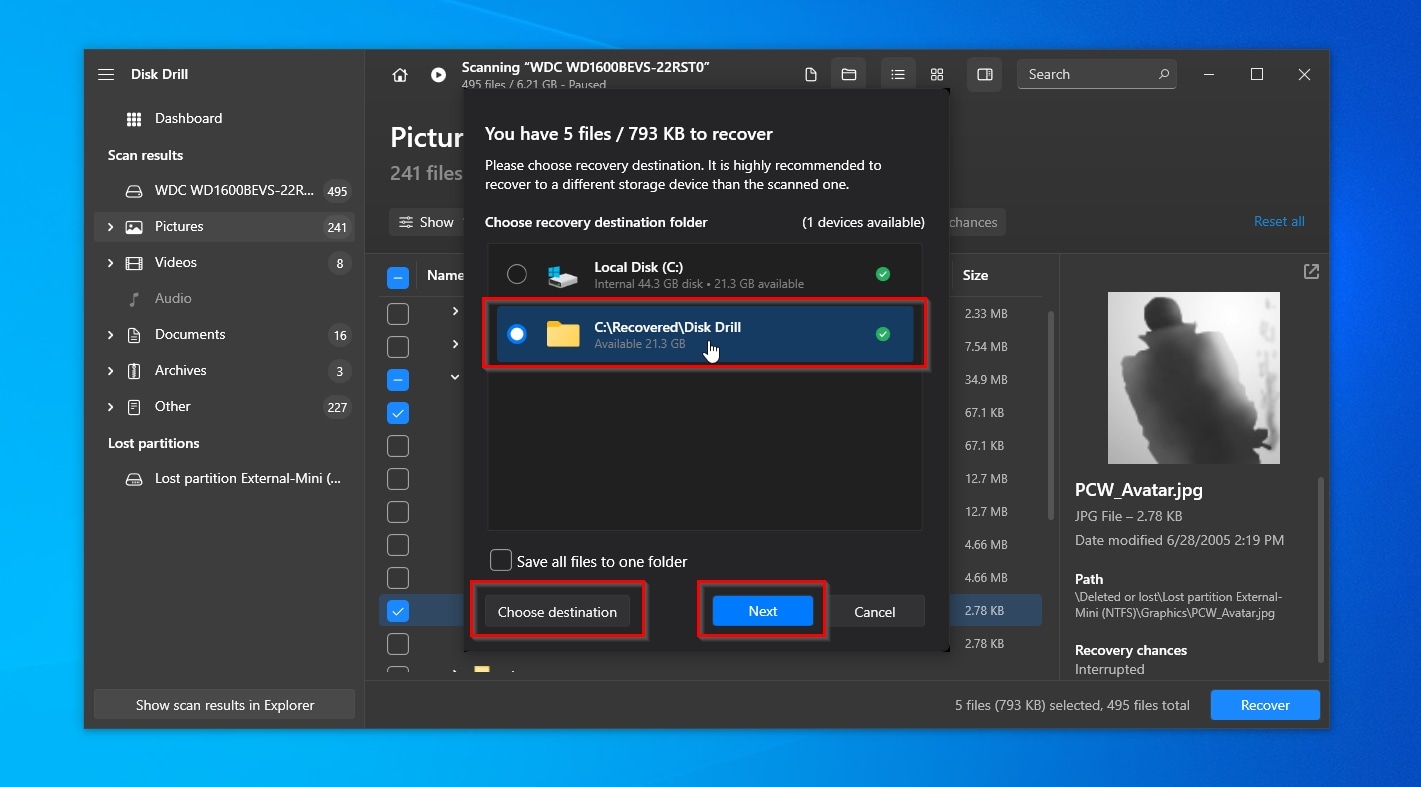
- Choose a target folder to store the recovered files. If your desired folder isn’t among the ones suggested by Disk Drill, click on Choose destination and select it from the file requester that will appear. When done, click on next.
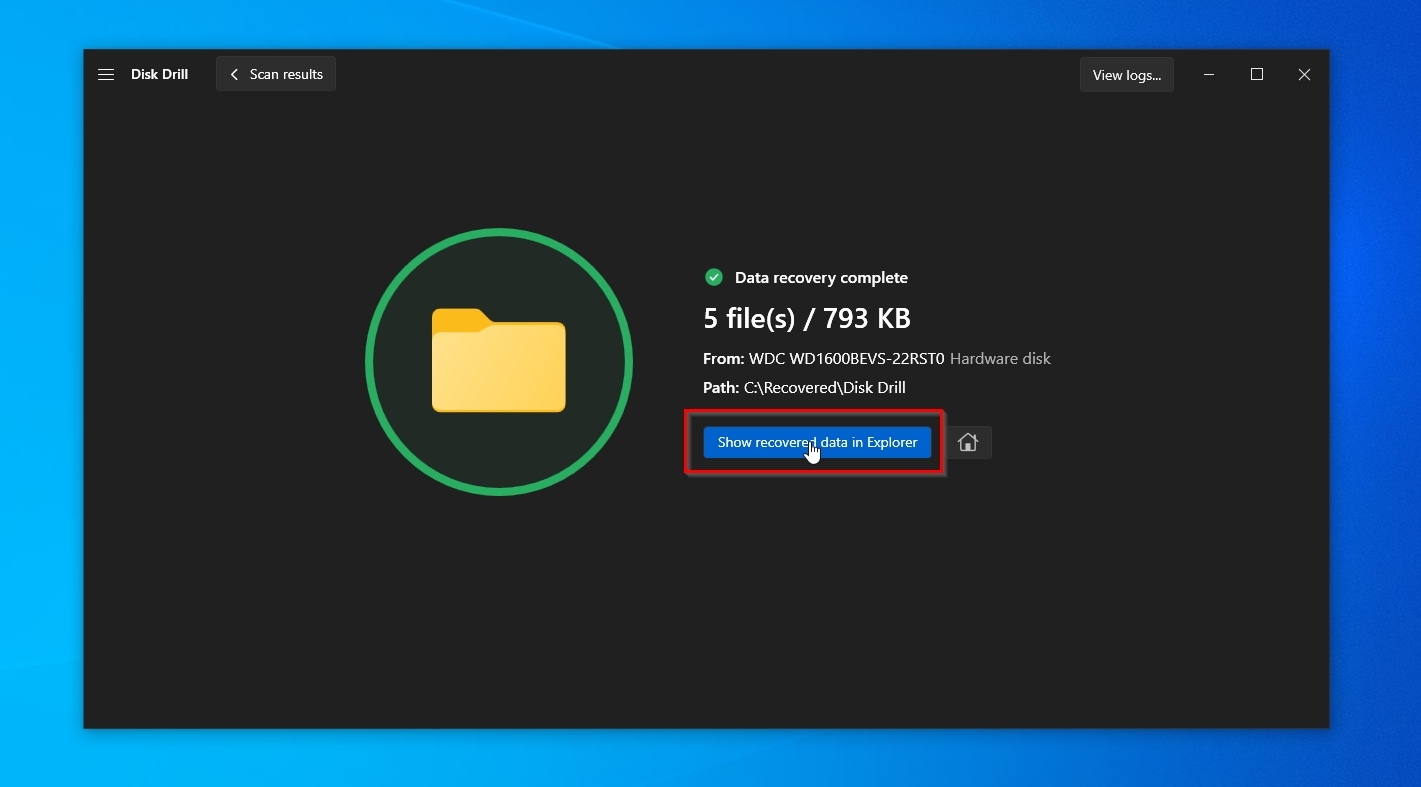
- Soon after, depending on the size of the data recovered and the speed of your disk and PC, Disk Drill’s data recovery will be complete. Click on Show recovered data in Explorer to check out the files Disk Drill brought back from your unallocated disk with the default file manager.
Method 2: Restore Files from Backups
Using a data recovery app can help in most data loss scenarios. However, if you’ve kept backups before, in some cases, restoring your lost files from them can be easier and quicker.
Let’s see how you can do that with Windows’ built-in File History functionality.
To recover your files from a backup using File History:
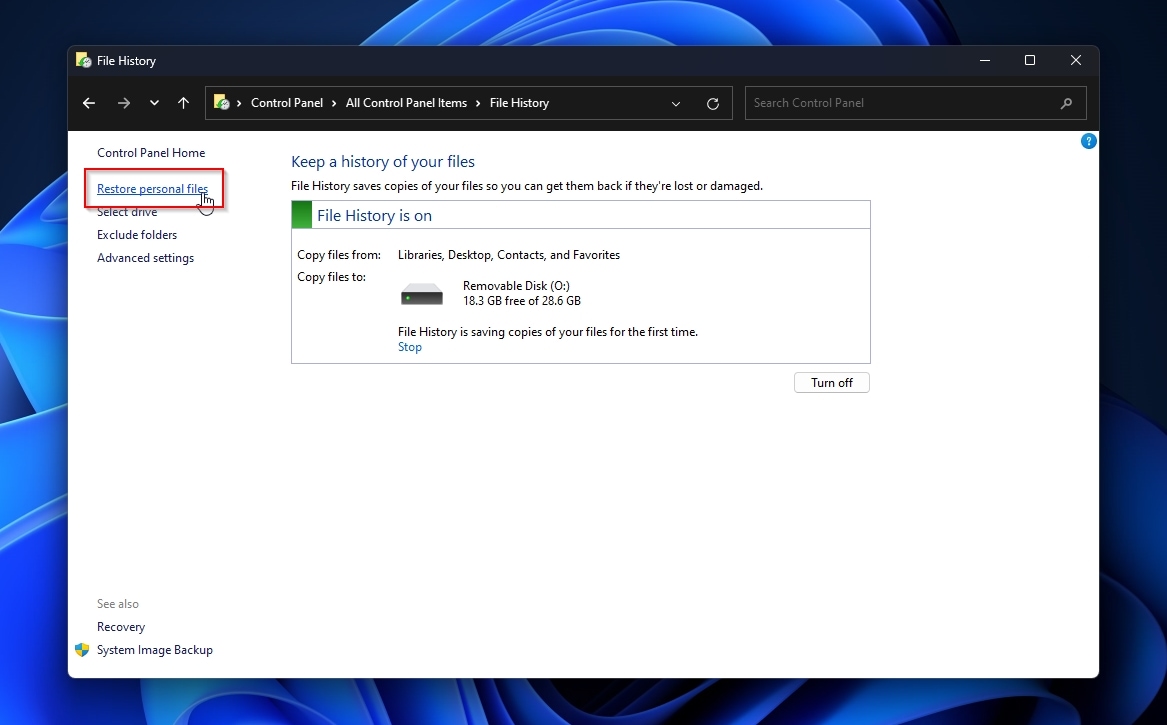
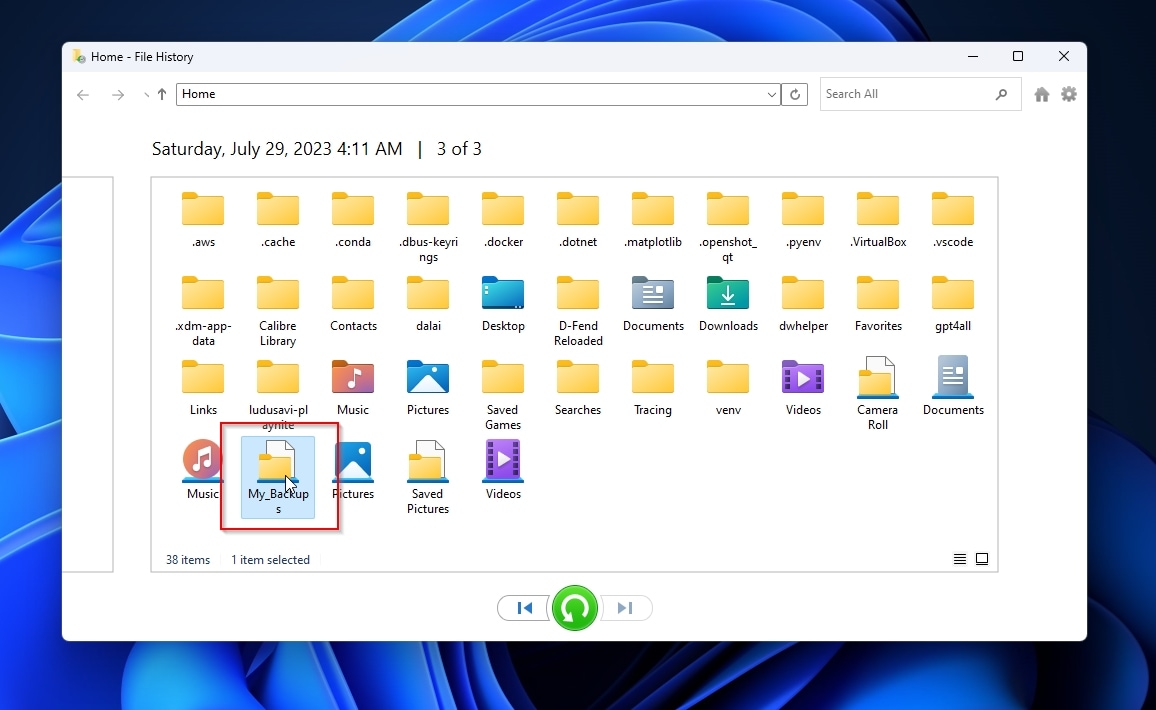
- Seek, find, and launch File History from the Windows Start menu or using Search. Then, from File History’s window and with your external drive with your backups connected, click on Restore Personal Files on the left of File History’s window.
- Select a backup if there is more than one using the left and right buttons at the bottom of File History’s window. Enter your custom library folder.
- Select the files you want to get back.
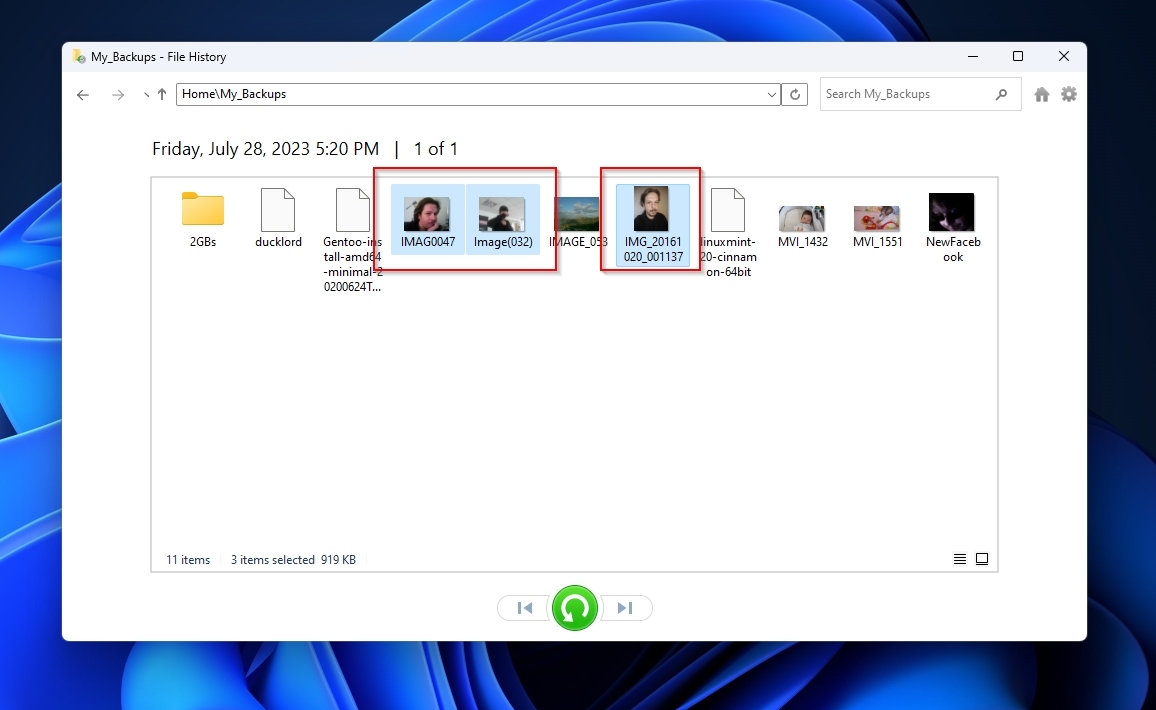
- Click on the big green button at the bottom center of File History’s window to restore your files.

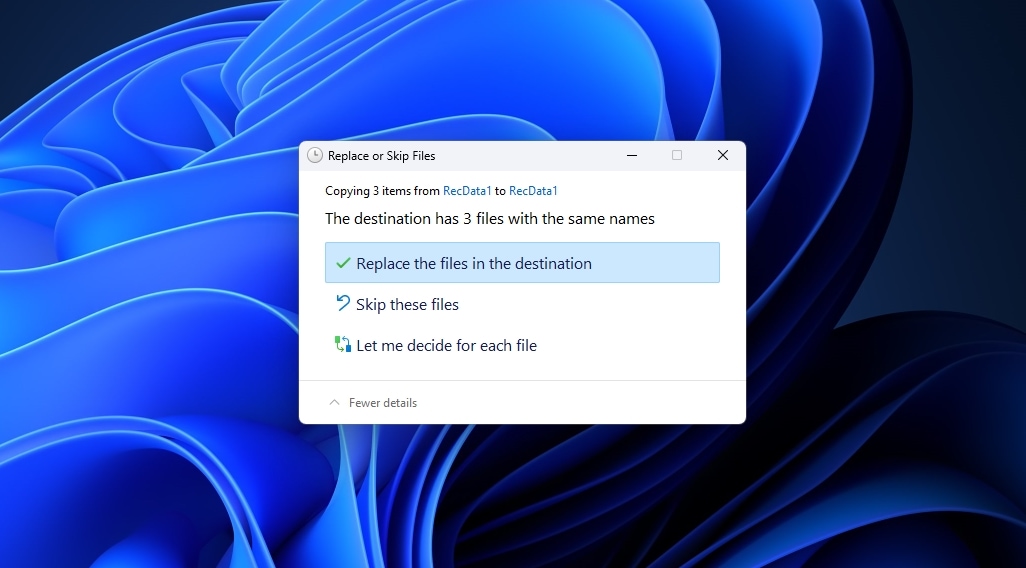
- If the recovery destination already contains files with the same names as the ones you are trying to restore, File History will ask you to choose how to proceed. You can replace the files in the destination, skip recovering them, or decide how to deal with each file individually.
How to Fix an Unallocated Disk
Getting your precious files back when a storage device appears empty or misbehaves in some other way is understandably the task with the highest priority. After getting your files back, the disk they used to call home will still be in the same state as before, practically unusable.
If the cause of the problems was a hardware issue, then it’s best to replace it. But why pay for a new storage device when often it’s possible to perform an unallocated disk recovery for free and keep using it?
Method 1: Fix an Unallocated Partition Using TestDisk
There are many ways you can “fix” a disk. One of the quickest is by using cmd and the TestDisk tool (for which you can read more here).
With the following steps, you can have TestDisk analyze your disk for lost partitions and write a new partition table to the disk to ensure it’s initialized and usable as a storage device.
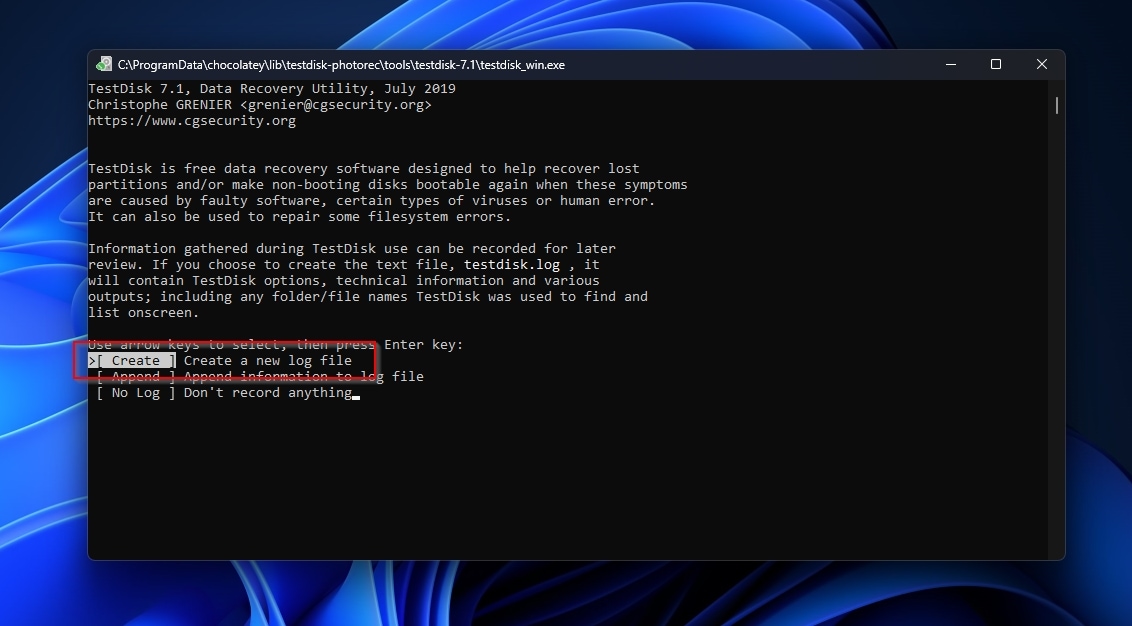
- Download the app from TestDisk’s official site – make sure to pick the correct version for your OS, which for most should be the Windows 64-bit entry. Since the app is distributed as an archive without an installer, you have to extract its contents manually to a folder. Then, enter that folder, right-click on testdisk_win.exe, and choose Run as administrator. Choose to Create (a new log file) since that can help with troubleshooting potential problems.
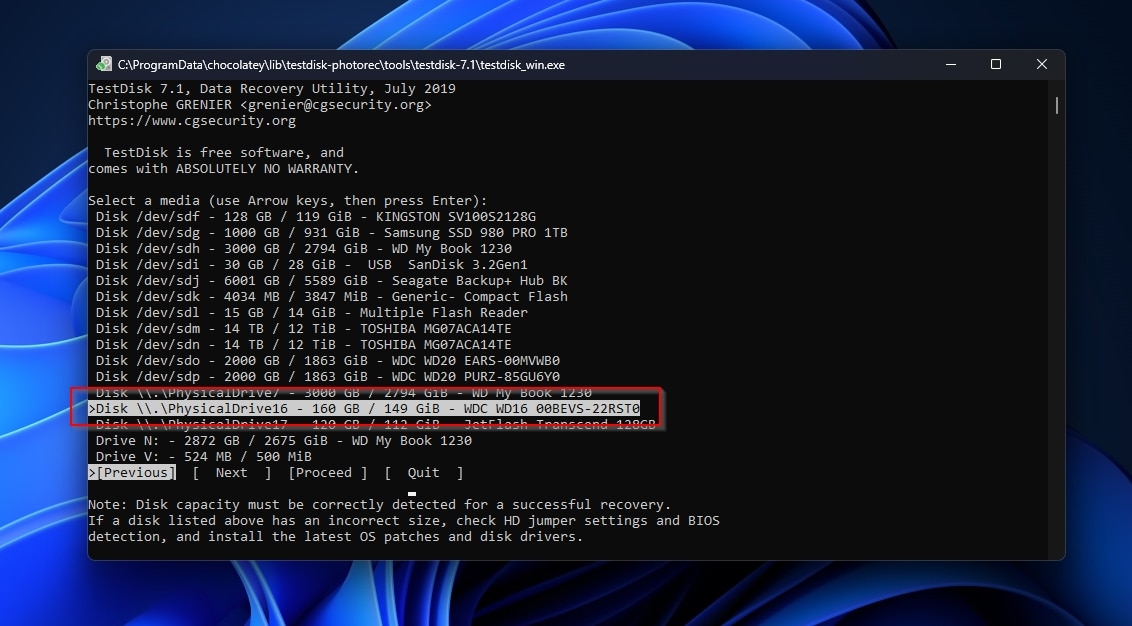
- Choose the drive you want to scan from TestDisk’s media list using the up and down cursor keys, then highlight Proceed with the left and right cursor keys and press Enter.
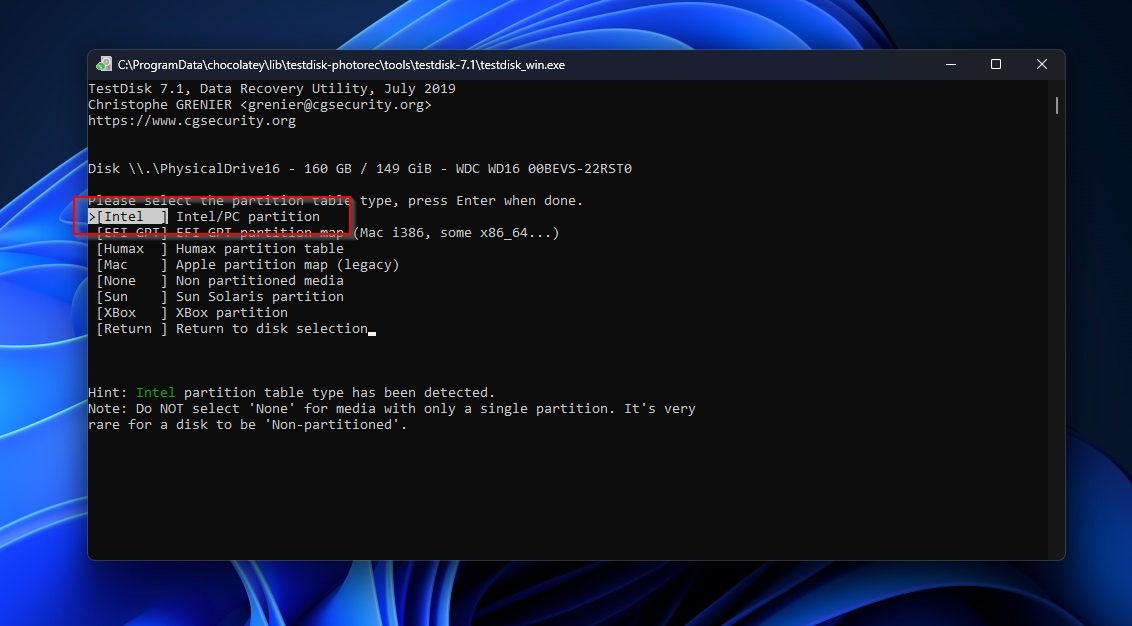
- TestDisk expects you to select the correct partition table type for your disk. You should usually go with Intel (the first option). If TestDisk has detected a partition table type, it will show you a related hint under the list.
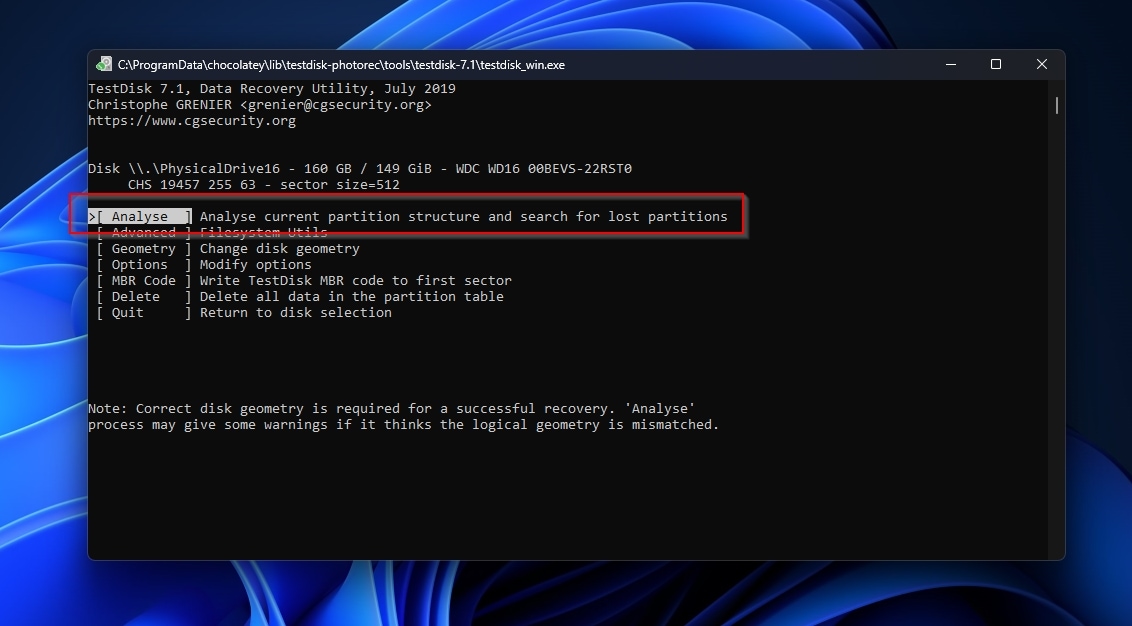
- Choose to Analyze the partition structure and search for lost partitions on your disk.
- Select Quick Search.
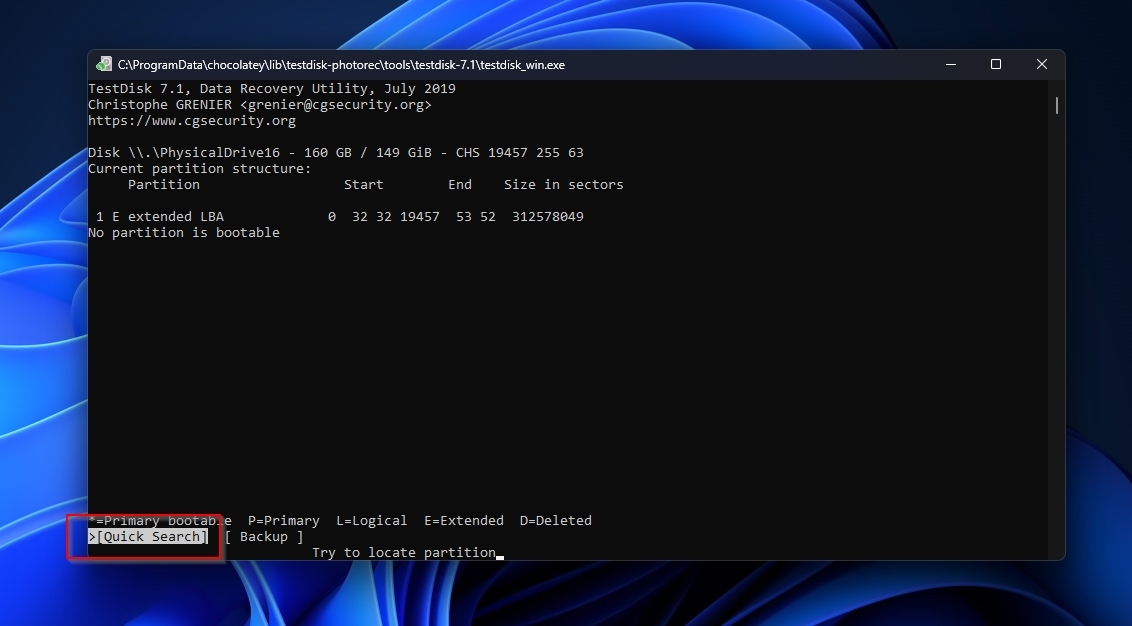
- TestDisk allows you to add and modify partitions. Still, most users usually have only a single partition taking up all of a disk’s space, which the app will already have selected. So, you’ll probably only have to hit Enter to continue.
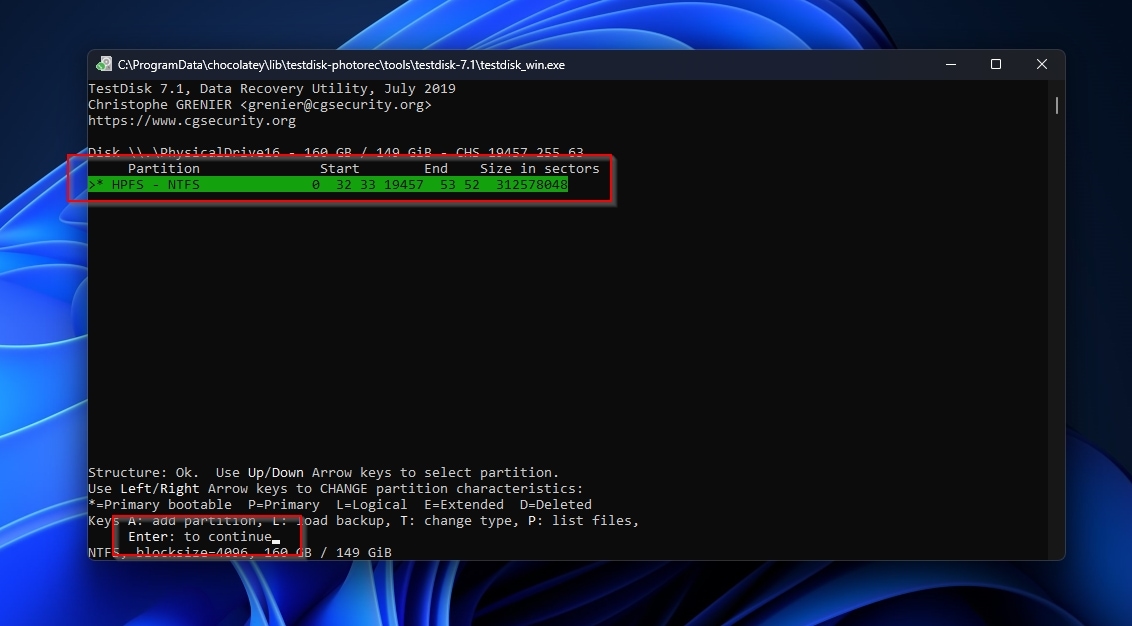
- TestDisk will show you the new or updated partition table. Highlight Write and press Enter to write it to your disk.

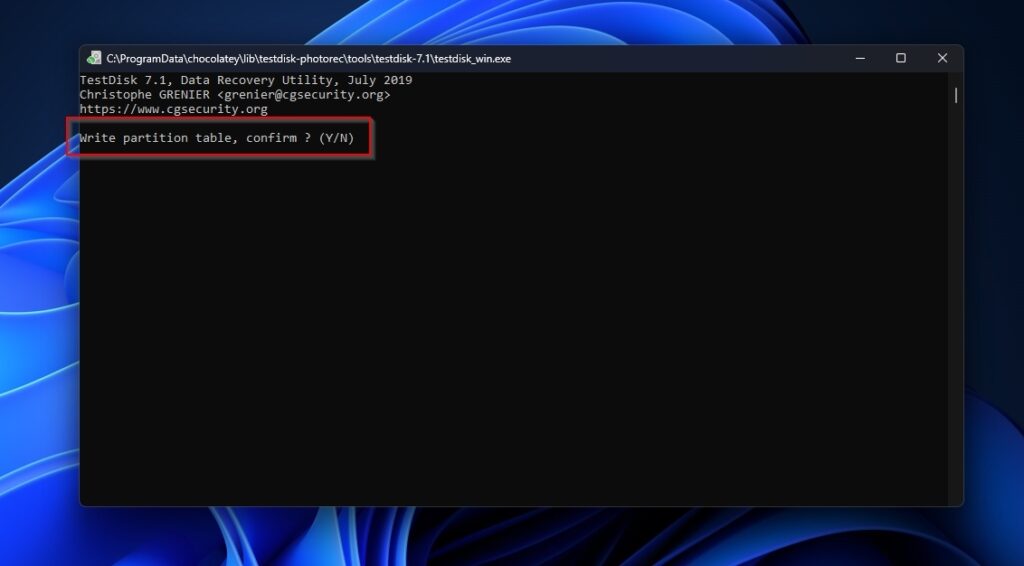
- Answer positively when TestDisk asks you to confirm writing the partition table.
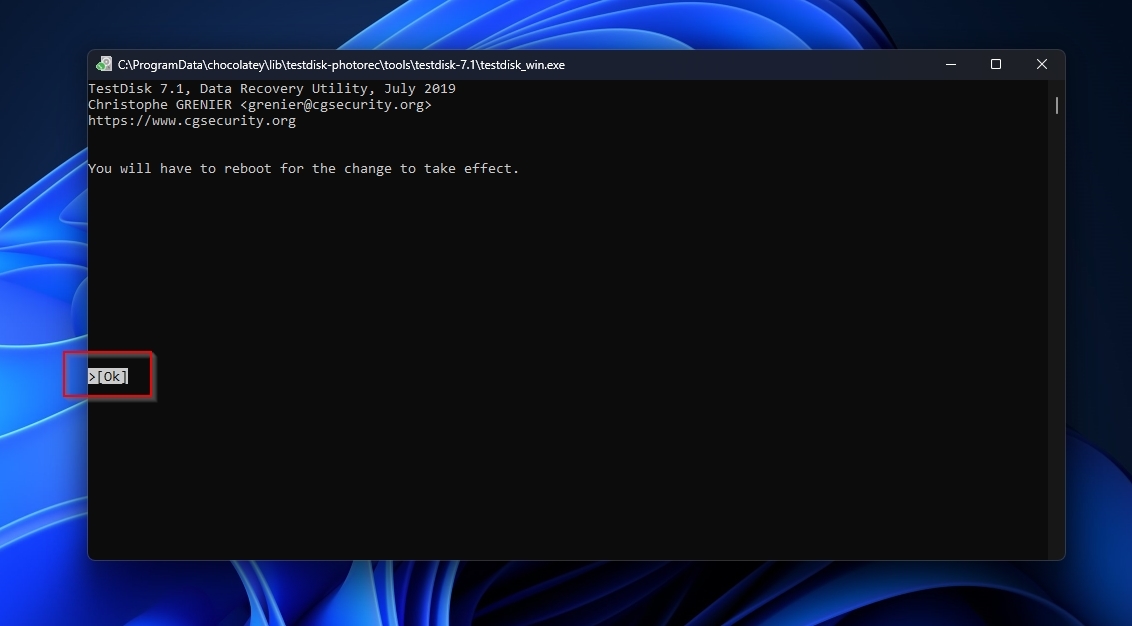
- Select OK to return to TestDisk’s disk menu.
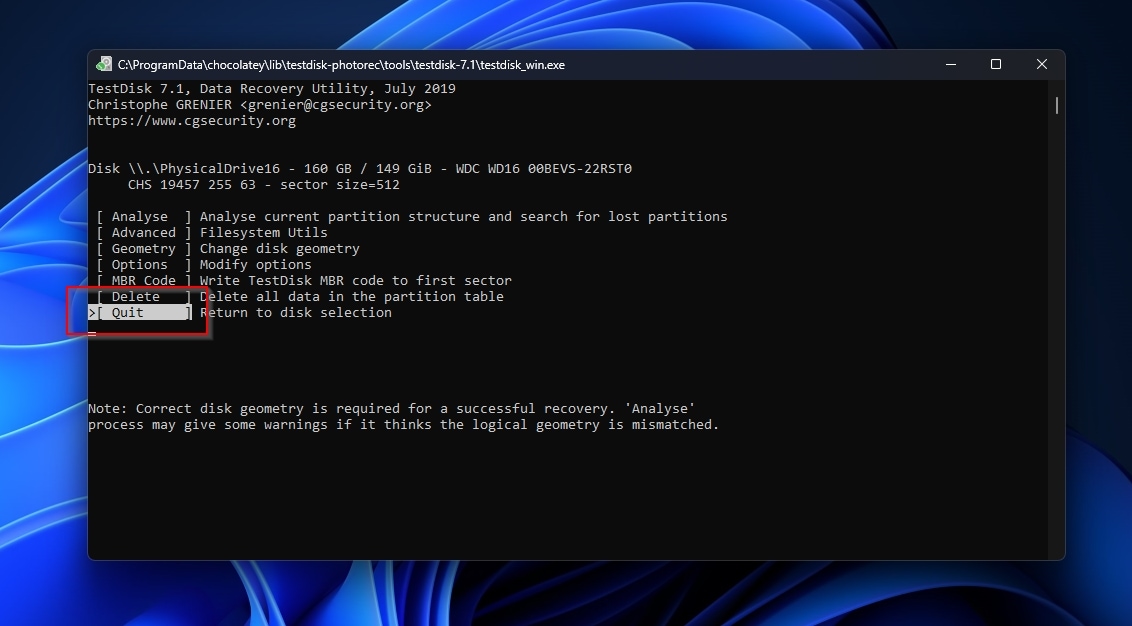
- Select Quit to exit TestDisk’s disk menu, then select Quit again from its media menu to leave the app.
Method 2: Reconfigure a Partition Using CMD
If you decide to skip any attempt at unallocated partition recovery and treat your disk as empty, starting from scratch, you’ll still have to create a new partition on it to use it.
You can do that with Windows’ Diskpart tool:
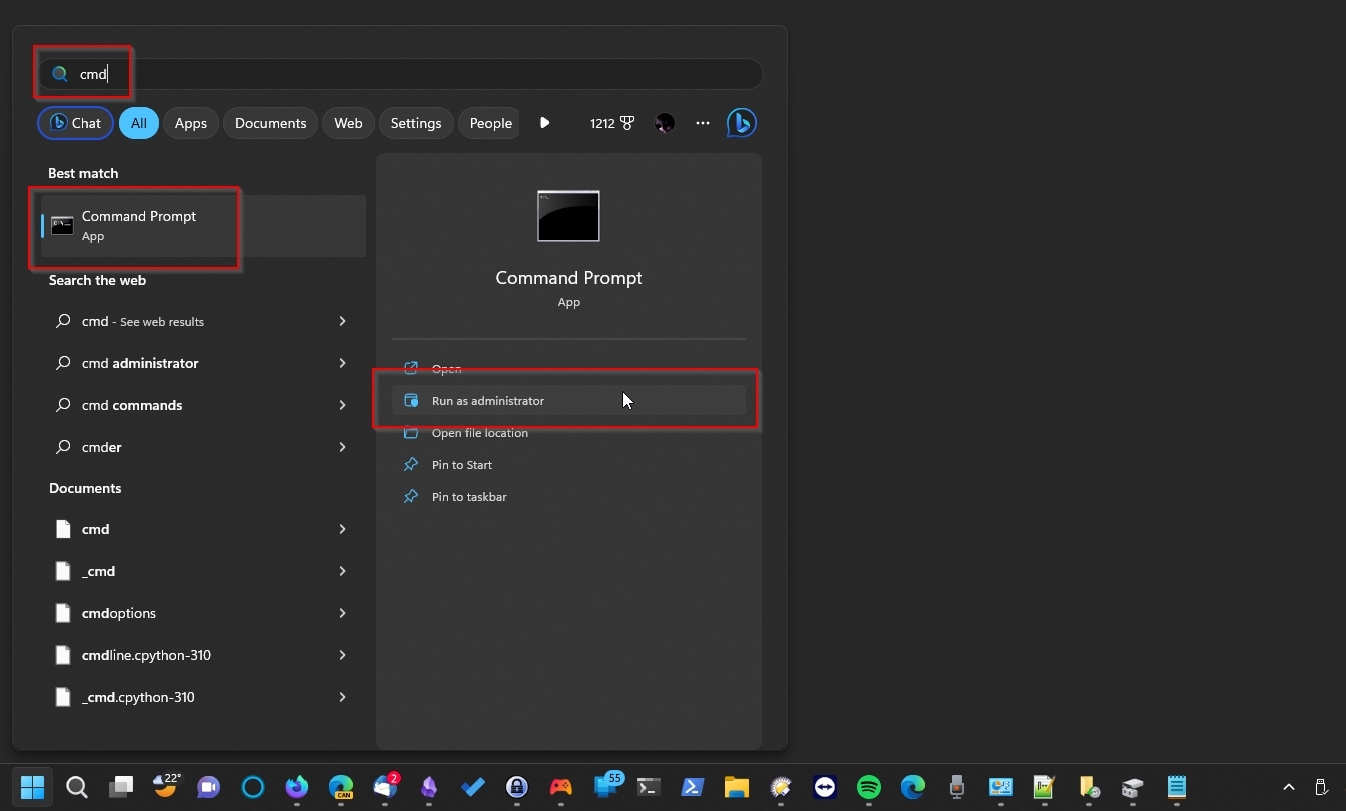
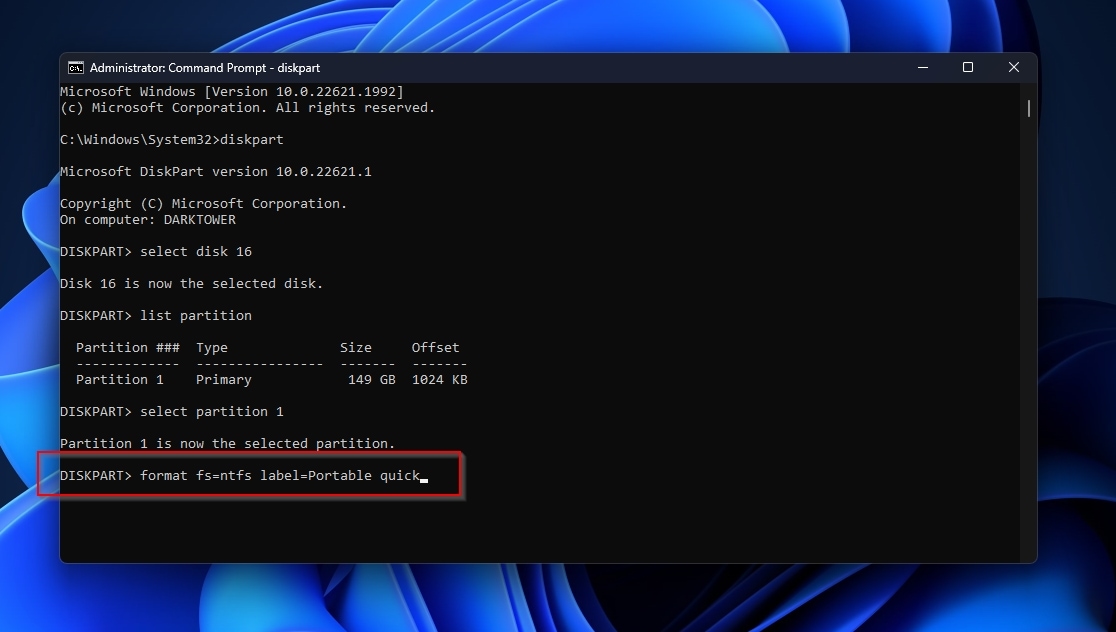
- Search for “cmd” in the Windows Start menu or using Search to locate the Command Prompt, and choose to Run as Administrator. Type diskpart in your Administrator CMD terminal window, and press Enter to launch the tool. Diskpart doesn’t offer an interface; you’ll have to interact with it by typing commands.
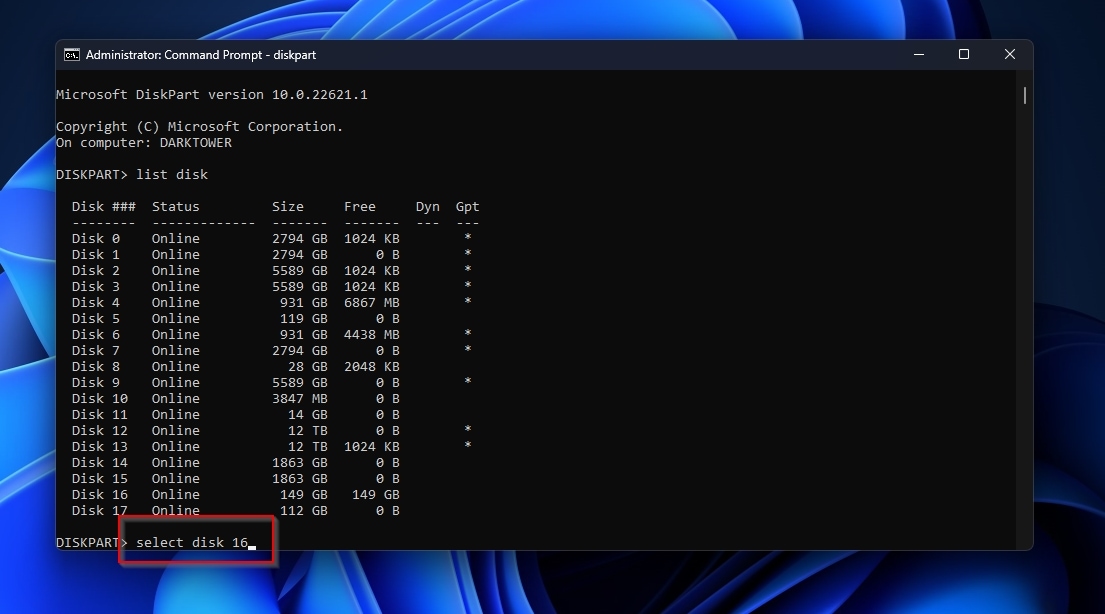
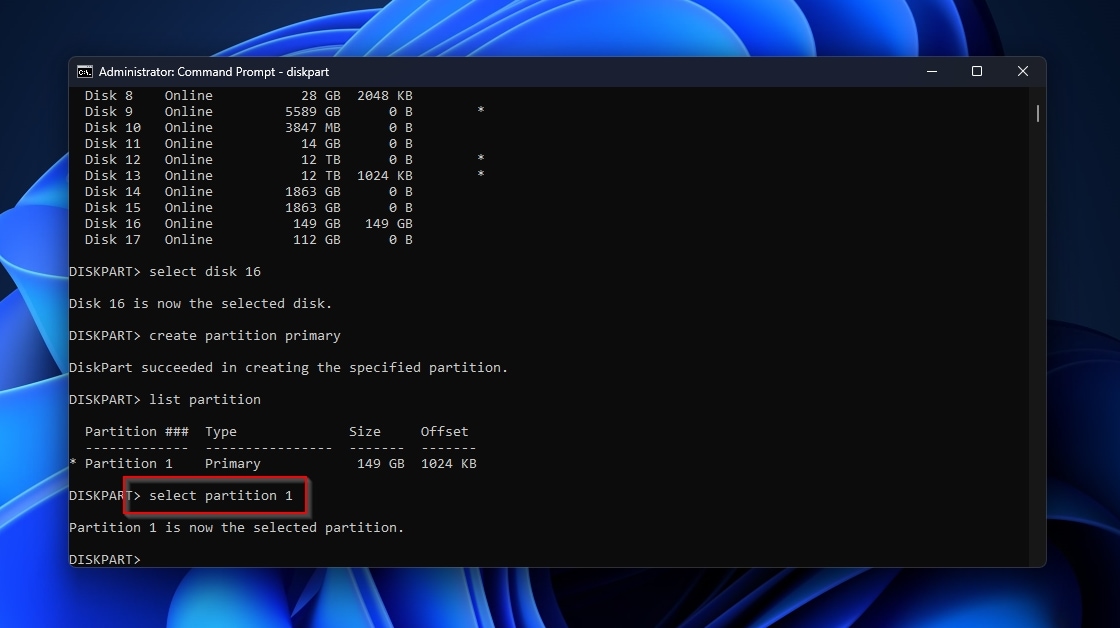
- Start with list disk to see all the disks on your PC. Note the number of the disk on which you want to act, then type select disk NUMBER to have all future commands in Diskpart target that disk. In our case, we used select disk 16.
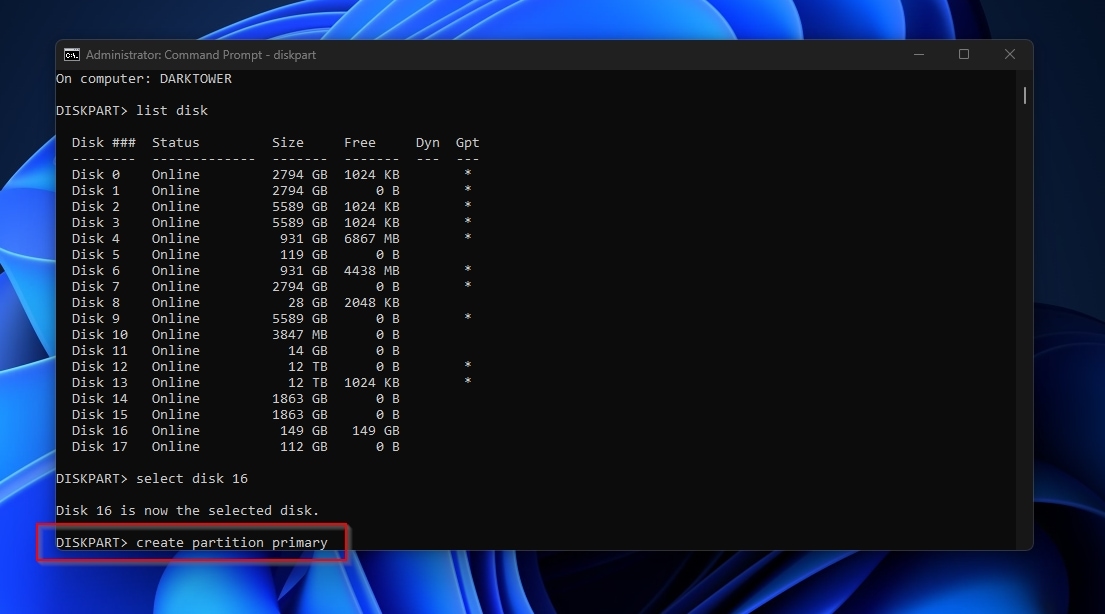
- Type create partition primary to make a new partition on the currently unallocated (“empty”) disk.
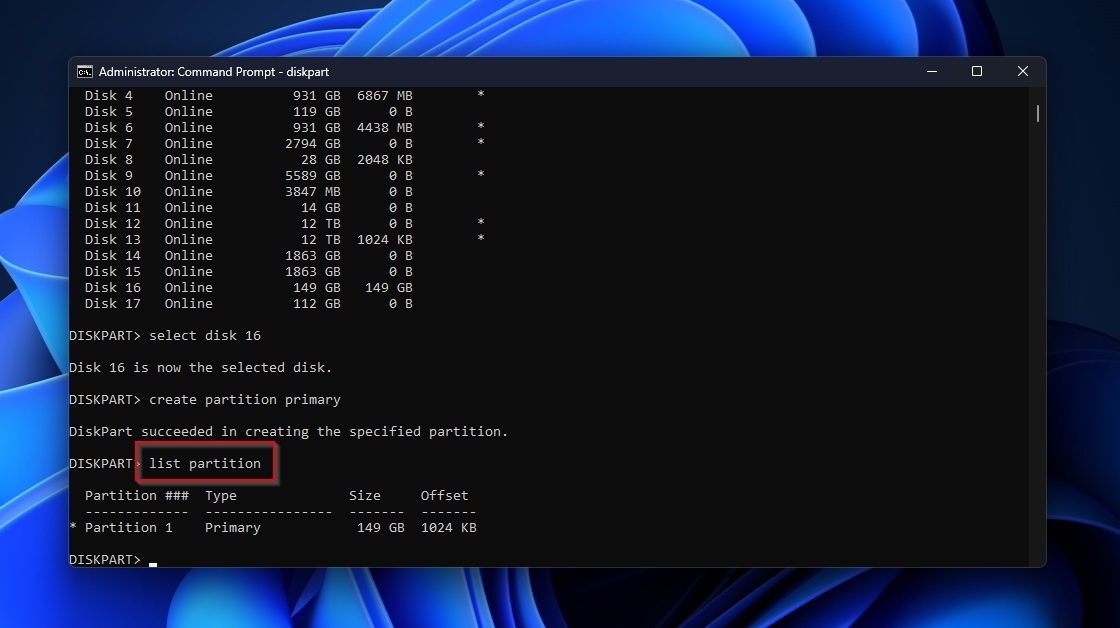
- Since we’ve only created a single partition, if you use the command list partition, it will be the only entry you’ll see.
- Use the command select partition 1 to have Diskpart target that partition.
- Your newly created partition doesn’t have a file system yet, so you’ll have to format it to use it. Do that using the command format fs=FILESYSTEM label=NAME quick, where “fs” is the file system you want to use (exFAT/FAT/FAT32/NTFS), “label” is the name you want to give the disk, and “quick” the flag that states if you want to perform a quick format (skip it for a complete format). When the process completes, remember to give your new partition a letter from which it will be accessible. For that, use the command assign letter=LETTER (for example, assign letter=Q). With everything done and your disk usable again, type exit to quit Diskpart.
Method 3: Recreate a Partition in Disk Management
Disk Management is less powerful and versatile than third-party tools. Still, it’s more than enough for creating one or more partitions to “recover” an unallocated hard drive and make it usable again.
To create, assign a letter, and format a new partition with Disk Management to use the unpartitioned and unallocated space on your disk:
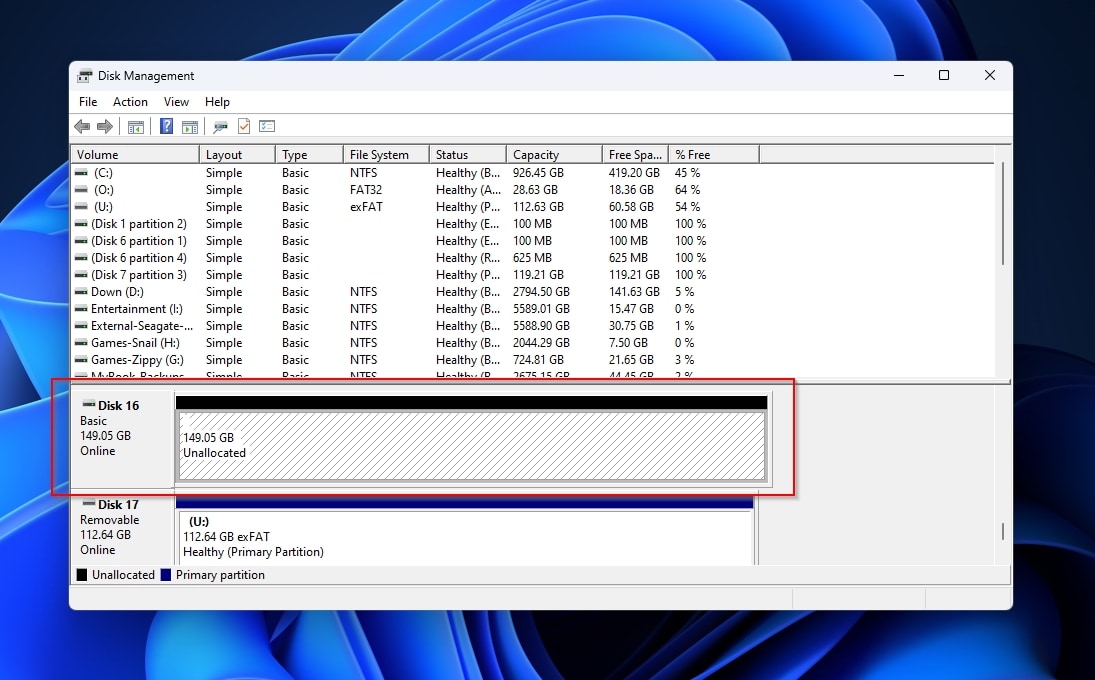
- Use the Start menu or Search to seek “disk management” and choose Run as administrator. When Disk Management’s window shows up, find your unallocated disk and click on it to select it.
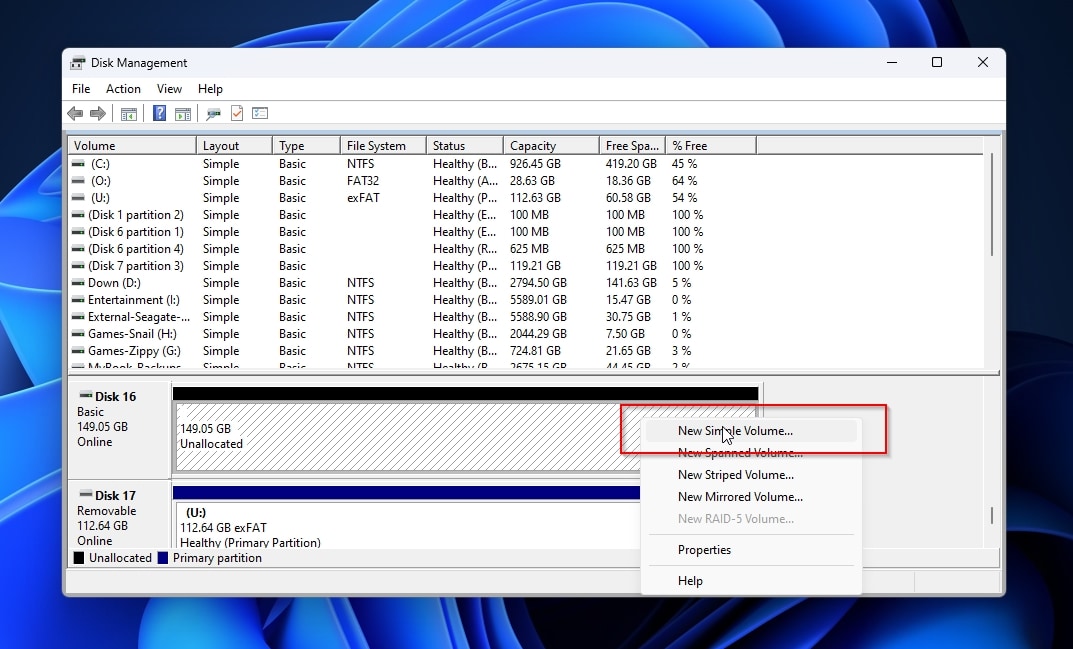
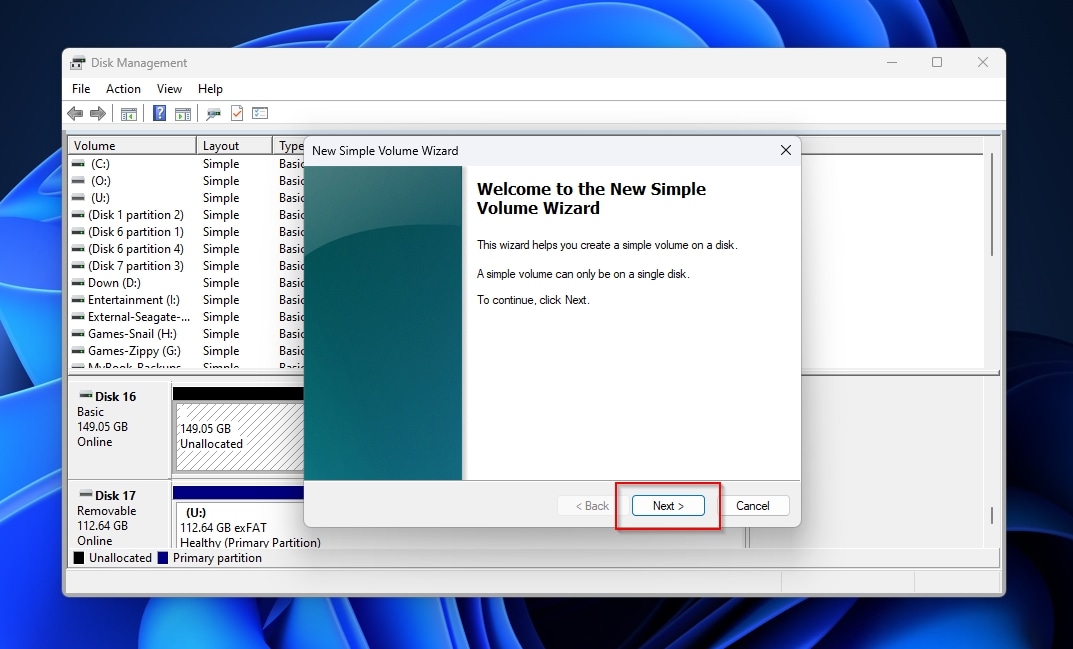
- Right-click on the unallocated space of your disk and choose New Simple Volume.
- Follow the steps of the New Simple Volume Wizard to create, configure, and enable a new partition on your disk.
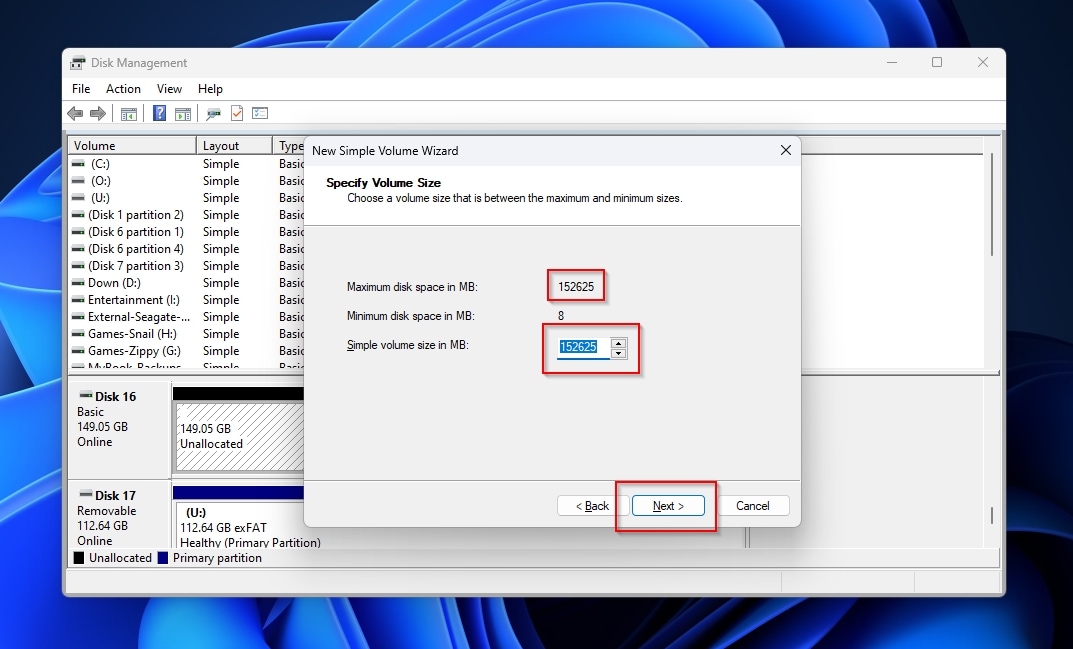
- If you don’t have a specific reason to split your disk into multiple partitions, let your new partition take up the whole disk by leaving the “Simple volume size in MB” at the same value as “Maximum disk space in MB“.
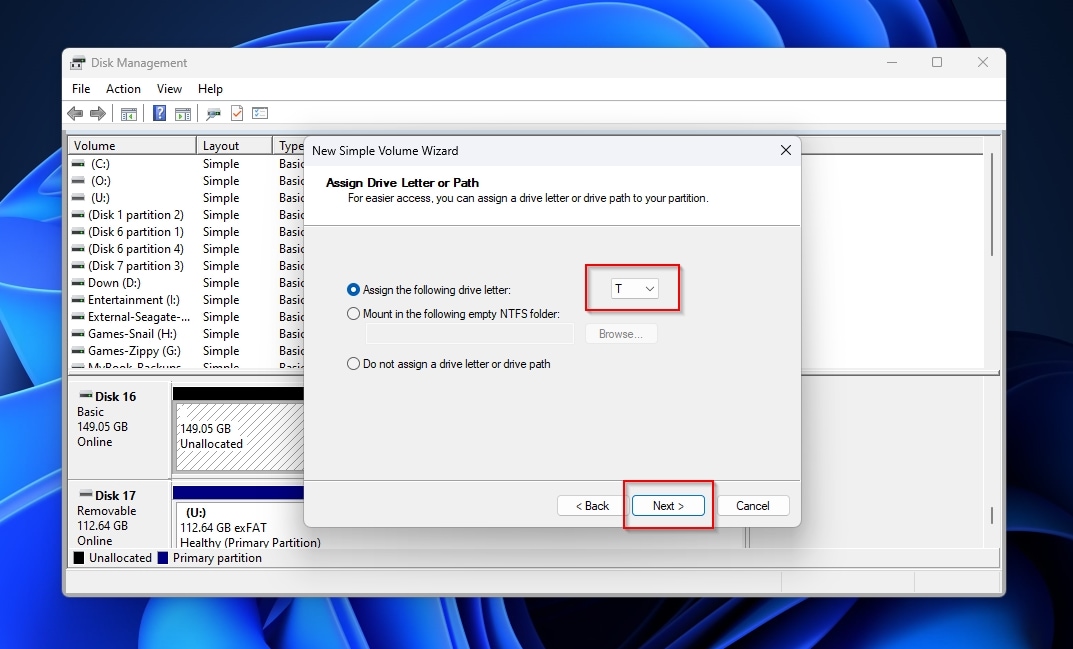
- Similarly, most people should choose to Assign the following drive letter and select a letter from the drop-down menu, from which the new partition will be accessible from the OS and other apps.
- Next, customize the format options as you wish.

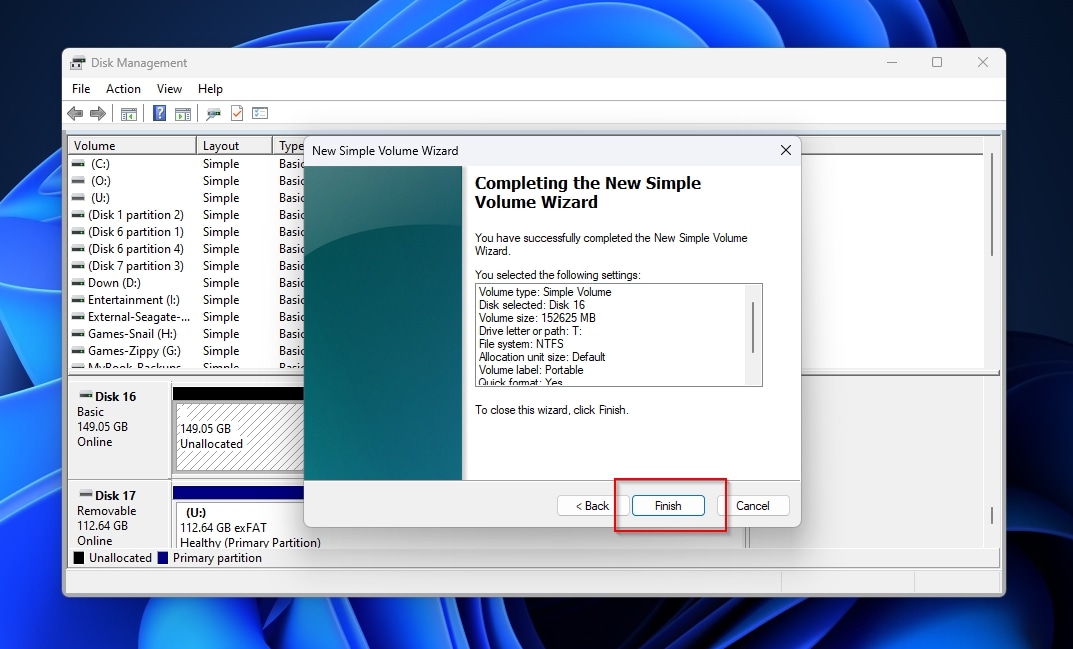
- Click Finish to complete the wizard and start formatting your disk.
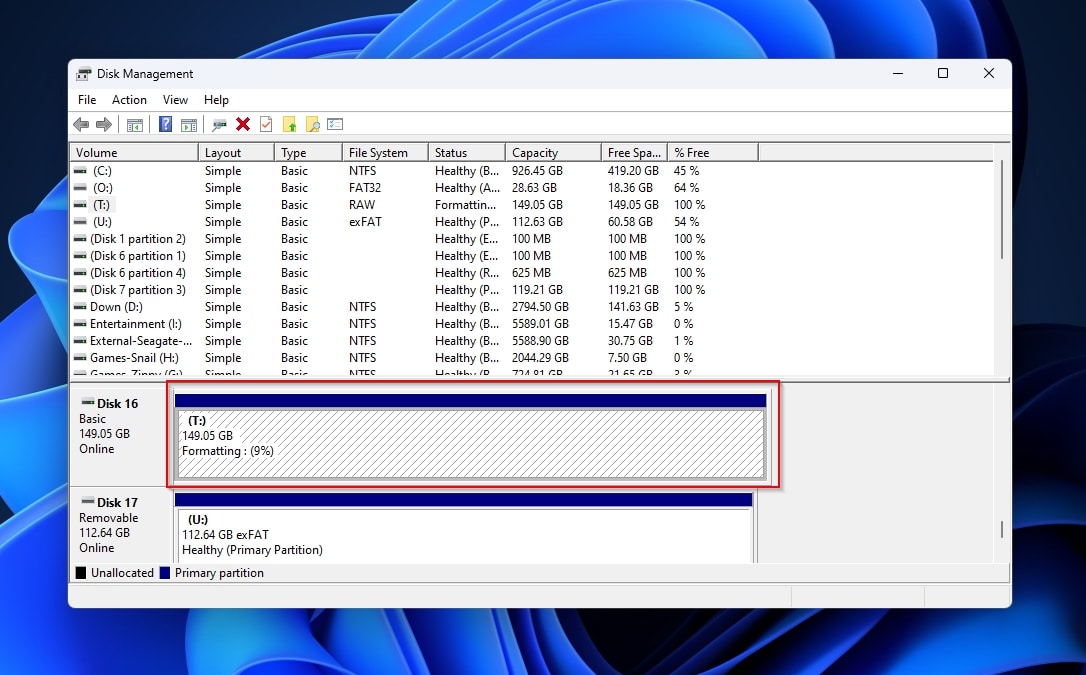
- Formatting takes time – especially on larger disks, and if you went for a complete instead of a quick format. Disk Management will show you the progress of the process on the drive’s preview.
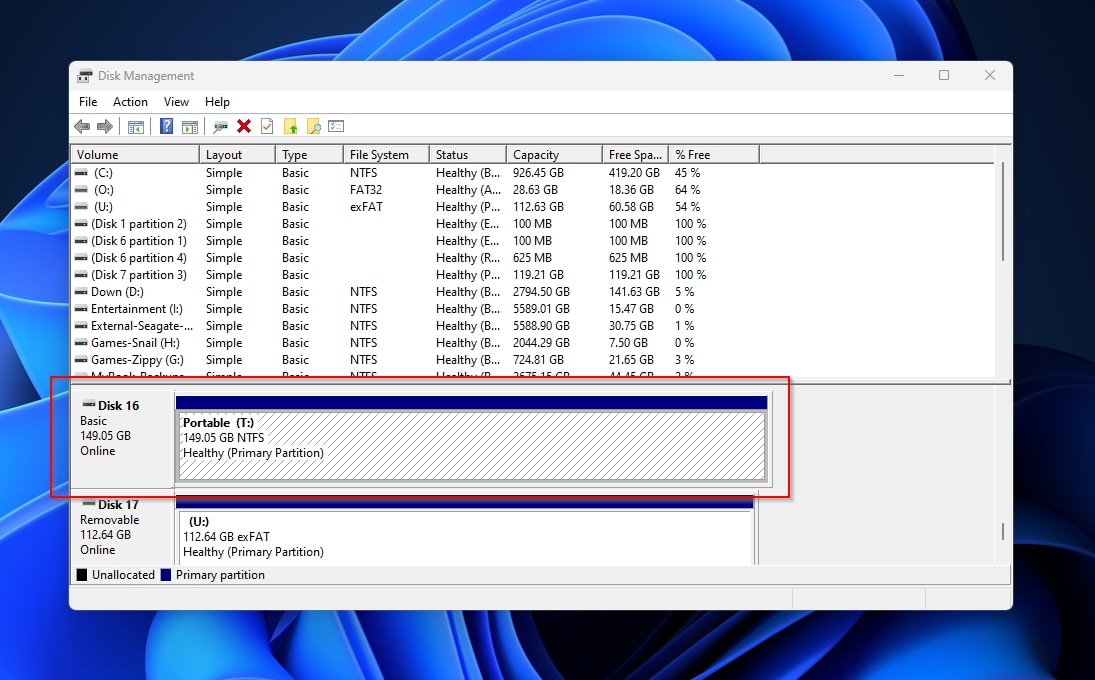
- When the process completes, Disk Management will report your partition’s letter, size, file system, health condition, and partition status on its preview. You can now access it from the OS or other apps “through” that letter.
Frequently Asked Questions
How to fix an unallocated external hard drive without losing data?
You'll have to use two methods to a) save your files from the drive and b) make it usable again:
- Use Disk Drill to select and analyze your unallocated drive.
- Select your files from Disk Drill's results and recover them to another storage device.
- Run Windows' Disk Management.
- Right-click on the unallocated space of your disk and choose to create a New Simple Volume.
- Follow the wizard's steps to create, configure, assign a letter, and format a partition to render your unallocated external hard drive usable again.
If you wish, copy back the files you recovered using Disk Drill.
How do I access an unallocated hard drive?
Data recovery apps like Disk Drill can access an unallocated drive, find your lost data, and give you access to it. Thanks to them, you can access your seemingly lost files and copy them elsewhere to “save them”.
However, they don’t “fix” your disk “to make it accessible again” by the OS or other apps. For that, you’ll have to create a new partition on them, assign it a letter, and format it, using a tool like TestDisk or Partition Management.
Remember to attempt that after recovering your files from your unallocated hard drive, for some or all of the disk’s existing data can get overwritten.
How is it possible to recover an unallocated partition for free?
You can use TestDisk to search your disk for lost partitions and, if found, reconstruct a partition table and write it back to the disk. This practically “recovers unallocated partitions”.
Conclusion
As we saw, it’s possible to recover your data from an unallocated drive, but also to fix and keep using it. Copy your recovered files back onto the drive, and everything will be “back to normal”. Soon, this adventure will be a distant memory of your first successful data recovery and drive restoration.
If you decide to fix and keep using your drive, we suggest postponing copying your files back on it until you’re sure it’s safe to do so. Testing it for two or three days to ensure there are no underlying hardware problems and it won’t magically “become unallocated” again, forcing you to go through the same steps a second time.

Odysseas is a geek with over three decades of experience in tech who occasionally lost vast amounts of data. “Data” he managed to recover most of the time using various recovery solutions.
Eventually, he joined our team to write about such data loss and recovery scenarios and all related software and methods.
Despite having written thousands of articles and tutorials for various popular outlets, he considers his data-recovery adventures an ongoing learning experience.
- Frisco, Texas, United States
Yevgeniy Tolkunov is Hardware Engineer at ACE Data Recovery. Yevgeniy has a Master's Degree in Physics, Information Technology; 15+ years of experience.