How to Recover Emptied Trash on a Mac [Solved]
If you’re wondering whether it’s possible to recover emptied Trash on Mac, you’ve probably found yourself in a situation you wouldn’t wish on anyone else.
Perhaps you’ve deleted important files without even realizing it at first and without a backup that you could use for recovery. It’s also possible that your data disappeared after a software error or hardware failure caused your Mac to crash unexpectedly.
Regardless of why you need to recover empty Trash on Mac, full recovery is possible if you follow our instructions and act quickly. Let’s look at three (but actually two) possible ways to recover files deleted from Trash on Mac.
Understanding the Possibility of Recovering Mac Trash Files
When you delete files from your Mac, they aren’t always gone forever, and there may still be a chance to recover them. The success of the recovery process depends heavily on the circumstances surrounding the deletion. Below is a table that describes various data loss situations and how they affect the data recovery process to help you understand what you’re dealing with, and which solution is the most suitable:
| Scenarios | Solutions and recovery chances |
| I accidentally sent the wrong files to the Trash | This scenario has the highest recovery chances as the files are not permanently deleted and can be easily restored directly from the Trash folder itself. |
| I have emptied Trash, but I am using Time Machine or saving files to iCloud. | If you have been using Time Machine or iCloud for backup purposes, then the chances of recovery are very high, and you should be able to recover your lost files quickly & easily. |
| I have emptied the Trash, or it has been more than 30 days since the day of the deletion. I don’t have any backups. | The chances of recovery are moderate and depend on the time elapsed since the deletion and the usage of the computer since then. Follow our instructions on how to use data recovery software like Disk Drill and PhotoRec to scan the storage device where the Trash is located as soon as possible. |
| I have a modern MacBook with an SSD. What’s more, I don’t have any backups. | Recovery chances can be low, especially if the data has been deleted for a while, due to the way SSDs manage data. However, you should still follow our instructions for using third-party software solutions like Disk Drill or PhotoRec because they still provide a chance of recovery. |
How to Restore Trash on a Mac
In this section, we will explore the most effective approaches for recovering data from emptied Mac trash: using backups and data recovery software. The first approach is useful if you have recent backups of your data, while the second is effective when you don’t have a backup or it’s outdated. We’ll guide you through the steps of both methods, so let’s get started! But first, let’s check the Trash one more time.
Method 1: Check if the Deleted Files Are Still in the Trash
Yes, you’ve probably already done that, but still. By default, deleted files on Mac computers go to a special folder called Trash, where they stay until the folder is emptied, which can happen automatically after 30 days, depending on your configuration. Because you may have only a limited amount of time to act, Trash is the first place you need to check whenever you need to recover deleted files on your Mac.
To restore files from Trash Bin:
- Open Trash by clicking on its icon, located on the right side or bottom of the Dock. If you don’t see the icon, you can also open Trash by entering the following command in a Terminal window: open .trash

- Go through Trash and look for the files you want to undelete. When you find them, select them by either pressing and holding the command key and then clicking the files or by holding the left mouse click and dragging the cursor around them.
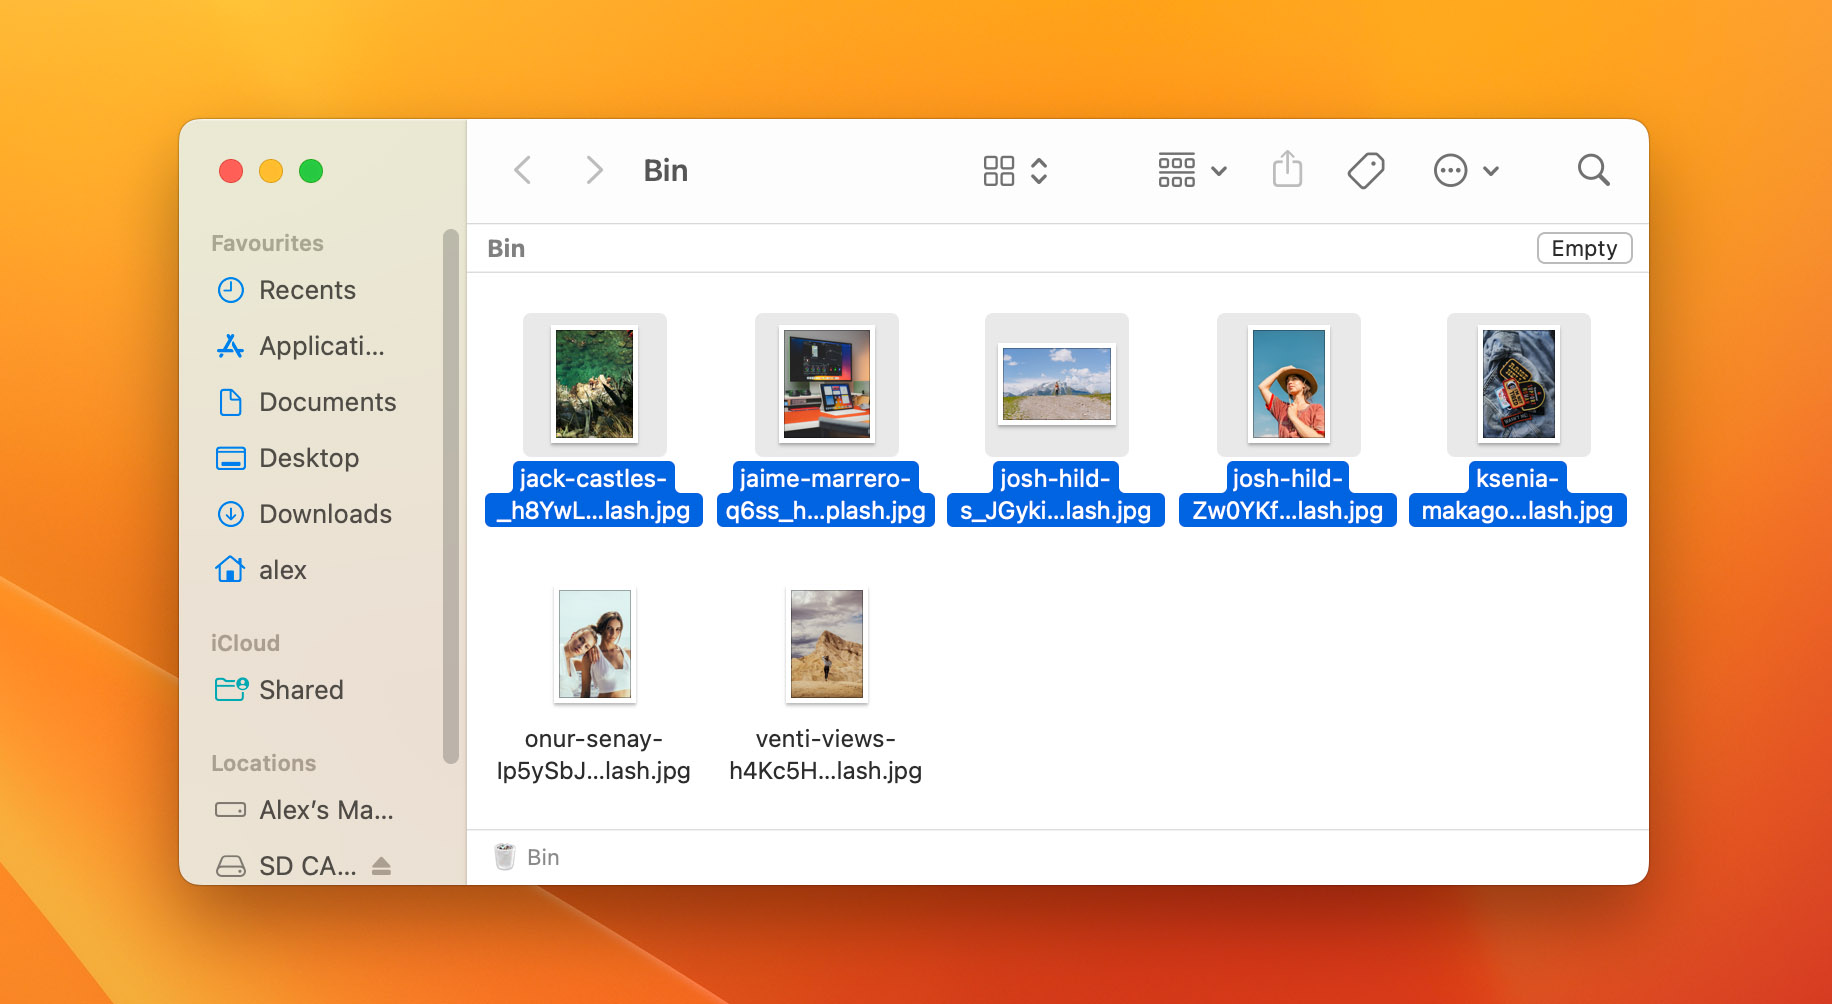
- Click on any of the selected files, hold the click, and drag your mouse to another folder or your desktop. As soon as you release the mouse, the files will be moved to the destination. If you change your mind halfway through, you can simply move the files back to Trash.
Method 2: Recover Files Deleted From Trash on a Mac via Backup
What if you can’t recover files from Trash on Mac because they’re no longer there? Does it mean the files are gone for good? Fortunately, it doesn’t. As long as you have a backup, you should be able to recover them in no time.
Option A: Time Machine
Since Mac OS X Leopard, Mac users can back up and recover files using Time Machine, and this feature is still relevant for macOS Ventura. This innovative backup software application distributed as part of macOS, and its purpose is to automatically back up all files users have on their system.
Because Time Machine doesn’t back up the Trash folder, you can’t use it to recover emptied Trash on Mac. However, you can use it to recover deleted files from whichever location they were before.
To recover files deleted from Trash Bin using Time Machine:
- Connect your Time Machine backup disk if it’s not already connected to your Mac.
- Open the folder that contained the deleted files. For example, if the files were in your Documents folder, open Finder and select Documents from the sidebar on the left.
- Click the Time Machine icon located in the Menu Bar and choose Browse Time Machine Backups.

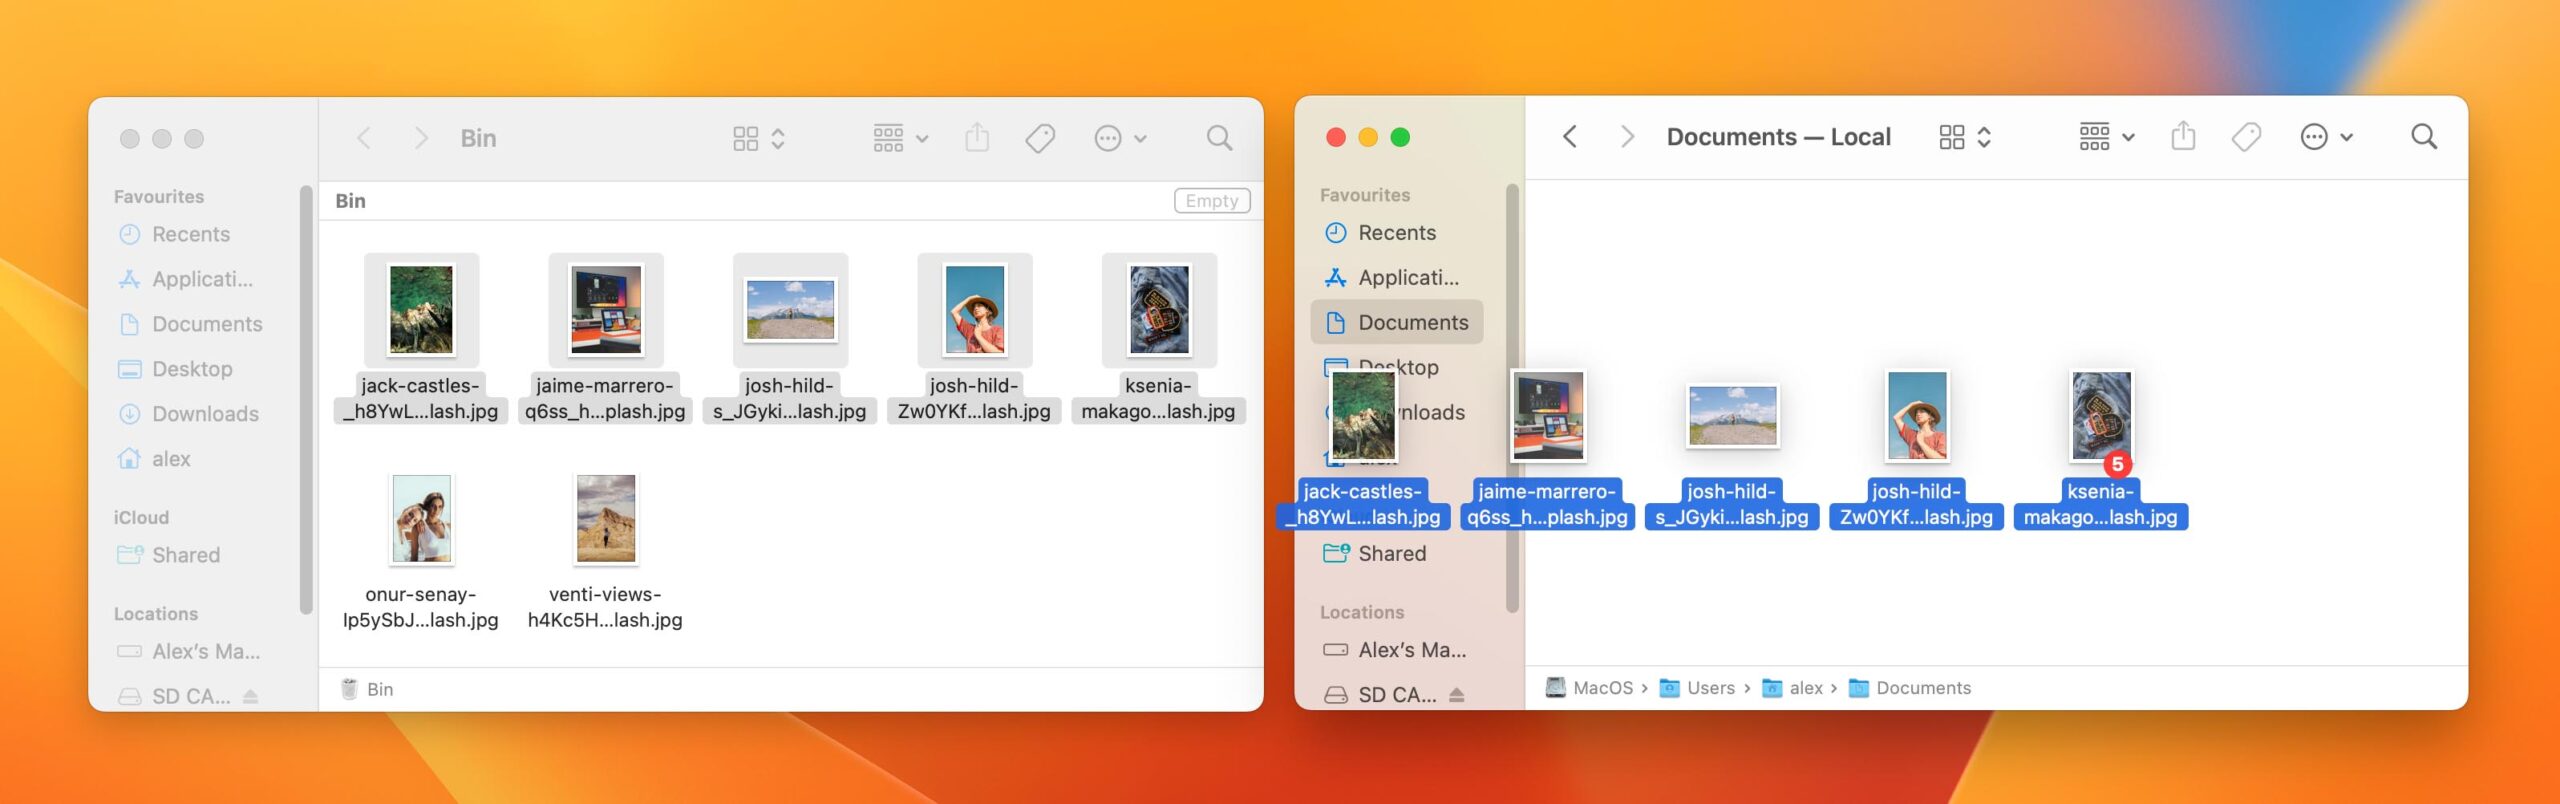
- Locate the files you want to recover using the timeline on the right edge of the screen.
- Click Restore to restore the selected file.
Option B: iCloud Backup
iCloud, Apple’s cloud storage service, is another potential solution for recovering files that have been deleted from the Trash Bin on your Mac.
Just know that this solution is usable only when you’ve manually backed up your data to iCloud instead of relying solely on automatic file synchronization. Why? Because iCloud synchronization deletes data from all devices as soon as the same date is deleted from one device.
If that’s your case, then you can follow these steps to recover files deleted from Trash Bin using iCloud:
- Open your web browser of choice, go to the iCloud website, and log in using your Apple ID.
- Click the “Drive” icon to see all your iCloud Drive files.
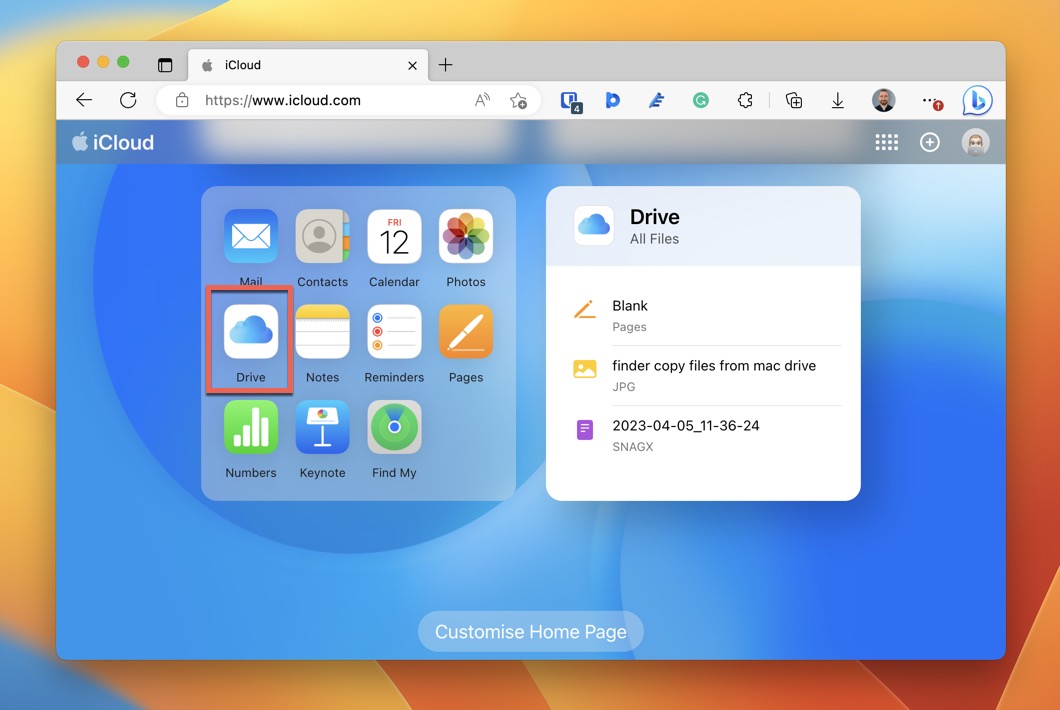
- Look for the files that you’ve deleted and want to recover. iCloud Drive displays recently opened files by default, and you want to choose the Browse tab in the left pane to see all files.
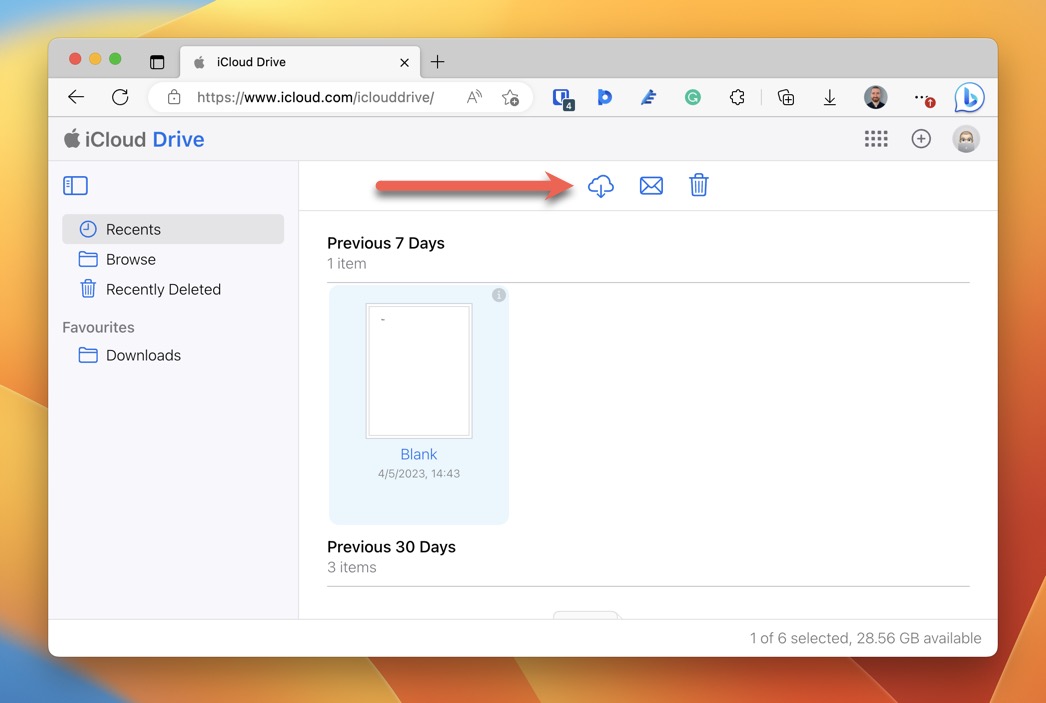
- Select all missing files (you can keep the Command key pressed while clicking on them to select multiple files).
- Click the “Download” icon located at the top of the screen to download the missing files to your device.
Method 3: Recover Emptied Trash on a Mac via Third-party Software
A backup is useful only when you actually have one. But what if you haven’t been backing up your files? That’s where data recovery software applications like Disk Drill and PhotoRec come in, allowing you to recover emptied Trash on Mac by analyzing the file system and looking for signs of deleted files.
We’ve diligently tested a variety of data recovery applications using our exclusive testing methodology, identifying the most effective tools for rescuing your precious files.
Option A: Disk Drill
![]() Disk Drill is a robust yet user-friendly data recovery software application designed to help you recover permanently deleted files from trash on Mac and much more.
Disk Drill is a robust yet user-friendly data recovery software application designed to help you recover permanently deleted files from trash on Mac and much more.
Not only does Disk Drill offer a unique one-click approach to data recovery, automating even the most complicated steps, but it also has an array of extra features that protect your files against future data loss and ensure your Mac stays in optimal condition.
When we evaluated Disk Drill, we considered a range of parameters before we decided that it’s a top choice for the recovery of emptied Trash on Mac, including:
- Recovery capabilities: Another critical area of our evaluation was recovery capabilities. Disk Drill supports a variety of file systems and file types, can recover original file names and folder structures, and can proficiently scan corrupted or RAW hard drives while bypassing system errors.
- Usability: One of the key features we highlighted was its usability. Disk Drill’s user-friendly interface and options to preview and filter recovered files by type, size, or date of deletion make the recovery process smoother and more intuitive.
- Value: Moreover, Disk Drill provides a good value for its price, taking into account the functions it offers and the fact that its free version can preview an unlimited number of files deleted from Trash for free.
To recover emptied Trash using Disk Drill:
- Download, install, and launch Disk Drill.
- Click the Search for lost data button next to the drive on which your files were stored prior to deletion.
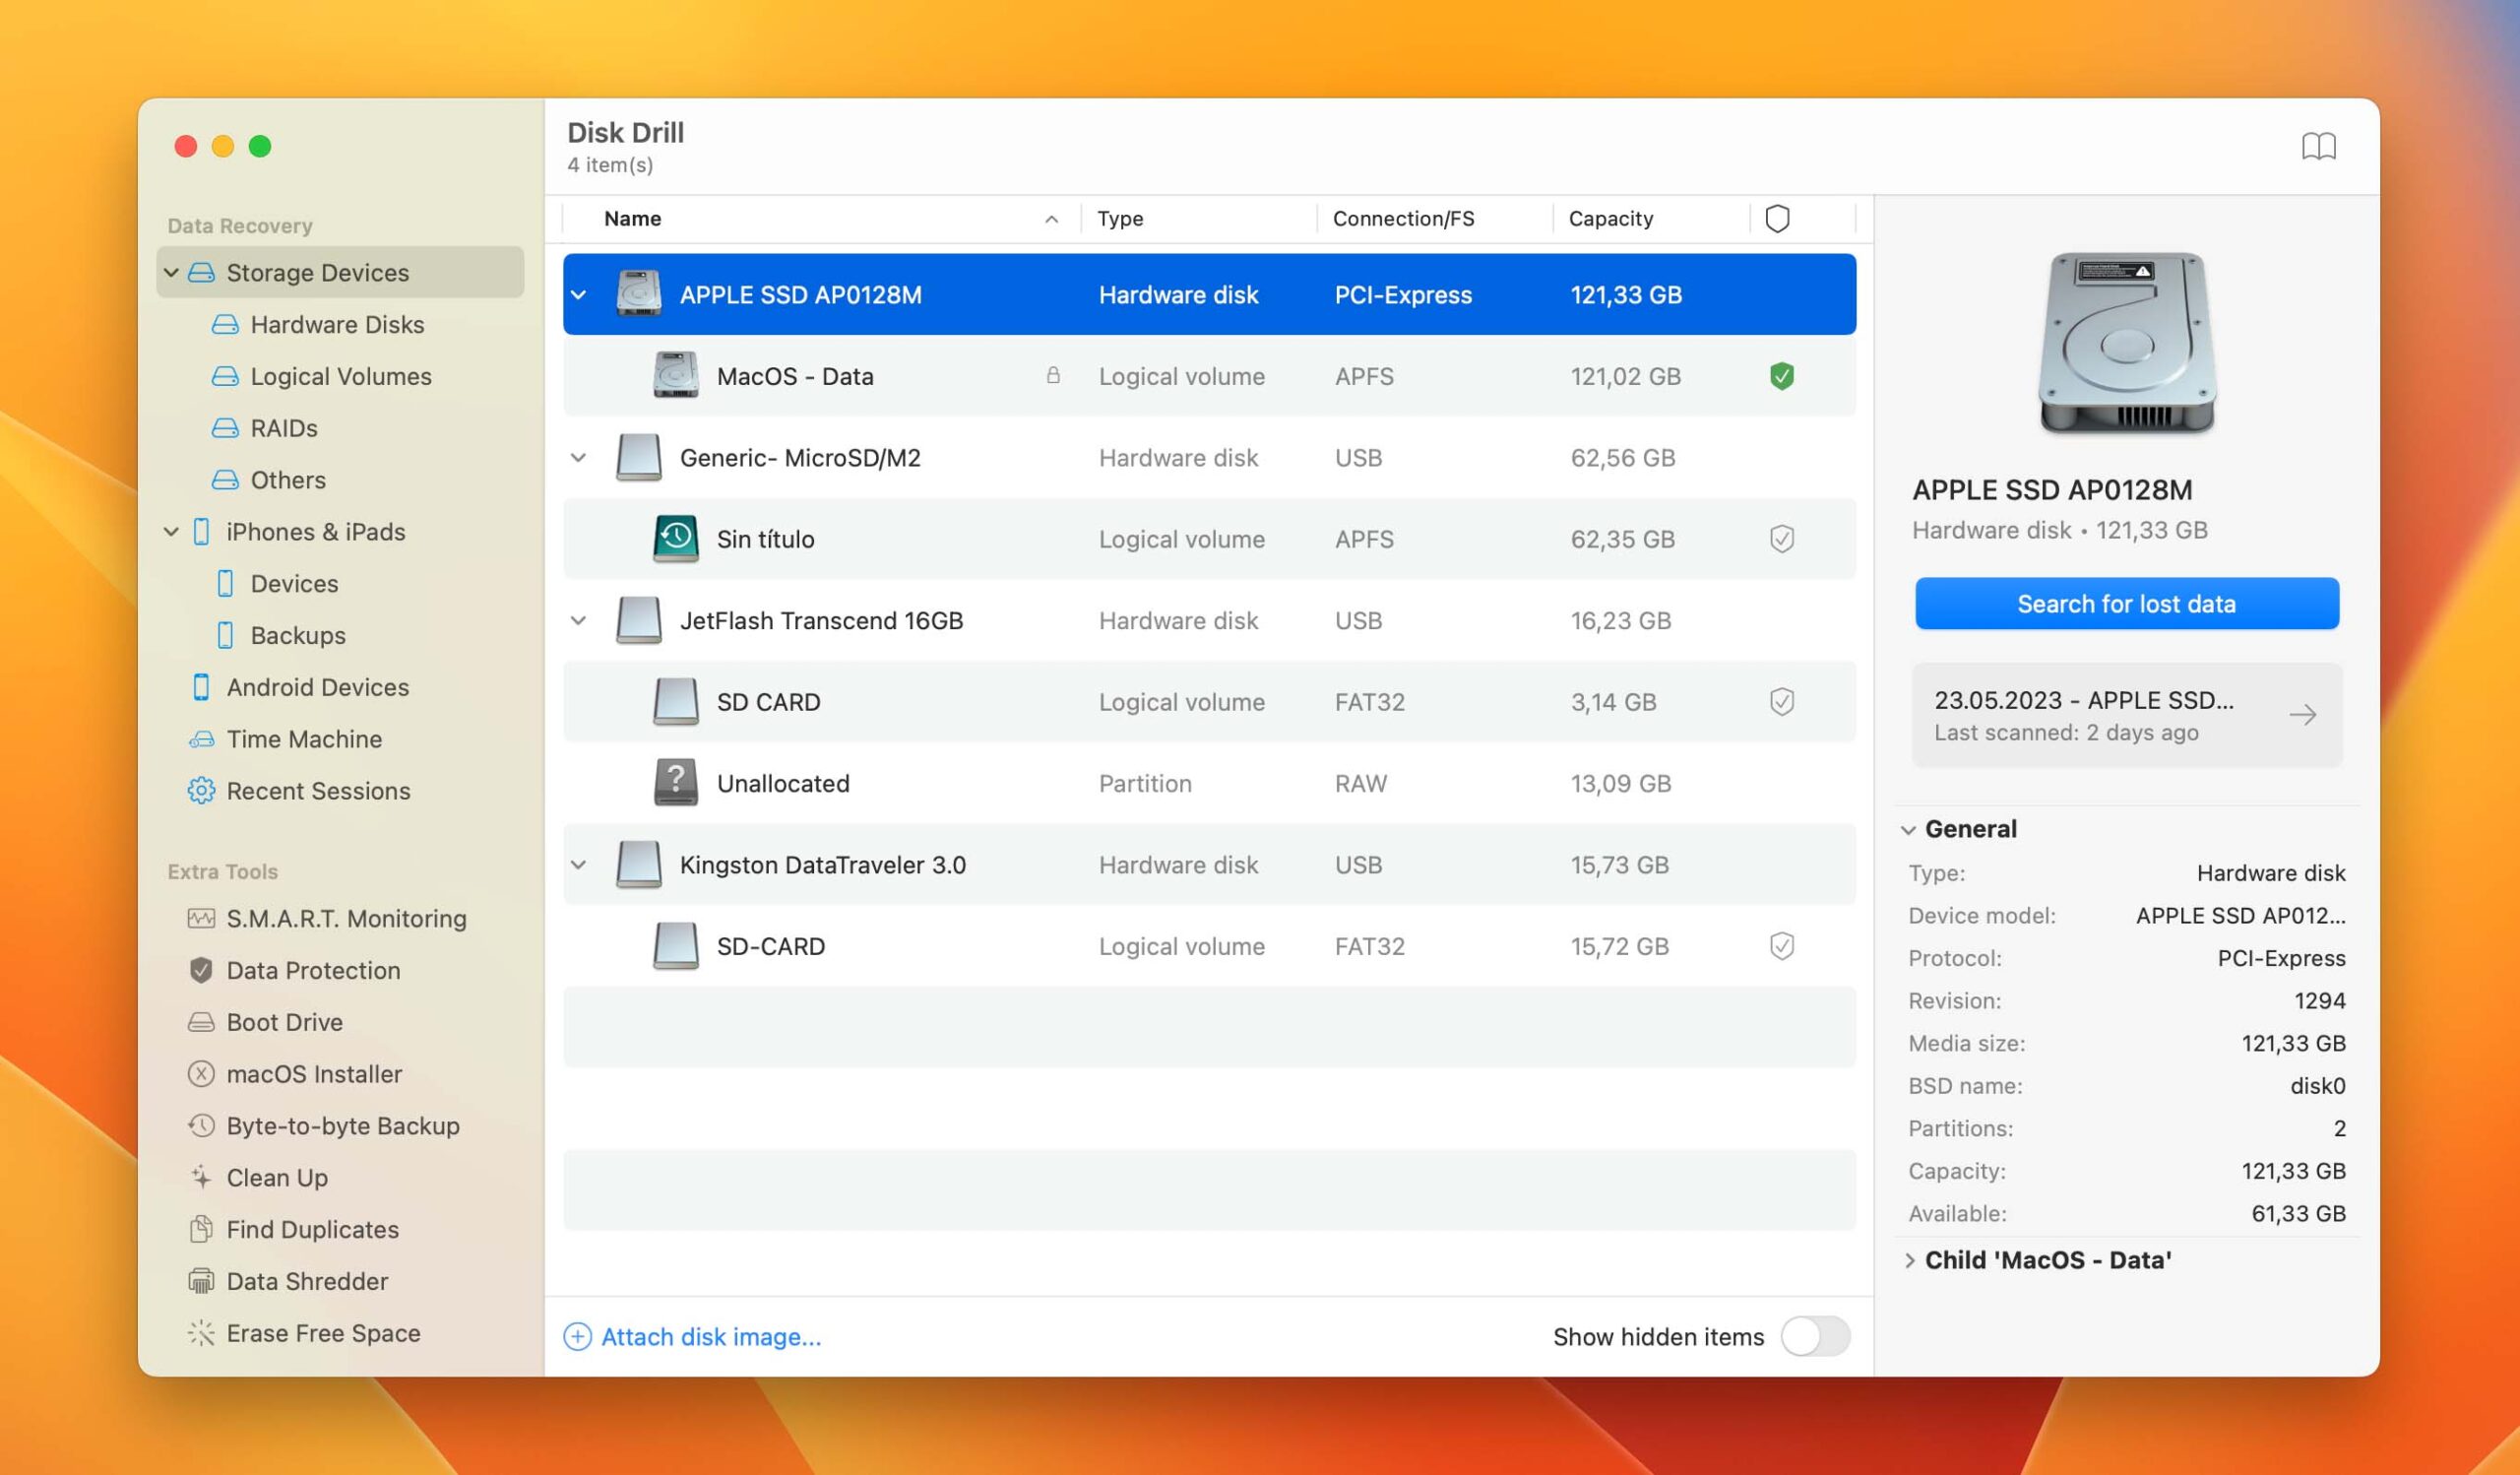
- Wait until Disk Drill finishes analyzing the drive.
- Look inside the recovery folders and locate the deleted files using the preview feature.
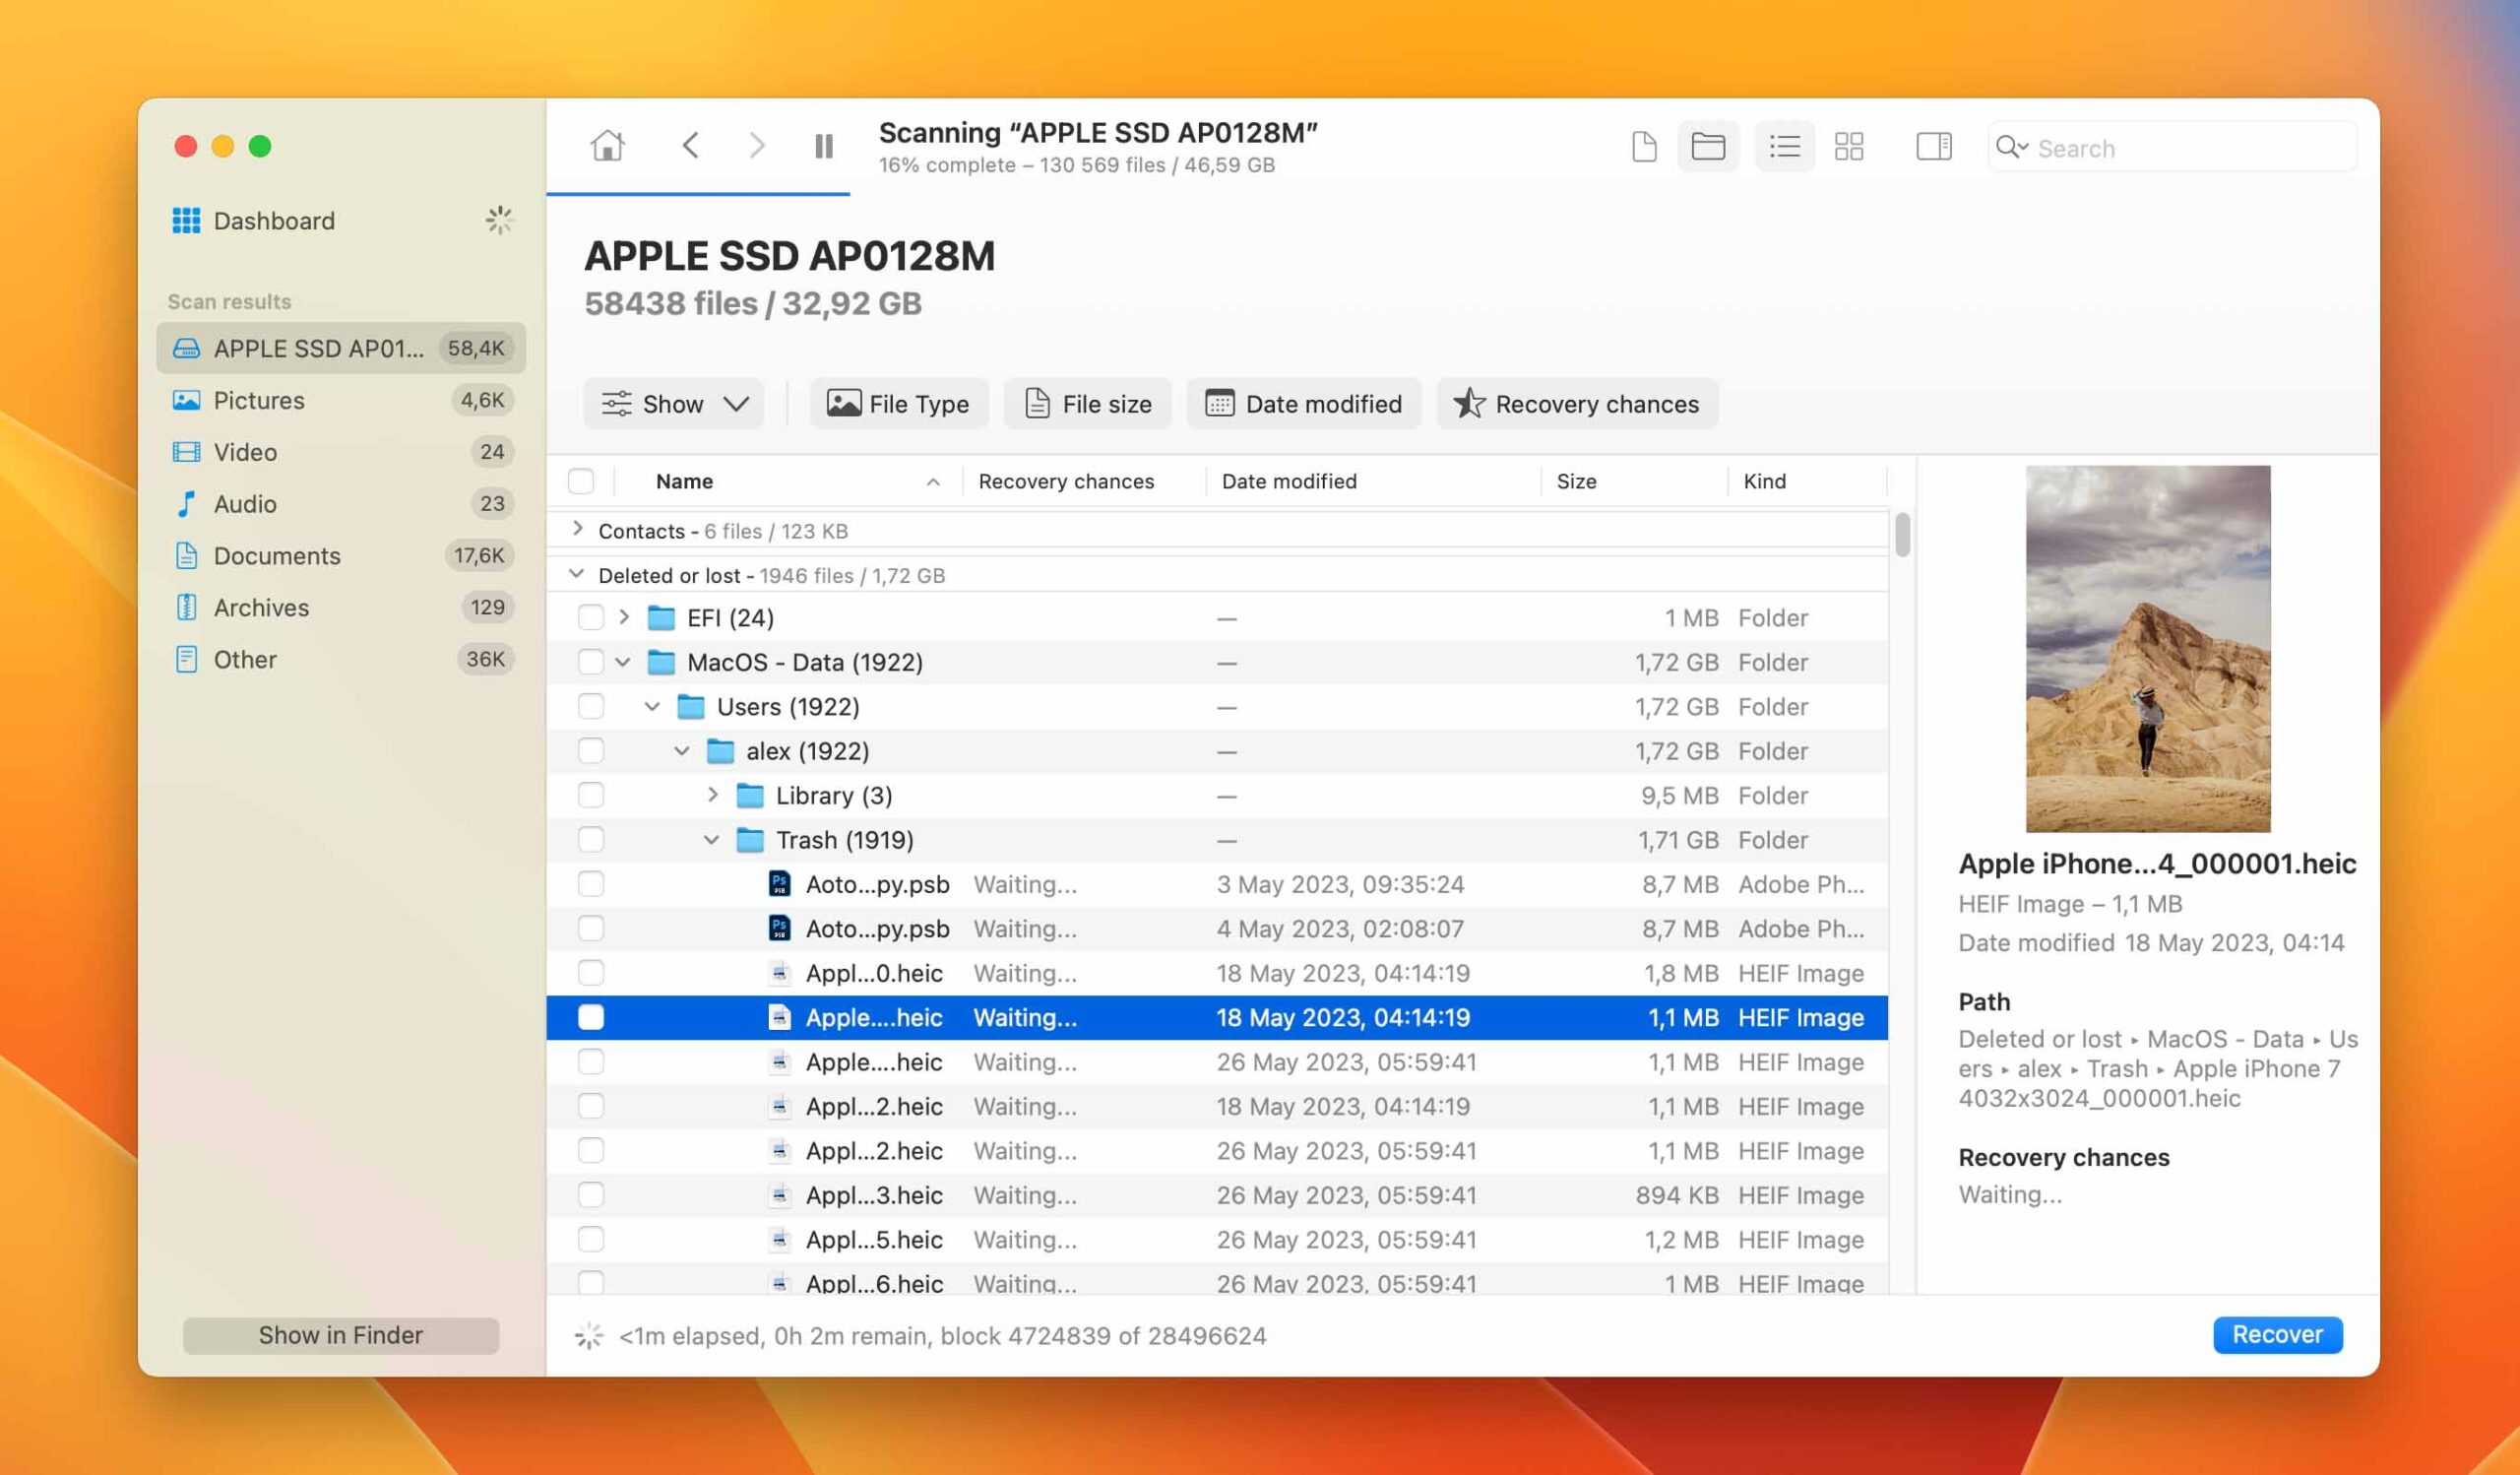
- Select each file you want to recover and click the Recover button.
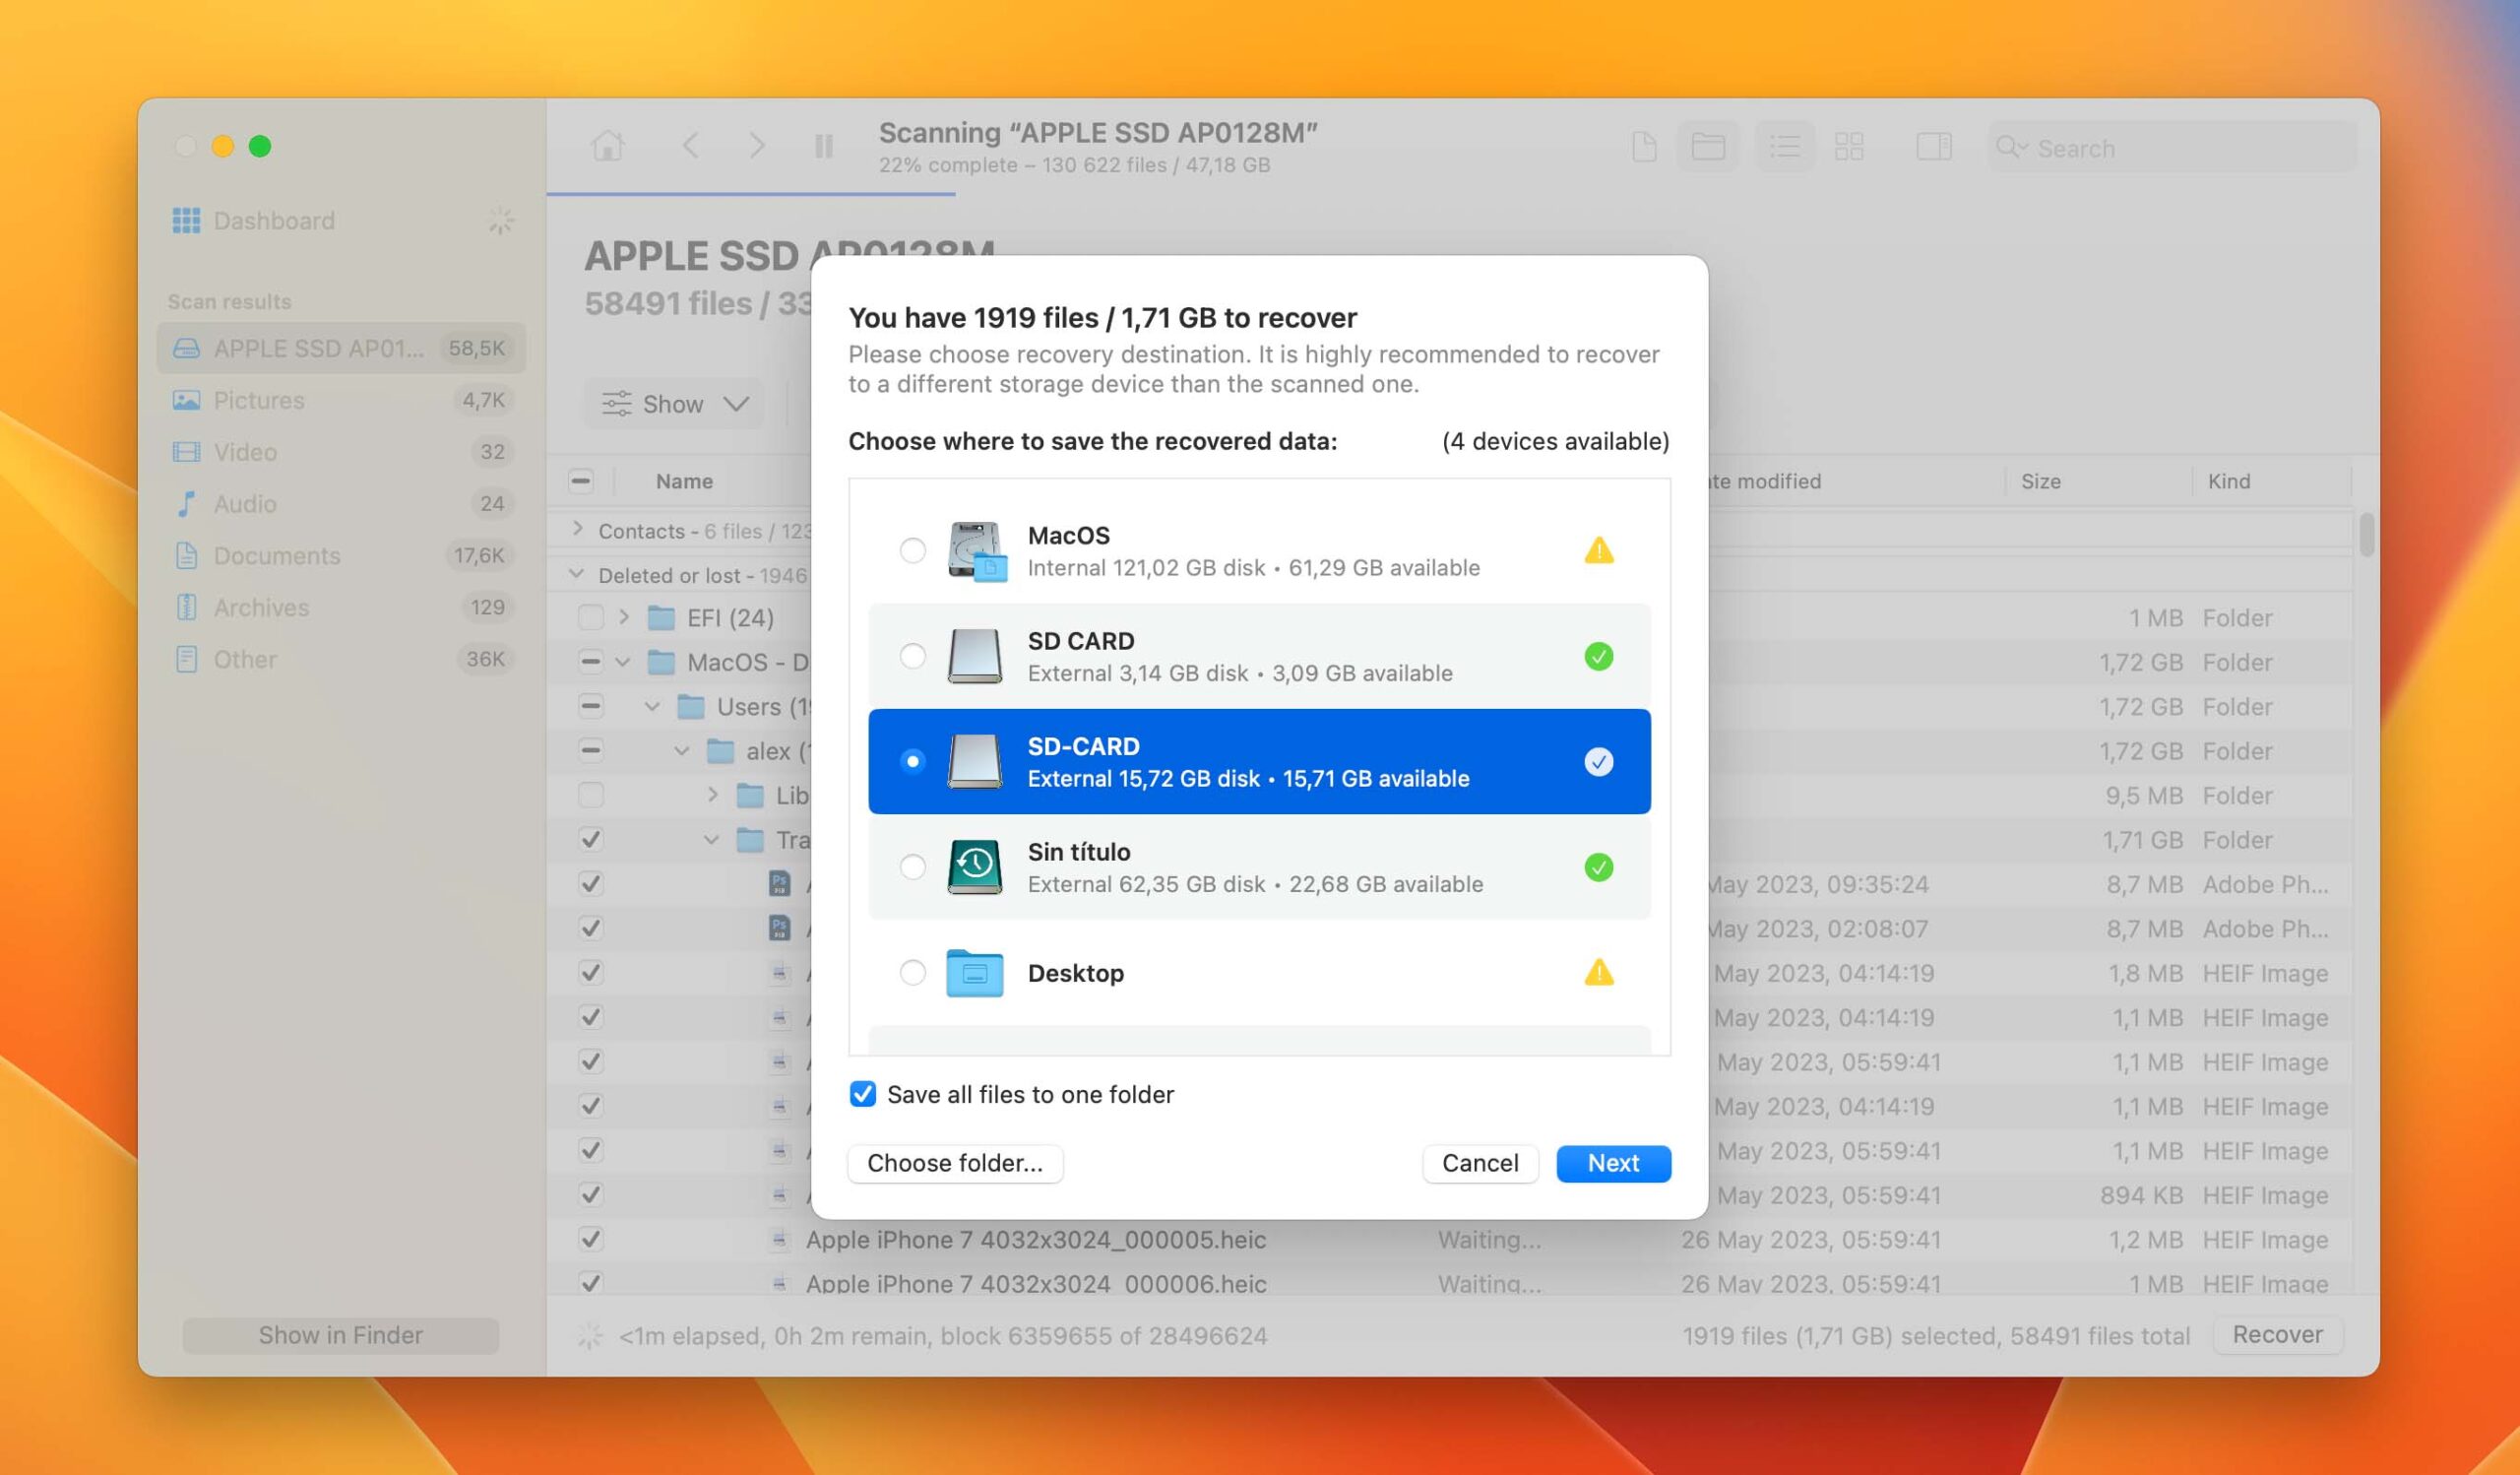
- Specify where you want Disk Drill to recover the deleted files and click Choose. You should always select a folder on a different drive than where the deleted files were originally located.
- Click the OK button to complete the restore.
Option B: PhotoRec
![]() One solid alternative to Disk Drill is PhotoRec. This open-source software is renowned for its ability to recover emptied Trash on Mac for free, making it a worthwhile option to consider.
One solid alternative to Disk Drill is PhotoRec. This open-source software is renowned for its ability to recover emptied Trash on Mac for free, making it a worthwhile option to consider.
Despite its powerful recovery capabilities (many file signatures are supported and the software can scan raw disks and disk images), it is worth noting that PhotoRec isn’t our first choice because it lacks a graphical user interface, can’t recover file metadata (recovered files never have their original names), and lacks the numerous convenience features found in Disk Drill.
You can recover files using PhotoRec by following these steps:
- Start by downloading TestDisk from its official website (PhotoRec is included with TestDisk). Alternatively, you can install TestDisk using Homebrew.
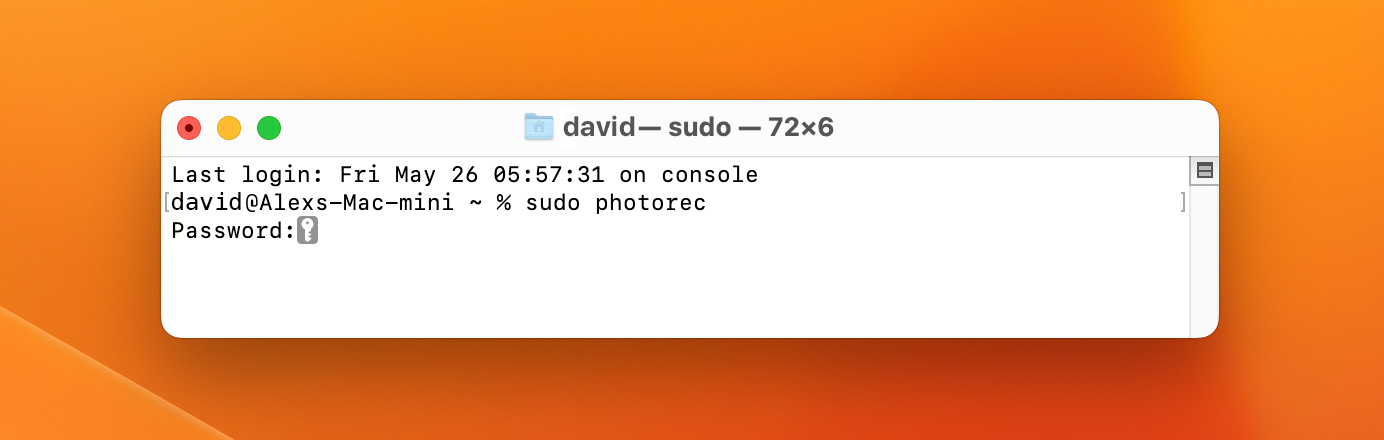
- Launch PhotoRec as an administrator in your Terminal emulator of choice using the “sudo photorec” command.
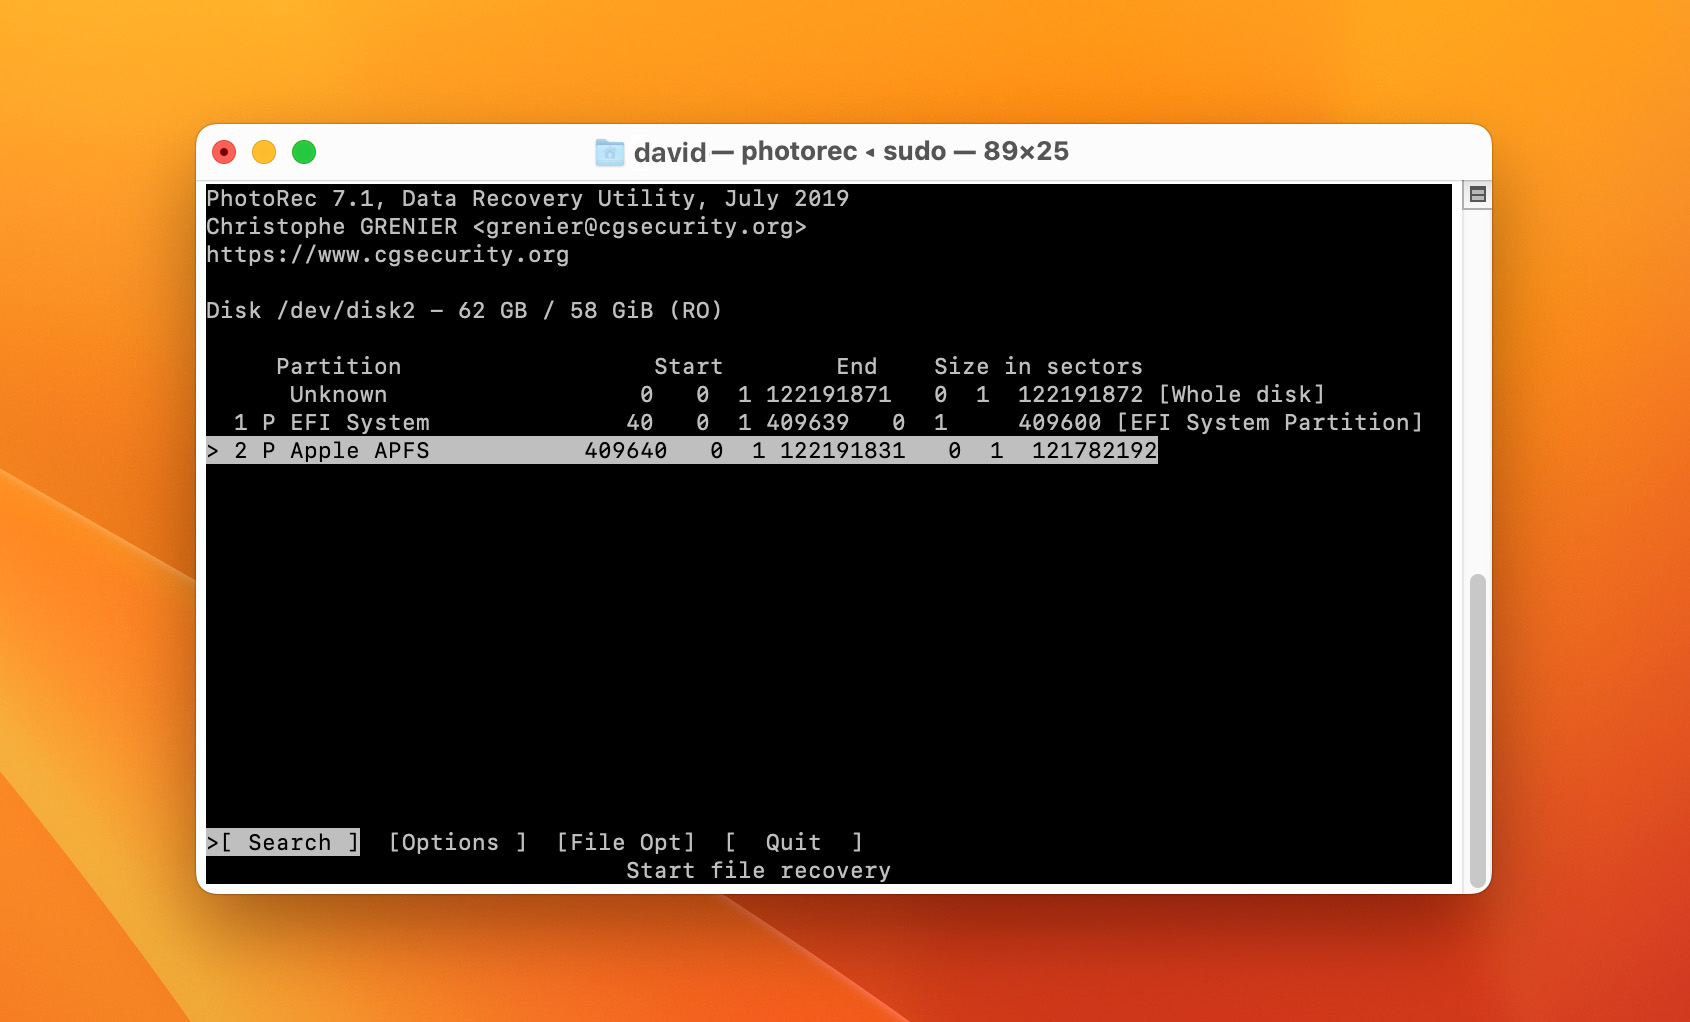
- Select the storage device partition where your emptied Trash data was last located.
- Search the partition with your missing data.
- Choose the correct file system for your partition so that PhotoRec knows how to scan it.
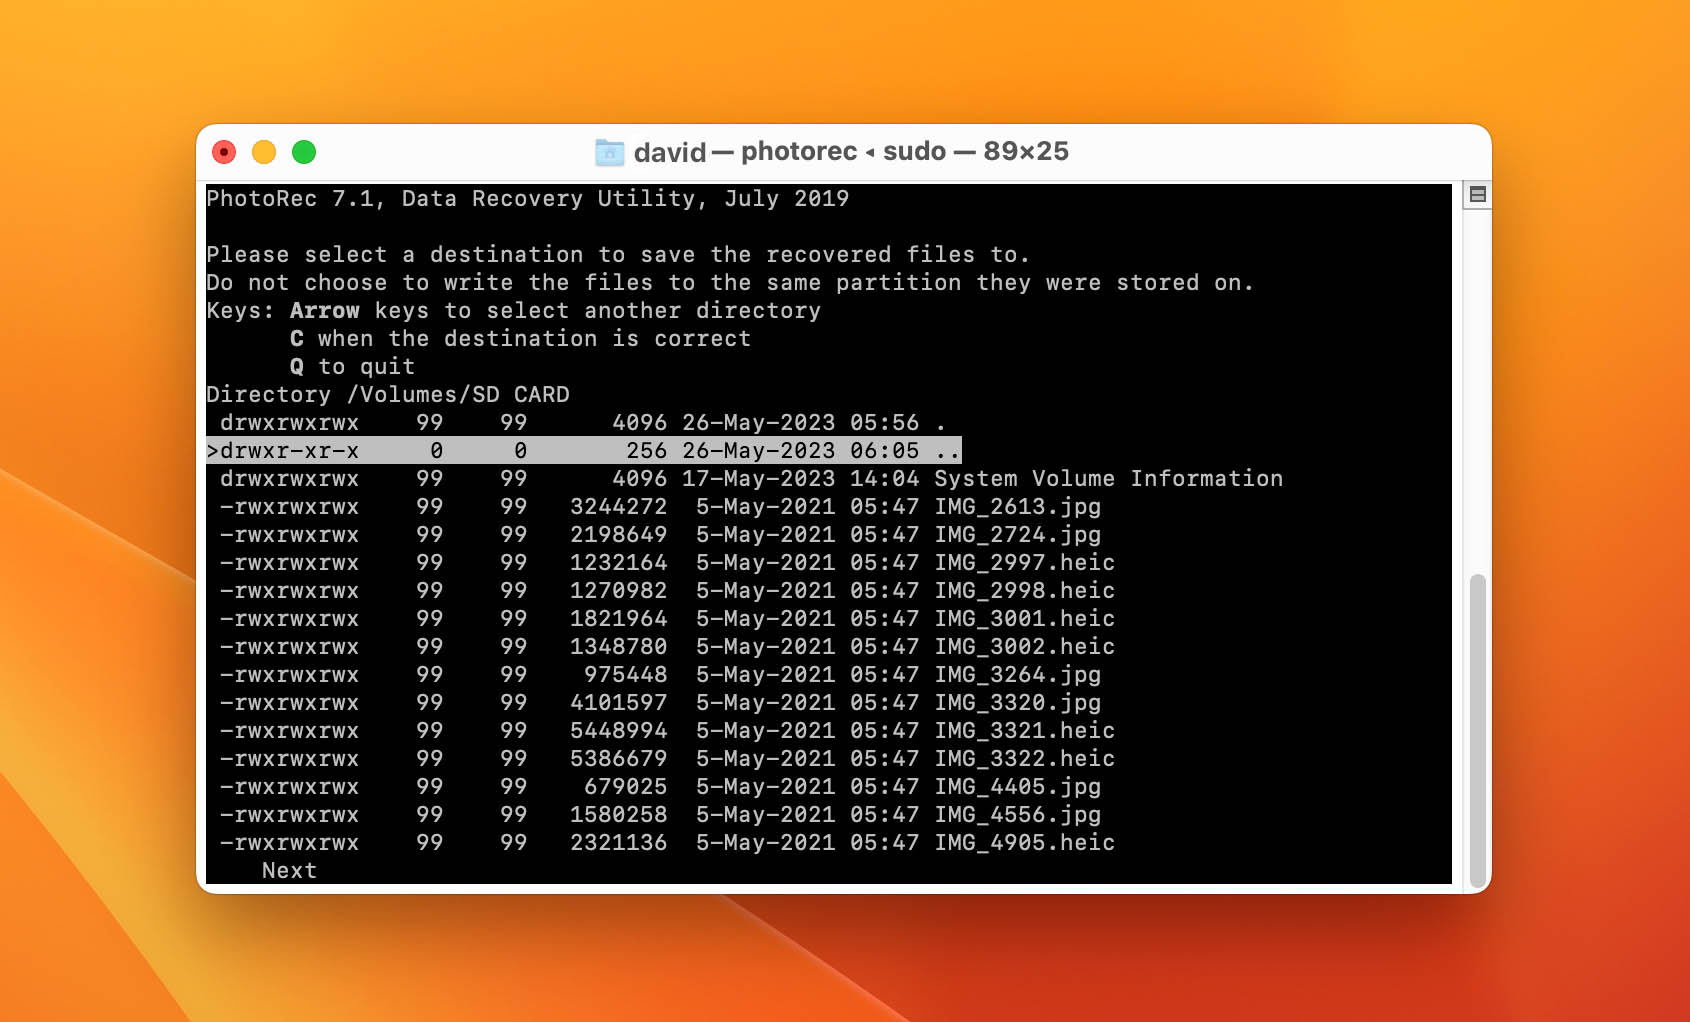
- Select a destination to save the recovered files to. Confirm your choice by pressing “c” on your keyboard. Ideally, this should be a directory on a different storage device than where the lost files were originally located.
- Wait for the recovery process to finish and review the results.
Common Reasons Why Mac Users Lose Data
Data loss can happen to anyone, no matter which operating system they use or how experienced they are, and it can happen for a number of different reasons. Here are three common reasons why Mac users lose data.
- Software Bugs: Seasoned software developers know that there’s no such thing as bug-free software. It’s just that some software bugs are much less serious and visible than others. The most serious software bugs cause applications to crash, which can result in the loss of unsaved work and a lot of swearing. As a Mac user, you should avoid using unoptimized software and old versions that haven’t been tested with the most recent version of macOS.
- Hard Disk Crashes: If hard disks were 100% reliable, there wouldn’t be any hard disk repair services. Unfortunately, we know that the annual failure rate of modern hard disks is between 1 and 7 percent. Of course, the older your hard disk is, the higher the chance of it failing suddenly and catastrophically. We recommend you always keep an eye on your disk’s S.M.A.R.T. status and have a backup ready should it ever crash unexpectedly.
- Deleting Files Accidentally: Not all data loss is caused by external factors. In fact, most data loss happens by accident. If you’ve ever had to write an important paper in one night, you know how easy it is to click the wrong button or press the wrong shortcut in a sleep-deprived state. Sometimes, users accidentally delete files but don’t notice their mistake for days or even weeks. By then, Trash has already been emptied, and the only solution is a reliable data recovery software application.
Prevent Data Loss with Regular Backups
Backups are by far the most reliable way to prevent data loss. As a Mac user, you already have a fantastic backup application present on your system: Time Machine.
All you need to create backups with Time Machine is an external storage device. If you have one, connect it to your Mac and open Time Machine from System Preferences. Select your external storage device and wait for Time Machine to automatically back up your Mac.
If you want to take your backup strategy to the next level, you can also consider storing important files in the cloud. Apple’s iCloud is a solid choice, but you can also use Dropbox, Google Drive, OneDrive, or any other reliable cloud storage service.
Frequently Asked Questions
How to undo empty Trash on Mac?
Here’s how to easily undo empty Trash on a Mac:
- Download and install Disk Drill on your Mac.
- Launch the app and select the disk you want to scan.
- Wait for the scan to finish and select the files you want to recover.
- Select a safe recovery destination folder.
- Finish the empty Trash recovery process.
Where is the Trash folder on Mac?
Trash is a hidden folder located in the root directory (the same directory where the Desktop, Documents, Downloads, Movies, Music, Pictures, and Public folders are located). To see it, open Finder, navigate to the root directory, and press CMD + SHIFT + . on your keyboard.
How to force empty Trash on Mac?
It’s fairly easy to run out of available storage space unless you empty Trash from time to time. To force empty Trash on Mac:
- Click the Trash icon in the Dock.
- Click the Empty button under the Search bar.
- Click Empty Trash to confirm the action.
How to recover emptied Trash on Mac without software?
If you don’t want to install a third-party software application to recover deleted Trash on Mac, you can use Time Machine:
- Open the folder where the deleted files were located before they were moved to Trash.
- Click the Time Machine icon located in the Menu Bar and choose Enter Time Machine.
- Select the files you want to recover and click Restore.
How to recover deleted Trash on Mac using Terminal?
Because Trash is just a hidden folder, you can copy files from it using Terminal. However, you won’t be able to recover any files from it if it’s been emptied. For that, you need a data recovery application.
David Morelo is a professional content writer with a specialization in data recovery. He spends his days helping users from around the world recover from data loss and address the numerous issues associated with it.
When not writing about data recovery techniques and solutions, he enjoys tinkering with new technology, working on personal projects, exploring the world on his bike, and, above all else, spending time with his family.
- Klennet Recovery Review (Formerly Zero Assumption Recovery)
- iBeesoft Data Recovery Review – A Likable Clone With Limited Features
- DMDE Review – A Data Recovery Powerhouse or a Usability Nightmare?
- Cisdem Data Recovery for Mac Review – A Clone in Disguise
- Tenorshare 4DDiG Review – All That Glitters Is Not Gold
- Houston, Texas, United States
Nikolay Lankevich has over 15 years of strong experience in various fields and platform includes Disaster Recovery, Windows XP/7. System analysis, design, application (Inter/Intranet) development, and testing. Provided technical supports on desktop and laptops on Win-XP and Macintosh for about 2000 employees.