
How to Recover Deleted Files on Windows 11
Hardware issues, software misconfigurations, malware, or the occasional accidentally deleted folder may be the reasons behind a widespread and quite dreaded problem: data loss.
Thankfully, data loss doesn’t have to be permanent. At least, not always. Equipped with the proper tools and know-how, in most cases, it’s possible to recover deleted files on Windows 11, as we’ll see in this guide.
Common Windows 11 Data Loss Scenarios
More often than not, data loss is merely an inconvenience, for, usually, all such problems have one or more solutions.
| Scenarios | Solution |
| I accidentally sent files to the recycle bin | |
| I deleted files and then emptied the recycle bin | |
| I permanently deleted files using shift + delete | |
| Files disappeared from my drive unexpectedly | |
| I lost files due to a virus infection | |
| I experienced data loss due to hard drive corruption |
How to Restore Deleted Files on Windows 11
When dealing with lost data, there are various ways to undelete files on Windows 11 and get back everything.
Although initially, data loss might seem like an insurmountable obstacle, you can even recover permanently deleted files on Windows 11 for free.
Let’s see how.
Method 1: Recover Permanently Deleted Files Using a Windows 11 File Recovery Tool
When selecting a recovery solution, you shouldn’t pick one lightheartedly. A subpar app could eliminate any chances of recovering deleted files.
That’s why we’ve tested an extensive catalog of data recovery tools in our labs, scrutinizing them comprehensively to find the cream of the crop.
We considered factors such as:
- ⚙️ Operating Systems support.
- 🗂️ File systems support.
- 📈 Success rate.
- ✅ Quality of produced results.
- 💸 Affordability.
- 👌 Ease of use.
Option A: Disk Drill
![]() Disk Drill is one of the best Windows 11 file recovery solutions, offering everything you’d expect from a stellar recovery app. It can get back almost any type of file from virtually any storage device, including the ones that show up as RAW or corrupted.
Disk Drill is one of the best Windows 11 file recovery solutions, offering everything you’d expect from a stellar recovery app. It can get back almost any type of file from virtually any storage device, including the ones that show up as RAW or corrupted.
That is, as long as your PC and Windows detect them. It doesn’t matter if you want to get back “normally” removed or shift-deleted files, hefty archives, or small TXTs, from old HDDs or new NVMe drives.
To recover deleted files on Windows 11 with Disk Drill:
- Download the application from its official site, install it, and run it. Select the disk from which you want to retrieve deleted files from Disk Drill’s Device/Disk List and click on Search for lost data.

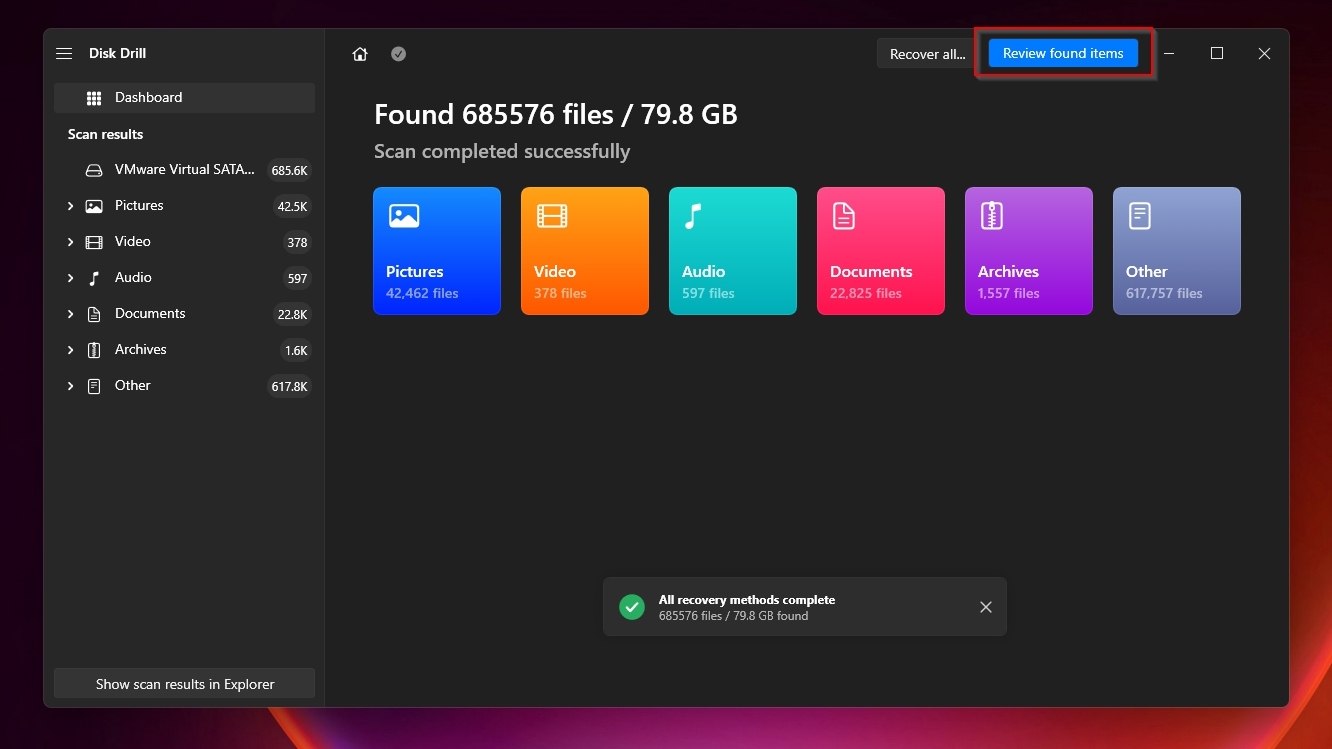
- When Disk Drill’s scan completes, click on Review found items on the top right of its window to see all the files the app located.
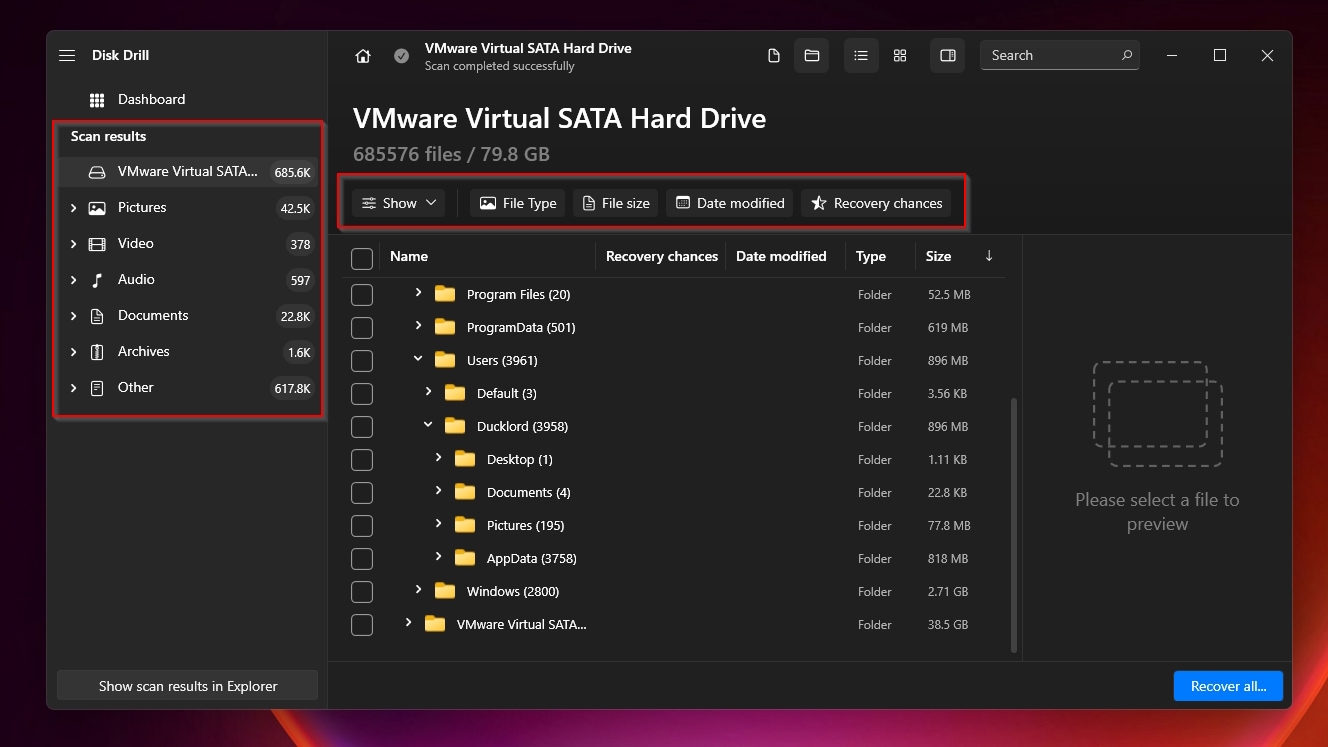
- You can use the categories on the left and the filters on top of the list to make sense of the results and locate specific accidentally deleted files.
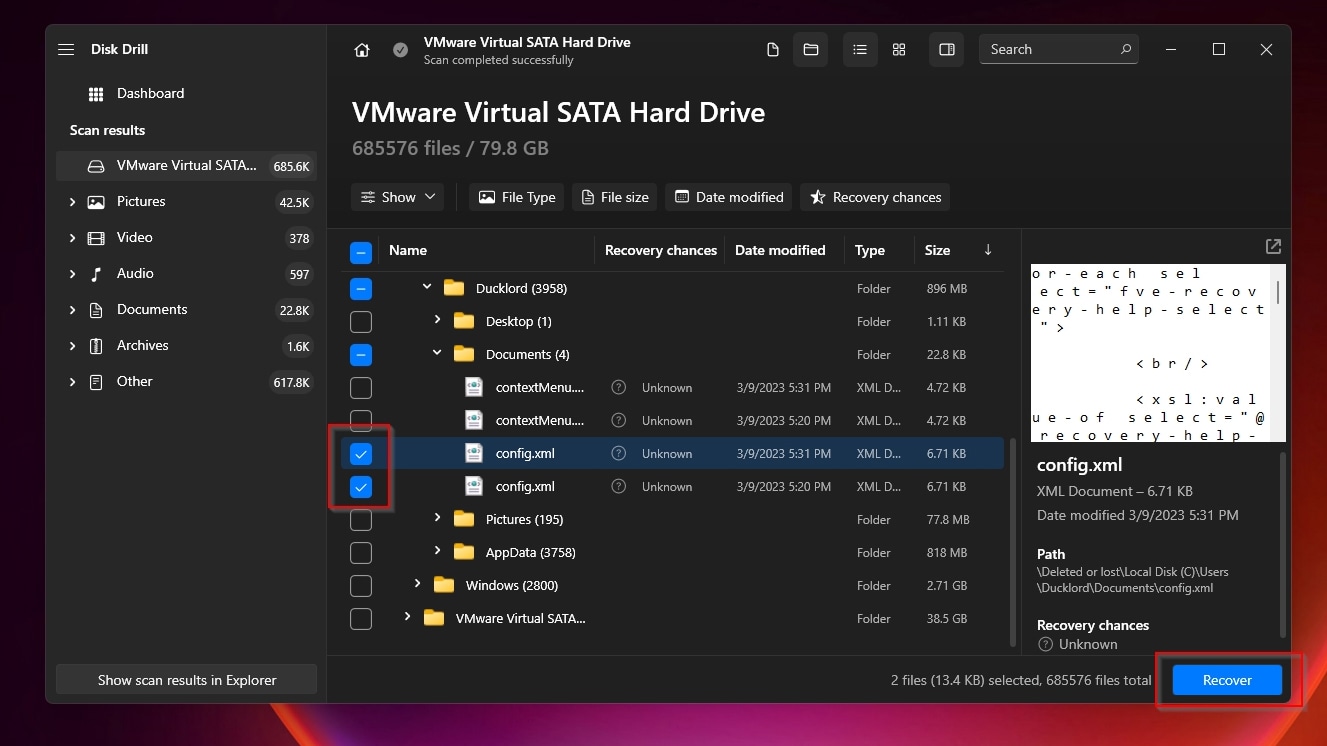
- Disk Drill lets you preview many types of files like pictures and documents to check their contents and ensure they’re the ones you seek. Place a checkmark on the left of the files you want to recover. When done, click the Recover button on the bottom right.
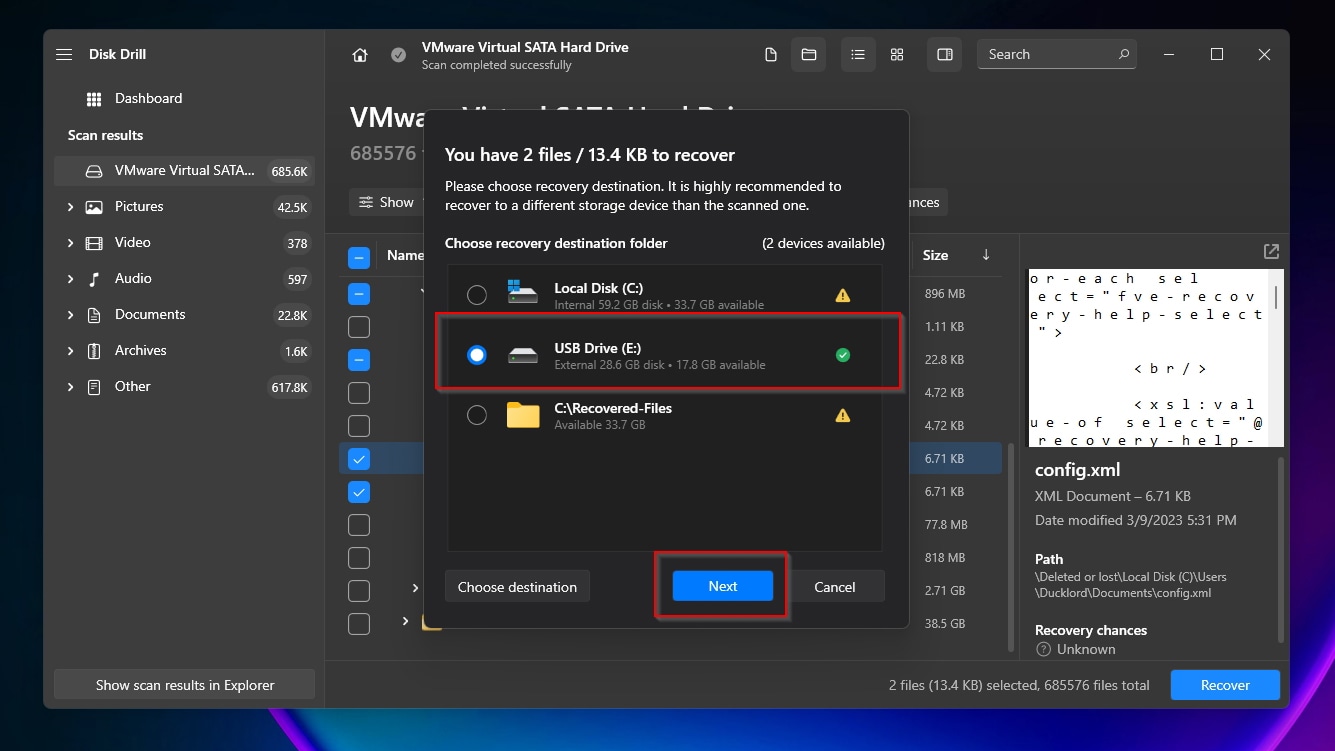
- Disk Drill will ask you to select a recovery folder destination where it will restore deleted files. It’s best to select a different destination than the drive from which you are trying to recover deleted files to avoid overwriting the data you are trying to recover. When done, click Next.
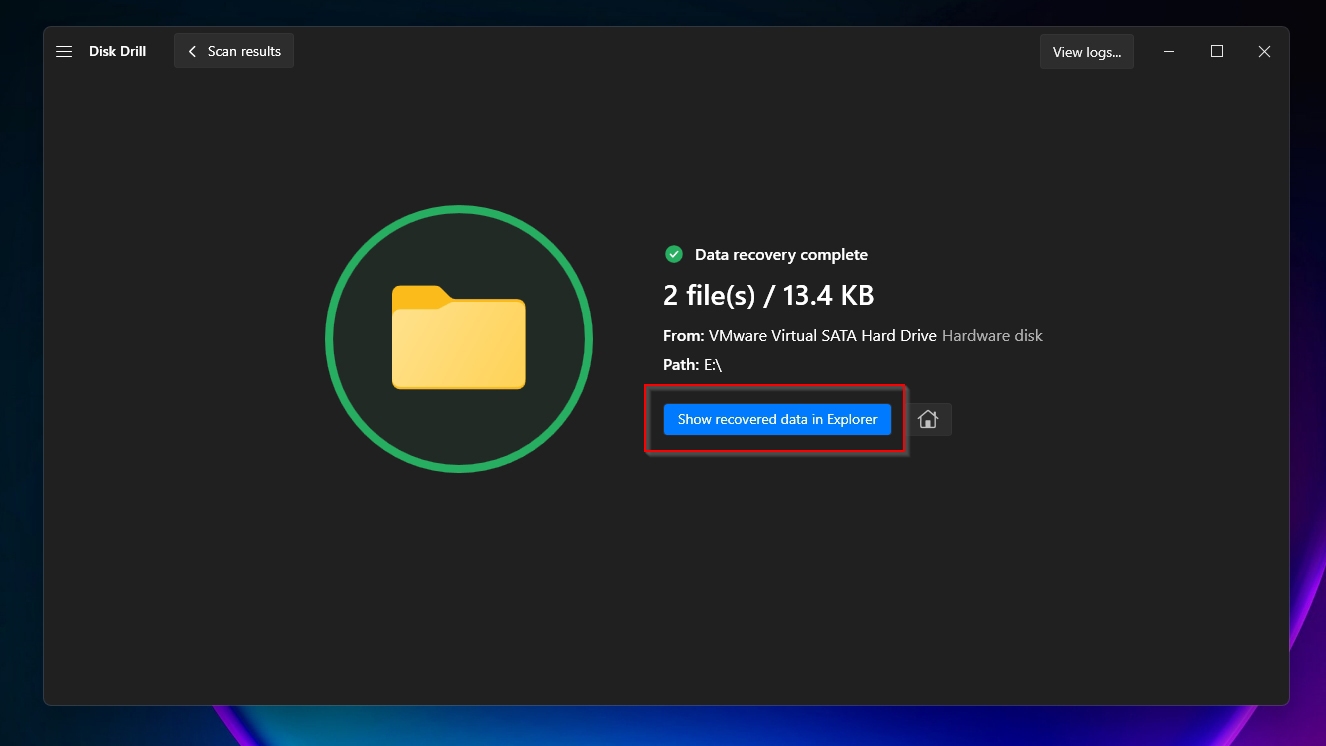
- Disk Drill will show you a brief report when the data recovery process is complete. You can quickly check the recovered files by clicking Show recovered data in Explorer.
Option B: Windows File Recovery Tool
![]() Another option you can use to recover deleted files on Windows 11 is Microsoft’s own Windows File Recovery Tool.
Another option you can use to recover deleted files on Windows 11 is Microsoft’s own Windows File Recovery Tool.
Unlike Disk Drill, Windows File Recovery Tool only supports the NTFS, FAT, exFAT, and ReFS file systems and doesn’t come with most of the bells and whistles of its third-party cousin.
Still, it’s an excellent option for when you need to restore deleted files on Windows 11 and only want to, for example, get back a few of the pictures you accidentally deleted yesterday. To learn more about all its pros and cons, check our thorough Windows File Recovery review.
For a simple Windows 11 file recovery using Windows File Recovery Tool.
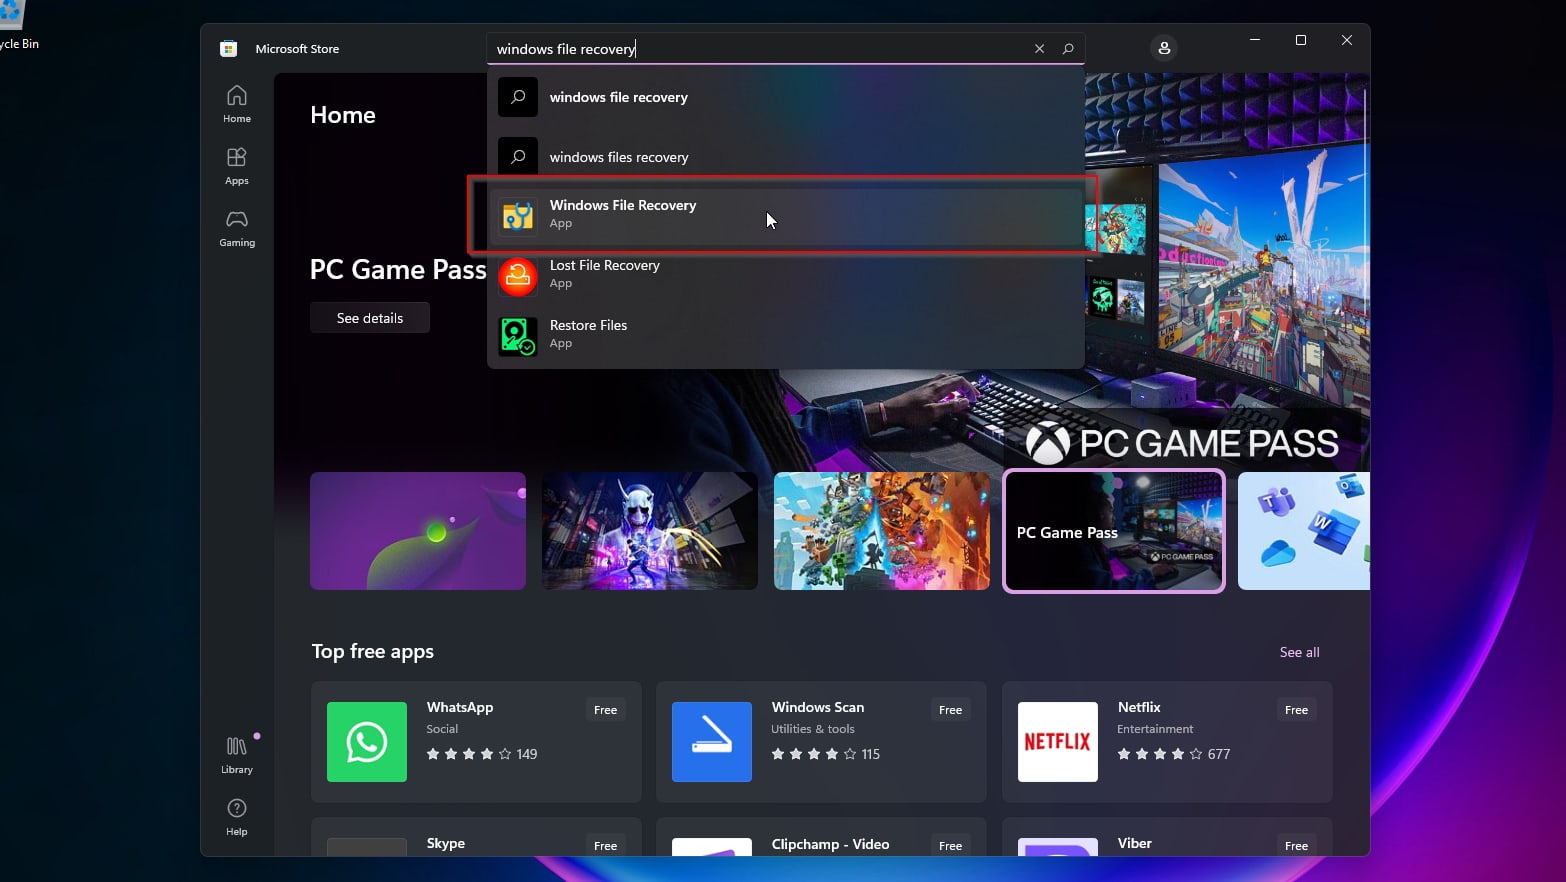
- Use the Start menu or Search to locate the Microsoft Store app and open it. Then, use the search field at the top to seek Windows File Recovery and visit its page.
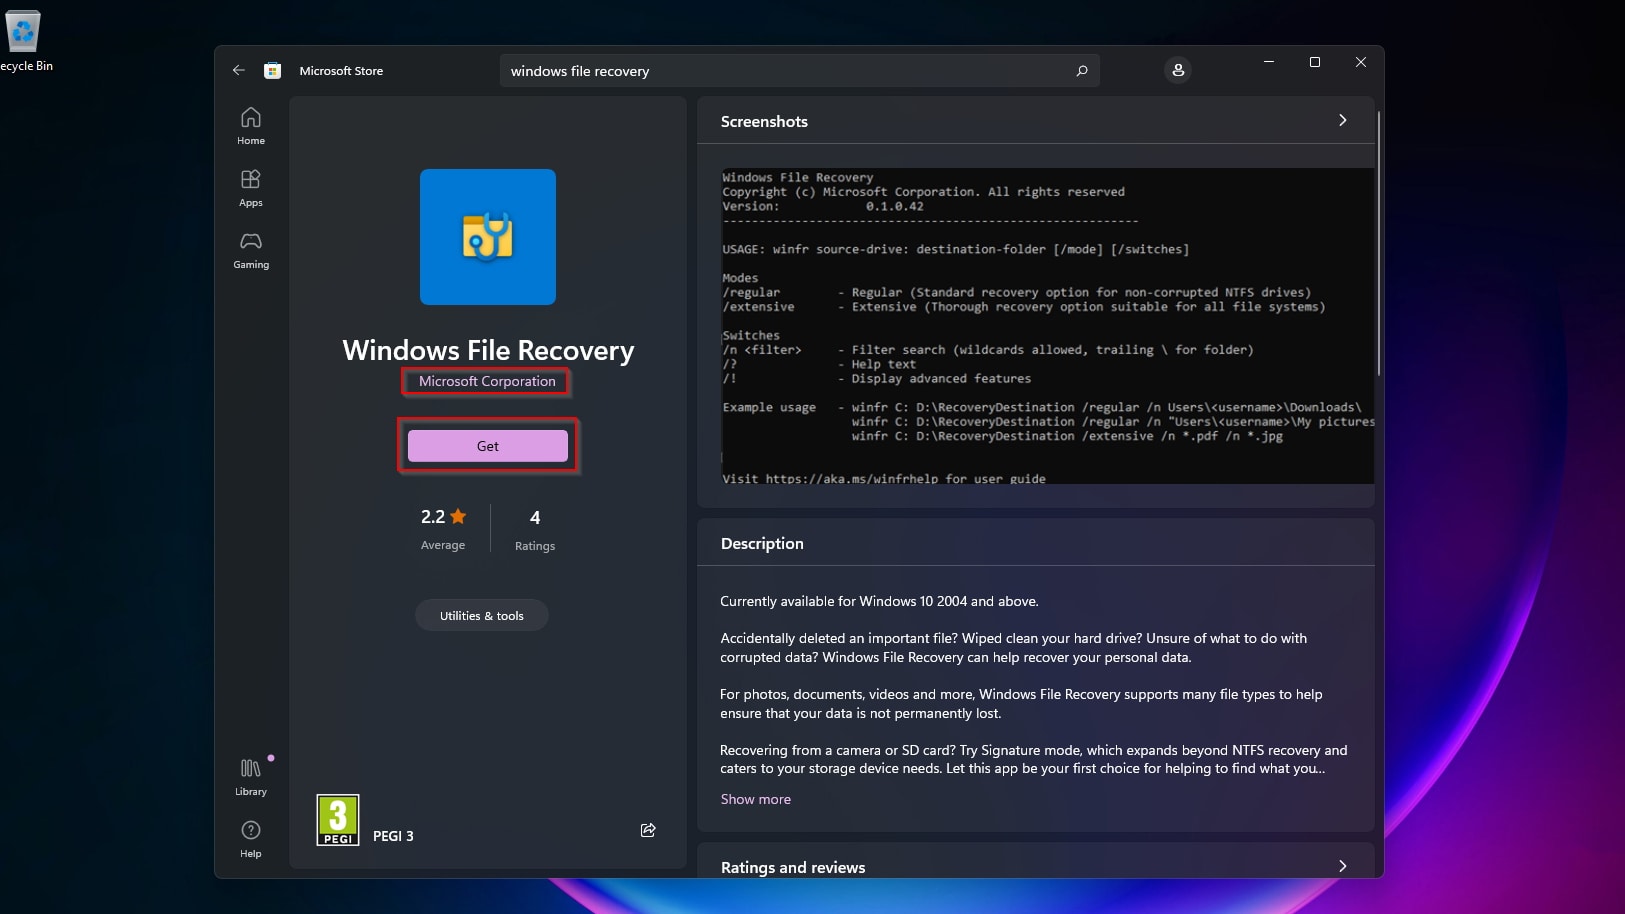
- Make sure the Windows File Recovery you found is made by Microsoft Corporation. Click on Get to download and install the app.
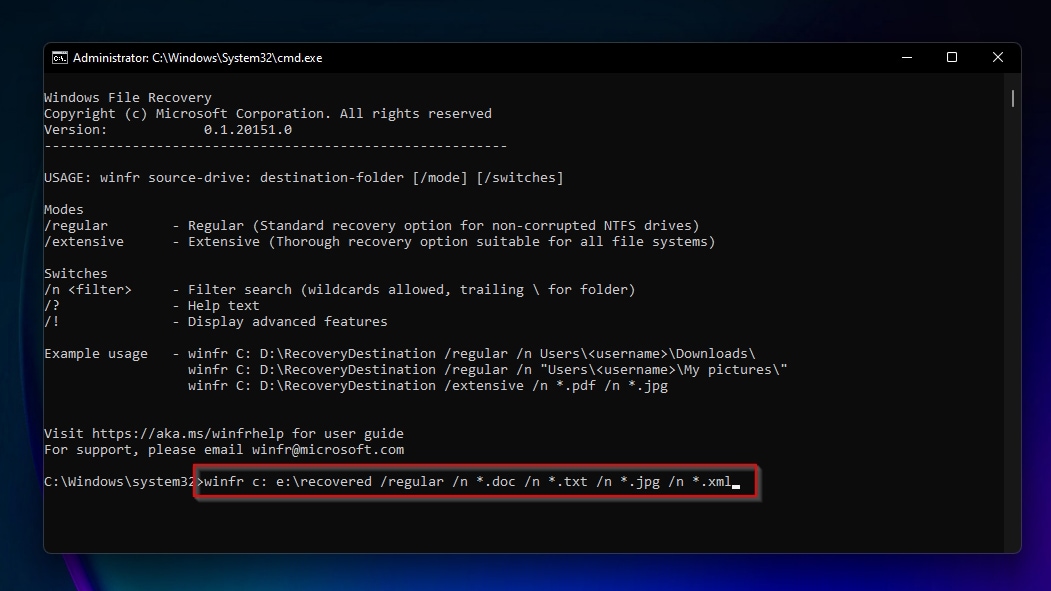
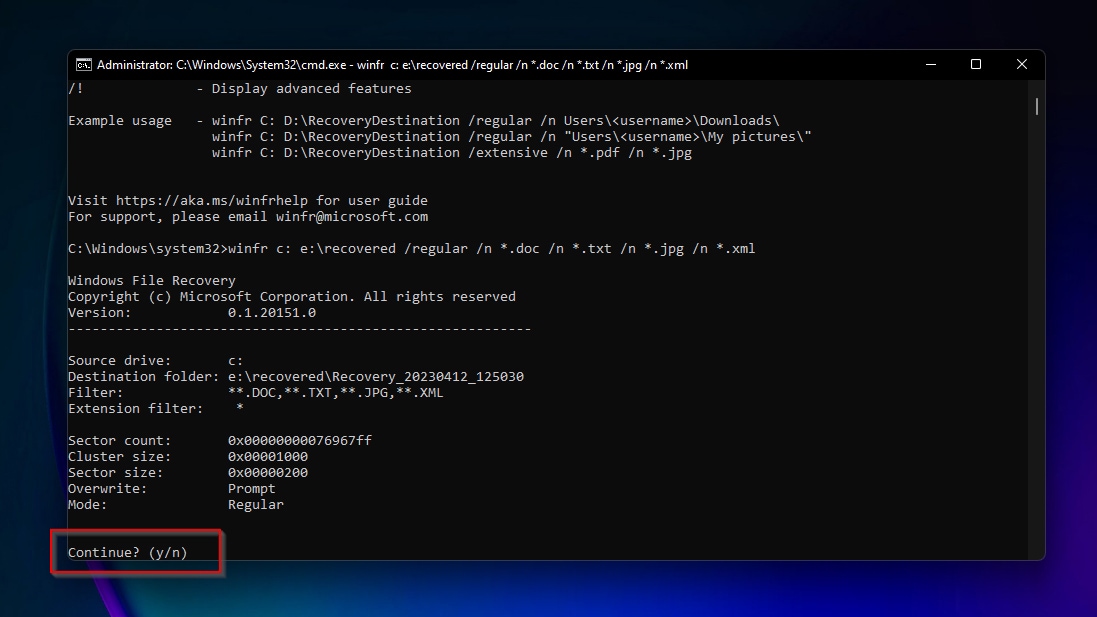
- Let’s say you want to use Windows File Recovery to recover deleted files from your C:\ system disk. You want to find the ones with the doc, txt, jpg, and XML extensions and store the results in a folder named “recovered” on the E drive. For that scenario, use the Start menu or Search to seek CMD or PowerShell and launch them as administrator. Then, use the command winfr c: e:\recovered /regular /n .doc /n .txt /n .jpg /n .xml.
- Windows File Recovery will present a summary of the process and ask you if you want to continue. Answer positively to proceed.
- When done, Windows File Recovery will offer you the option to view the recovered files.

To learn more about any data recovery solution, check our standalone in-depth reviews of dozens of such apps for both Windows and macOS.
You can also use our comparison tool to pit recovery apps against each other and find the best option for you.
Even better, our interactive software picker can help you locate the optimal solution for you by guiding you through a series of straightforward questions.
Method 2: Get Back Deleted Files From Recycle Bin
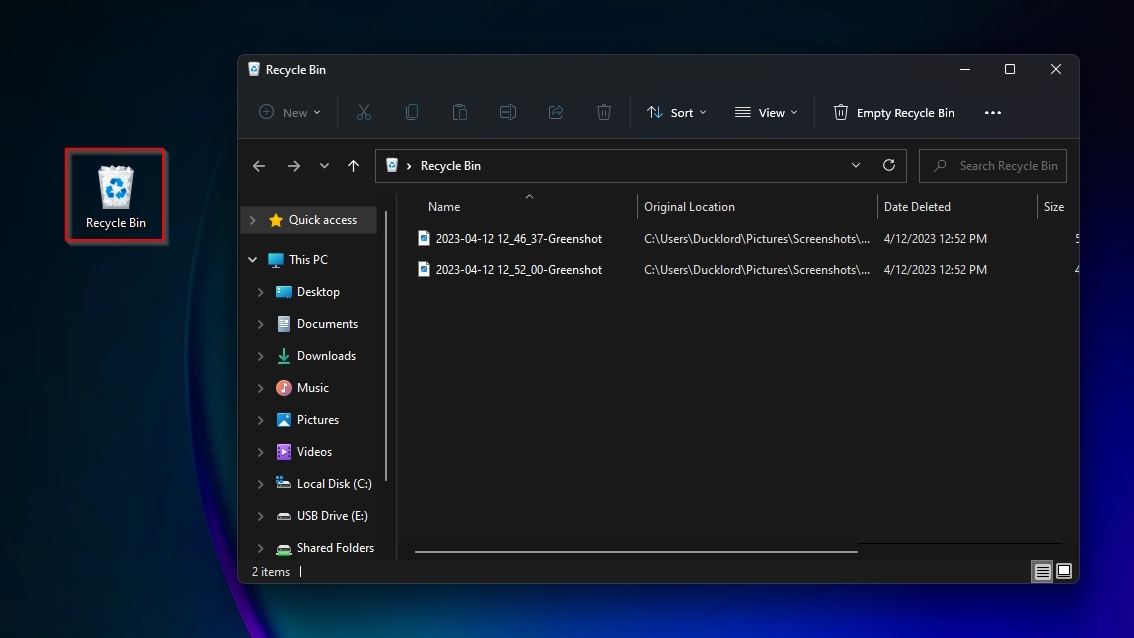
The Recycle Bin is a special system folder in Windows where all deleted files are moved after removal. They remain there for several days (user customizable) or until newer deleted files require the space they occupy.
To learn more about the Recycle Bin, check our article on recovering files deleted from the Recycle Bin.
To get back your accidentally deleted files from the Recycle Bin:
- Double-click the Recycle Bin’s icon on your desktop. If it’s not there (it depends on the computer’s configuration), open your favorite file manager and locate it at the root of the disk. Note that, unlike some third-party file managers, Windows Explorer insists on not displaying the Recycle Bin among the rest of your folders. You can still access it by entering “shell:recyclebinfolder” (without the quotation marks) in your file manager’s address bar or Windows’ Run dialog (by pressing Windows Key + R).
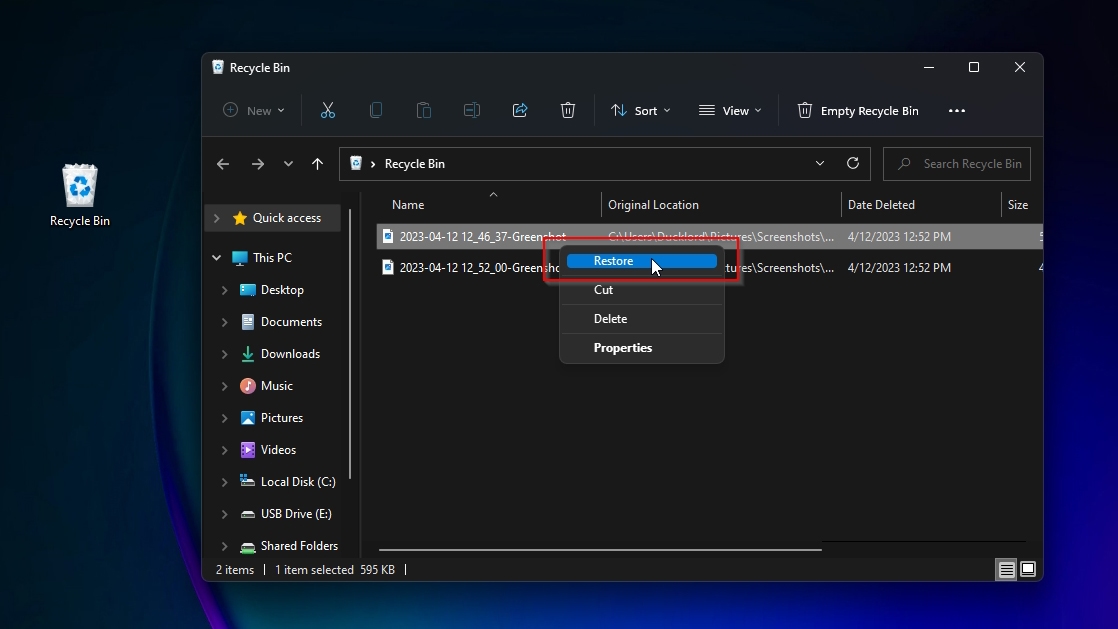
- You will find your recently deleted files inside the Recycle Bin. To get back any of those files, select them, right-click on one, and choose Restore. You’ll find them back at their original location.
Undo Deletion
Did you realize that you still need a file right after removing it? You can undo delete actions that just happened by pressing CTRL + Z. No need to manually “dive” into the Recycle Bin.
Remember, though, that CTRL + Z only reverts your last action, so this is possible only if you use that combination immediately after the deletion.
Method 3: Restore Deleted Files From Previous Versions
Another way to get back your accidentally deleted data is with the Previous Versions feature built into Windows. However, you should also have enabled and used the related File History backup solution.
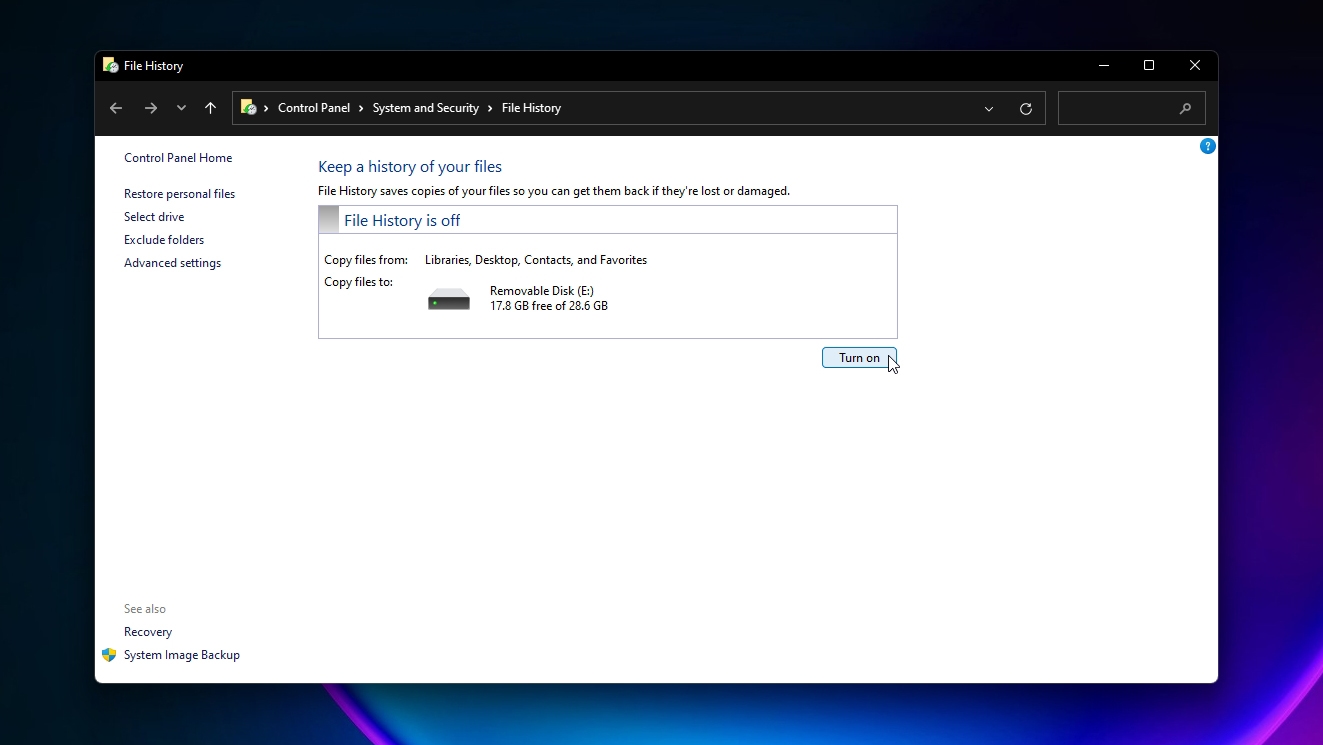
To enable File History on Windows 11:
- Search for File History using the Start menu or Windows Search. When found, open it.
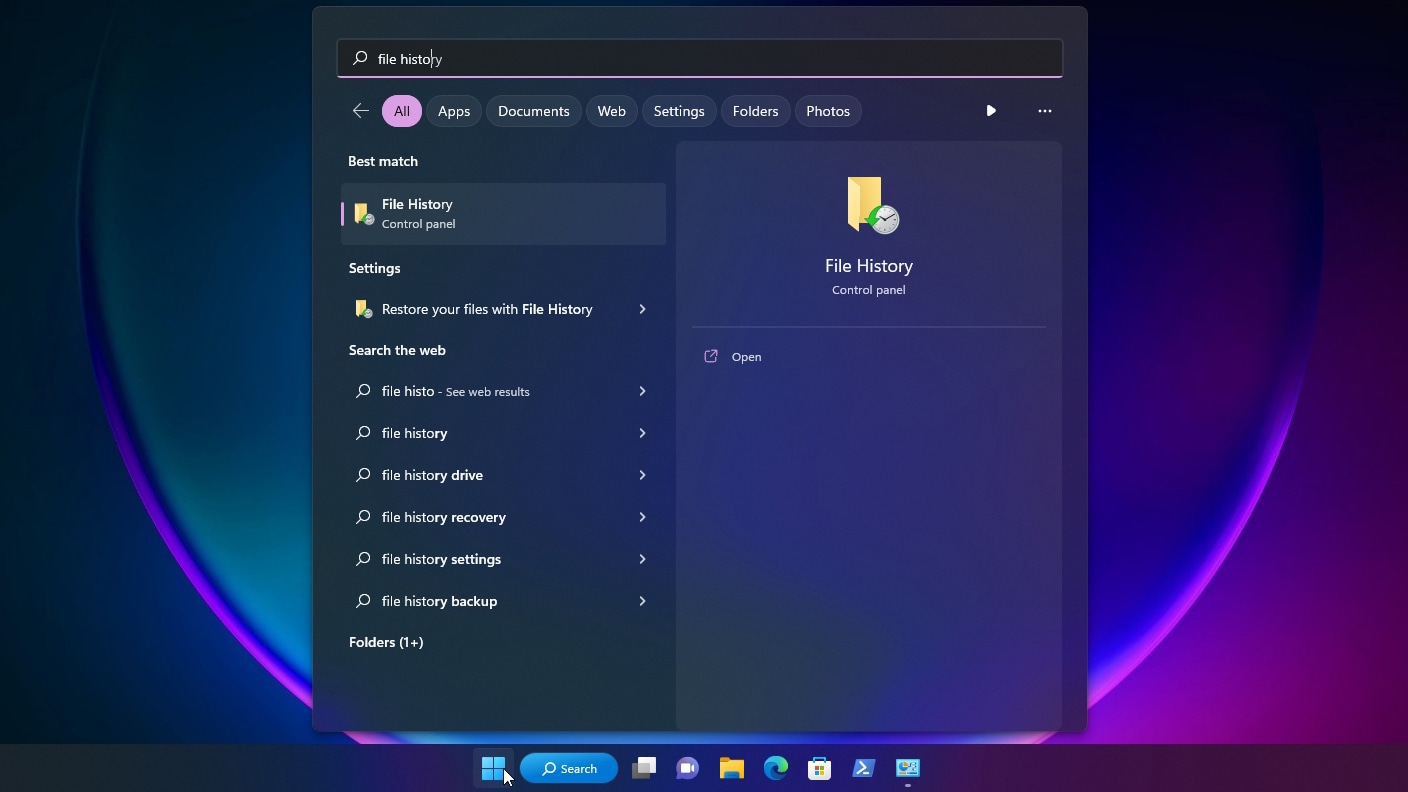
- With an external drive connected, click Turn on to enable File History and have it store backups of your files on it.
With File History enabled and some backups available, to restore deleted files using Previous Versions:
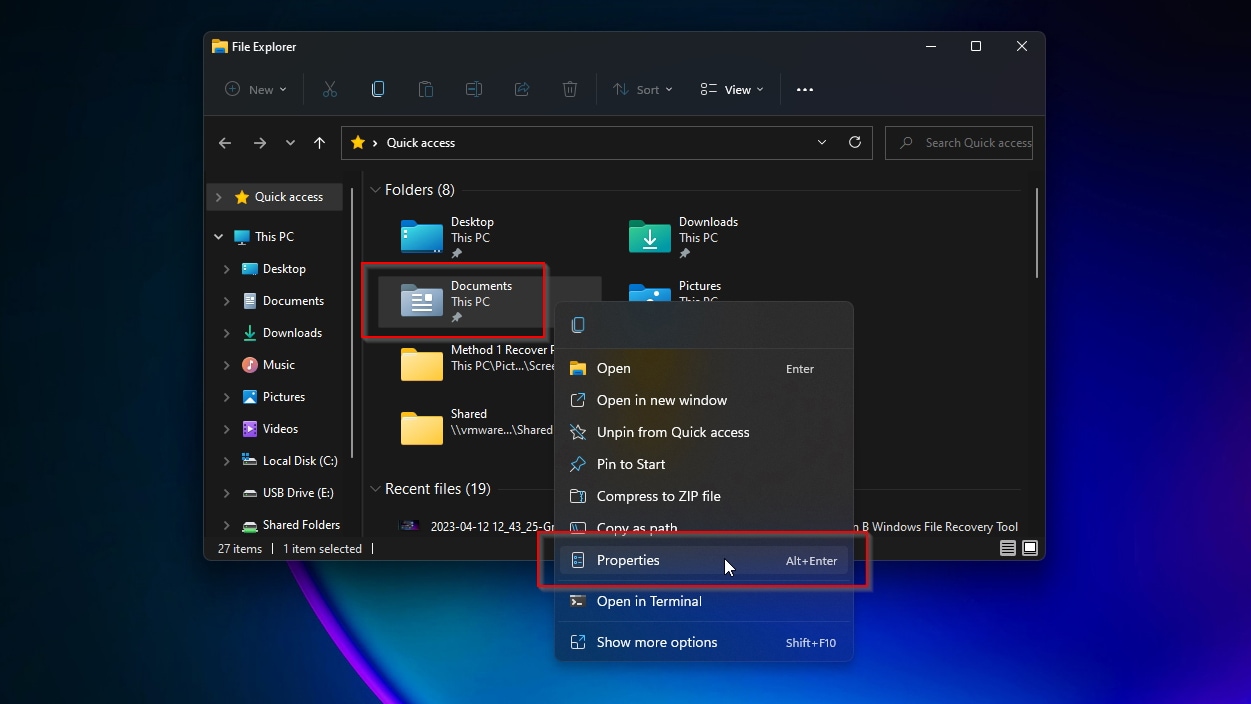
- Fire up your favorite file manager (or launch Windows File Explorer with Windows Key + E). Right-click on the folder where your deleted files reside. Select Properties from the menu that shows up.
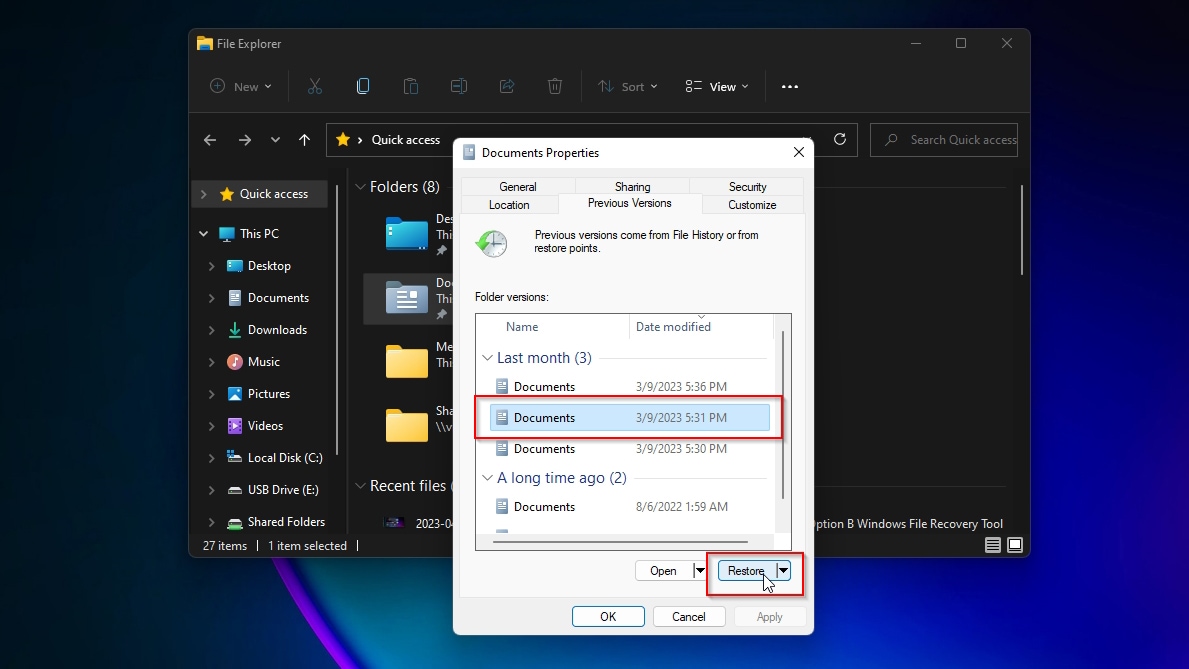
- Move to the Previous Versions tab, and select a backup from when your lost files were still inside that folder. Click Restore to revert the folder to that point in time.
Method 4: Retrieve Deleted Folders Using Windows 11 Backup & Restore
Backup and Restore (Windows 7) may be old by today’s standards, but it’s still available, and with the same name to boot, within the latest versions of Windows.
To be able to restore deleted files using Backup and Restore (Windows 7), you’ll first need to have some backups taken with it.
To have Backup and Restore for Windows 7, take backups of your files on Windows 11:
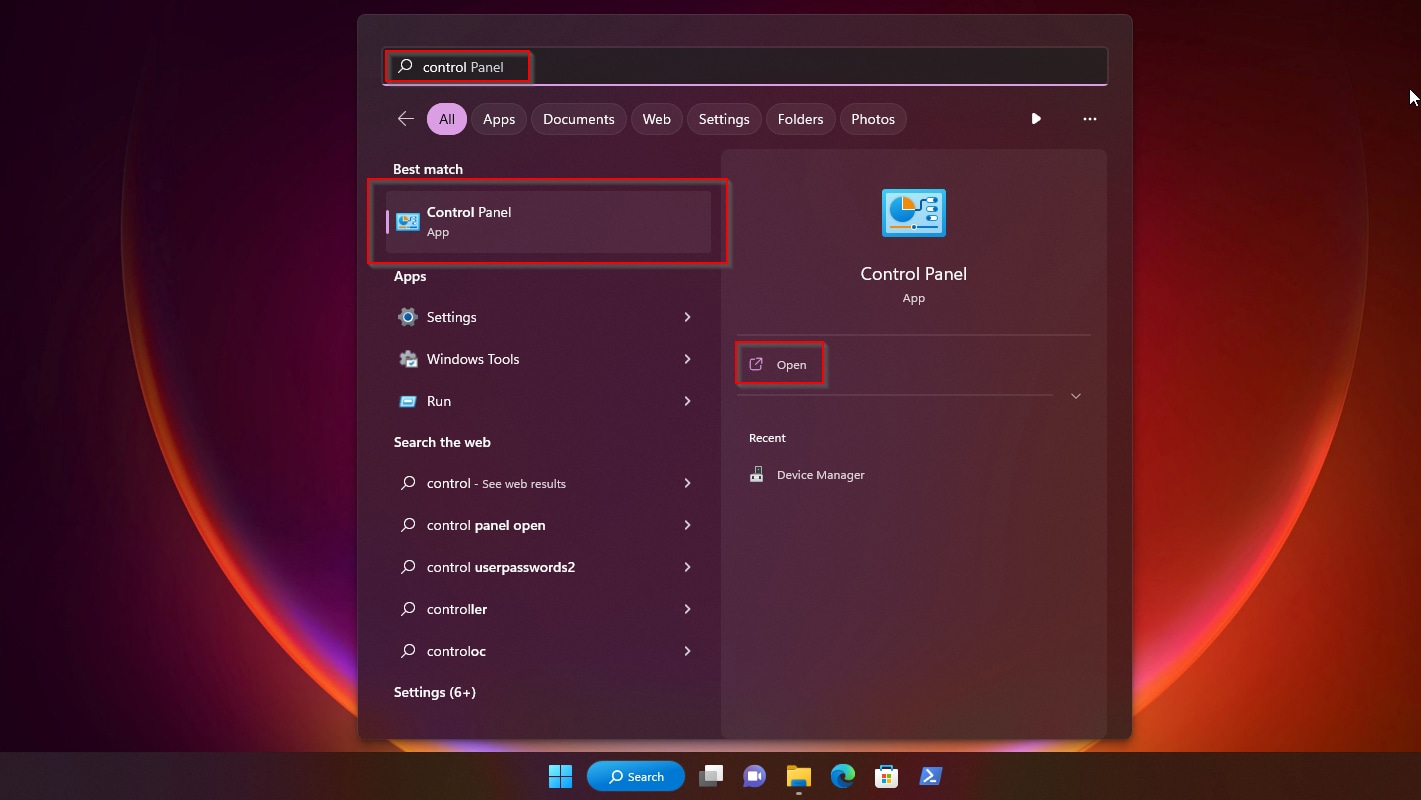
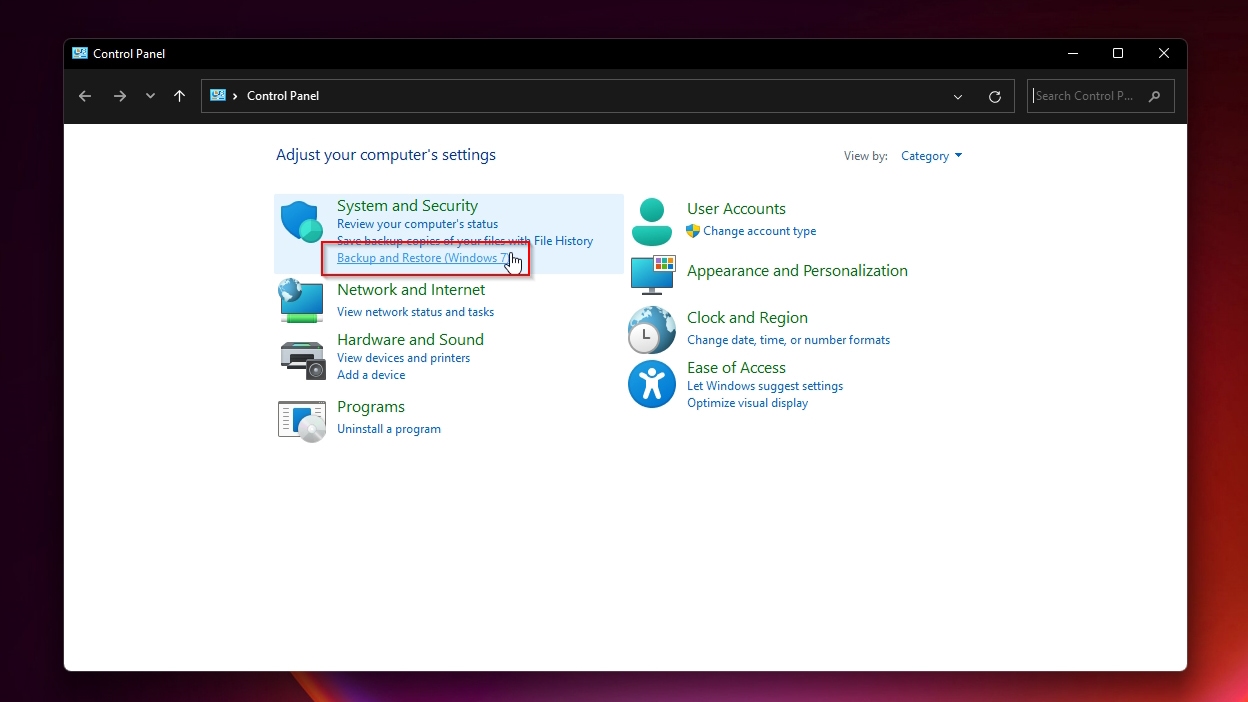
- Use the Start menu or Search to seek the classic Control Panel and open it.
- Under System and Security, choose Backup and Restore (Windows 7).
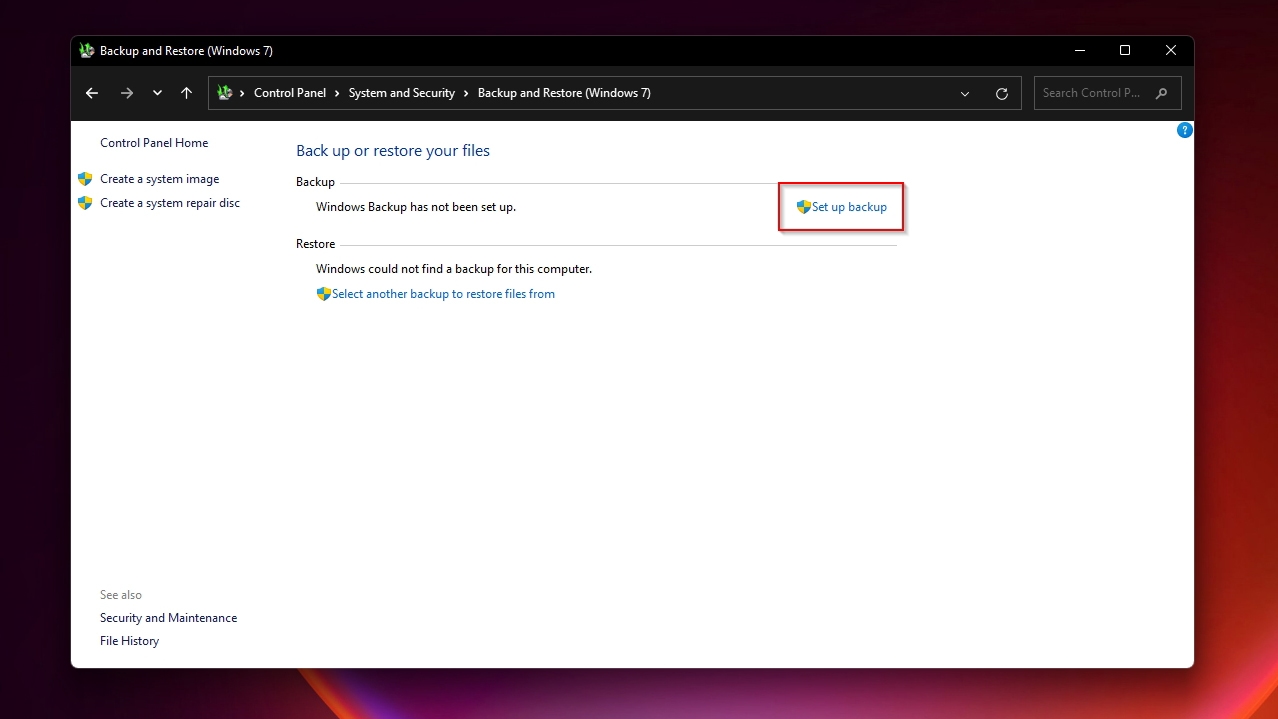
- Click Set up backup.
- Select the drive where you want to store your backups — using an external drive for such scenarios is usually best. Then, click Next.

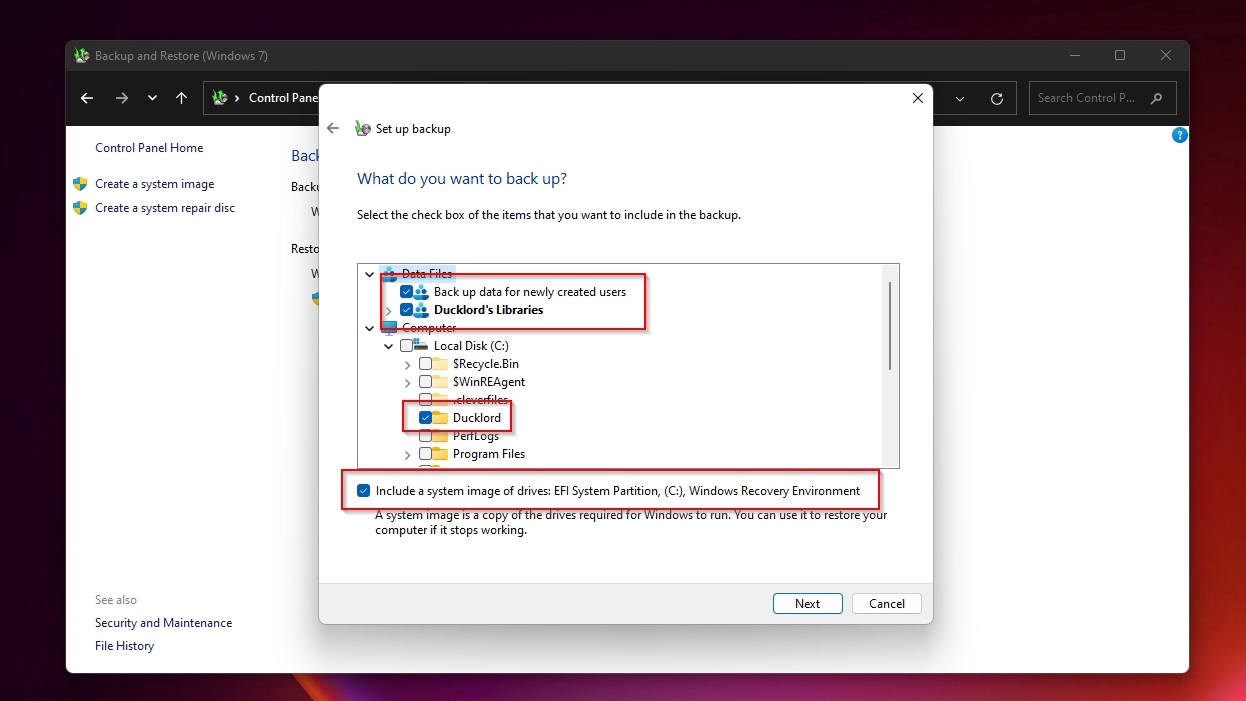
- To manually select what to back up, pick the second option, Let me choose, and click Next.

- Navigate the presented tree folder view and place a checkmark on the left of the files and folders you want to have backed up. When done, click Next.
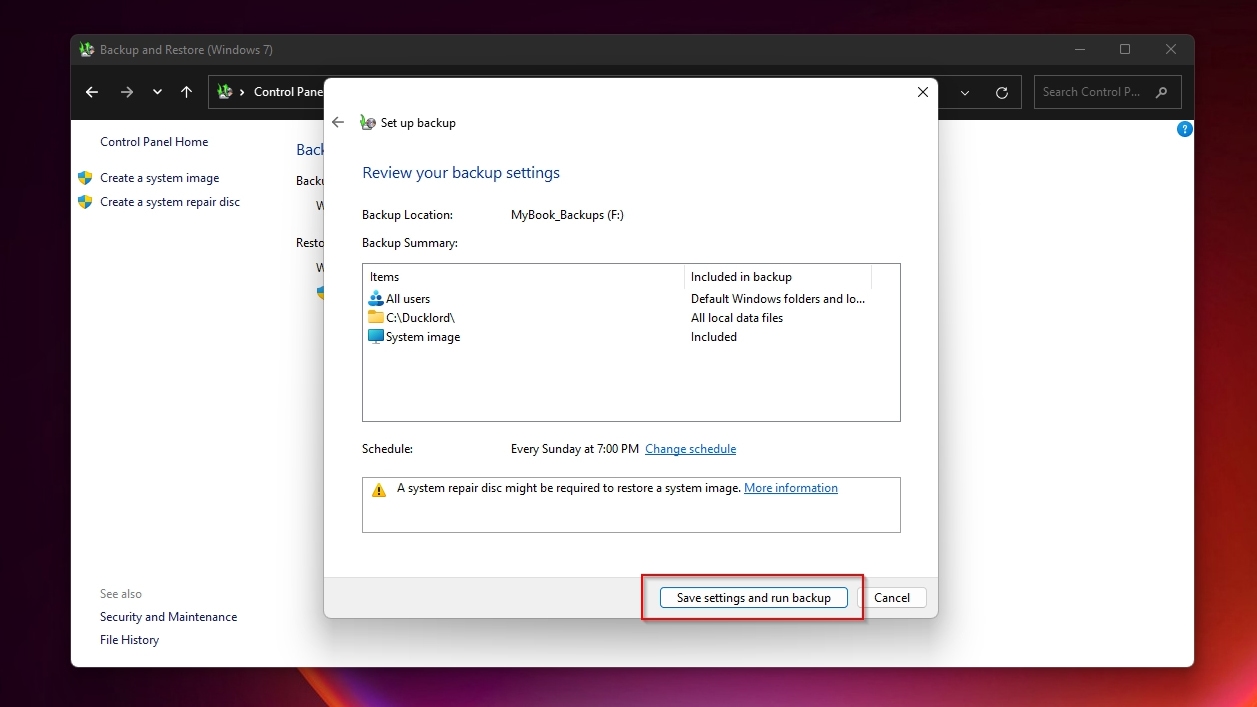
- Click Save settings and run backup to do precisely that.
To retrieve deleted files from a Backup and Restore (Windows 7) backup:
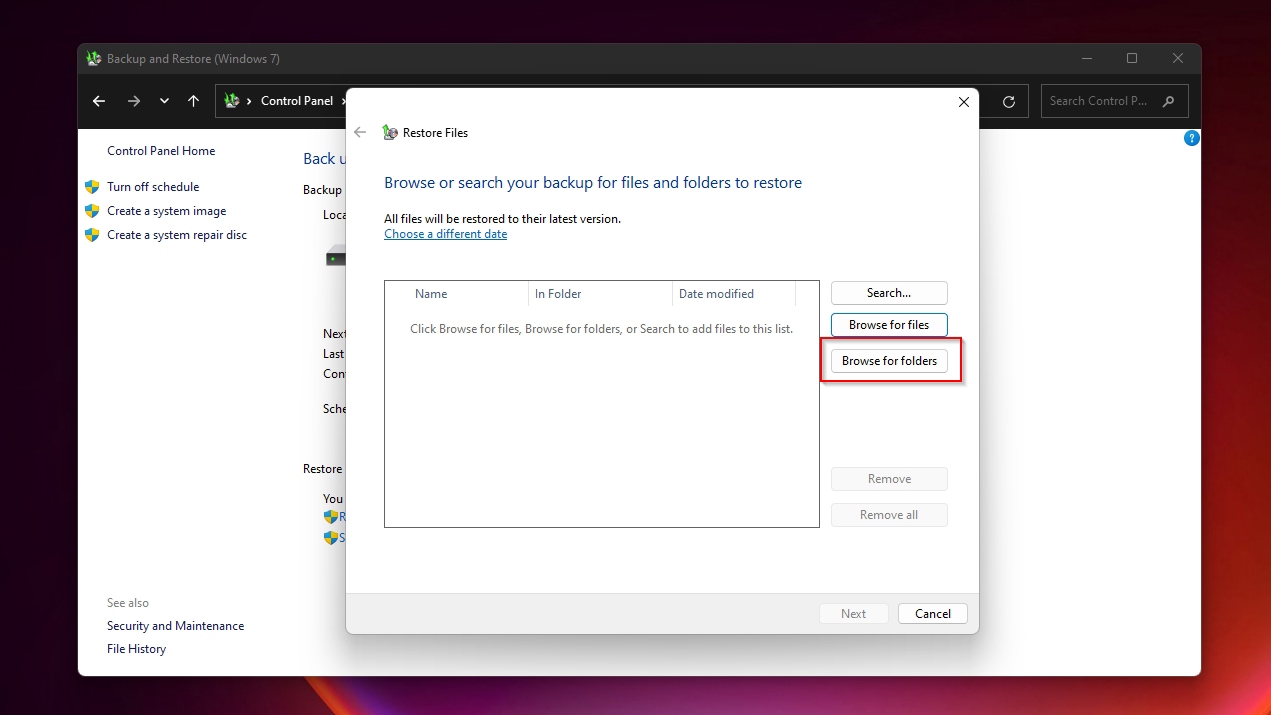
- Visit Backup and Restore (Windows 7)‘s main page, as we saw above. Click on Restore my files.

- Click Browse for files or Browse for folders on the right of the window. For this guide, we’ll recover a folder.
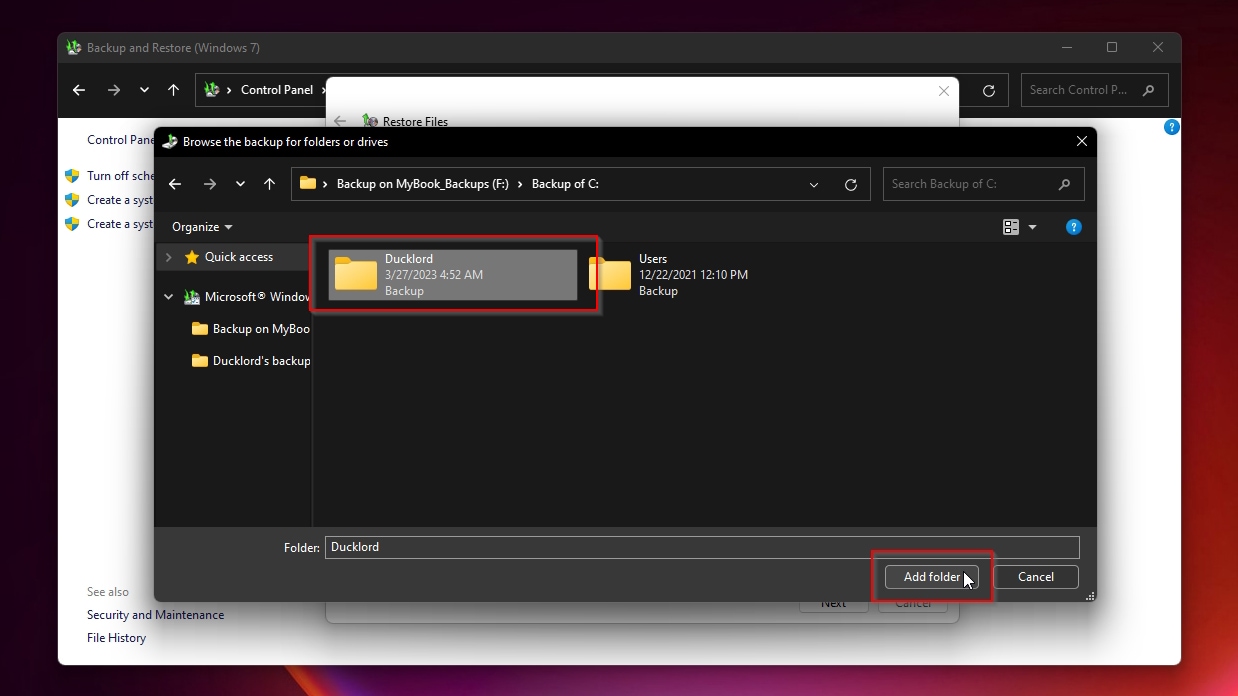
- Choose the folder you want to recover, and click Add folder.
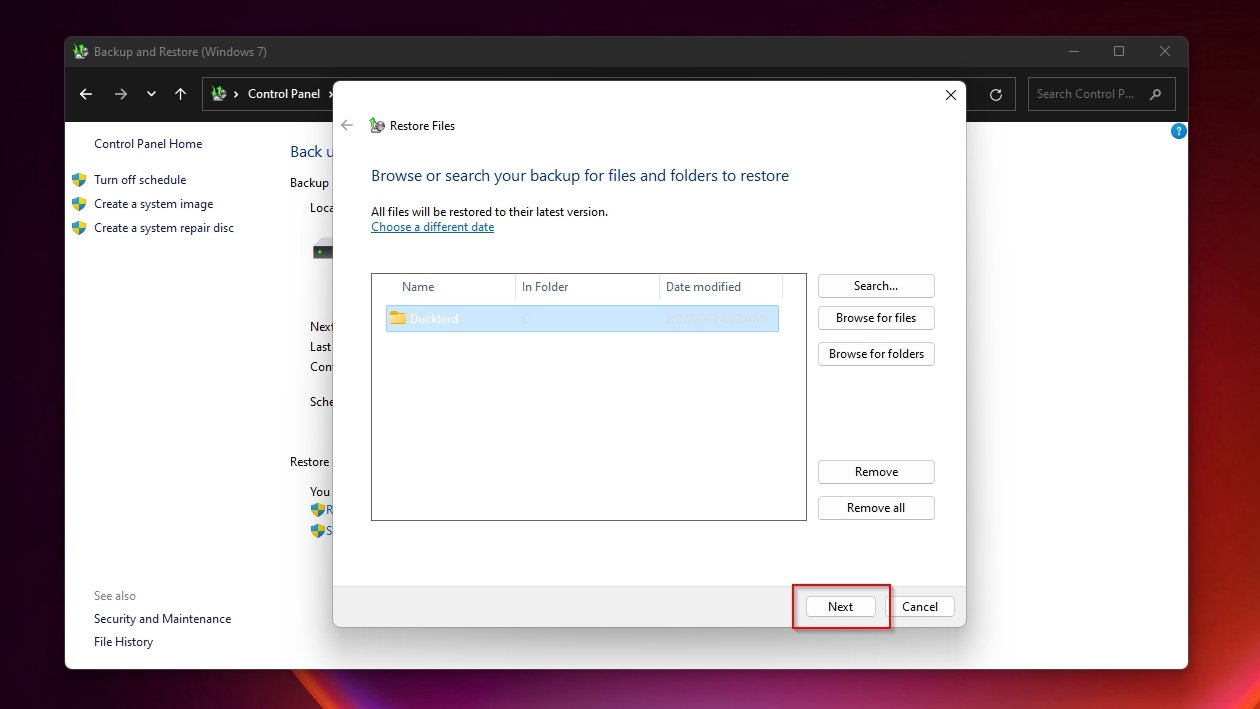
- You can repeat the last step to add more folders and files to that list. When done, click Next.
- Select if you want to restore your data in its original location or in a new one (which you’ll have to choose with a click on Browse). Then, click Restore.
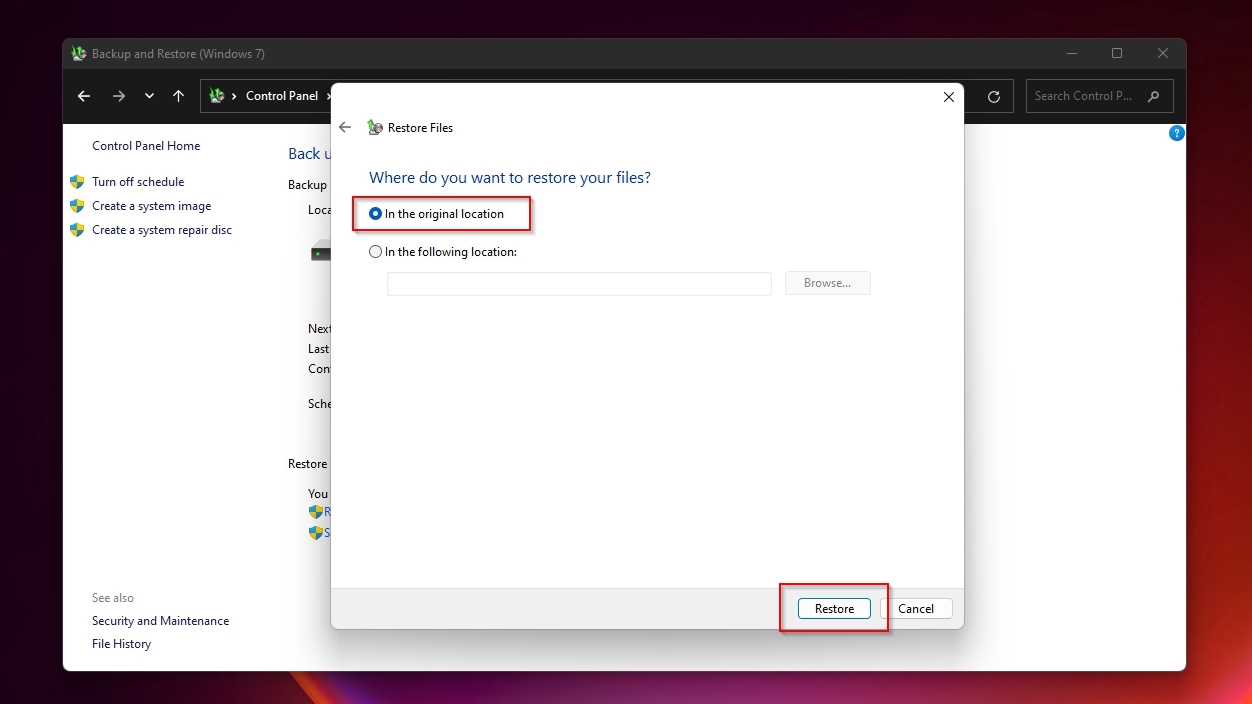
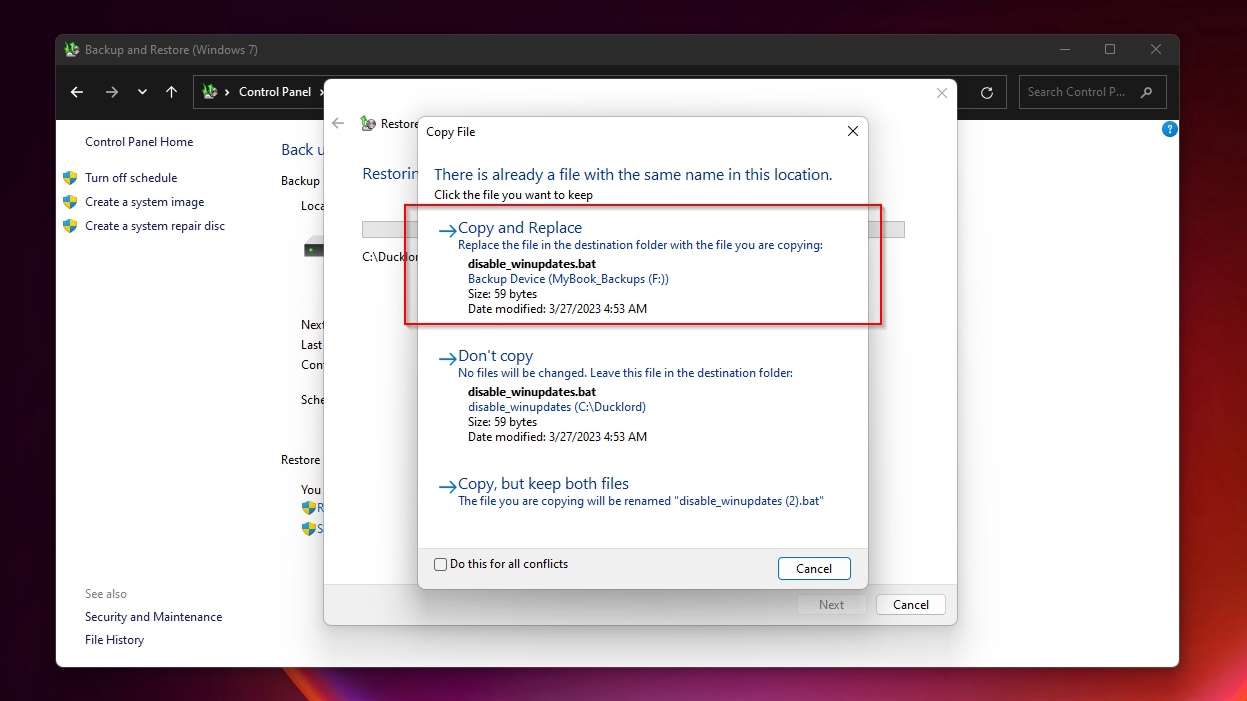
- If files and folders with the same names exist in your selected destination, Backup and Restore (Windows 7) will ask you how you want to deal with their overlapping.
Method 5: Recover Deleted Files and Folders From OneDrive
Are you using a solution like Box, Dropbox, or OneDrive? In that case, you can restore deleted files on Windows 11 from their online versions that remain untouched in your cloud storage.
To recover permanently deleted files on Windows 11 that are still available on your OneDrive cloud storage:
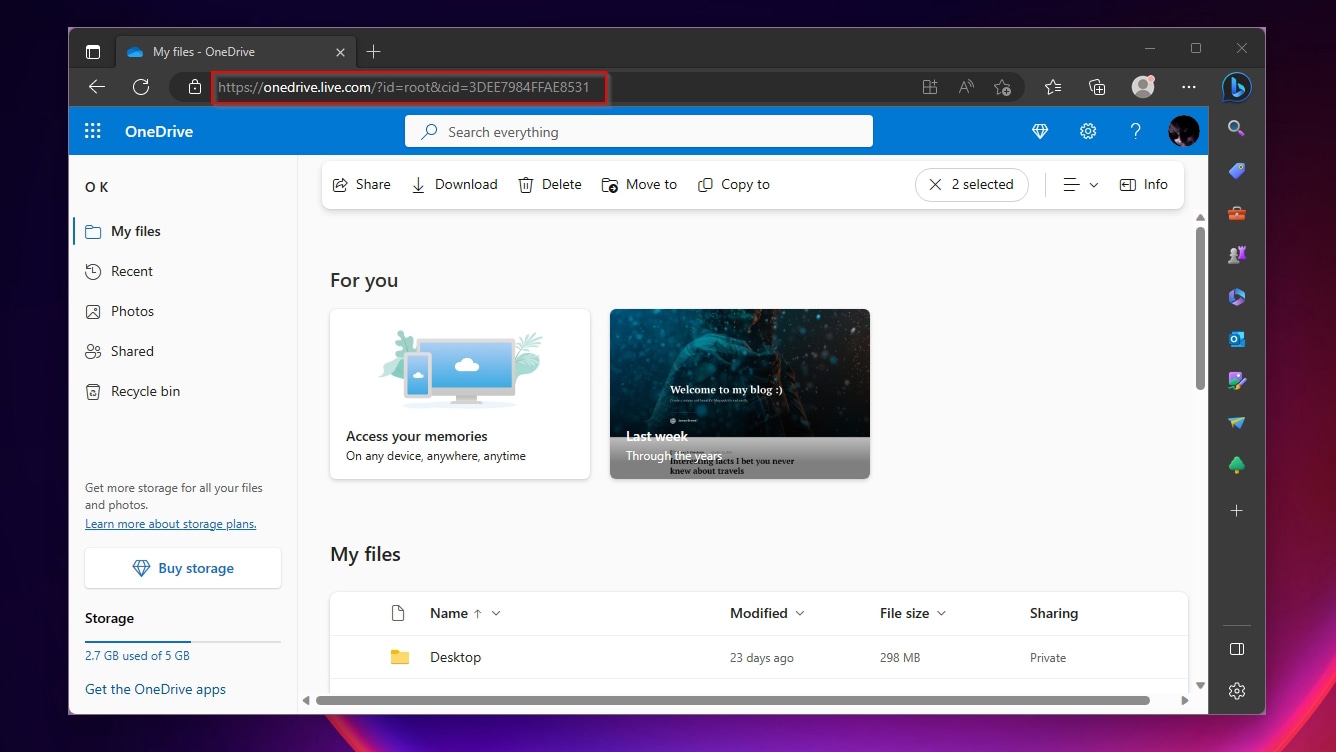
- Visit OneDrive’s official site and log in with your credentials.
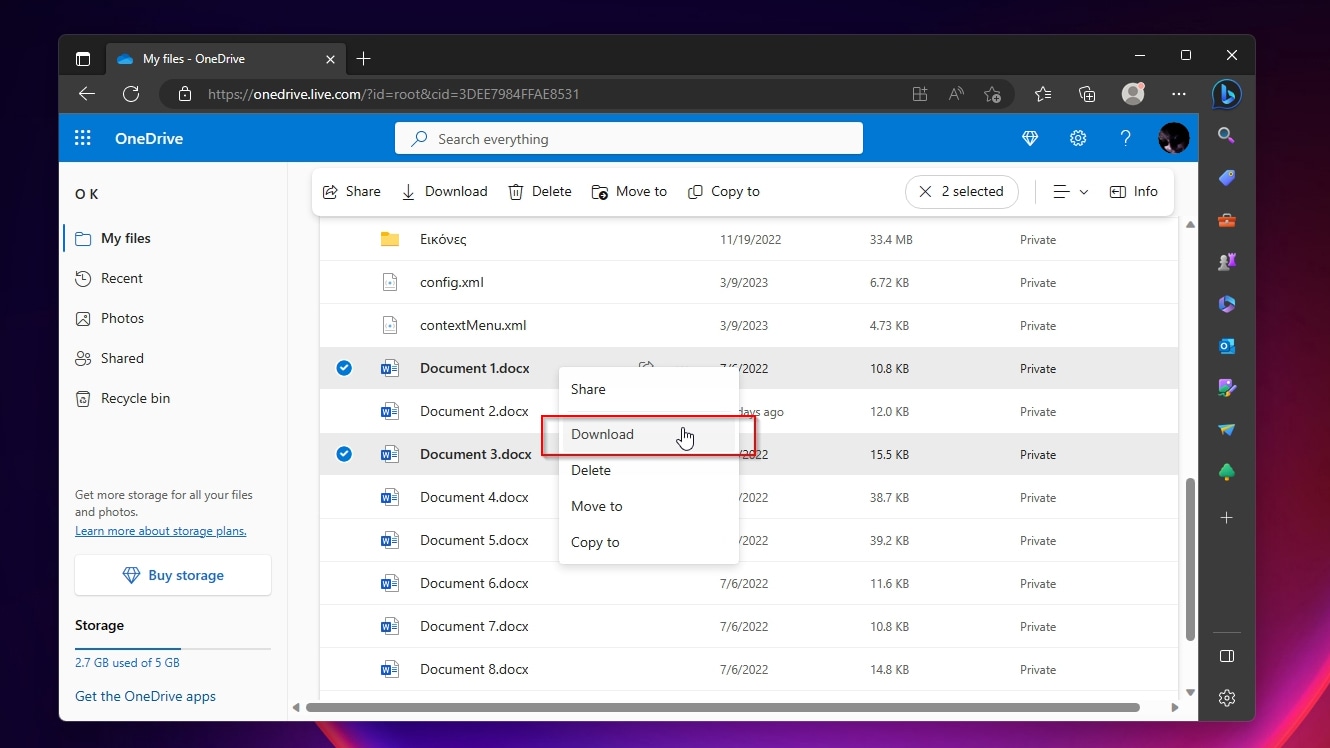
- Locate the files you want to get back (remember to also look on the Recycle bin on the left), and place a checkmark on their left. Right-click on one of them and choose Download to save them back to your PC’s local storage.
Frequently Asked Questions
How to recover permanently deleted files from a PC?
You can recover permanently deleted files from your PC by a) retrieving them from a backup or b) getting them back from where they were stored using a data recovery solution. For example, with the second option:
- Download, install, and run Disk Drill on Windows 11.
- Scan the drive with the permanently deleted files.
- Wait for the scan to complete.
- Select your files & click Recover.
- Choose where to store the recovered versions.
How to find deleted files on Windows 11?
You can usually find your deleted files on Windows 11 by looking in the Recycle Bin. If they’re not there, you can retrieve them from a backup or using a data recovery solution. If you have File History enabled, to get your lost files back using Previous Versions:
- Right-click on the folder where your lost files resided, and choose Properties.
- Move to the Previous Versions tab.
- Select the backup you want to revert to and click on Restore.
How to recover deleted photos on Windows 11?
To recover deleted photos on Windows 11, you can use the same methods you’d use for any other files. For example, to recover your TIFF, PNG, and JPG photos from your D drive into the C:\recovery folder using Windows File Recovery:
- Download and install Windows File Recovery from the Microsoft Store.
- Run CMD or PowerShell “as an administrator”.
- Use the command winfr d: c:\recovered /regular /n *.tif /n *.tiff /n *.png /n *.jpg
Where is the recycle bin in Windows 11?
There’s not one, but multiple “Recycle Bins” on Windows, each stored in a hidden folder on the root directory of each storage device. Each is named “$RECYCLE.BIN”, but you’ll only be able to see them if you use a third-party file manager. Since they’re considered essential system folders, Windows Explorer keeps them hidden. Still, you can visit them manually using their complete path, for example, “E:$RECYCLE.BIN” to view the one on drive E.
Can I recover permanently deleted files from Windows 11 using CMD?
You can’t recover permanently deleted files from Windows 11 using CMD alone, but you can use an app like Windows File Recovery or PhotoRec through CMD. For example, to recover your deleted TXT files from drive C into a D:\recovered folder using Windows File Recovery:
- Get Windows File Recovery from the Microsoft Store.
- Run CMD with administrative rights.
- Use winfr c: d:\recovered /regular /n *.txt
Conclusion
As we saw in this article, it’s possible to recover even permanently deleted files on Windows 11, as long as they still exist in a relatively recent backup or you use an online cloud storage solution.
Even when those aren’t viable options, you can still use a data recovery solution, like Disk Drill or Windows File Recovery, to locate and undelete your lost files.

Odysseas is a geek with over three decades of experience in tech who occasionally lost vast amounts of data. “Data” he managed to recover most of the time using various recovery solutions.
Eventually, he joined our team to write about such data loss and recovery scenarios and all related software and methods.
Despite having written thousands of articles and tutorials for various popular outlets, he considers his data-recovery adventures an ongoing learning experience.
- Frisco, Texas, United States
Yevgeniy Tolkunov is Hardware Engineer at ACE Data Recovery. Yevgeniy has a Master's Degree in Physics, Information Technology; 15+ years of experience.