How to Recover Data from a Corrupted SD Card on Mac
Have you recently attempted to access data stored on an SD card but failed to do so because the tiny storage device has been affected by a major problem? We’re talking about data corruption, a dreaded issue that can cause thousands of files to disappear in the blink of an eye. But you’re reading this guide for a reason: you believe there’s hope, and there is because data corruption doesn’t always mean a final goodbye to your precious files. So, let’s recover your corrupted SD card on Mac!
Is It Possible to Recover a Corrupted SD Card on Mac?
In most cases, it’s entirely possible to recover and repair a corrupted SD card on your Mac. However, the likelihood of successful corrupted SD card recovery depends on the nature and extent of the damage:
| Damage | Recovery changes | Solution |
| Excessive wear and tear (Sectors on SD cards degrade over time, which can eventually lead to corruption) | High | Recover lost data using Disk Drill and stop using the SD card. |
| File system damage (An inconsistent state of the file system can result from an unexpected removal, power loss, or software malfunction and result in the loss of an entire partition) | High | Repair the SD card using First Aid or diskutil and recover lost data using DiskDrill or TestDisk. |
| Individual file damage (Individual files can become damaged for the same reasons as the entire file system and stop being accessible) | Medium | Recover lost files using Disk Drill. |
| Malware infection (Viruses and other malicious software can corrupt, delete, or hide your data) | Medium | Recover lost data using Disk Drill and format the SD card to erase all malware. |
| Physical damage (Physical harm like exposure to water, dropping, or breaking can lead to unreadable sectors or a completely non-functional SD card) | Low | Contact a data recovery service. |
The good news is that most SD card issues stem from causes that are fixable, especially with the right tools and approach. If you’re facing a trickier problem, then the best data recovery services can often save the day, and they don’t always charge as much money as you might think, especially if your data is extremely valuable to you.
How to Recover Data from a Corrupted SD Card on Mac
When it comes to performing corrupted SD card recovery on Mac, you want to use a solution that can deliver the best possible results with the least amount of effort.
Our favorite solution that meets these criteria is Disk Drill, a top-ranking SD data recovery software application for macOS and Windows. You might wonder why Disk Drill stands out. Well, after meticulous testing and comparison with other software, Disk Drill emerged as a top-tier repair tool for several reasons:
- 👤 Outstanding user experience: Even if you’re not tech-savvy, its intuitive design ensures a smooth ride through the recovery process.
- ✅ Verified data recovery performance: Our Disk Drill in-depth review has verified the effectiveness of the application’s data recovery algorithms.
- 🪄 Many extra features: With Disk Drill, you can create a byte-to-byte backup of your corrupted SD card before you begin the recovery process and much more.
- 📄 File format support: SD cards are commonly used to store image and video files (both in lossy and lossless file formats), and Disk Drill can recognize them with ease.
- 👀 Unlimited free previews: You can preview all your retrievable files for free to verify their integrity and ensure you’re recovering exactly what you need.
As long as your SD card is detected by your computer (it’s listed in Disk Utility), then Disk Drill can likely help—even if the SD card is raw (it doesn’t have a file system).
Now, let’s walk through the steps to recover your corrupted SD card on Mac using Disk Drill:
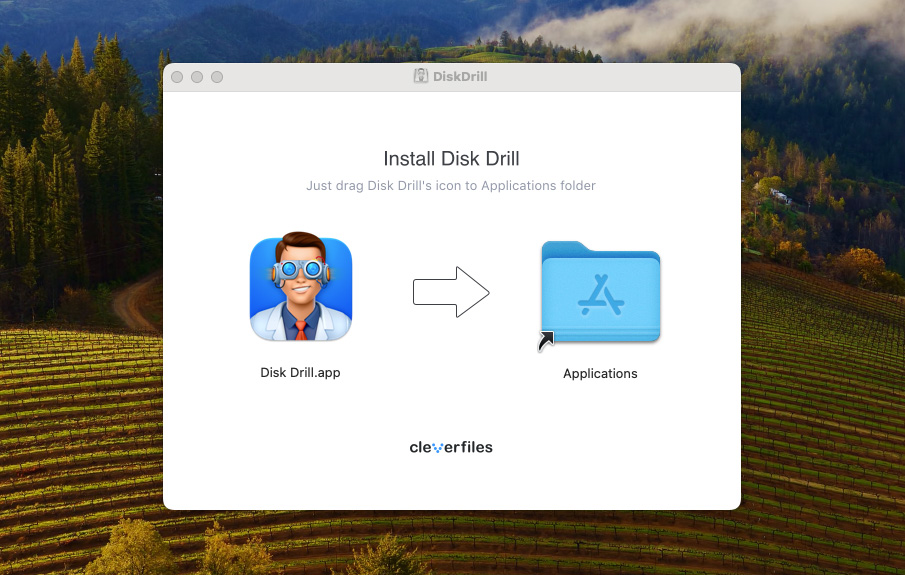
- Start by downloading Disk Drill from the official website. After downloading, launch the installer and drag the application into the Applications folder.
- Insert your corrupted micro SD card into the Mac, either directly or using a card reader. If the SD card doesn’t show up in Disk Utility right away, then check if the card is properly seated or try a different card reader.
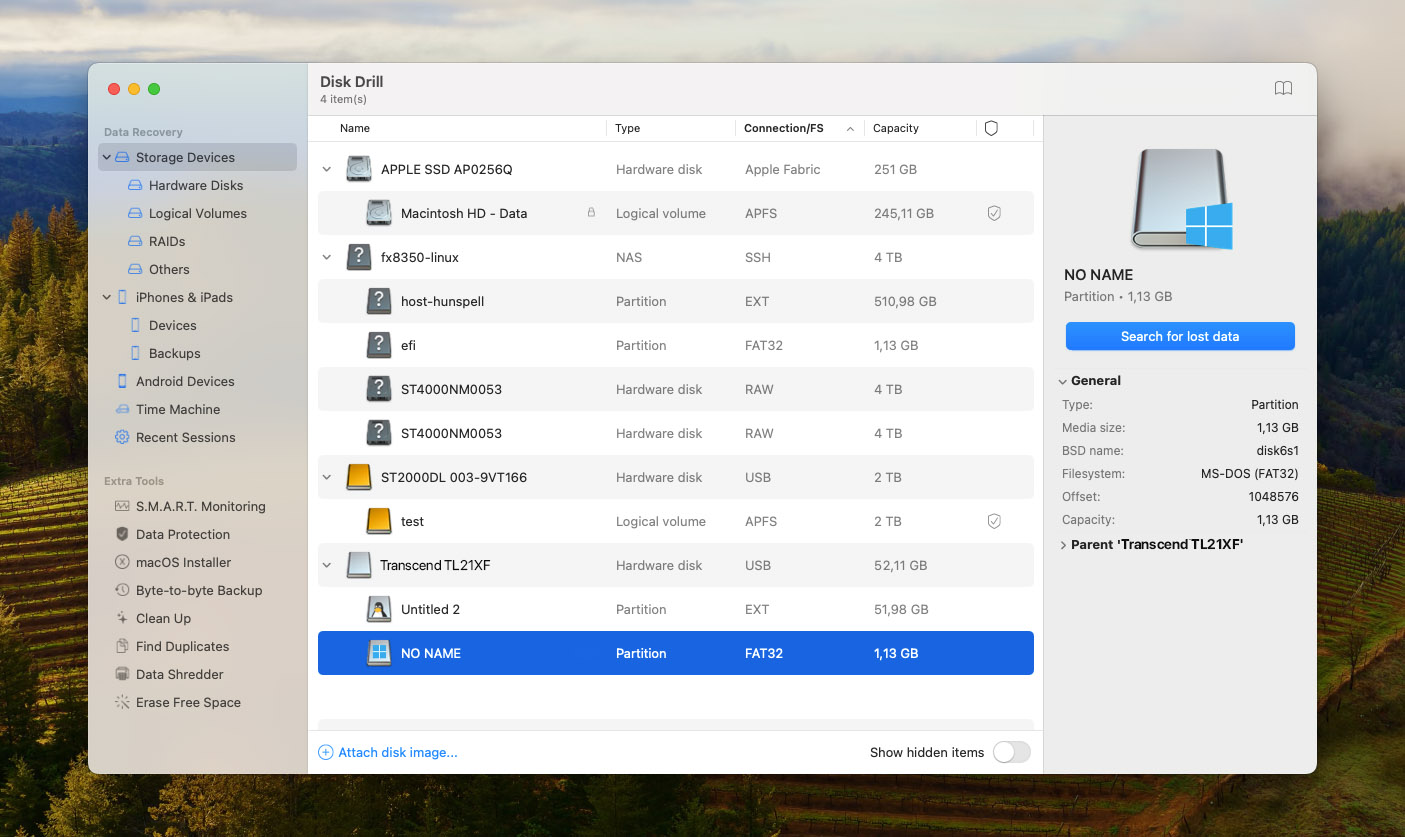
- Launch Disk Drill and locate your corrupted SD card in the list of available storage devices. Click on the card and use the Search for lost data button to initiate its scan.
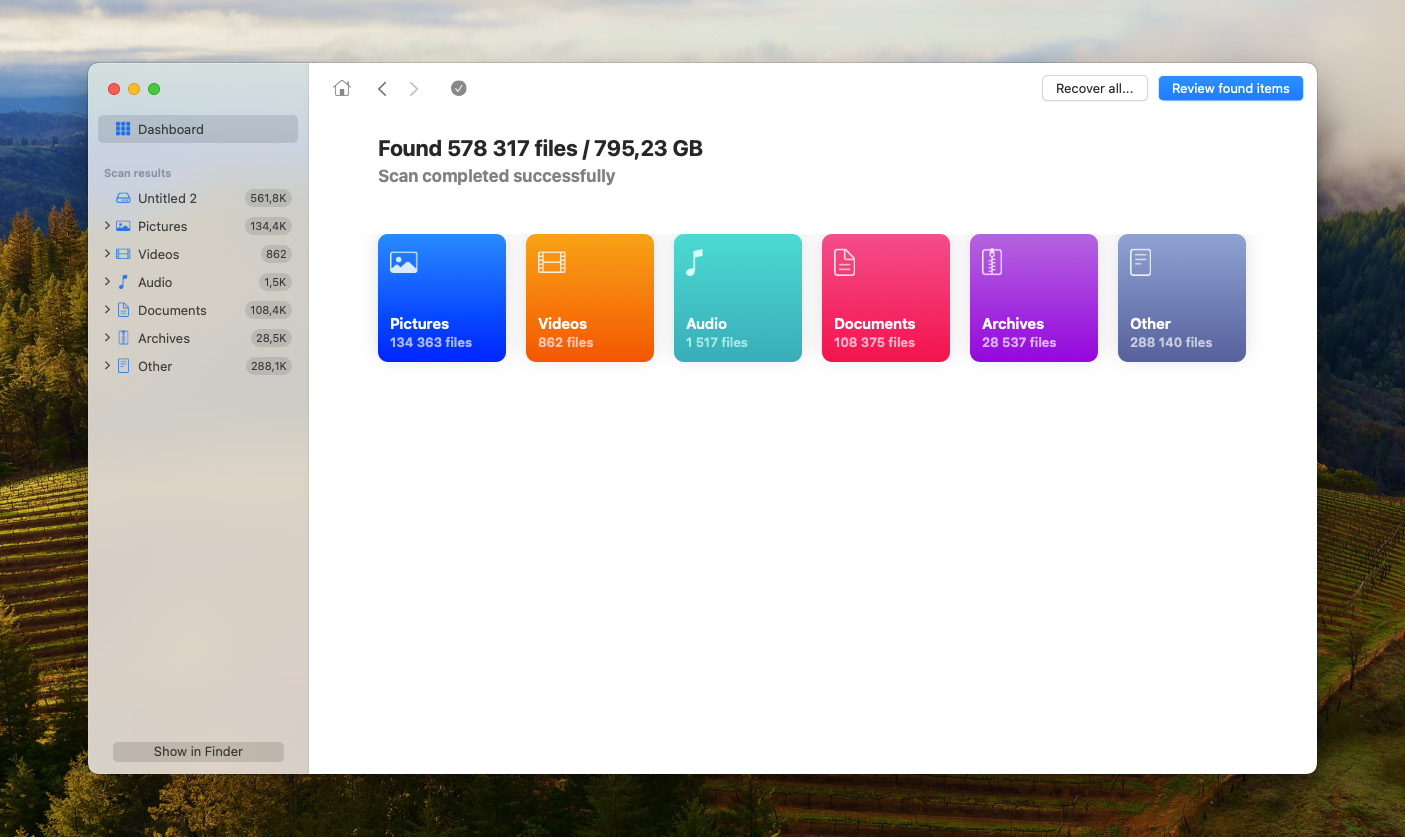
- Preview recovery results immediately by clicking the Review found items button or wait until the scan completes. The software will display all retrievable files, categorized by their availability (Deleted or lost, Existing, and Reconstructed).
- Browse through the list of recoverable files and select the files or folders you want to restore. Thanks to Disk Drill’s unlimited free previews, you can ensure you’re recovering exactly what you need. Look for specific files using the search bar or filter the results by file type.
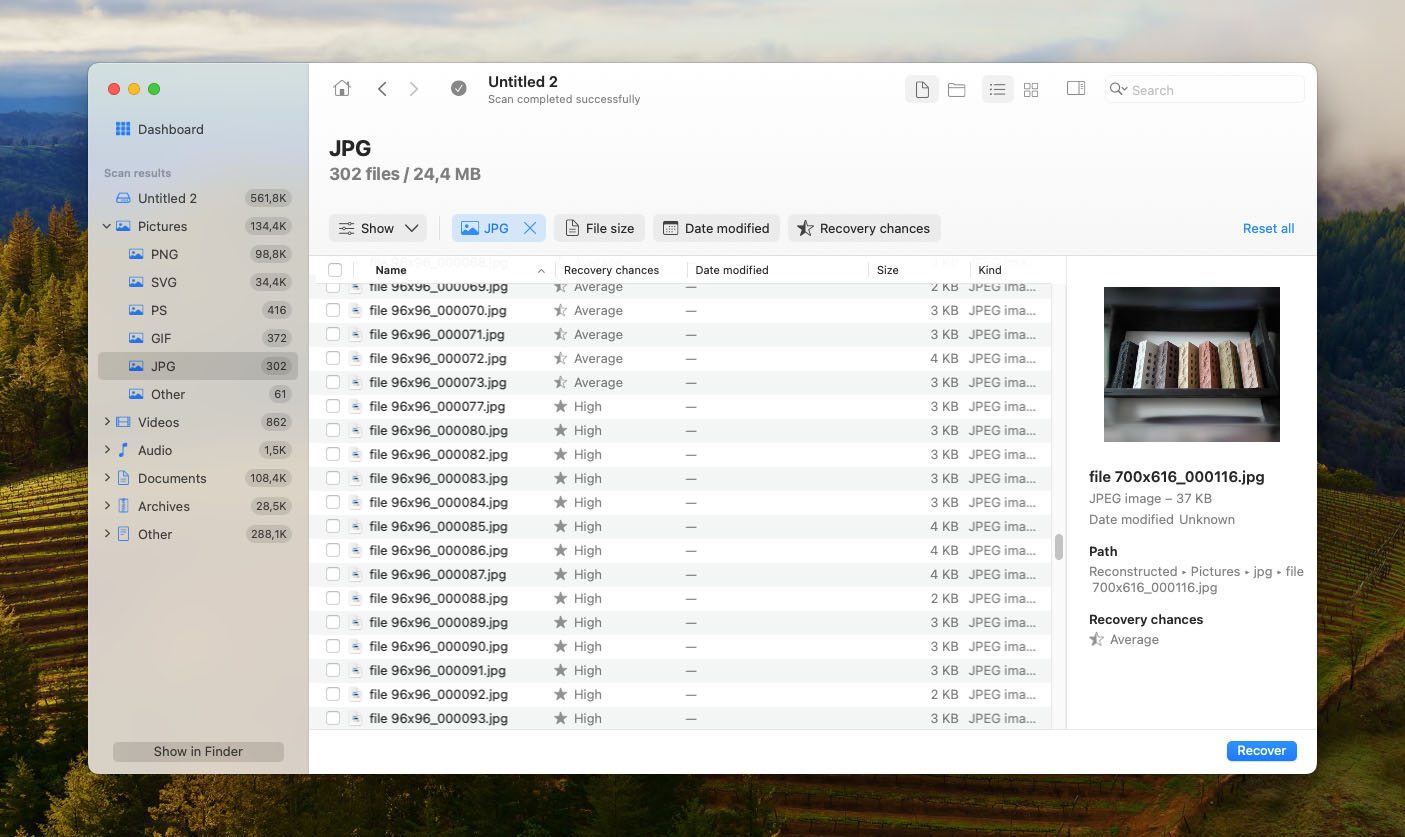
- Click the Recover button when you’re happy with your selection. A dialog box will appear asking you to choose a destination for the recovered files. It’s essential to save these files to a different location than the corrupted SD card to prevent overwriting.

These steps should be enough to successfully perform both corrupted microSD card Mac recovery and corrupted full-size SD card Mac recovery.
How to Repair an SD Card on Mac
So you’ve tried to recover your files using the best data recovery software, but what if the SD card itself still acts up? Maybe it keeps disconnecting, or perhaps it’s not even showing up on your Mac. Before you label that card as done and dusted, there’s a good chance you can still repair and uncorrupt it using one of the methods described below.
Method 1: Repair an SD Card Using First Aid
If you need to repair a corrupted SD card on Mac, then First Aid should be your number one choice because it’s part of Disk Utility, so you can access it without downloading any additional software and use it to find and fix common file system errors. Here’s how:
- Launch Disk Utility (Applications > Utilities > Disk Utility).
- Select your corrupted SD card from the list of storage devices in the left pane.
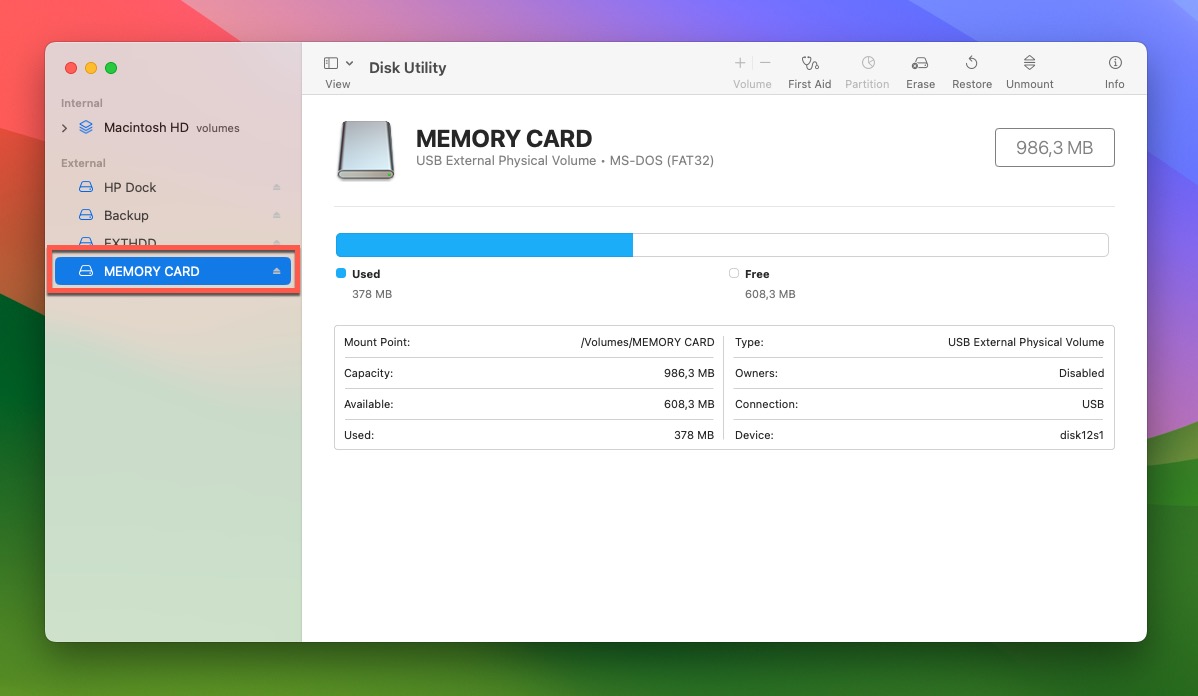
- Click the First Aid button in the top toolbar and then click Run.

The process may take a few minutes, depending on the size and state of your SD card. Once complete, First Aid will provide a summary of its findings. If it finds and successfully repairs errors, then you should be good to go!
Method 2: Diagnose the SD card Using Terminal
The Terminal app can be a real lifesaver when you’re trying to fix a corrupted SD card on Mac because it lets you use many lesser-known but highly effective commands. One such command is diskutil, a powerful built-in repair tool that can help diagnose and fix issues with storage devices. This is what you need to do to put it to good use:
- Launch the Terminal app (Applications > Utilities > Terminal).
- Type diskutil list and press Enter. This will display a list of all connected storage devices, including your SD card.
- Identify your SD card from the list by its size and name. Remember its disk identifier (such as /dev/disk2), as you’ll need it in the next step.
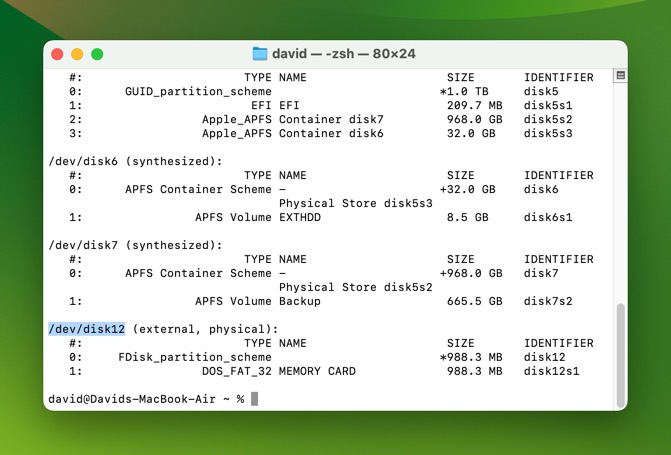
- Type the following command: diskutil verifyVolume /dev/disk2 (make sure to replace /dev/disk2 with the actual identifier assigned to your corrupted SD card)
- Follow up with this command: diskutil repairVolume /dev/disk2 (again, use the correct identifier)
After the repair process is done, Terminal will display a summary. If it says the volume was repaired successfully, eject and reinsert the card to check if it’s now functioning correctly.
Method 3: Reset SMC or NVRAM
If the SD card is not detected by your Mac, the problem may lie within the system’s hardware settings. Resetting the System Management Controller (SMC) or Non-Volatile Random-Access Memory (NVRAM) can sometimes fix the issue.
Here’s how to reset your Mac’s SMC:
- Turn off your Mac.
- Press the left Control button, the left Option button, and the right Shift button. Keep holding them for exactly 7 seconds.
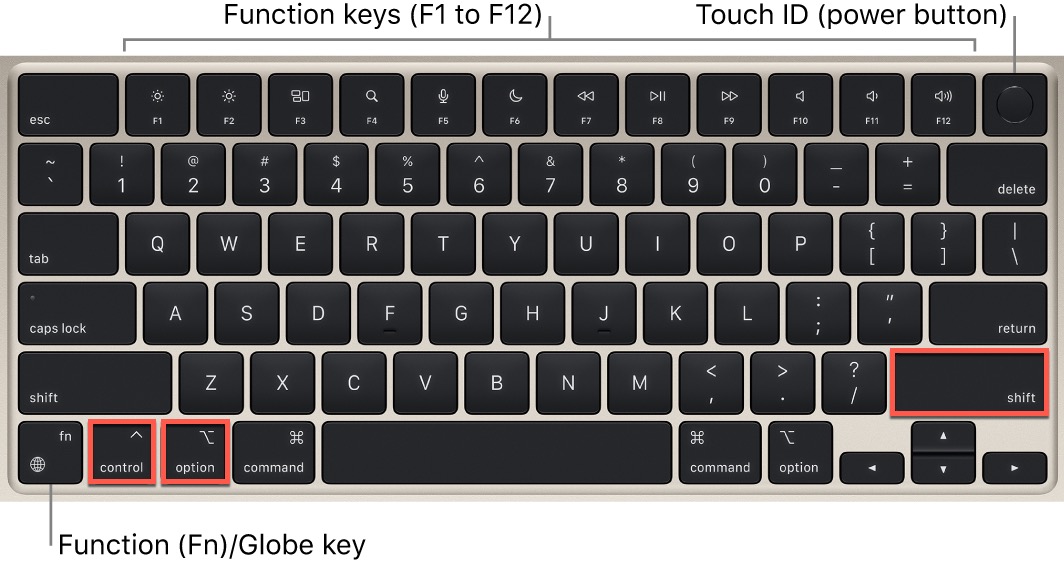
- In addition to the keys you’re holding, press and hold the power button and keep holding all four keys for another 7 seconds.
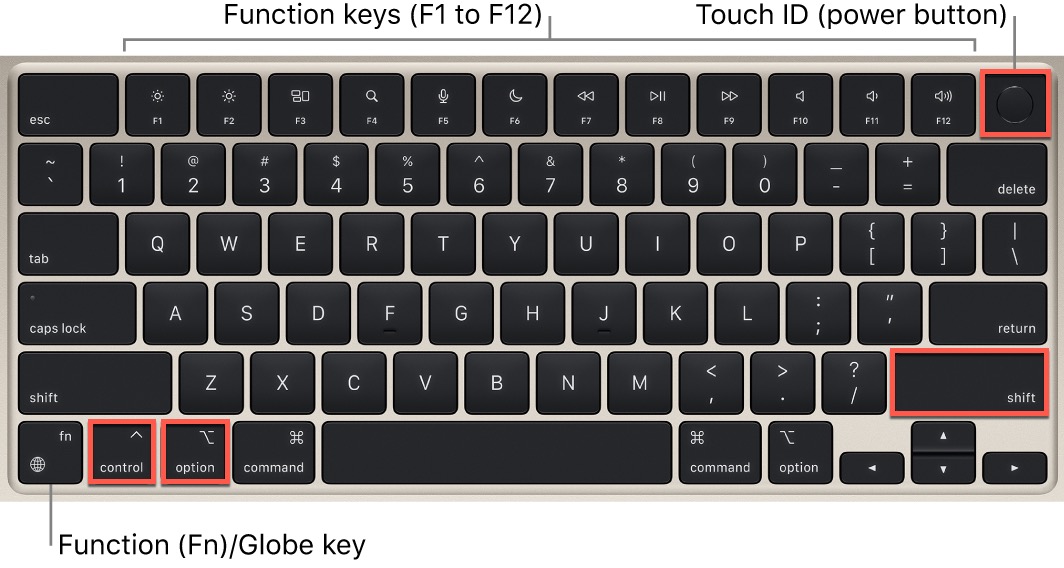
- Wait a few seconds.
- Press the power button to boot up your Mac.
To reset NVRAM, do the following:
- Launch the Terminal app.
- Enter the following command: sudo nvram -c
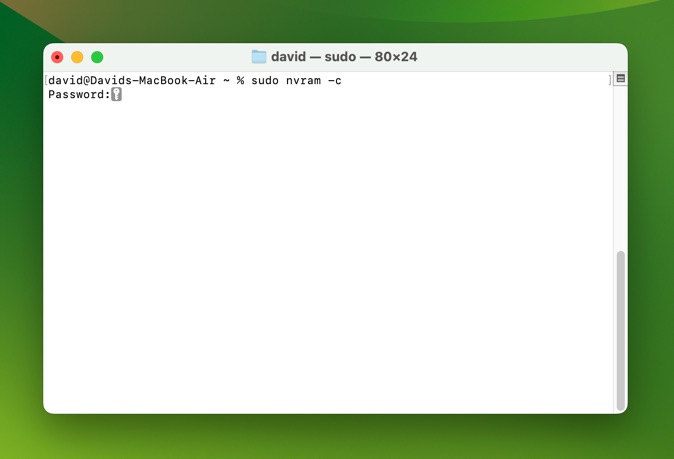
- Type in your admin password and hit Enter.
- Restart your Mac.
After resetting the SMC or NVRAM, reinsert your SD card and check if it is now recognized by your Mac.
Method 3: Third-Party Repair Tools
One excellent free recovery and repair tool that can help those aiming to fix a corrupted SD card on Mac is TestDisk. Developed to recover lost partitions and make non-booting disks bootable again, this open-source application is great for those who have lost an entire partition due to file system corruption.
Unfortunately, repairing a disappearing SD card partition that’s not showing up using TestDisk is somewhat complicated because the application lacks a graphical user interface. Fortunately, the tool’s official wiki provides detailed step-by-step instructions that explain what you need to do really well.
The only thing the official instructions don’t explain is that you can easily install TestDisk using Homebrew, a package manager for macOS:
- Launch the Terminal app.
- Enter the following command to install Homebrew: /bin/bash -c “$(curl -fsSL https://raw.githubusercontent.com/Homebrew/install/HEAD/install.sh)”
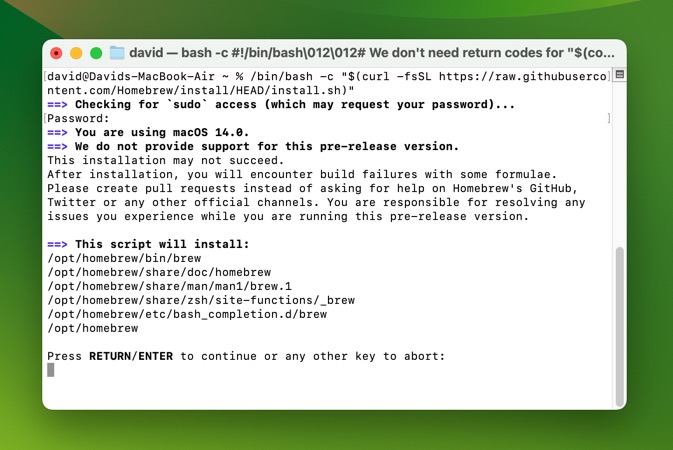
- Enter the following command to install TestDisk: brew install testdisk
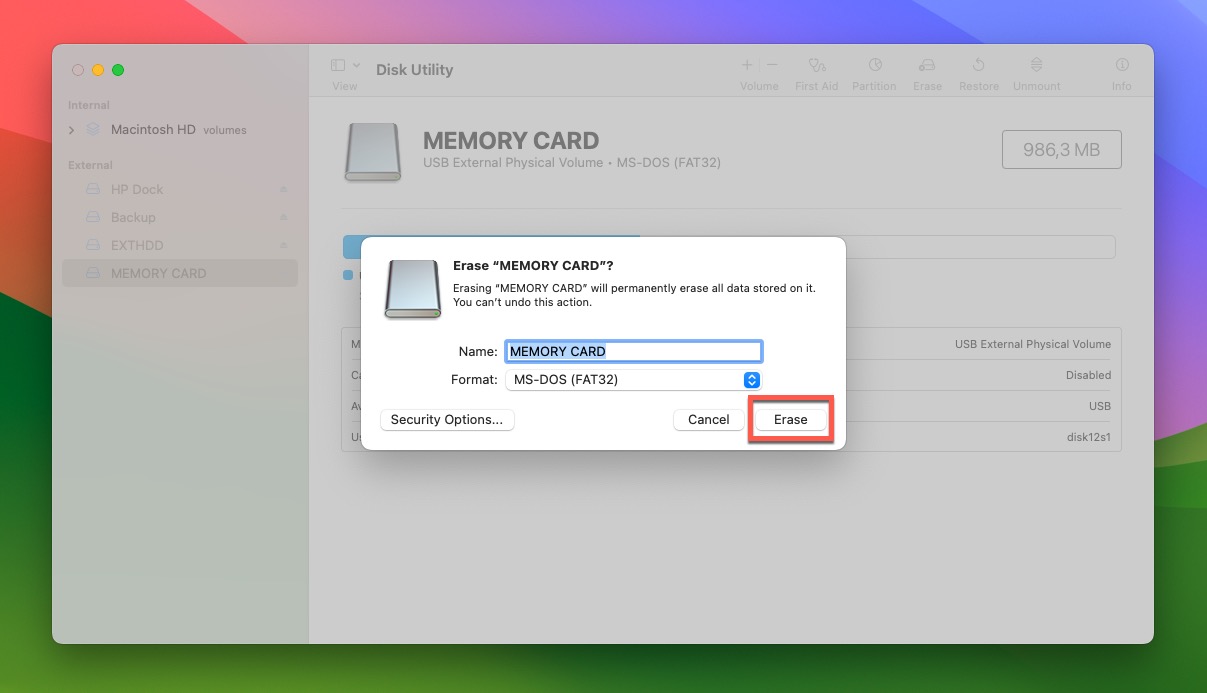
Method 4: Format Your Memory Card
Let’s say you’ve tried all the above, and your SD card is still misbehaving. It’s frustrating, we know, but don’t toss it out just yet. If you’ve successfully recovered your data, or if you’re okay parting with what’s on the card, then you might want to consider the ultimate fix: formatting.
By formatting your memory card, you erase all data on the card and set up a new file system, which can often resolve even some of the most problematic corruption-related issues in no time. To format a corrupted SD card on Mac:
- Plug in your SD card to your Mac using a card reader.
- Launch the Disk Utility app (Applications > Utilities > Disk Utility).
- Select your SD card from the list on the left. Make sure to select the entire SD card and not just a single partition.

- Click the Erase option located in the top toolbar.
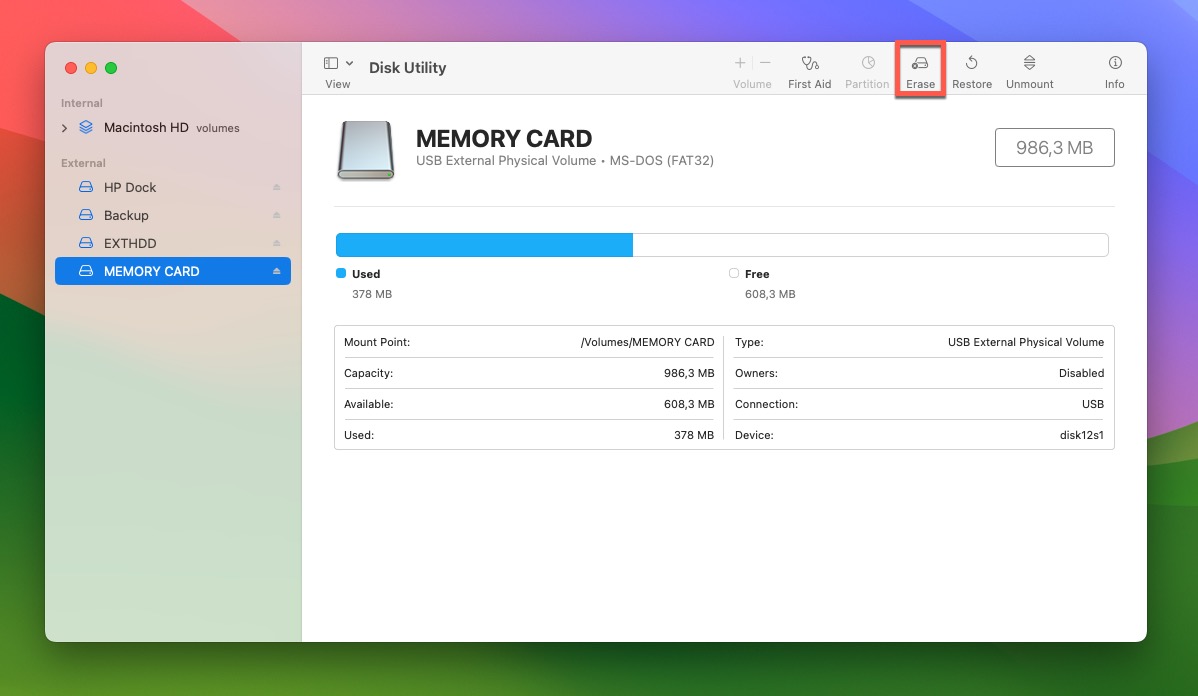
- Choose the desired format (FAT32 for smaller cards and exFAT for cards over 32 GB). Provide a name for your card if you want to.
- Confirm your decision to format the corrupted SD card on Mac by clicking the Erase button.
Method 5: Contact a Data Recovery Service
Sometimes, despite our best efforts, SD cards might just refuse to cooperate, especially if they’ve suffered physical damage. If you’ve noticed any visible signs of wear, cracks, or breakage on your SD card, it’s often best not to attempt any DIY solutions because a failed repair attempt could cause further damage, making recovery even more challenging—if not impossible.
In such cases, the safest bet is to contact a professional data recovery service. Using specialized equipment, data recovery service technicians are able to transplant tiny SD card chips into donor memory cards and perform other complicated repairs of physical damage.
Frequently Asked Questions
How do I fix a corrupted SD card on my Mac without formatting?
To fix a corrupted SD card on Mac without formatting:
- Connect the SD card to your Mac.
- Open Disk Utility (located in Applications > Utilities).
- Select the SD card from the list.
- Click the First Aid tool.
- Follow the on-screen prompts.
How to fix a corrupt SD card on Mac that won't format?
If the corrupt SD card won’t format, then its write-protection switch might be the culprit. This tiny switch on the side of the SD card, and it needs to be in the off position for write operations to happen.
How to recover photos from a corrupted SD card on Mac?
Here’s how to recover photos from a corrupted SD card on your Mac:
- Download a reliable data recovery tool like Disk Drill.
- Connect the corrupted SD card.
- Launch Disk Drill and select the SD card.
- Click Search for lost data to scan for recoverable photos.
- Preview, select, and recover them to a safe location.
Conclusion
Losing access to precious files on an SD card can be deeply distressing. Yet, as this comprehensive guide illustrates, there are actionable steps and reliable tools like Disk Drill available to Mac users facing such problems. Arm yourself with the right knowledge, act quickly, and you stand a strong chance of restoring your lost files and giving your SD card a renewed lease on life.
David Morelo is a professional content writer with a specialization in data recovery. He spends his days helping users from around the world recover from data loss and address the numerous issues associated with it.
When not writing about data recovery techniques and solutions, he enjoys tinkering with new technology, working on personal projects, exploring the world on his bike, and, above all else, spending time with his family.
- Klennet Recovery Review (Formerly Zero Assumption Recovery)
- iBeesoft Data Recovery Review – A Likable Clone With Limited Features
- DMDE Review – A Data Recovery Powerhouse or a Usability Nightmare?
- Cisdem Data Recovery for Mac Review – A Clone in Disguise
- Tenorshare 4DDiG Review – All That Glitters Is Not Gold
- Frisco, Texas, United States
Yevgeniy Tolkunov is Hardware Engineer at ACE Data Recovery. Yevgeniy has a Master's Degree in Physics, Information Technology; 15+ years of experience.