Unhide Files in USB: How to Show Hidden Files on USB Drive
Staring blankly at your screen and trying to figure out where your USB files have gone? You’re not the first person. Your files can become hidden for a bunch of reasons. But, it’s not always easy to unhide them, and some of them may actually be lost.
Don’t stress. We’ll show you various ways to show hidden files in your USB drive, and how to recover any files that have become lost.
Why Your USB Drive Might Have Hidden Files
Files become hidden when they’re marked with the hidden attribute. While they are still on the USB drive, hidden files on a USB will not appear like normal when you access the device in File Explorer. Likewise, files can disappear completely as a result of damage. Here are some common reasons why your files may have been marked as hidden or otherwise disappeared:
- 🤷♂️ Files were hidden accidentally – Even though it’s not easy to do, it is possible that you or someone else accidentally marked the files as hidden as a result of being in a rush or clicking the wrong option by mistake.
- 🦠 Malware has hidden your files – It’s possible for malware to be created that can hide and delete your files. Additionally, malware can actually attack your files can cause them to become lost.
- ❌ USB drive has become corrupted – If your USB becomes corrupted, it could result in data loss, causing your files to disappear. Continued use of the USB drive can be dangerous. Therefore, in this case, recovering files from the corrupted USB as soon as possible is paramount.
Thankfully, there are ways to get your hidden or lost files back. Next, we’ll show you how to recover hidden files from your USB that you can’t unhide.
How to Recover Hidden Files from USB that You Can’t Unhide
First, we’re going to show you how to recover hidden files from a USB using data recovery software. This will also work for recovering any hidden files that have been deleted from your USB. Because your files may have disappeared due to some form of damage to your USB, it’s best to start with flash drive data recovery before anything else as further use of the USB drive may result in the data becoming permanently lost.
For this, you will need a capable data recovery tool. The ideal data recovery tool will be able to do the following:
- 🔍 Locate and hidden files – Looking for lost data is important, but it’s even more important that the software is able to find and display any of your data that is marked as hidden, including those that were deleted.
- 🗃️ Support multiple file systems – USB drives typically use FAT16, FAT32, or exFAT file systems, so it’s important that the software is able to scan these file systems for lost data, and essential if you want to recover your data with the original file names and folder structure.
- 💻 Find lost partitions – A USB with a corrupted file system may have lost one of its partitions, causing the data to become inaccessible or disappear. This is why the ability to search for entire lost partitions is always helpful.
- ❌ Scan RAW USB drives – RAW USB drives have no file system, so software that can scan a USB without a working file system greatly helps your chances of recovering more data.
With all this considered, our top recommendation is Disk Drill. After extensive testing, Disk Drill was able to demonstrate that it’s more than capable of finding our hidden data and recovering it with ease, even if it was deleted. In addition to other file systems, it displayed great efficiency in recovering files from FAT16/FAT32/exFAT file systems. Furthermore, during our review of Disk Drill, it was able to find our lost partitions that still contained some data.
Follow these steps to retrieve hidden files in a USB using Disk Drill:
- Download and install Disk Drill.
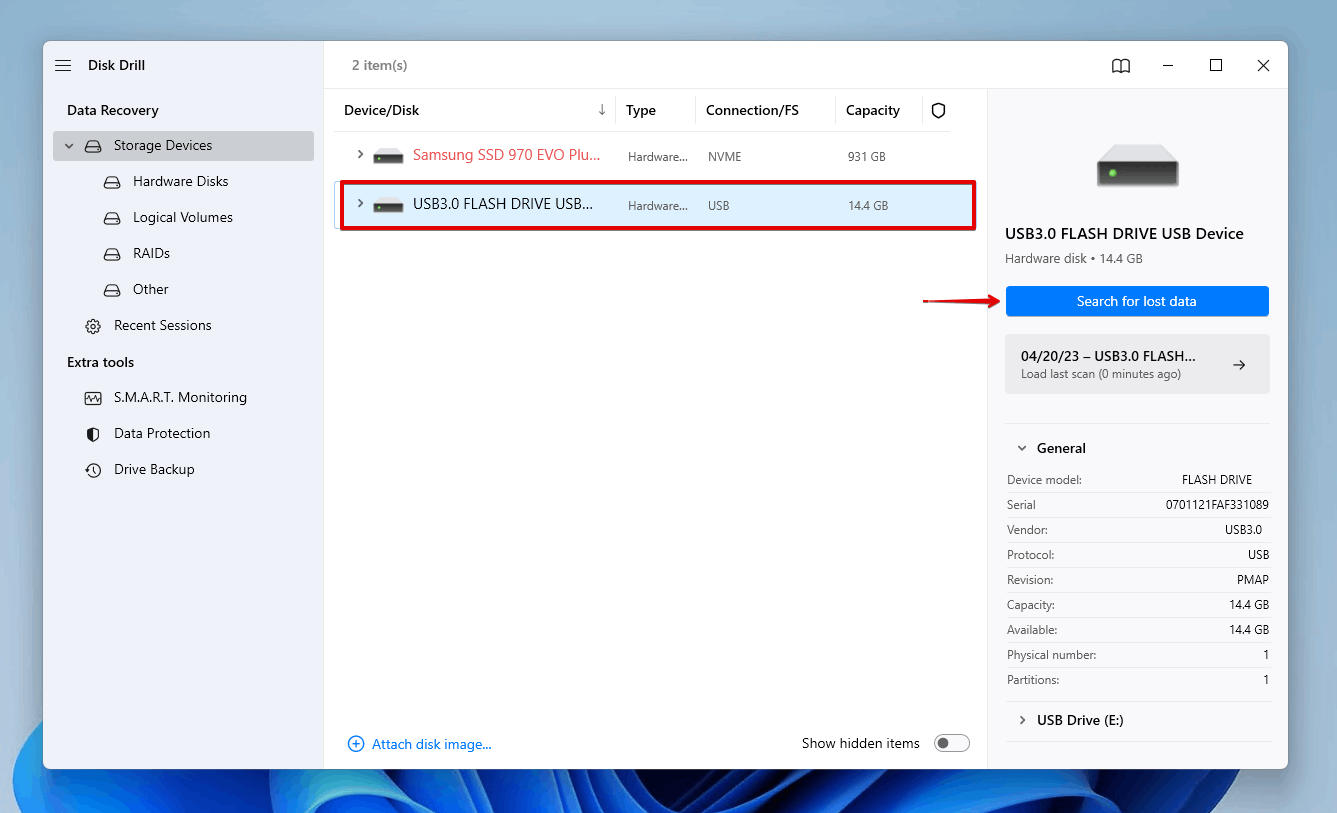
- Select the USB that contains the hidden or deleted files and click Search for lost data. If you only want to search a specific partition, click the dropdown next to your USB and select the partition manually.
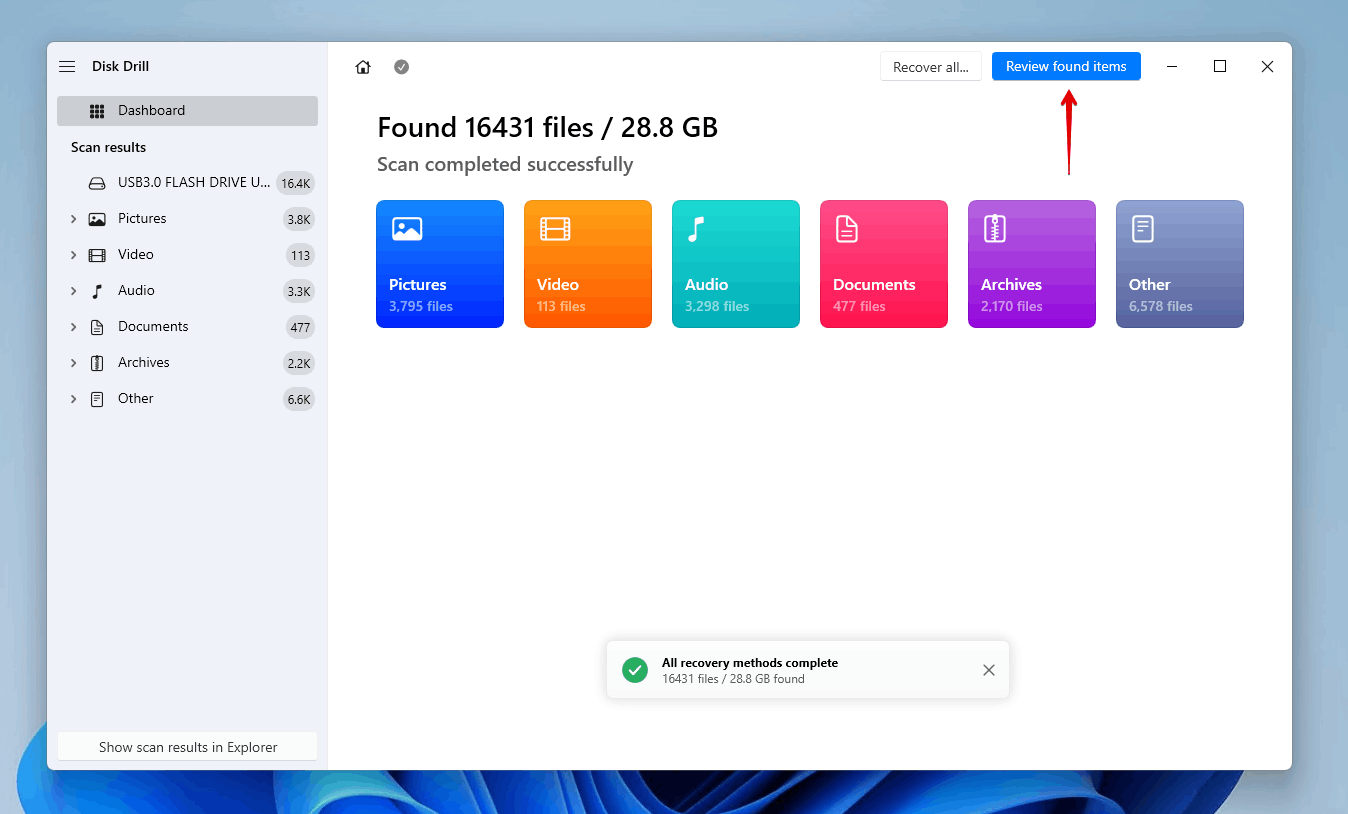
- Click Review found items when the scan is finished. You can also click on the colored file type icons to filter the results or recover everything by clicking Recover all.
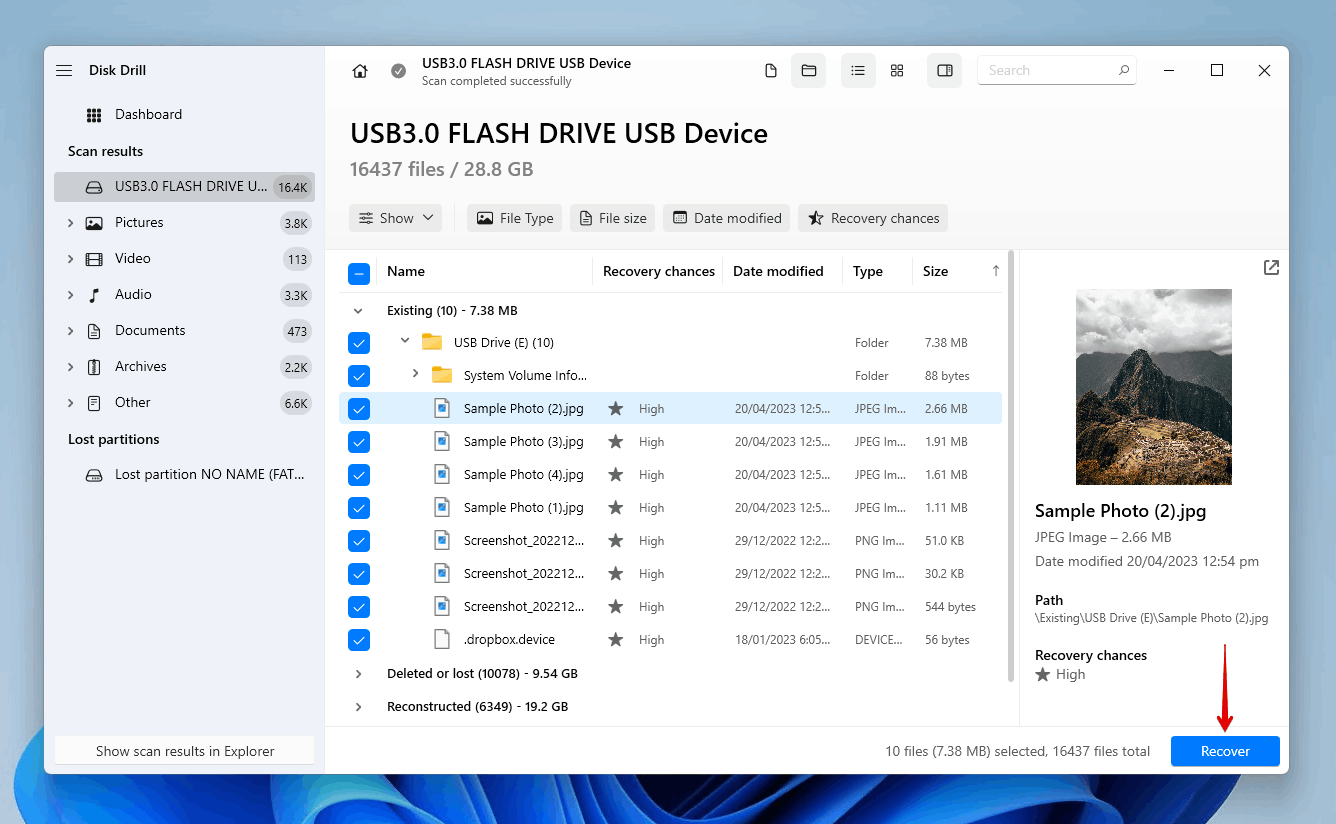
- Select the hidden or deleted data you would like to recover. Disk Drill displays all of your hidden files, as well as any files that are lost or deleted. If you’re only looking for existing hidden data, browse the Existing dropdown, or click Show > Existing. When ready, click Recover.
- Select a safe location for recovery. Make sure you don’t choose a location on the same USB drive you’re recovering from, as it could corrupt your data. Click Next.
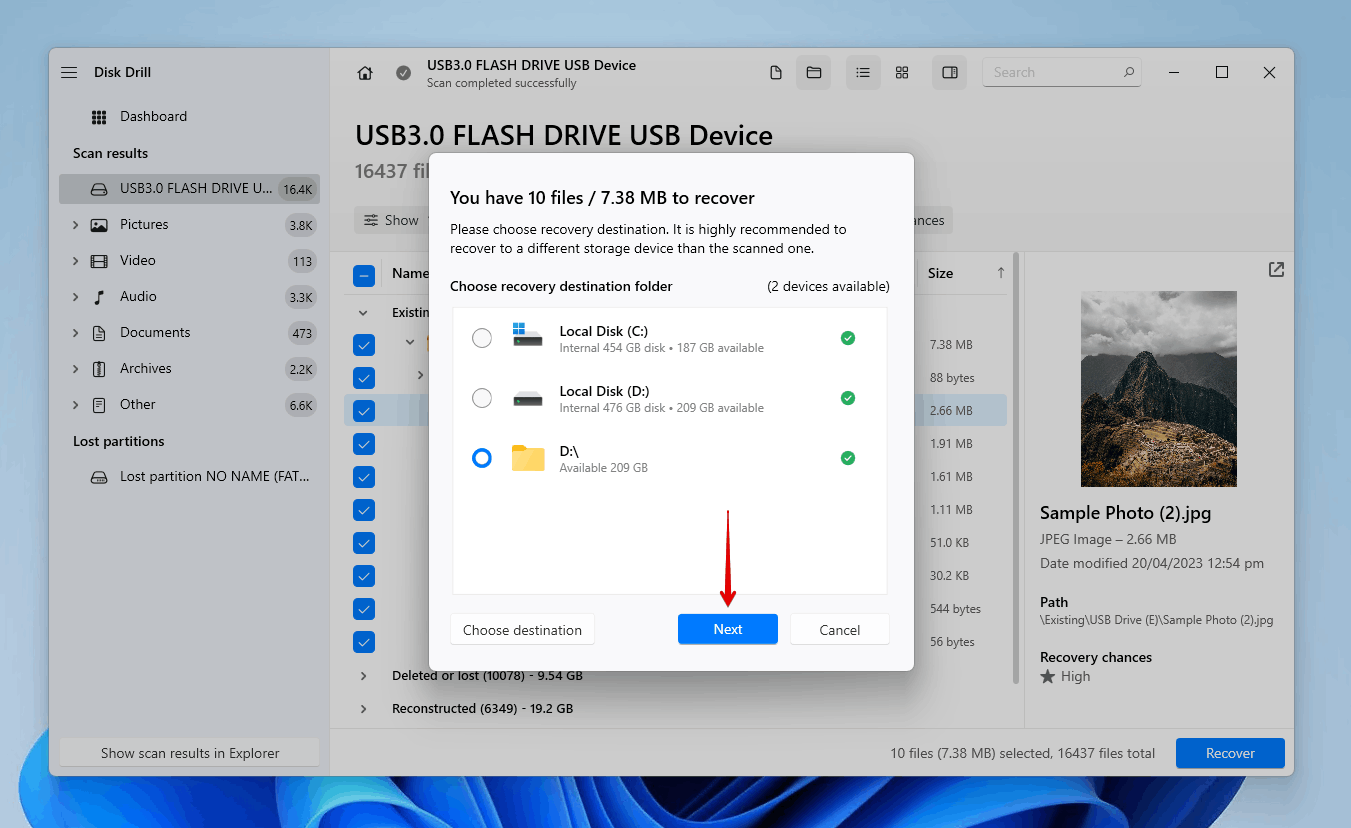
Once recovered, your data will be visible and you can view it at the recovery location you specified in the final step.
How to Unhide Files on USB Flash Drive
Let’s look at the various ways you can show hidden files in your pen drive. The below methods are shown on Windows 11, but they will also work fine on Windows 10 (with some slight variation in the steps).
Method 1: Scan With Antivirus Software
To make sure it wasn’t a virus that caused your files to become hidden, you should scan your USB drive with an antivirus solution. Microsoft Defender Antivirus is included with copies of Windows 10 and 11. It’s a great tool to find and remove any malicious software that could have infected your USB drive.
This is how you perform a virus scan using Microsoft Defender Antivirus:
- Open File Explorer.
- Shift+Right-Click your USB (or just right-click on Windows 10) and click Scan with Microsoft Defender. This will immediately perform a quick scan.
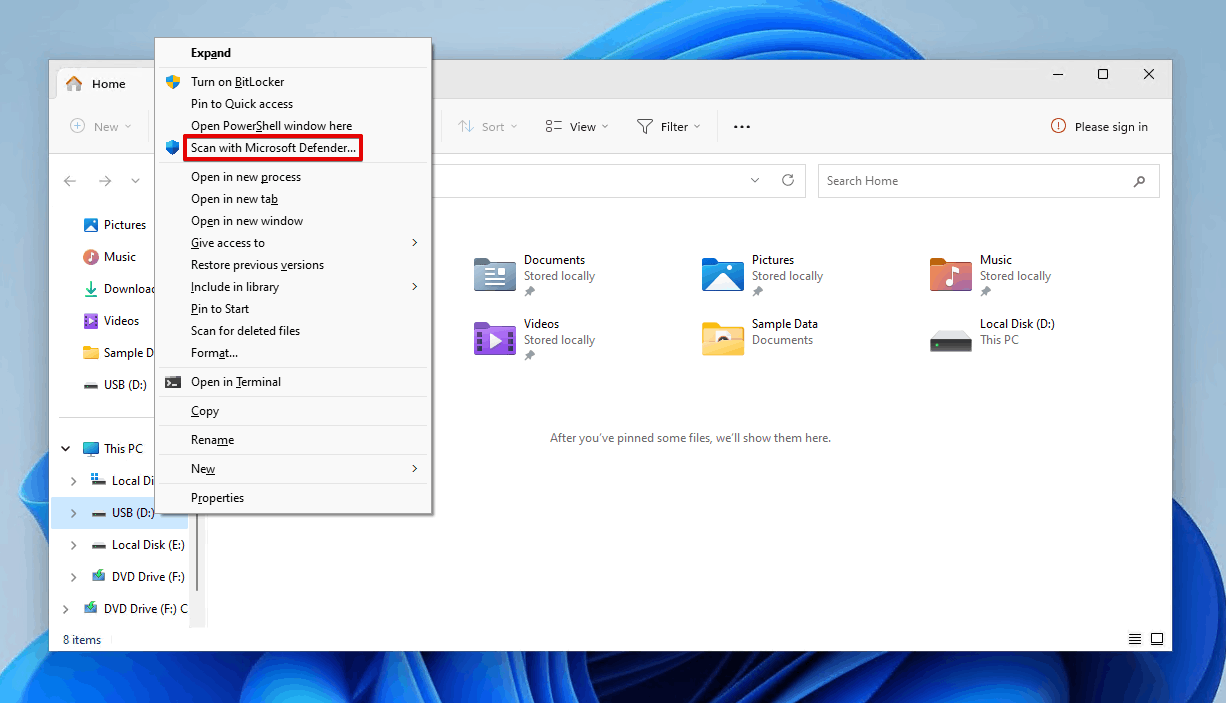
- If you want to perform a more comprehensive scan, select Microsoft Defender Antivirus (offline scan), then click Scan now.

Method 2: Show Hidden Files In USB Using Attrib Command
Once you know your USB drive is clean, you can use the attrib command to see hidden files in the USB. The attrib command allows you to add or remove attributes from files and folders. We’ll be using it to remove the hidden attribute from our files.
This is how you use the attrib command to unhide hidden files on your USB drive:
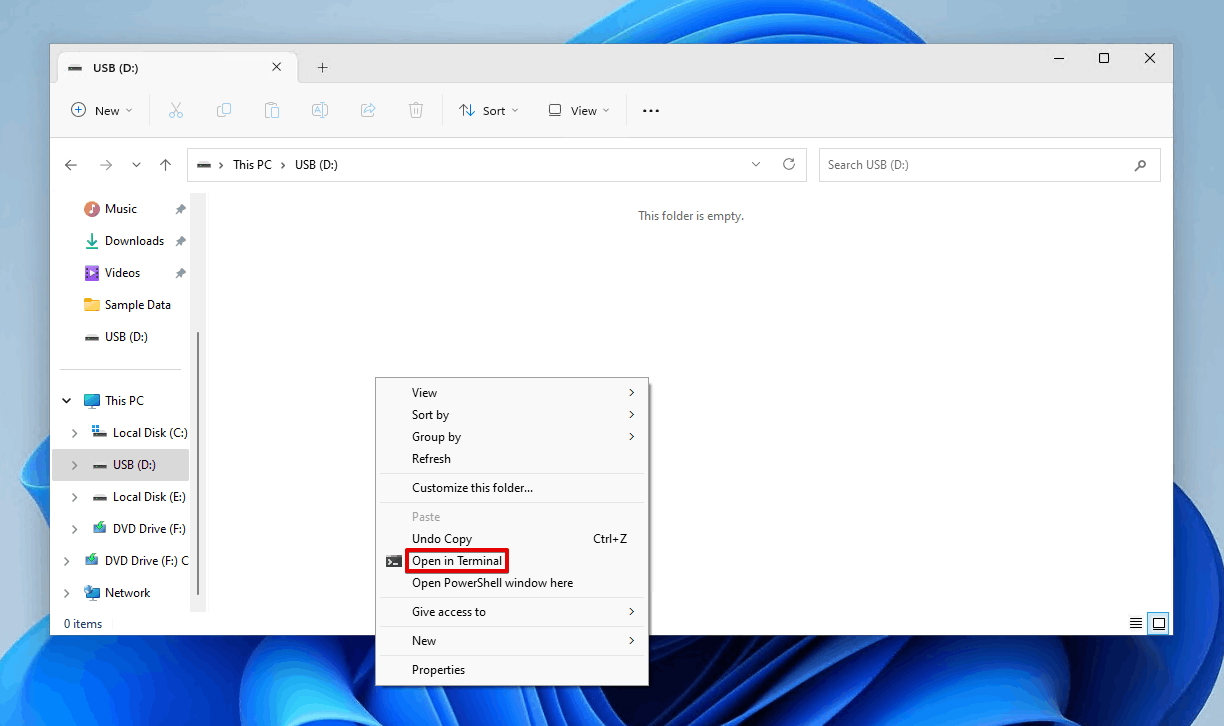
- Open your USB drive in File Explorer.
- Shift+Right-Click a blank space and click Open in Terminal.
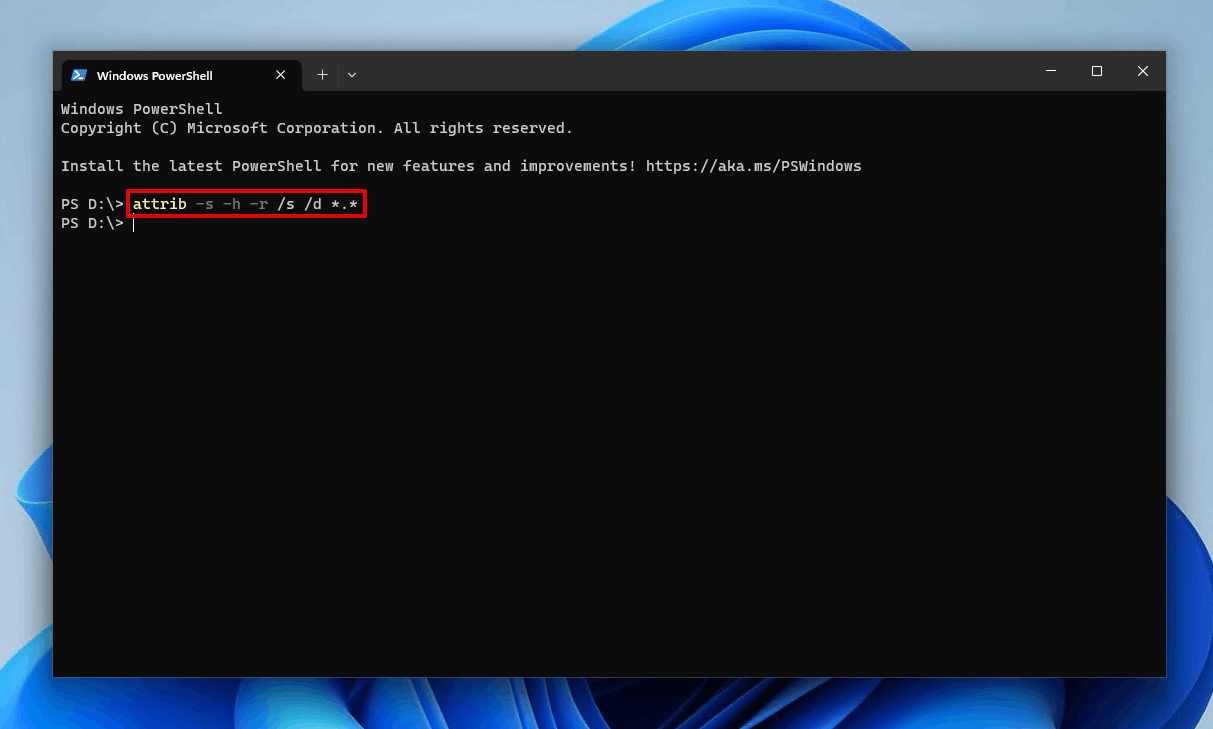
- Type attrib -s -h -r /s /d *.* and press Enter. All hidden files and folders will now be visible.
Method 3: Unhide Files in File Explorer
Not comfortable navigating a command-line terminal? No problem. You can achieve the same results through File Explorer with a few extra steps. Using File Explorer is one of the easier ways to unhide files in a USB, as everything can be done in just a few clicks.
This is how you unhide hidden files using File Explorer, then remove the hidden attribute from them:
- Open File Explorer and navigate to your USB.
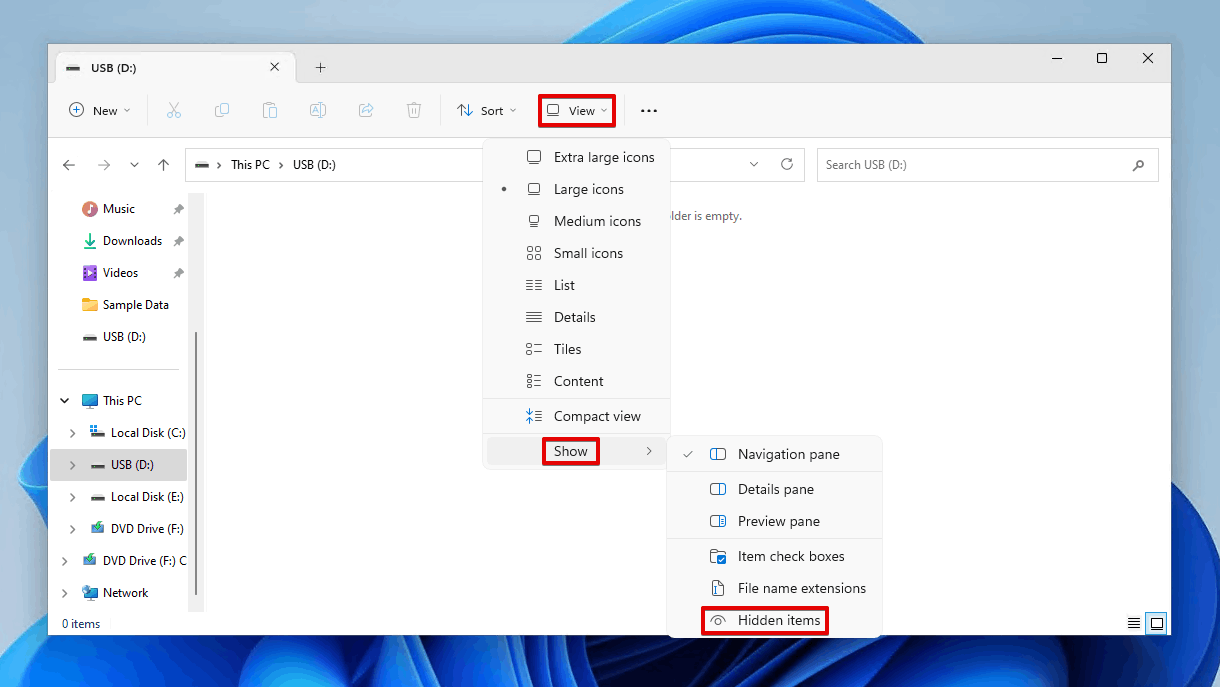
- Click View, then Show, then Hidden items.
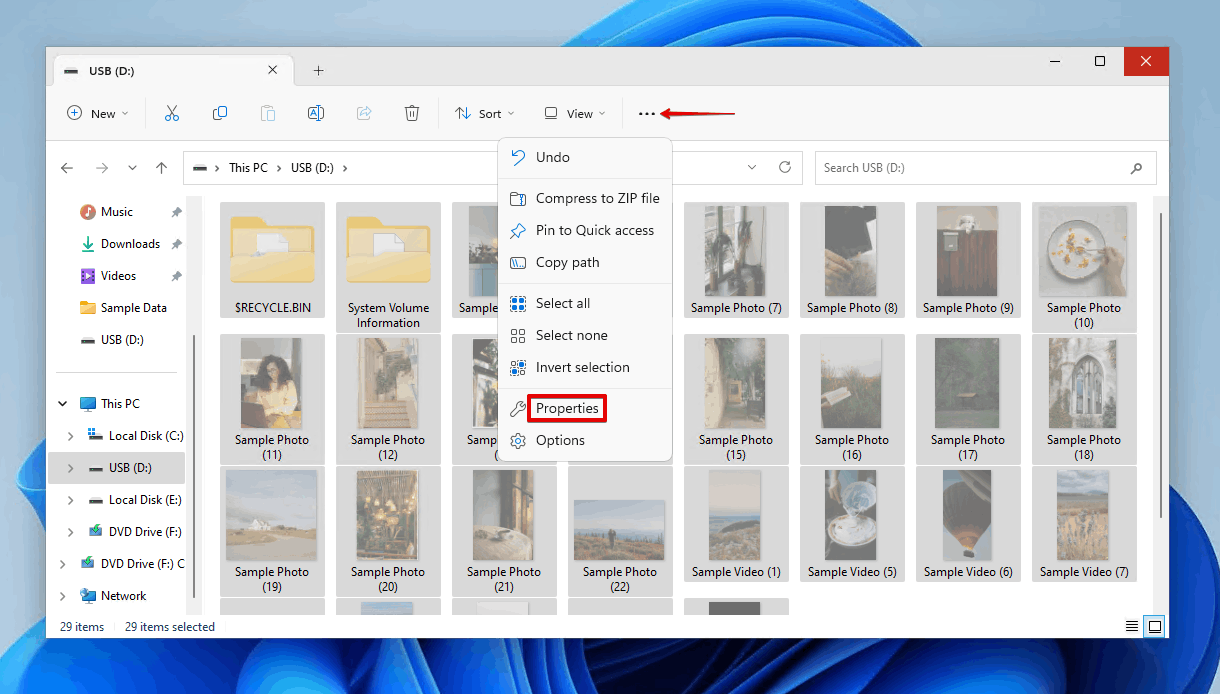
- Highlight all of your hidden data and click Properties.
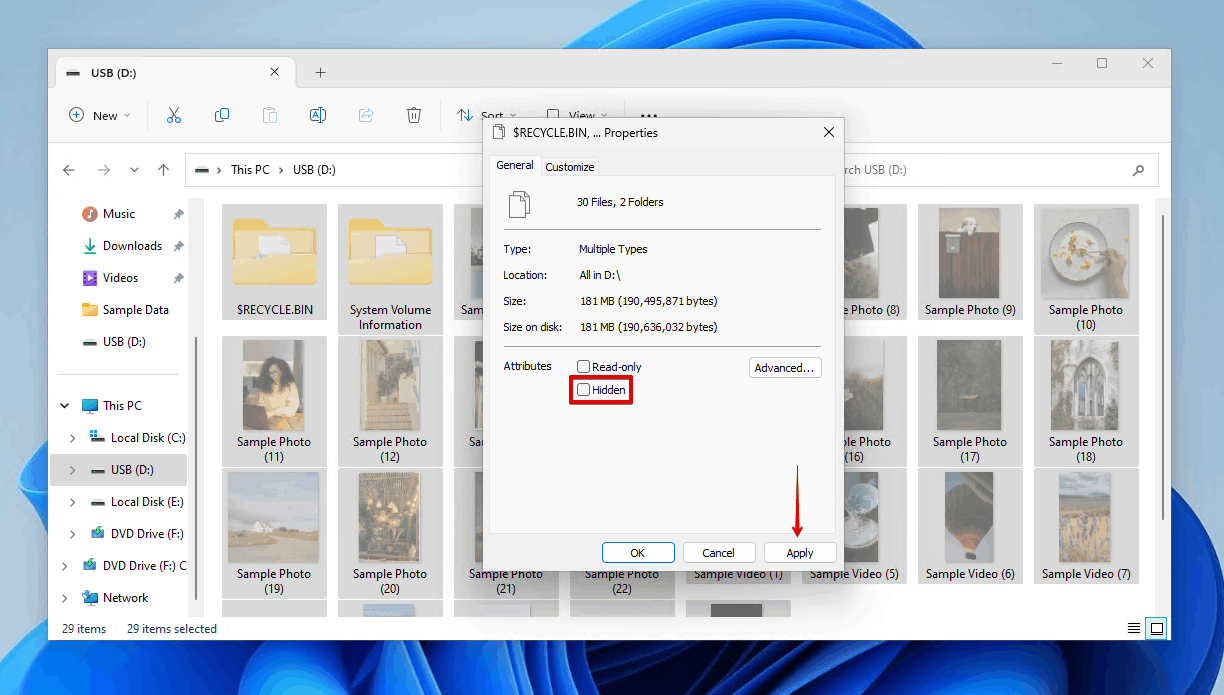
- Untick Hidden, then click Apply.
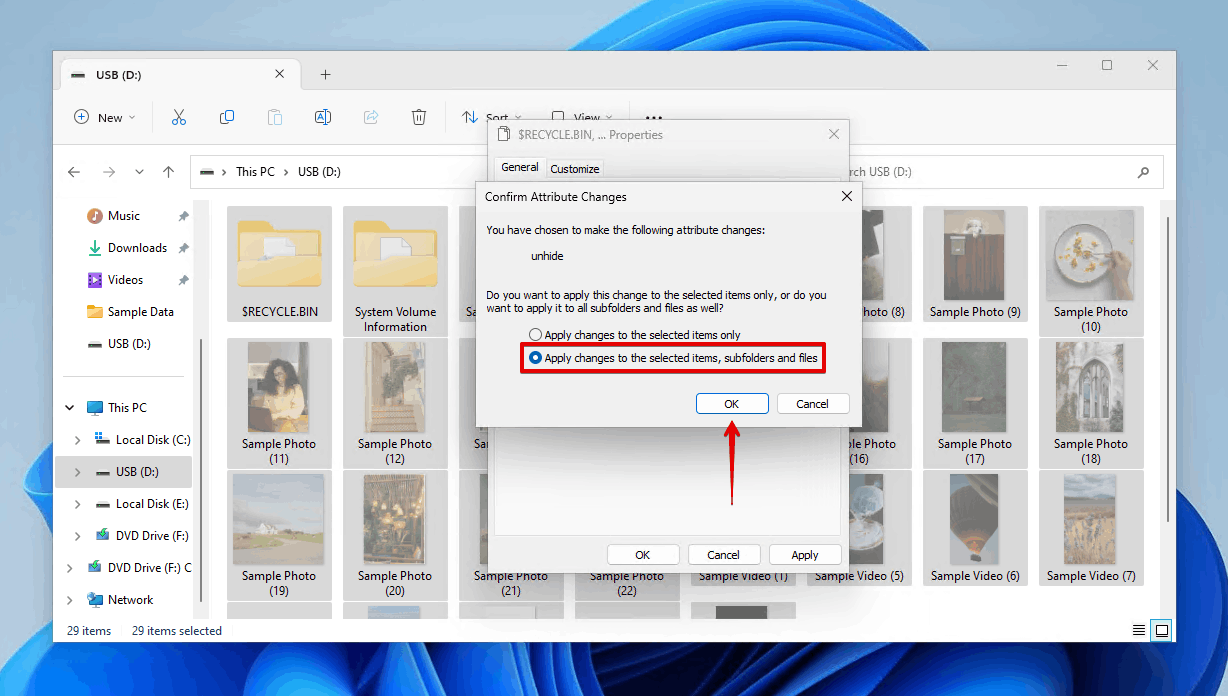
- Select Apply changes to the selected items, subfolders and files and click OK.
Method 4: Display Hidden Files in Control Panel
You can display hidden files through Control Panel, which will allow you to open the hidden files in your pen drive. This is another means of showing hidden files if the attrib command and File Explorer didn’t work out for you.
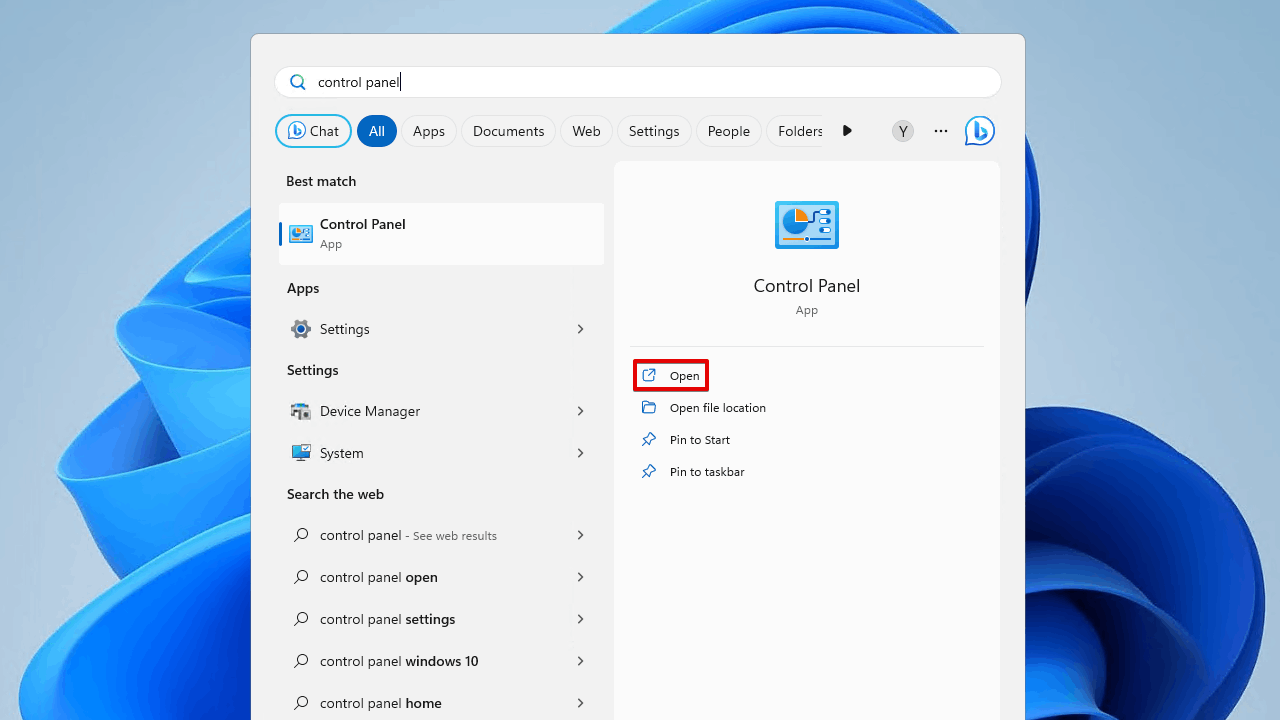
- Open Start and search “Control Panel”. Open it.
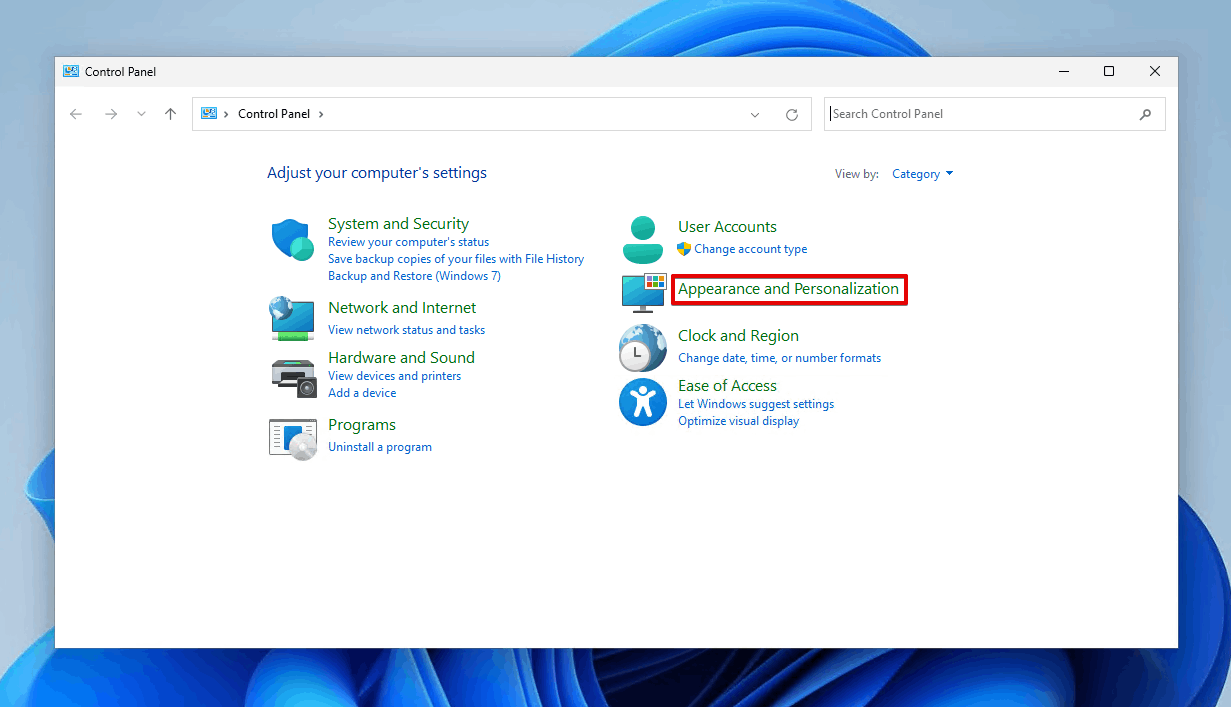
- Click Appearance and Personalization.
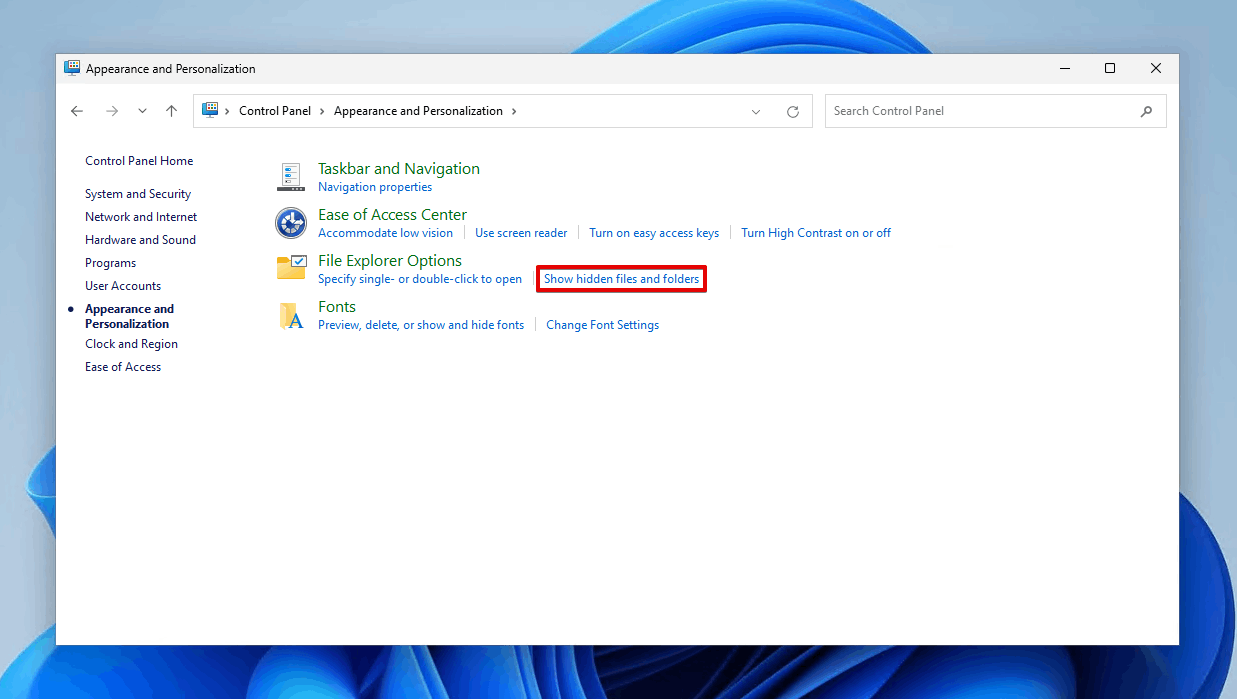
- Click Show hidden files and folders.
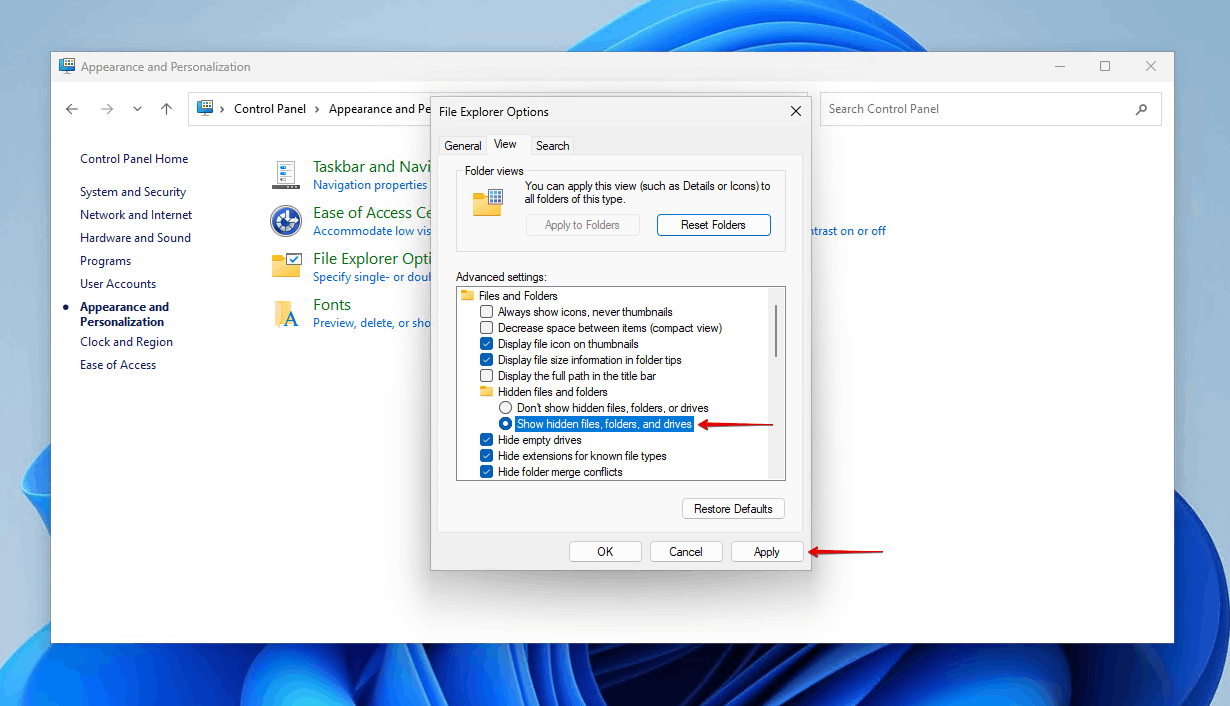
- Select Show hidden files, folders, and drives and click Apply.
How to Check the Health of Your USB Drive
If you suspect that some of your files became lost or deleted due to something like bad sectors, you should check the health of your USB. You can do this using USB Flash Drive Tester from Virtual Console, an application that checks your USB drive for bad or unstable sectors.
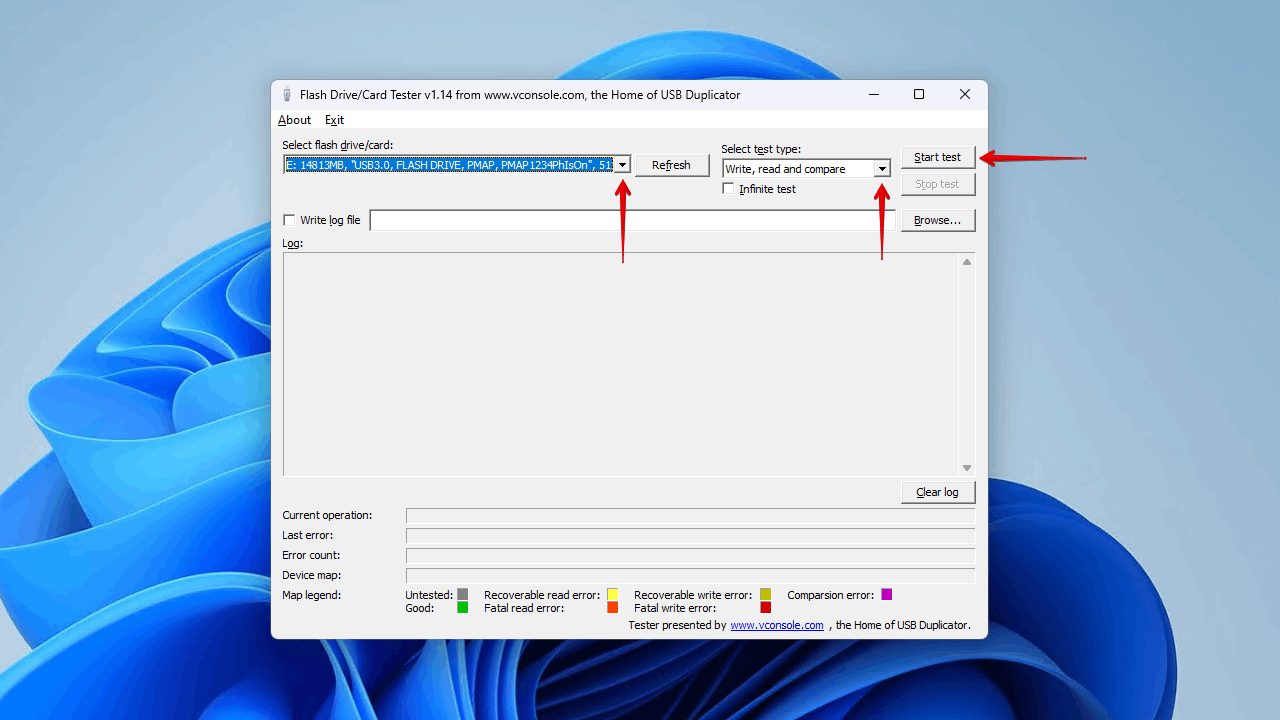
- Download and install USB Flash Drive Tester.
- Select your USB and choose Write, read and compare. Click Start test.
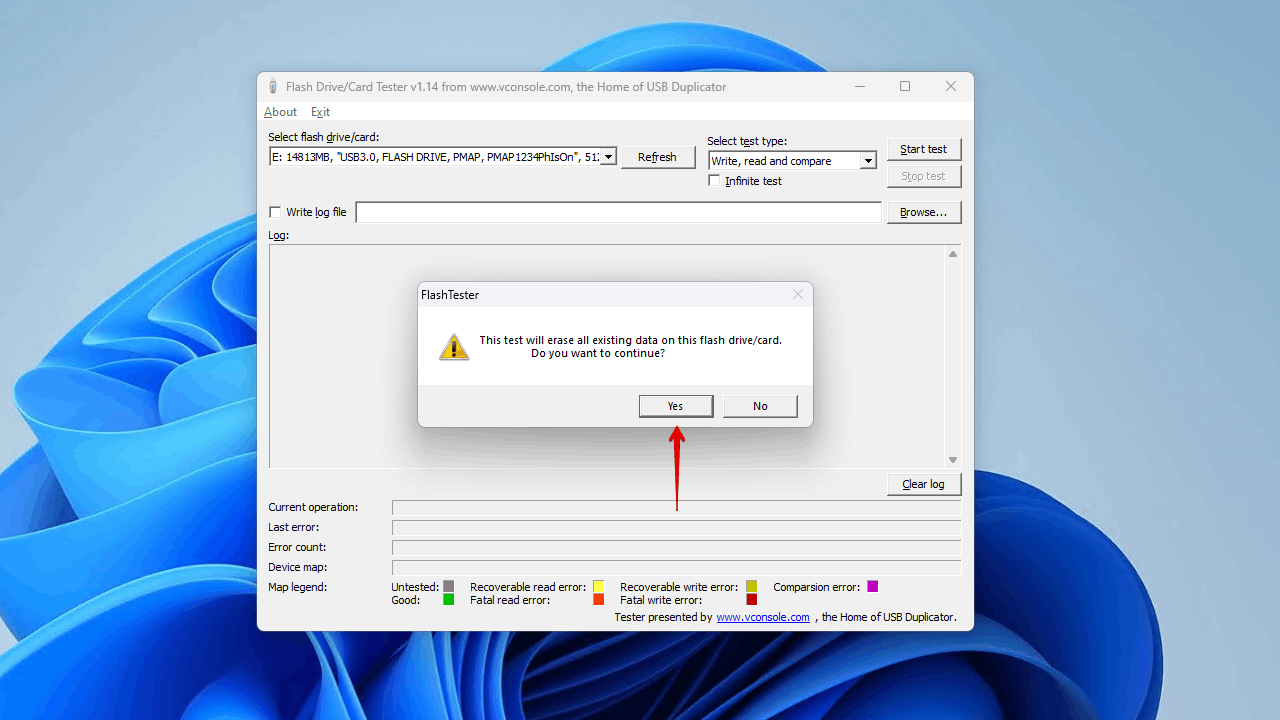
- Click Yes. Wait for the test to complete.
Once the test is complete, you can check the device map at the bottom and see if the USB failed to write data to any sectors. If there is a large number of bad sectors, you should replace the USB drive.
Frequently Asked Questions
How to show hidden files on USB using CMD?
You can show hidden files on your USB through CMD using the attrib command. The attrib command will remove the hidden attribute, making your hidden files and folders visible again.
- Open File Explorer and go to your USB.
- Shift+Right-Click a blank space and click Open in Terminal.
- Type attrib -s -h -r /s /d *.* and press Enter.
How to unhide hidden files in USB caused by a virus?
To ensure the issue doesn’t happen again, the first thing you should do is scan for any viruses on the USB drive.
- Open File Explorer.
- Shift+Right-Click your USB and click Scan with Microsoft Defender.
You can follow up with a Microsoft Defender Antivirus (offline scan) if you want a more extensive scan. Once you’re sure the USB drive is clean, you can unhide hidden files using File Explorer.
- Open File Explorer and navigate to your USB.
- Click View > Show > Hidden items.
- Highlight all of your hidden data and click Properties.
- Untick Hidden, then click Apply.
- Select Apply changes to the selected items, subfolders and files and click OK.
Are there any tools to show hidden files on USB?
You can find hidden files on your USB with Disk Drill’s smart scan. It will display all existing and lost files on the USB, as well as any that were lost or deleted due to some form of damage. Otherwise, you can simply unhide the files using Command Prompt, File Explorer, or the Control Panel.
How to show hidden files on USB on Mac?
You can view hidden files on a USB on Mac using a keyboard shortcut.
- Navigate to your USB using Finder.
- Press Shift+Command+. to display the hidden files.
Conclusion
Files that are hidden without your knowledge can be cause for concern. Although it could be accidental, files can also become hidden as a result of a virus attack or corruption. In any case, you should tread carefully, as your USB may be close to failing.
You should scan your USB drive with a reliable data recovery tool like Disk Drill, as it will pull all hidden existing and lost data for you to recover. Once your data is safe, you can proceed to unhide the files through Command Prompt (using the attrib command), File Explorer, or Control Panel.
- 46 publishings
- Auckland, New Zealand
Jordan Jamieson-Mane is a content writer with a focus on technology-related content. He has spent much of his life studying and working with all types of technology. During his time as a writer, he has written countless articles in the field of data recovery, breaking down complex topics into articles that are easy to understand.
When he's not writing articles on data recovery, Jordan enjoys traveling the world, reading books, and building websites.
- LC Tech FILERECOVERY Professional Review – Can It Compete with Modern Recovery Tools?
- UFS Explorer Review – A Powerful Recovery Tool With Lots to Offer
- Cisdem Data Recovery for Windows Review – A Capable Copy
- AnyRecover Data Recovery Review – A Polished Solution for Basic Users
- iBoysoft Data Recovery Review: Not Much to Offer
- Frisco, Texas, United States
Yevgeniy Tolkunov is Hardware Engineer at ACE Data Recovery. Yevgeniy has a Master's Degree in Physics, Information Technology; 15+ years of experience.