How to Recover Overwritten Files
Is It Even Possible to Recover Overwritten Files?
Possibly. The reason we cannot give a definitive answer to the question is that a number of circumstances affect the ability to recover files that were replaced or overwritten. In some cases you may be able to retrieve part or all of an overwritten file. At other times it will be impossible to recover overwritten files because the data has been totally destroyed, as the storage space is reused. But if the data is important, it is always worth trying.
Complications Behind Recovery of the Overwritten Data
When data is written to a disk, it occupies a physical space on that disk. Once it’s deleted, it still resides on the disk for a time, at least until it’s overwritten with new data (or deleted by a TRIM command, which we’ll talk about shortly). There are two common ways that data is overwritten.
Recovery case | Description |
A new version of a file replaces the old one | This happens when you save a new version of an existing file. For example, if you make changes to an existing Word document and then save it, the new version will overwrite the previous one. |
A file was deleted and a new one was saved in its place | Once a file is deleted, the space it occupies on the disk is marked as available to the operating system. Eventually, a new file will be written to this space, overwriting the old data. |
Due to the nature of how data is saved to a disk, it can be very difficult to recover the data once it’s overwritten, oftentimes impossible. However, there are some additional factors to consider that can influence recoverability.
- 💽 Availability of backups – If you made a backup of your data at some point, you’ll be able to restore a copy of the data from that backup. This is the best way to recover data that has been overwritten, as it doesn’t require the use of data recovery software.
- ⌛️ Time elapsed – The sooner you attempt recovery, the better. As time goes on, regular disk usage increases the likelihood that new data will overwrite that which has been lost. Even if you don’t personally write new files to the disk, your operating system is constantly adding and deleting files in the background.
- 💾 Type of storage (HDD/SSD) – Solid-state drives, unlike traditional hard-disk drives, use TRIM to facilitate more efficient garbage collection. When a TRIM command is issued, any existing deleted data on the SSD is immediately erased, causing it to become unrecoverable. Therefore, you have a higher chance of recovering data from an HDD or an SSD with TRIM disabled.
Try to Recover Overwritten Files via Disk Drill
Despite how challenging it can be to recover overwritten files, it’s not always impossible. In times when only part of the data has been overwritten (namely the body of the file), data recovery software may be useful. In order for there to be at least a chance of performing partial file recovery, the beginning and end of the file structure must be intact, as this is what’s used by the recovery algorithm to identify it. One recovery tool that excels at this is Disk Drill, a professional data recovery tool that utilizes multiple scanning algorithms to recover as much data as possible.
Here are some reasons why we prefer Disk Drill for this task:
- 🧩 Partial file recovery – Disk Drill has a chance of performing partial file recovery in certain cases where only some parts of the file have been overwritten.
- 💿 Byte-to-byte drive backups – Disk Drill has the ability to create byte-to-byte backups of your drive. In doing so, you can preserve a snapshot of the disk in its current state. This ensures that you can recover data from the image at any point in time, eliminating the time-sensitive factor associated with recovering data directly from the disk.
- 📖 Read-only algorithms – Disk Drill uses non-intrusive read-only algorithms. In doing so, you can guarantee that nothing is written to your disk, potentially overwriting the data you’re trying to recover.
To attempt to recover replaced files follow these steps:
- Download and install Disk Drill for Windows. ⚠️ If the files you are trying to recover reside on your computer’s main hard drive, you should download the application to a different storage device. We recommend using a USB drive to avoid further file corruption before trying the recovery.
- Launch the application.
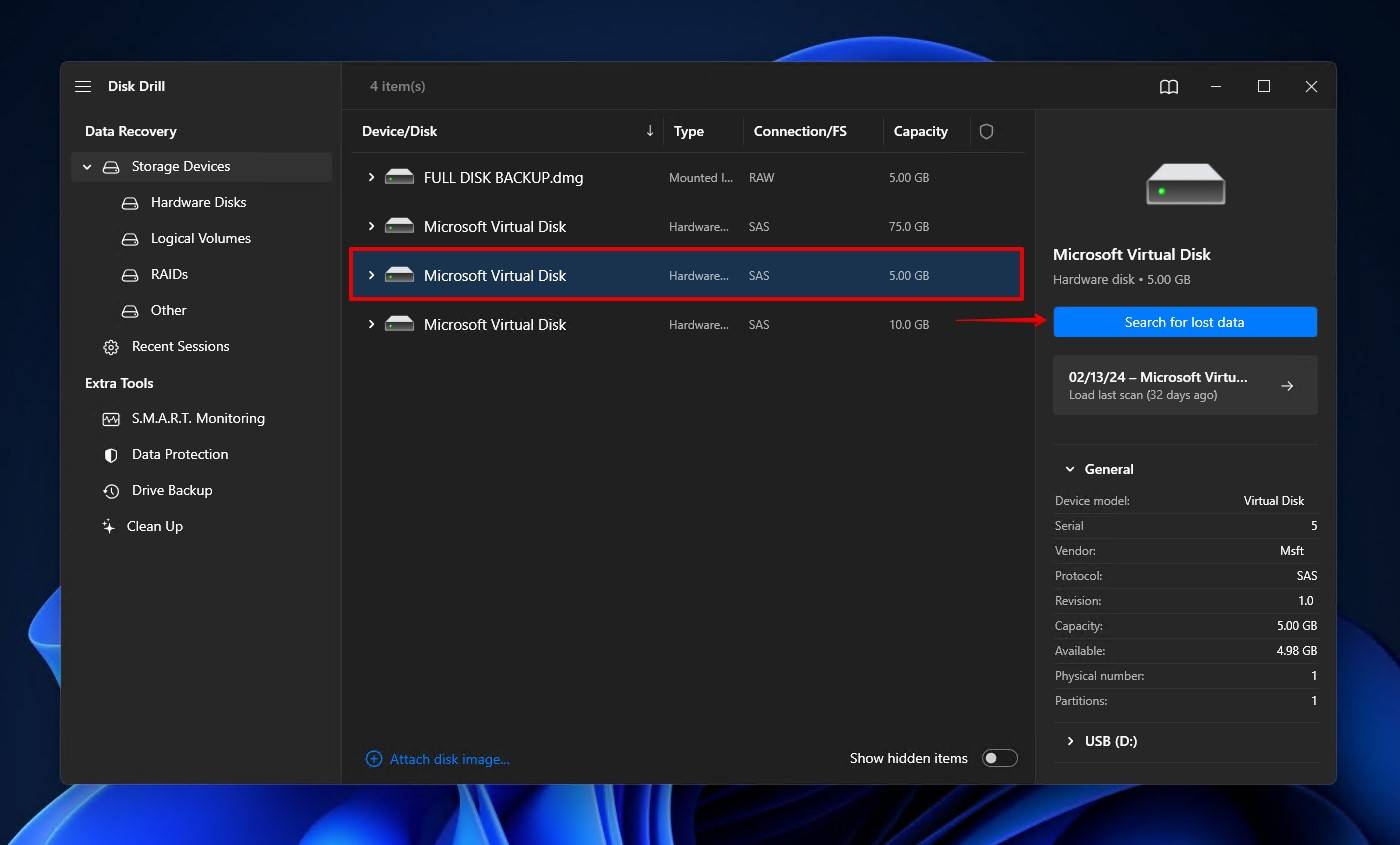
- Choose the disk or partition that contained the overwritten files you wish to recover from the list presented by the program.
- Click the Search for lost data button to initiate the scanning algorithms that will search for recoverable files.
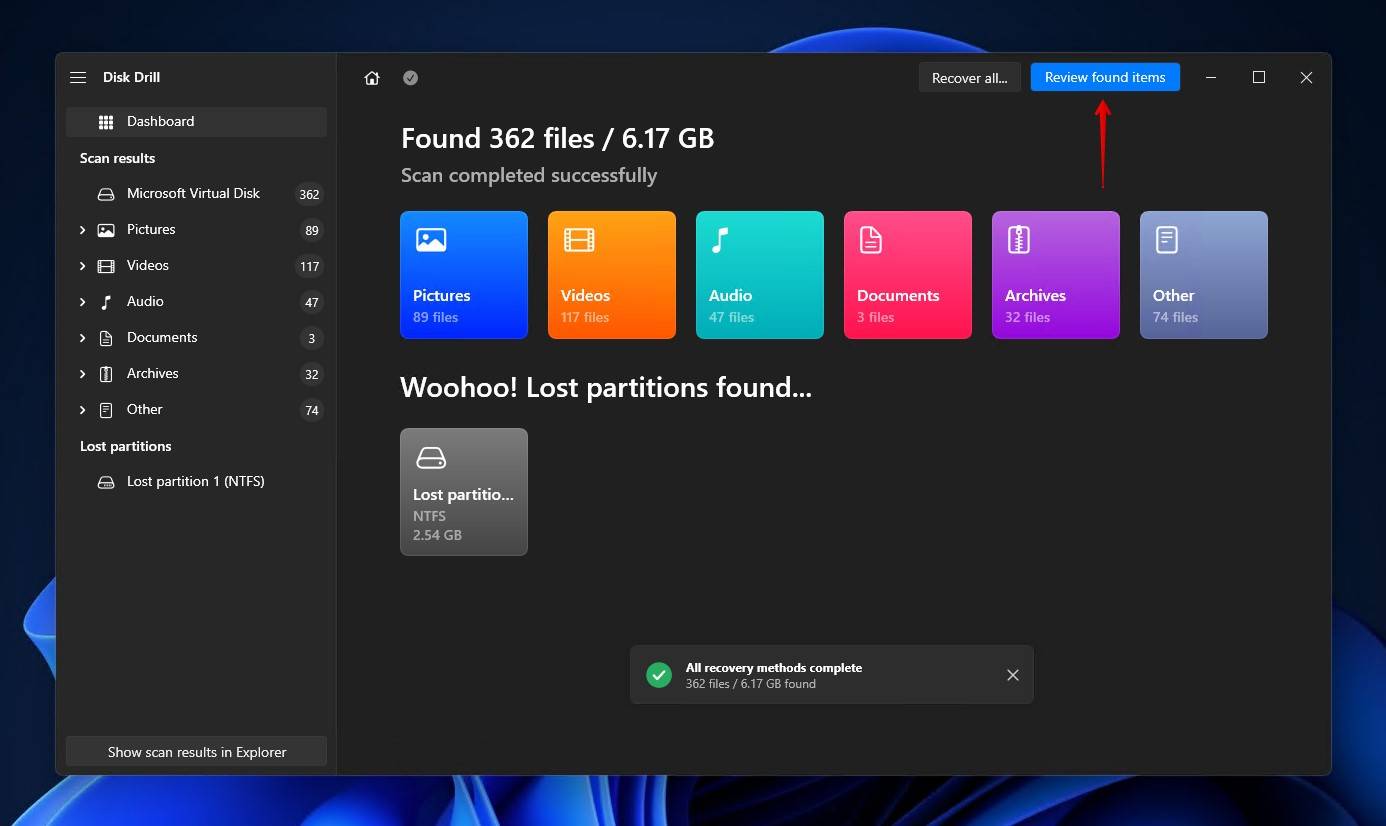
- Click Review found items to explore what Disk Drill discovered. Alternatively, you can click on one of the colored file type icons to filter the results, or click Recover all to recover everything that was found.
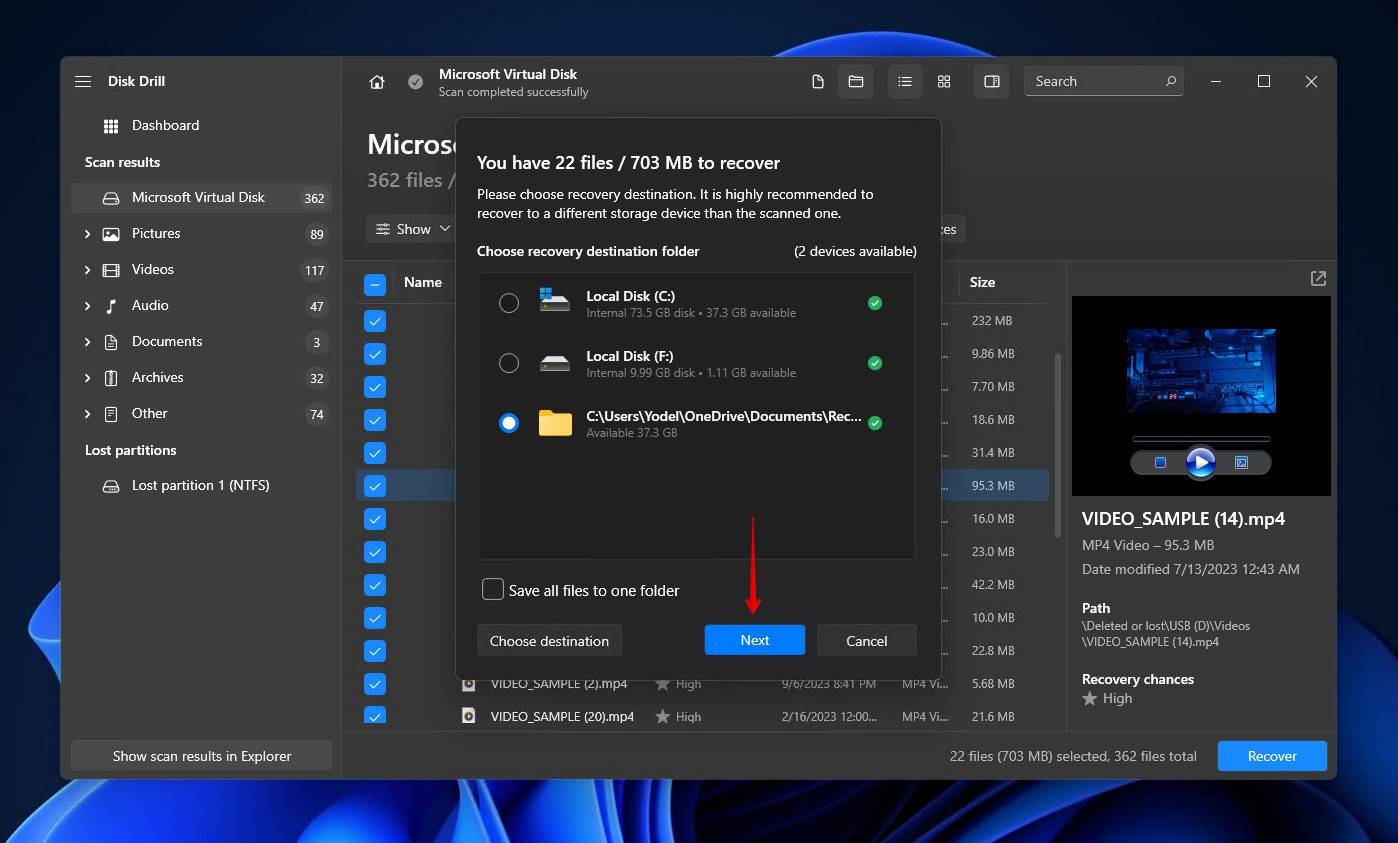
- Select the files that you want to recover. Use the search box at the top of the window to search for specific files. When you’re ready, click Recover.

- Choose where you want to restore the files you are about to recover. Do not use their original location to minimize potential file corruption.
Disk Drill employs multiple scanning algorithms to find as much of your lost data as possible. In instances where it is able to recover your file with its metadata intact, such as the original file name and folder structure, you’ll find it in the Deleted or lost section in the scan results screen. However, even if the original metadata of the file cannot be restored, the file may still have been recovered by its signature in the Reconstructed section without its original name.
Disk Drill works on all Windows versions including Windows 7, Windows 8, Windows 10, and the latest Windows 11. You can download it as freeware and use it to recover up to 500MB of data before making any financial investment in the tool. The tool at least gives you a chance to retrieve an overwritten file if at all possible. In other data loss scenarios, Disk Drill is an invaluable tool for data recovery.
Check The Possibility to Recover Replaced Files Without Software
Even without third-party recovery software, there may still be a chance of getting the data back. Here are some of the ways you could potentially recover overwritten data.
Try to Recover Files That Were Replaced From the Previous Versions
If you have the Windows Backup service active on your system, you may be able to recover an overwritten file with a previous version. Follow these steps to attempt recovery with this method.
- Open File Explorer.
- Navigate to the file or folder which contained the files that you wish to recover.
- Right-click and select Restore previous versions from the menu.
- Select the version you wish to recover from the list provided by Windows.
- Click the Restore button to recover the file.
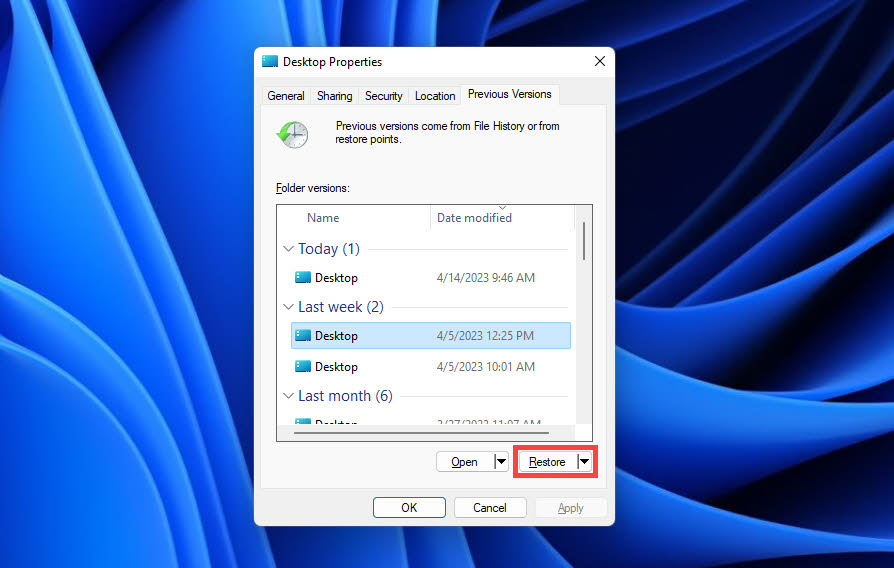
A previous version of your file must list in order for this method to be viable.
Recover Files Using Backup and Restore
It’s worth checking to see if Backup and Restore is active and contain a working version of the file you wish to restore.
Follow these steps to restore a file using Backup and Restore:
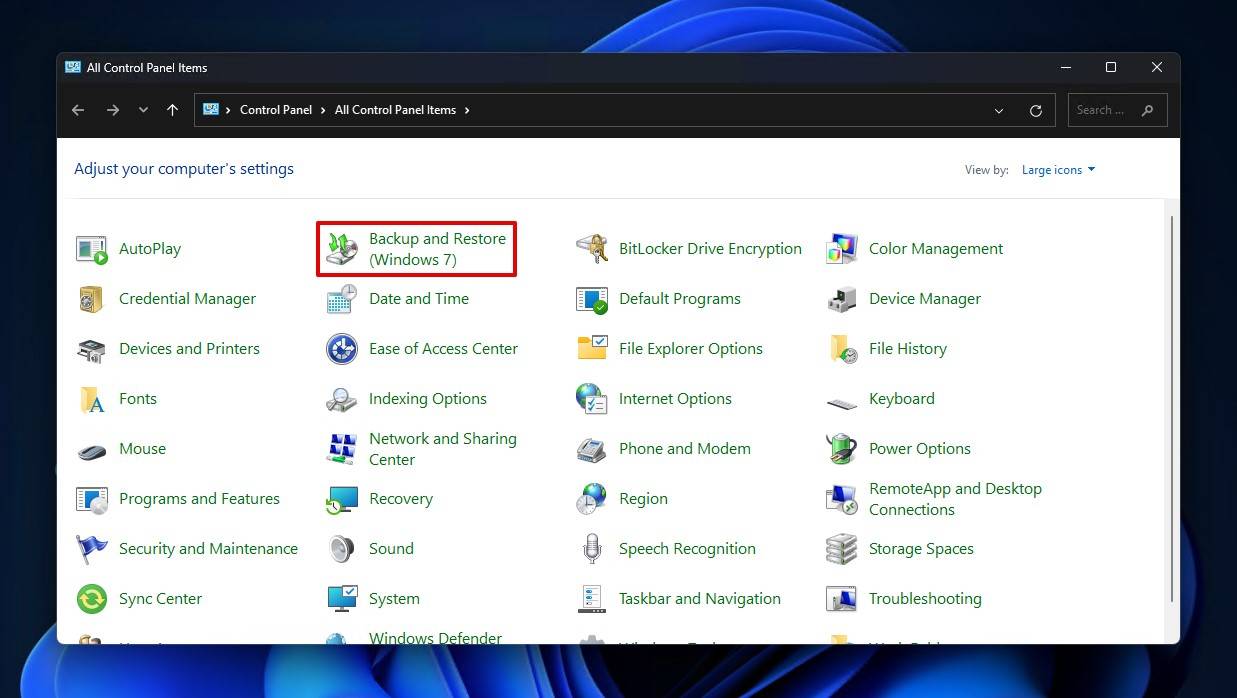
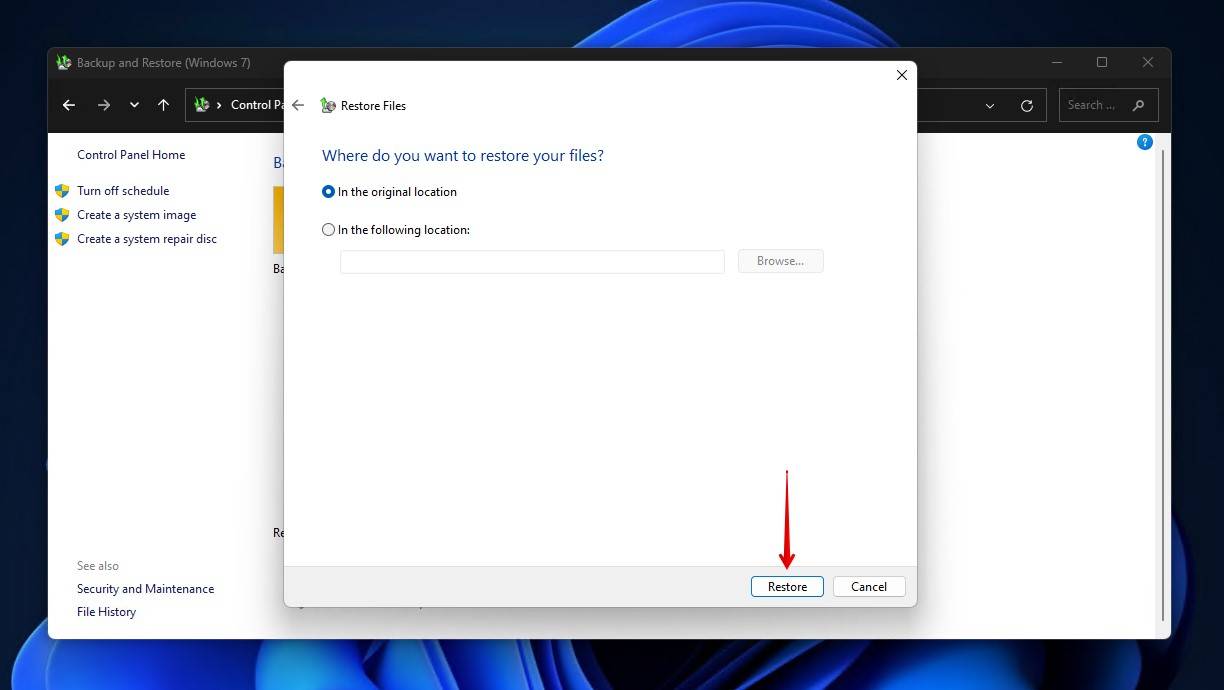
- Open Start. Search for and open “Control Panel”.

- Click Backup and Restore (Windows 7). You may need to switch your view mode to Small icons or Large icons if you do not see it.
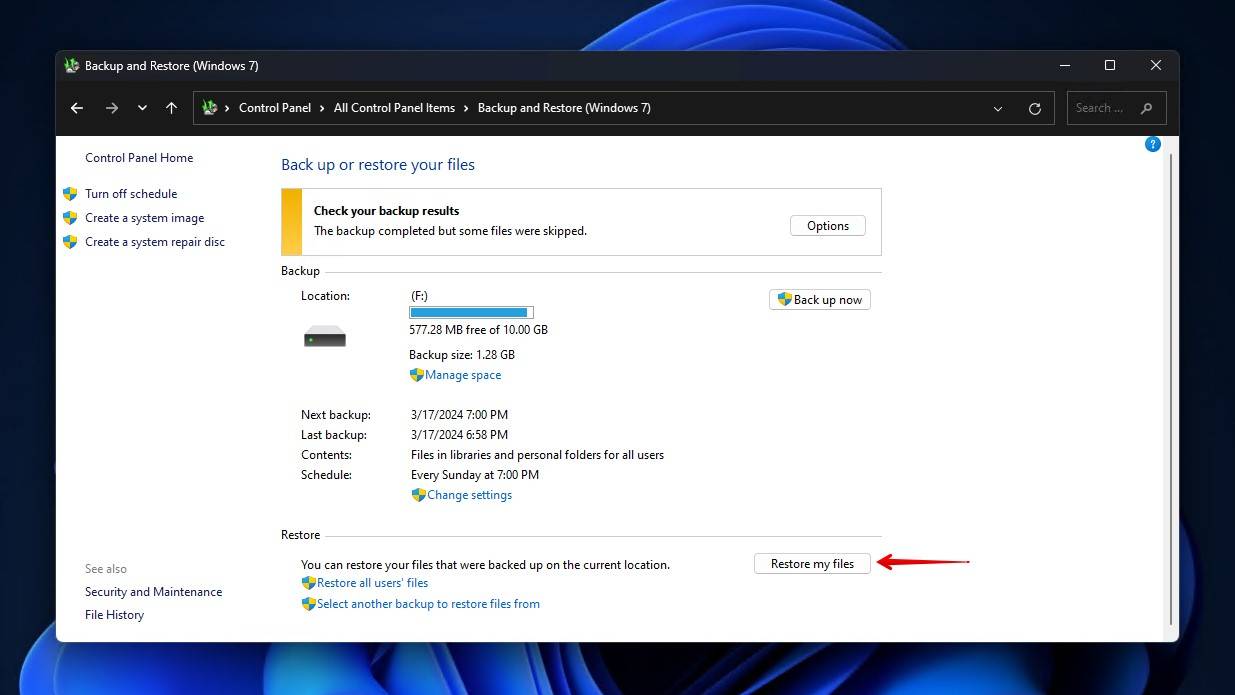
- Click Restore my files.
- Click Browse for files and select the files you wish to recover.
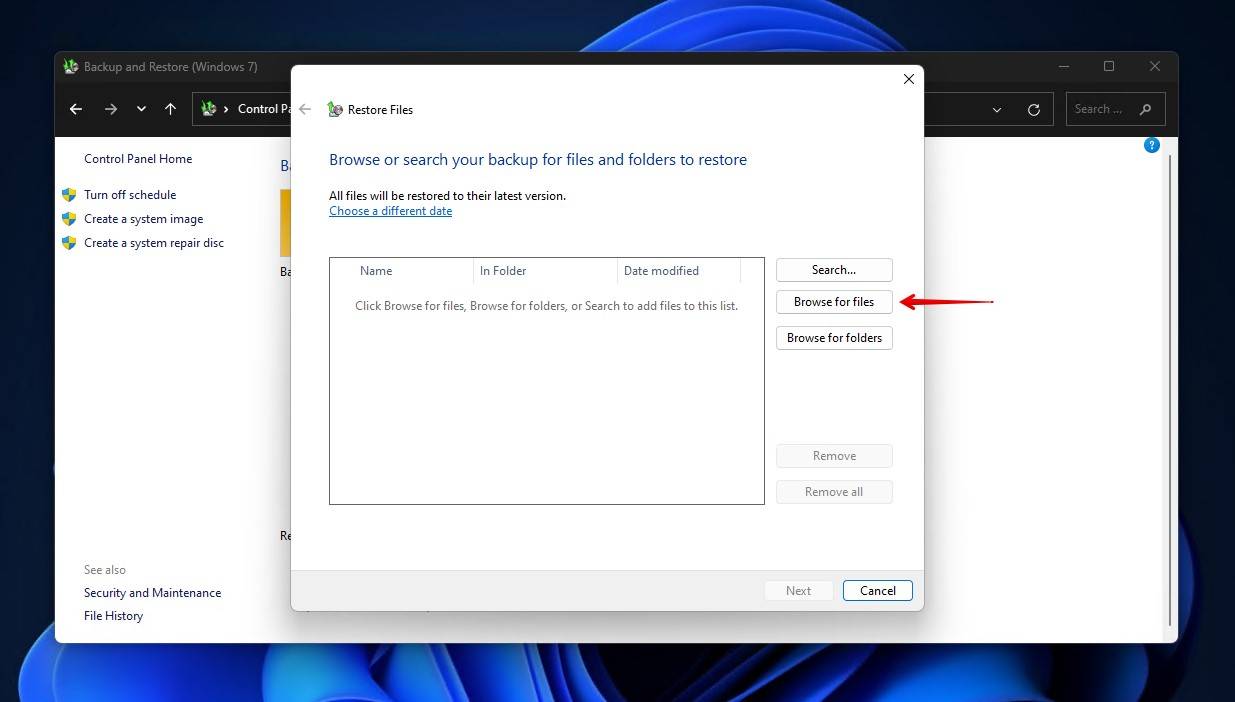
- Click Next.

- Choose whether you want to restore the files to their original location or a new one. Then, click Restore.
Recover Replaced Files From Another Type of Backup
You may be able to retrieve overwritten files from a previously made backup of your system. This requires that you are taking backups and that the file or files in question are included. There are a few methods available for backing up data, and some of them may be already enabled.
- Cloud backups – Cloud storage has become immensely popular, mainly for its ease of use, auto-synchronization, and built-in redundancy. OneDrive is Microsoft’s own cloud storage service that comes with Windows, but other popular options include Google Drive and Dropbox. An added benefit is that most cloud storage services have file versioning, allowing you to restore a previous version of a file that has been overwritten by a new version.
- Automatic program backups – Some developers include basic backup functionality right in the software. Some good examples of this are Microsoft Office programs and AutoCAD, which periodically save a snapshot of the file you’re working on so that you can recover if your system or application crashes.
- Backups from third-party software – If you’ve installed any dedicated backup software in the past, like Macrium Reflect and Duplicati, it would pay to check any backups you’ve previously made to see if a copy of the file you’re looking for exists there.
Your Important Files Were Accidentally Overwritten. How Could You Prevent That?
Exercising care when working with important files is the best way to avoid having them accidentally overwritten. While you can manually back up each file before you modify it, this can become tedious and time-consuming if you need to do it every time. Instead, you can make use of one of the backup methods we mentioned earlier.
We’ll briefly explain some of the best backup solutions you can implement now to keep your data safe.
Cloud Backup
Cloud storage backups are one of the easiest ways to keep a copy of your data safe and sound. Not only is a copy of your data kept safe in a secure remote location, but you can access it from anywhere with an internet connection. One downside of cloud storage is that once you use all of your free storage, you need to upgrade to a paid subscription. But, if you don’t exceed that limit, it can be a great way to keep your files safe without too much manual intervention.
We’ll show you how to set up OneDrive, the cloud storage solution included with Windows:
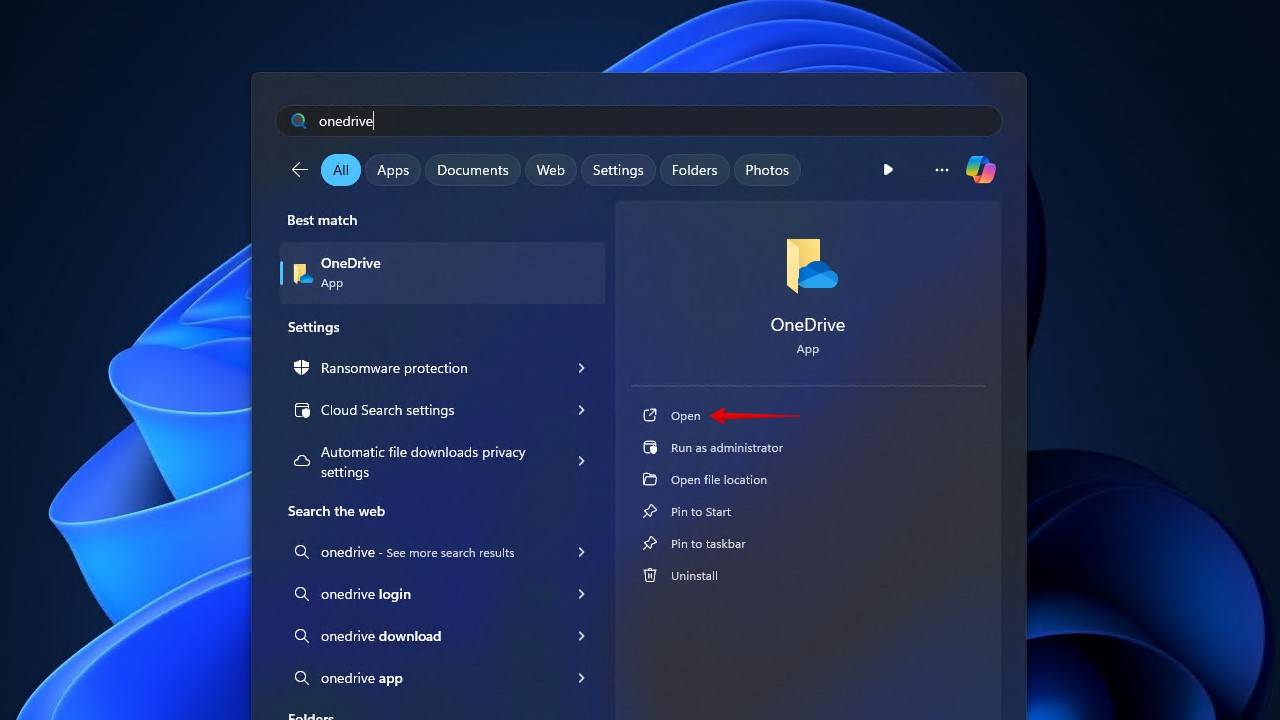
- Open Start and search OneDrive. Open the app.
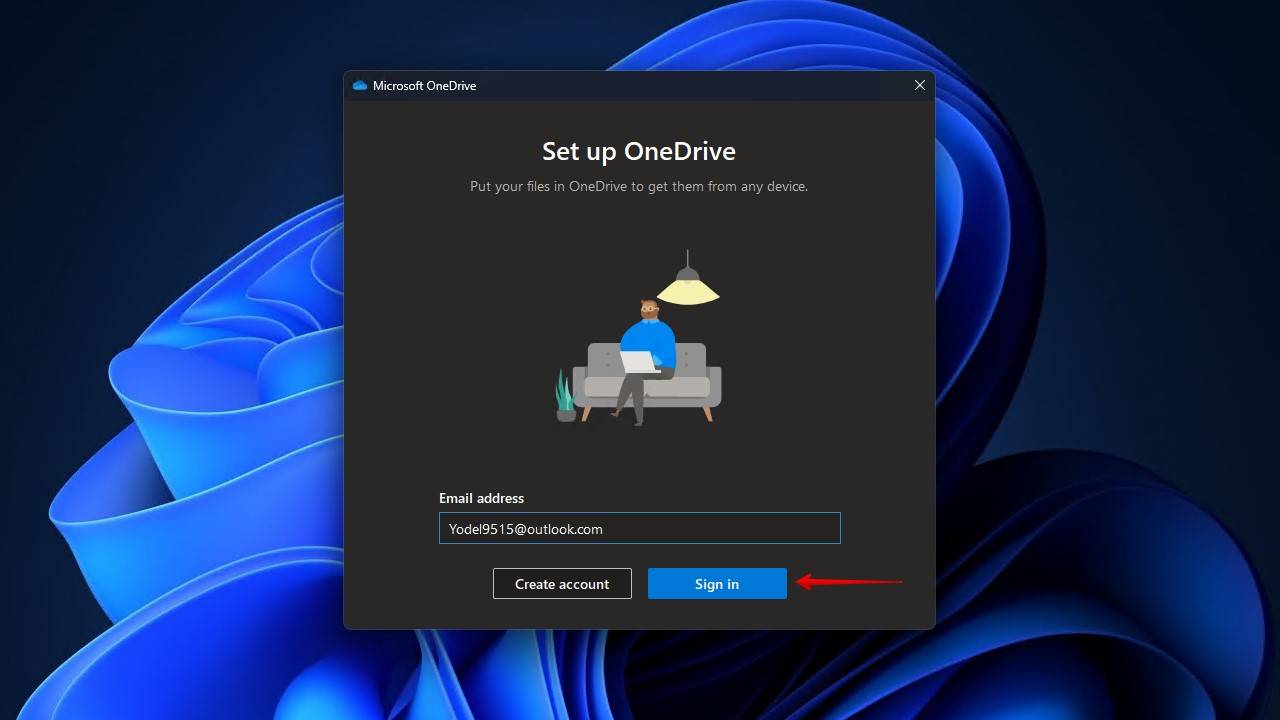
- Enter the email address for your Microsoft Account and click Sign In. You will be asked for your password on the next screen.
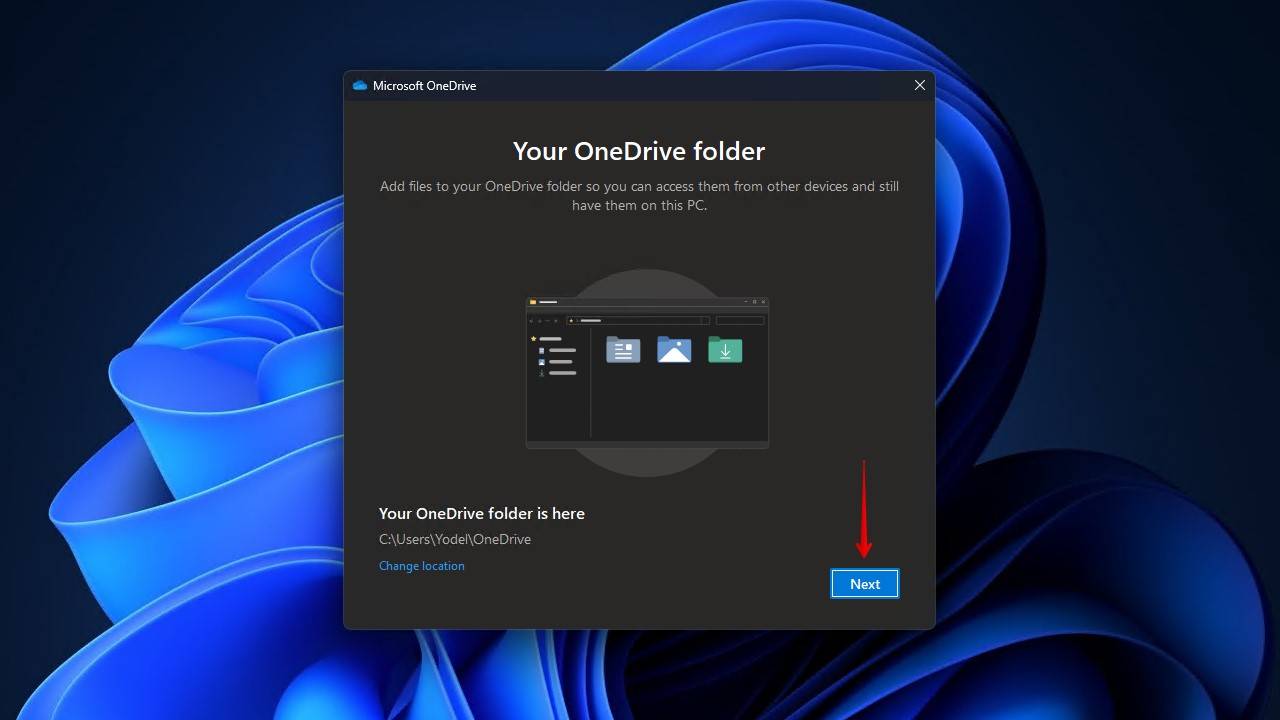
- You can then choose where you want your OneDrive folder to be stored. The default path is %userprofile%\OneDrive. Click Next.
- Choose the folders you wish to include in the backup, then click Start backup.
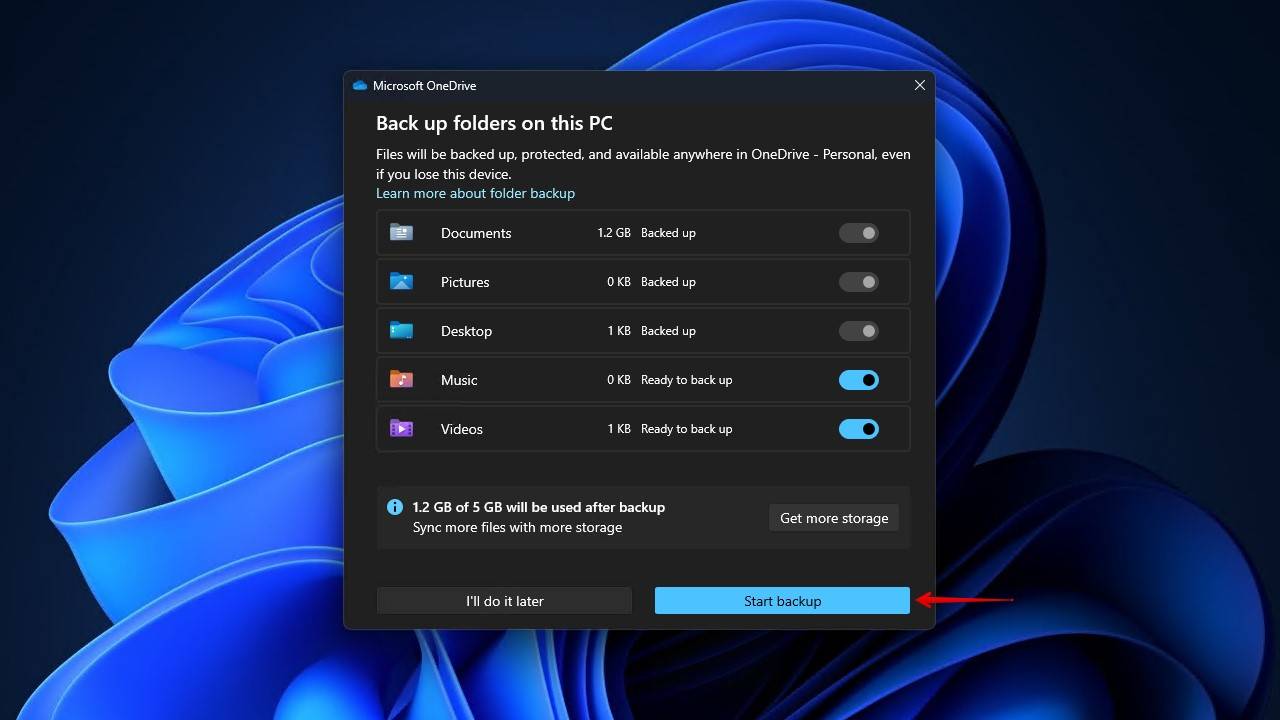
Once set up, OneDrive will automatically back up any files stored in the folders you specified to be backed up. They can be accessed from the OneDrive folder on your computer or through the online OneDrive interface.
Native Backup Solutions
Windows comes with some useful backup solutions baked into the operating system. Previously, it relied on Backup and Restore as its main backup utility. A newer backup feature, File History, was introduced with Windows 8 and has since replaced Backup and Restore as the primary backup utility for Windows (although Backup and Restore is still available to use).
We’ll show you how to set up File History on your Windows computer:
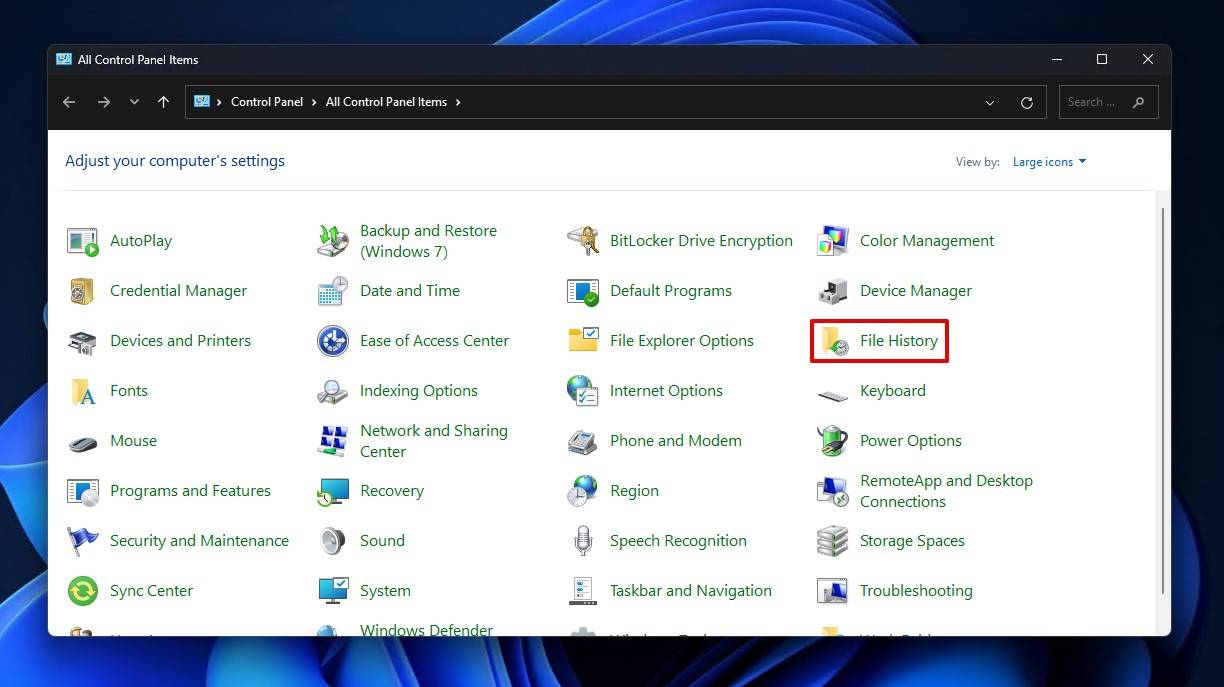
- Open Start. Search for Control Panel, then open it.
- Click File History. If you don’t see it, make sure your view is set to Small icons or Large icons in the top-right.
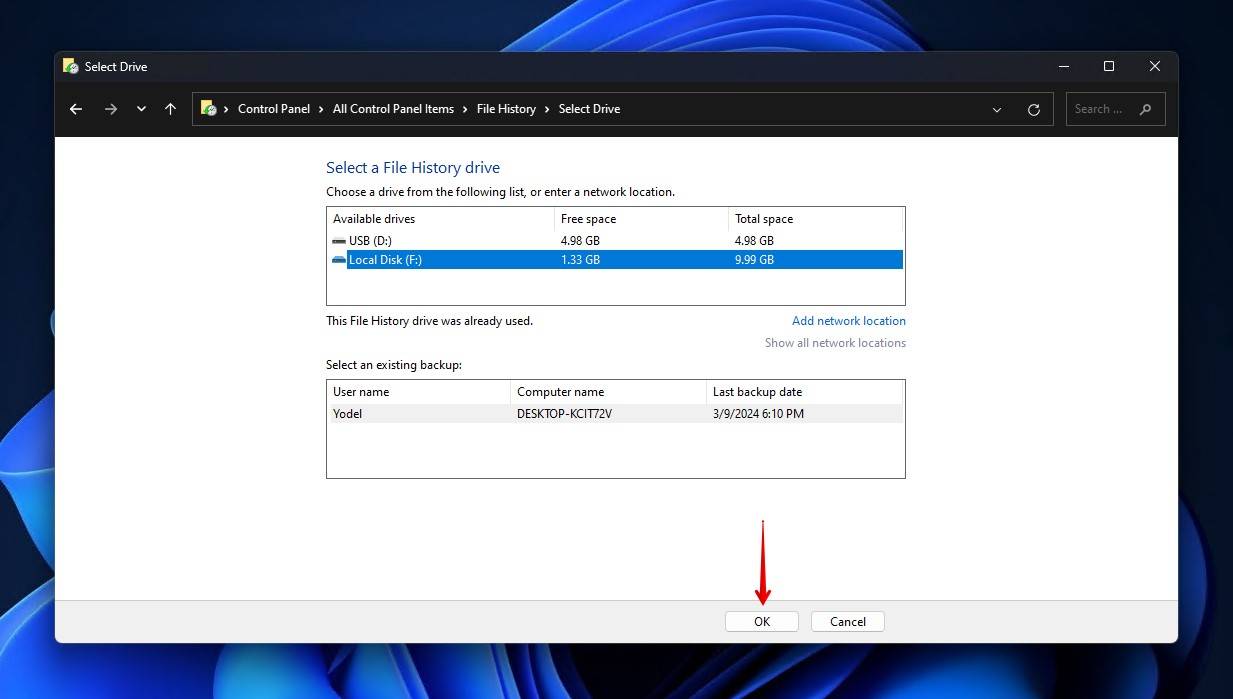
- Click Select drive.

- Select the drive you wish to use to store File History backups, then click OK. Once enabled, you will see what folders are being backed up in the Copy files from: section.
- To choose how often your files are backed up and how long backups are retained for, click Advanced settings.

Dedicated Backup Solutions
Third-party backup software often gives you a lot more control over how you back up your data. Some also include the option to back up directly to cloud services. For most users, the native backup solutions included with your operating system will do. But, if you want to implement a more comprehensive backup plan, third-party software is the way to go.
There are many options out there to choose from, but for now, we’re going to show you how to image a disk using Macrium Reflect Free:
- Download and install Macrium Reflect Free (this version is only available through mirror sites like Major Geeks).
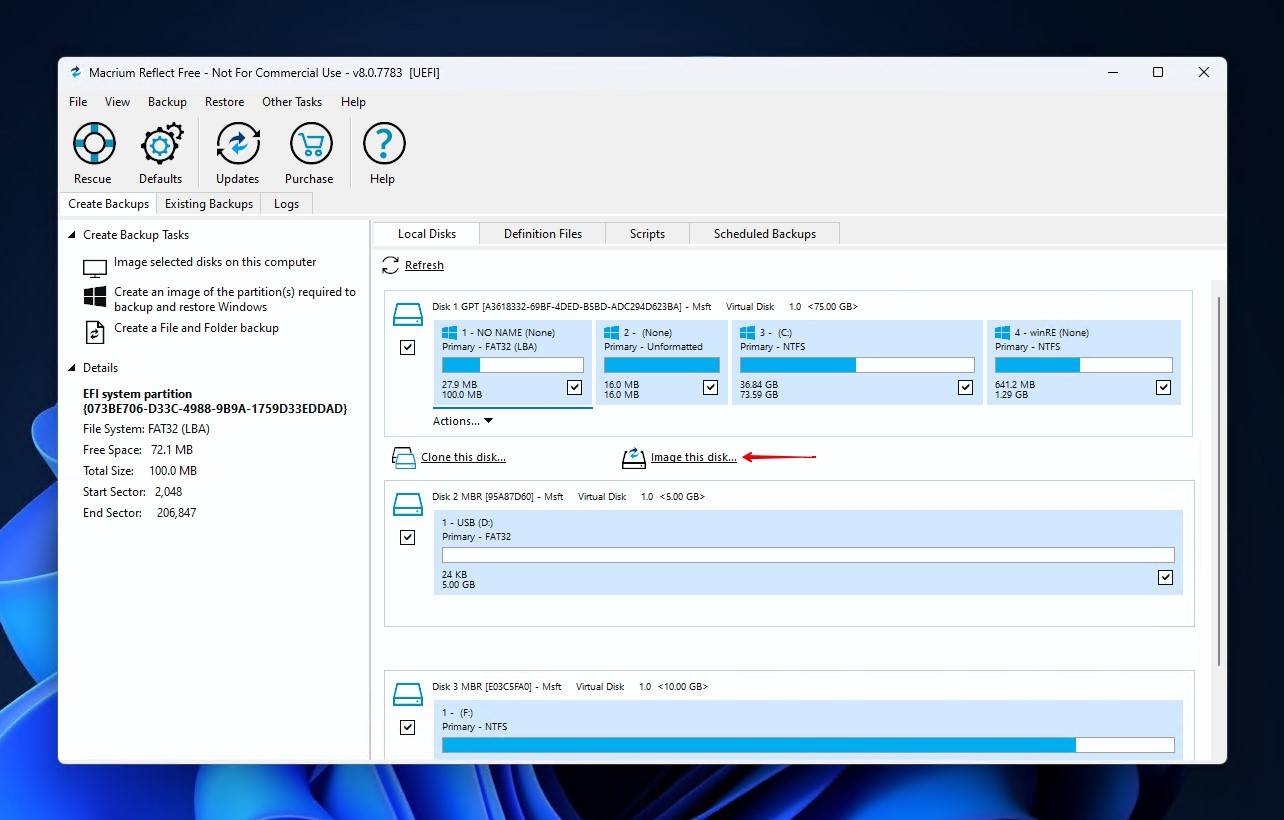
- Underneath the disk you want to image, click Image this disk.
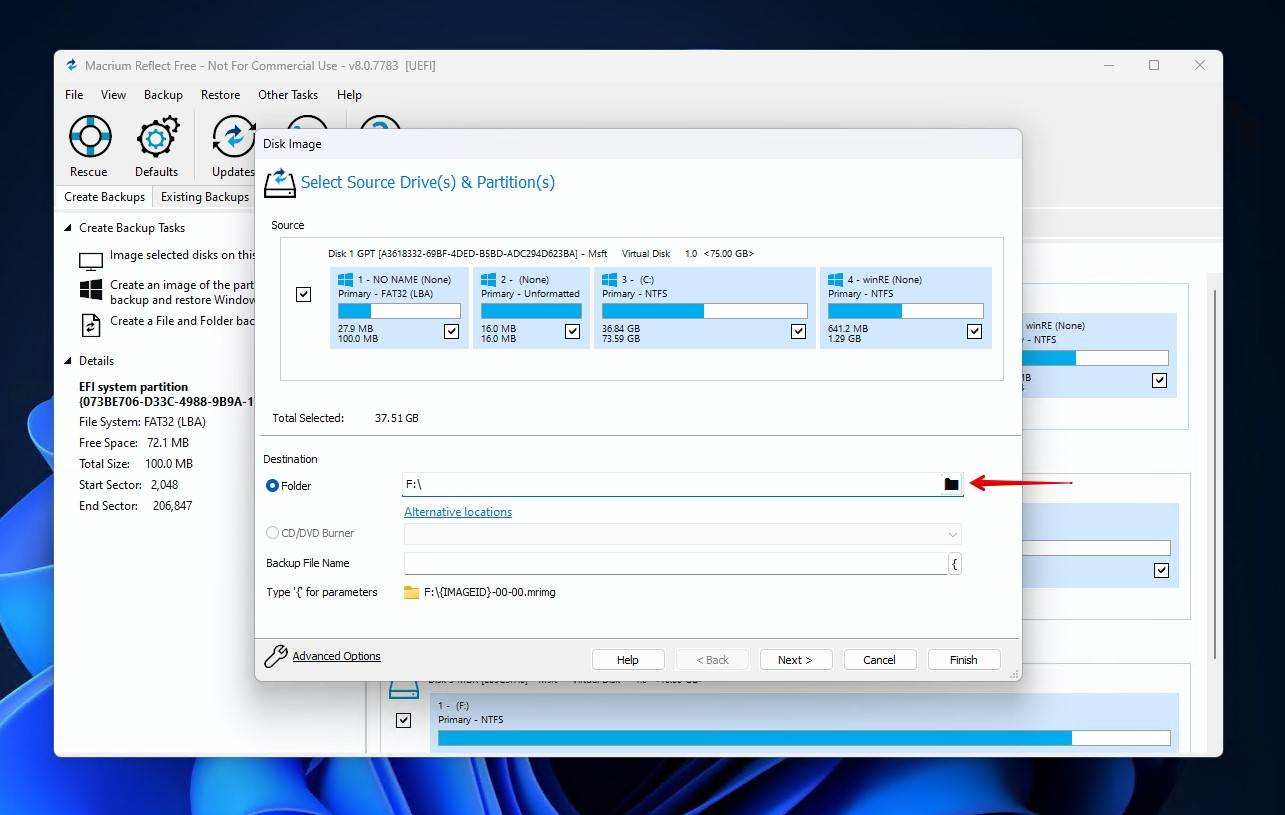
- Specify where you want to store the image file, then click Next.
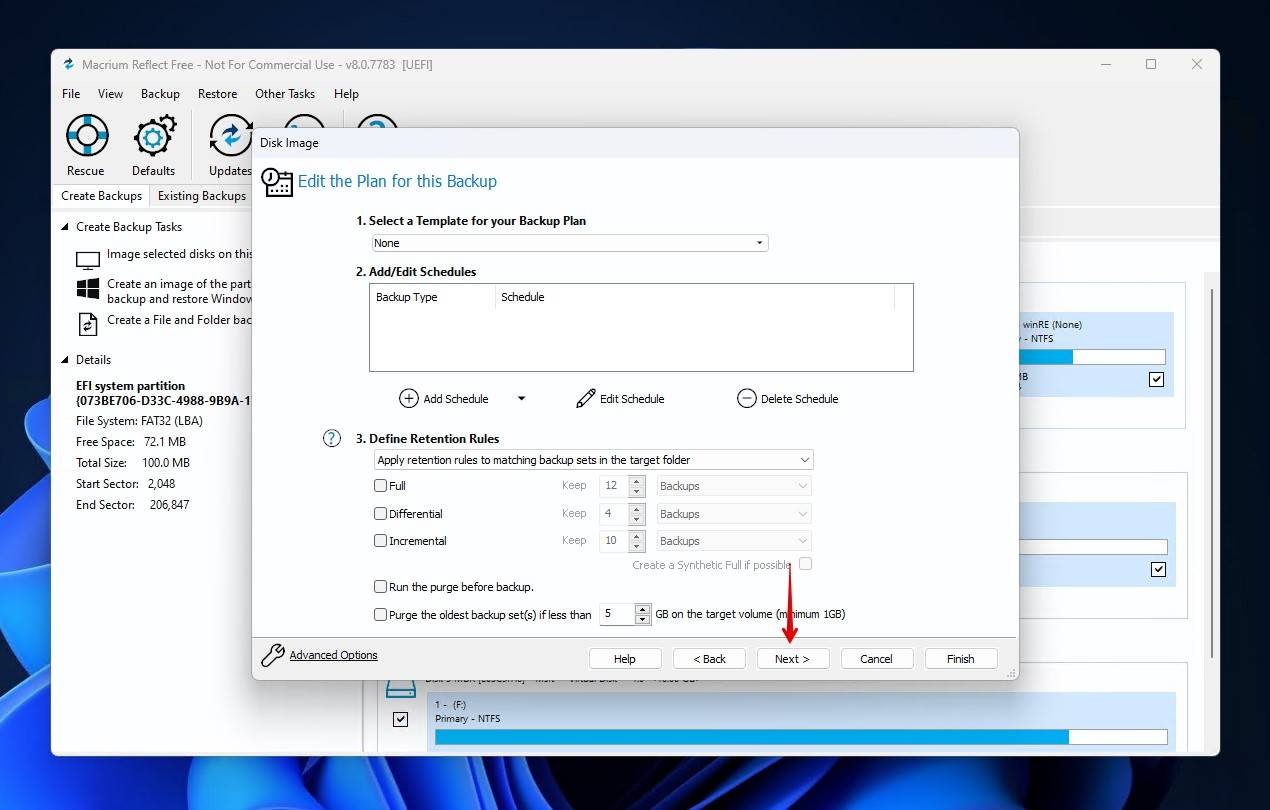
- Set up your Backup Plan. When ready, click Next.
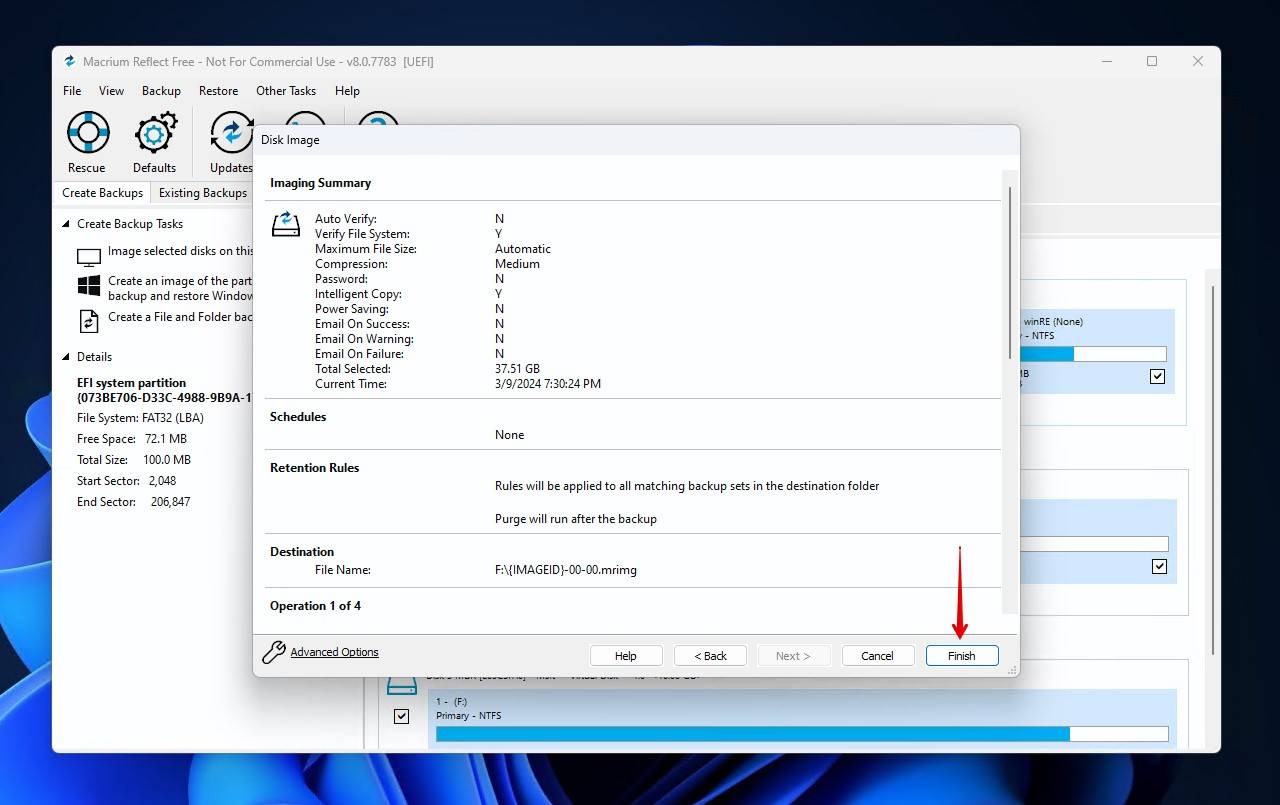
- Click Finish.
Frequently Asked Questions
What happens when I overwrite an existing file with the same name?
The new version of the file will overwrite the existing one at the same physical location on the disk. If this is done, it’s highly improbable that you will be able to recover it with data recovery software, as the information for the old file would be gone. Instead, your best chance of recovery is by restoring an older version of the file from a backup.
Is it possible to recover overwritten data from an external hard drive?
Potentially. You can connect the device to your system running Windows 10 or another version of the OS and attempt to recover the files using data recovery software such as Disk Drill.
Why is data that has been overwritten hard to recover? What are the technical issues?
There is one main issue that differentiates an overwritten file from a deleted file. Deleted files are usually only logically removed from the computer system which means that they can be recovered by data recovery software. An overwritten file has been physically altered. This lowers the probability that a data recovery tool can restore the file to its original state.
Conclusion
While data recovery software is excellent at recovering deleted files or missing partitions, the problem of overwritten files is more difficult to successfully address. An overwritten file may be altered in ways that cannot be undone. You can attempt to recover a replaced file with the methods described above, but there is a good chance that you will be unsuccessful.
Your best defense against overwriting important files is to make backup copies before performing any activities that may result in changes being made to the original data. Make it a priority to protect your data in as many ways possible.
- 46 publishings
- Auckland, New Zealand
Jordan Jamieson-Mane is a content writer with a focus on technology-related content. He has spent much of his life studying and working with all types of technology. During his time as a writer, he has written countless articles in the field of data recovery, breaking down complex topics into articles that are easy to understand.
When he's not writing articles on data recovery, Jordan enjoys traveling the world, reading books, and building websites.
- LC Tech FILERECOVERY Professional Review – Can It Compete with Modern Recovery Tools?
- UFS Explorer Review – A Powerful Recovery Tool With Lots to Offer
- Cisdem Data Recovery for Windows Review – A Capable Copy
- AnyRecover Data Recovery Review – A Polished Solution for Basic Users
- iBoysoft Data Recovery Review: Not Much to Offer
- Frisco, Texas, United States
Yevgeniy Tolkunov is Hardware Engineer at ACE Data Recovery. Yevgeniy has a Master's Degree in Physics, Information Technology; 15+ years of experience.