How to Recover Data from a Formatted Partition
Formatting a partition will inevitably result in data loss, which is why it’s always the last resort when users encounter issues. But there are situations that force users to format a partition (which we’ll talk about more later) and it’s also possible that a user formatted the partition by accident.
Fortunately, you can recover data from a formatted partition. However, a successful data recovery depends on how the partition was formatted, and by extension, what caused it. This article has all the information you need. Read on!
Is It Possible to Recover Data from a Formatted Partition?
The short answer is it depends. There are 3 main factors that can affect partition recovery: (1) the reason for formatting, (2) the type of formatting executed, and (3) what happened after the partition was formatted.
We’ll break down each factor below, and by the end, you should have a better understanding of your situation and what to do next.
What Was the Reason for Formatting the Partition?
First, let’s figure out the root cause for formatting the partition. Below are 3 common scenarios that result in formatting (and consequently, data loss), that still have a high chance of recovery. Hopefully, your case falls under one of them.
- Accidental formatting – The user accidentally formatted the partition via File Explorer or through the Disk Management app. Users might also format the wrong partition. In such cases, formatted partition recovery will only work if Quick Format was selected (it usually is by default).
- Virus infection – Viruses may corrupt a partition’s file system, making it unreadable by the operating system. In such cases, Windows may ask to format the drive or partition to make it functional again. Infected drives and partitions are usually highly recoverable.
- Hard drive or partition corruption – A corrupted hard drive or partition is usually unreadable by the operating system. Again, this will prompt the user to perform a format in order to fix it. As long as only a Quick Format is performed, you should be able to recover data after the format. Note that corruption may also apply to the data itself – fortunately, data recovery software can usually rebuild the data and make it readable/usable again.
Was It a Quick Format or a Full Format of the Partition?
You may have noticed mentions of Quick Format in the last section – let’s clarify what that means, how it compares to a Full Format, and why it’s important to understand the difference between the two.
- Quick Format – Let’s say you accidentally formatted an external hard drive. If you used Quick Format, your data disappears from File Explorer but remains physically stored on the drive until they are overwritten by new files. As long as new data haven’t been saved, you can still recover data from the formatted external hard drive.
- Full Format – A Full Format both erases your data and overwrites it with zeroes upon execution. Once that data is overwritten by the Full Format process, you will no longer be able to restore it. It will also locate and exclude any bad blocks from use after formatting, along with any data stored in them.
In summary, while a Quick Format and a Full Format both erase your data, they each do it in different ways.
Has the Partition Been Used Since It Was Formatted?
In the last section, we established that it’s the process of overwriting data which makes it unrecoverable – not the formatting itself.
So, if you performed a Quick Format on your drive or partition, your data is safe for the time being because this format type does not overwrite anything. However, it does mark your data to be overwritten anytime new files are written to the drive or partition.
Once you save a bunch of new data to the newly formatted drive or partition, it will overwrite the existing data that still resides on that drive or partition… This makes recovery impossible.
So if you just performed a Quick Format on your drive or partition, stop using it immediately to avoid overwriting data! Then proceed to the next section of this article, where we’ll teach you how to “unformat” your formatted partition by recovering its data.
How to Recover Formatted Partition
We’ve established that it’s highly possible to recover files from a formatted partition (as long as your data hasn’t been overwritten)… But how? You need partition recovery software – special tools that can locate, extract, and rebuild data directly from the file system.
We’ve tested, compared, and written about dozens of data recovery software in an effort to help users find the best app for their unique needs.
For this task (recover partition after format), we chose 3 tools that will give you the best chances of recovery: Disk Drill, R-Studio, and TestDisk. We’ll demonstrate each of them for you in the sections below.
Method 1: Recover Files From a Formatted Partition Using Disk Drill
Disk Drill is a super popular data recovery software and our #1 pick out of the three apps we’ll be demonstrating in this article. It’s beginner-friendly yet powerful, and it has proven reliable for recovering problematic and formatted partitions on both HDD and SSD storage devices (as long as TRIM has not overwritten the data).
It supports all major file systems, including ExFAT, FAT32, and NTFS, and it can usually work with partitions that appear as RAW or unrecognized in File Explorer – which is a sign of a damaged or improperly formatted partition. Disk Drill also provides 500 MB of free data recovery, which is plenty if you only need to restore a few hundred photos or important documents.
To use Disk Drill to recover formatted hard drive partition:
- Connect the drive that contains the formatted partition. If the partition is on your system drive, connect an external drive to store the recovered files later.
- Download and install Disk Drill.
- Launch Disk Drill via the Start menu or its desktop icon.
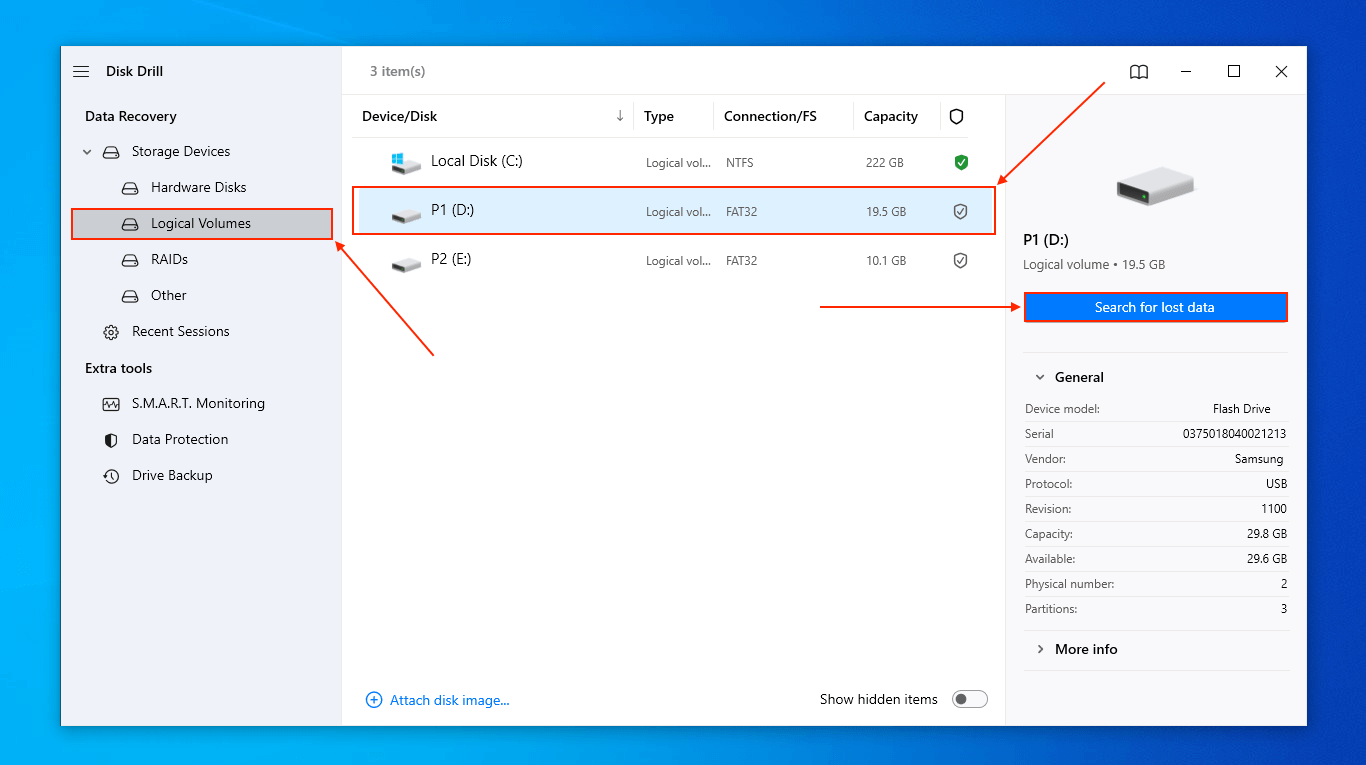
- From the left sidebar, select Logical Volumes (under Data Recovery > Storage Devices). Then, select the volume that contains the formatted partition and click Search for lost data.
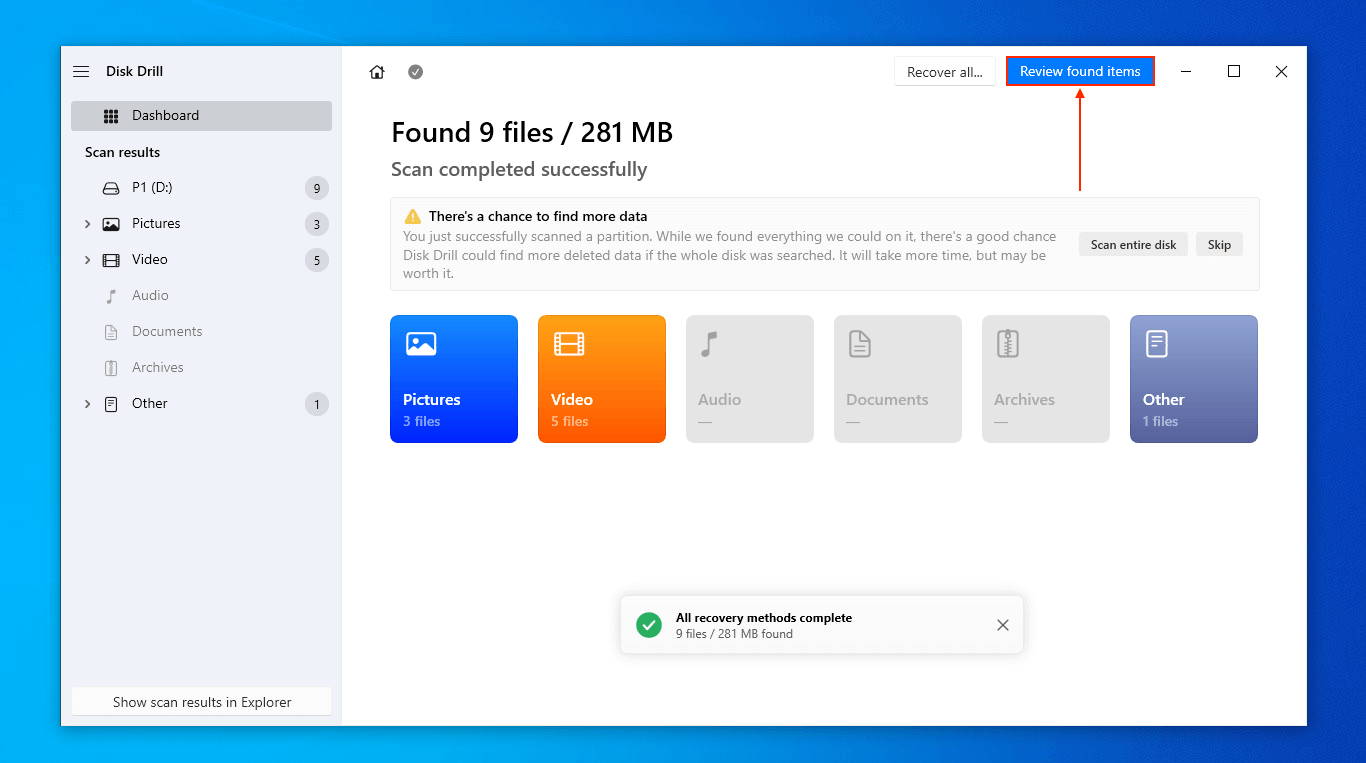
- Once Disk Drill finishes scanning the partition, click Review found items. Note that you will be given the option in this stage (and the next) to scan the entire disk and not just the partition in case Disk Drill finds more files.
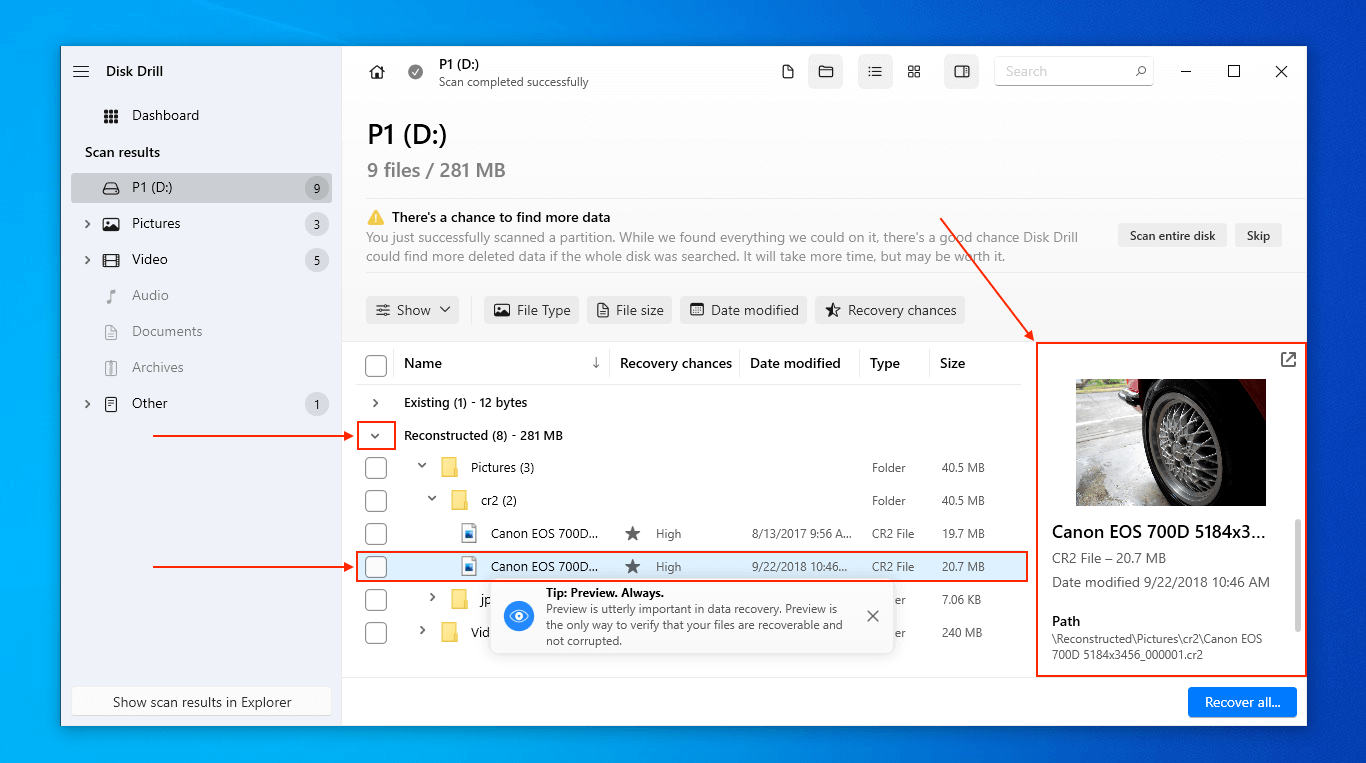
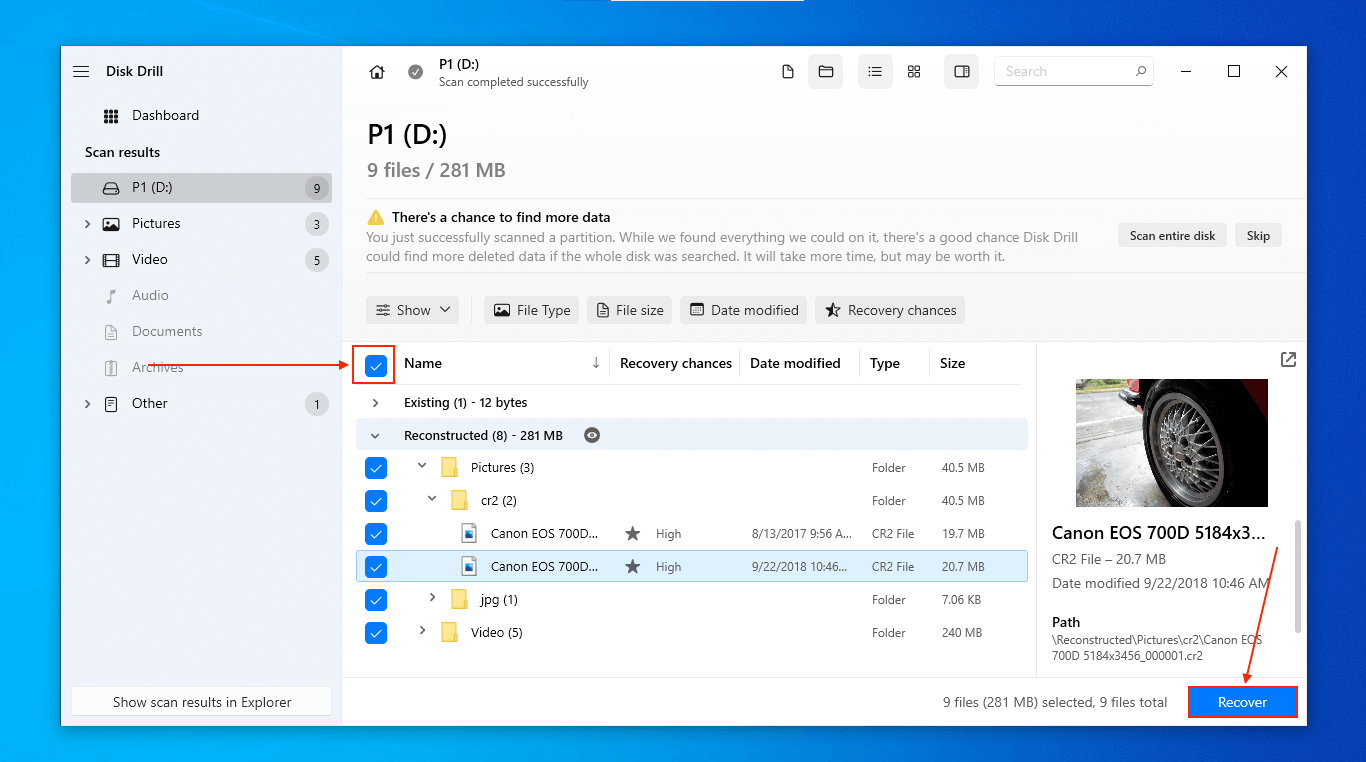
- Expand the Deleted or lost and Reconstructed tabs to view the extracted data from your formatted partition. Clicking on a file will display its preview in the rightmost panel.
- Use the boxes in the leftmost column to select the files and folders you want to restore from your wiped partition. Alternatively, click on the box at the top of the column to select all files. Then, click Recover.
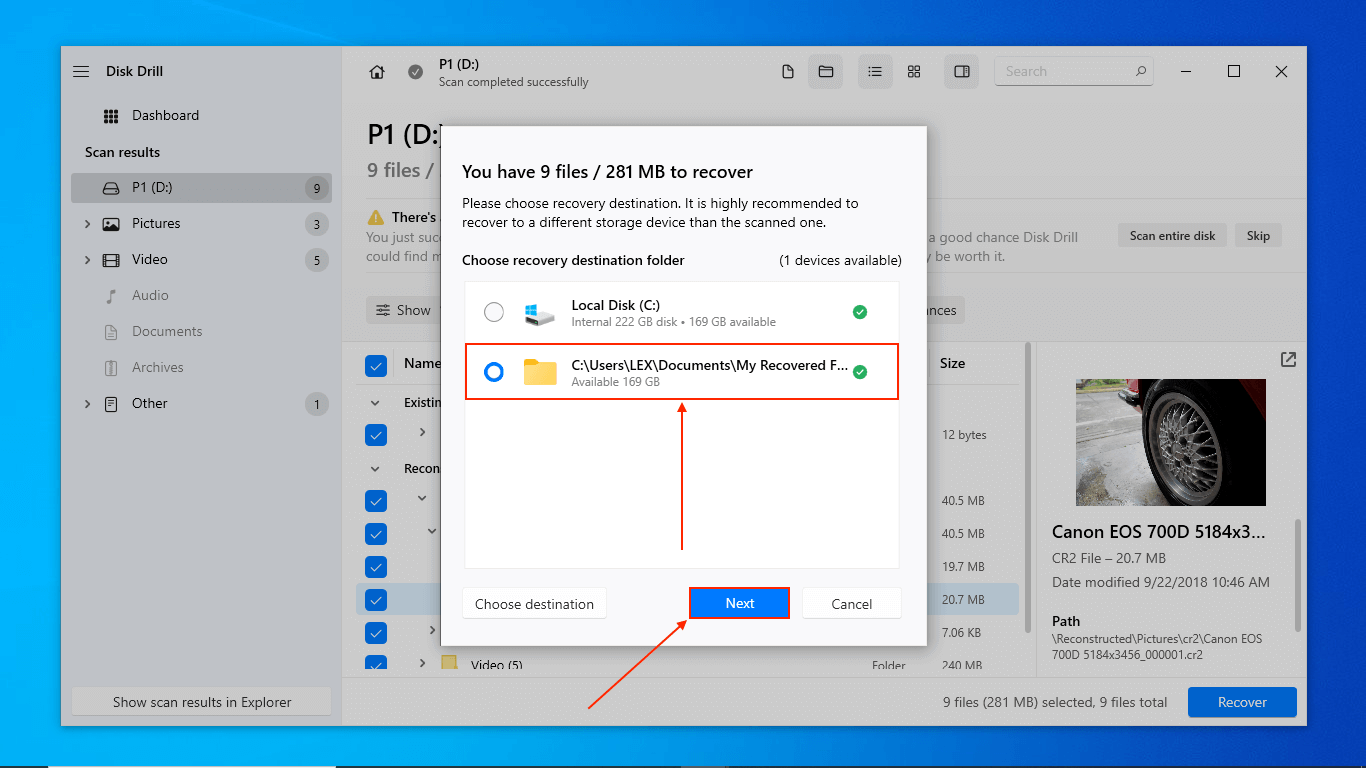
- Select a location on a DIFFERENT drive or partition than the one that stores the partition you want to recover. Click the Choose destination button if you want to specify a location that isn’t listed in the dialogue box. Then, click Next to recover the formatted data.
Method 2: Restore Data From Your Formatted Partition Using R-Studio
R-Studio is another well-loved app that is commonly used by technicians due to its powerful arsenal of advanced features. Its deep scan technology can detect and recover files from formatted and corrupted partitions.
R-Studio is a bit more intimidating than Disk Drill, but it’s worth the learning curve. It also supports ExFAT, FAT, and NTFS file systems, though you can only restore files under 256 KB for free. It’s still super affordable if you pick a version that supports a single file system (either NTFS or FAT/ExFAT), instead of the full version that supports all 3.
To recover your partition using R-Studio:
- Connect the drive that contains the partition you want to recover. If the partition is on your system drive, connect an external drive to store the recovered files later.
- Download and install R-Studio.
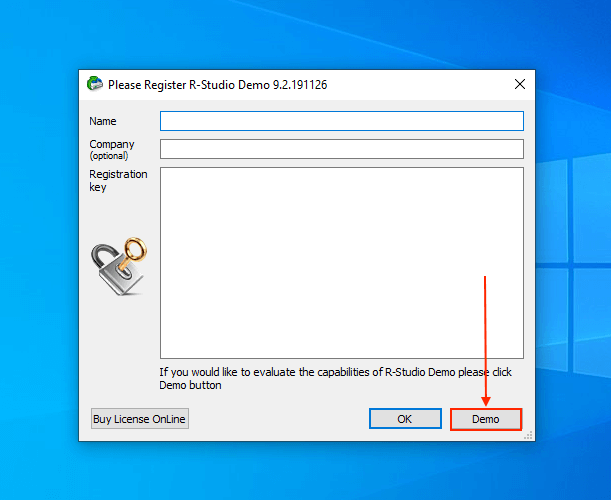
- Launch R-Studio via the Start menu or its desktop icon. Click Demo which will allow you to preview any files the app finds but you can only restore files that are 256 KB and smaller.
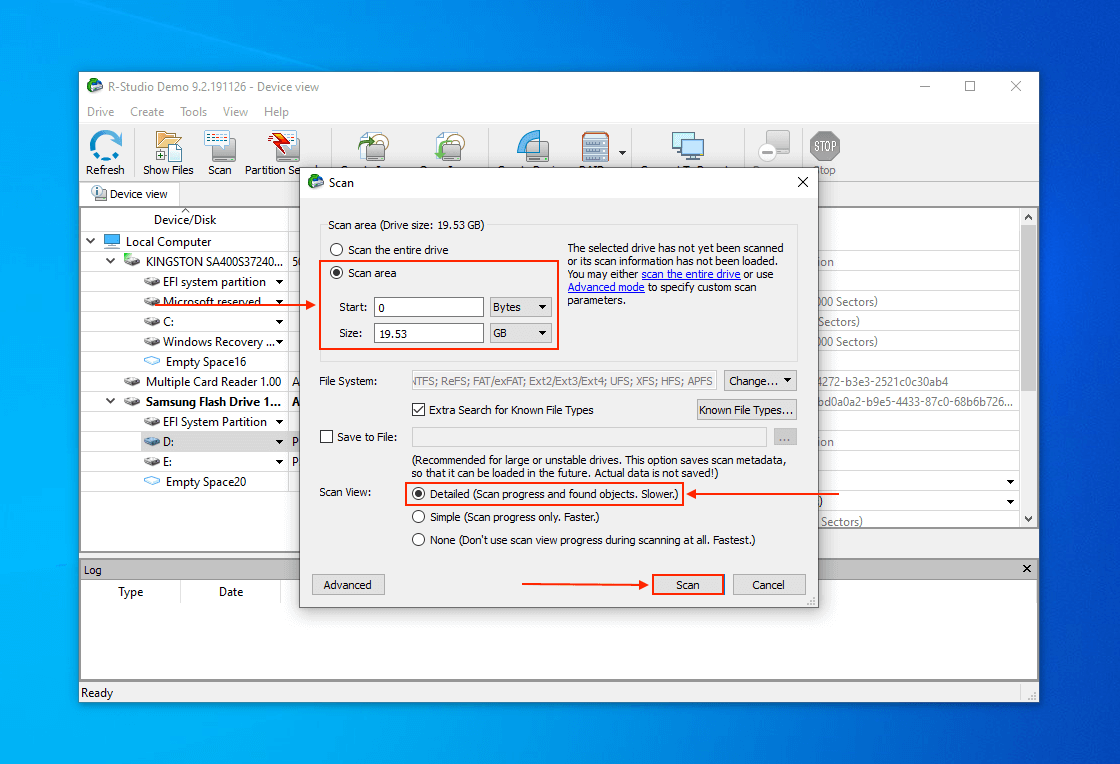
- Select your formatted or corrupted partition from the list of available drives and partitions. Then, click Scan.
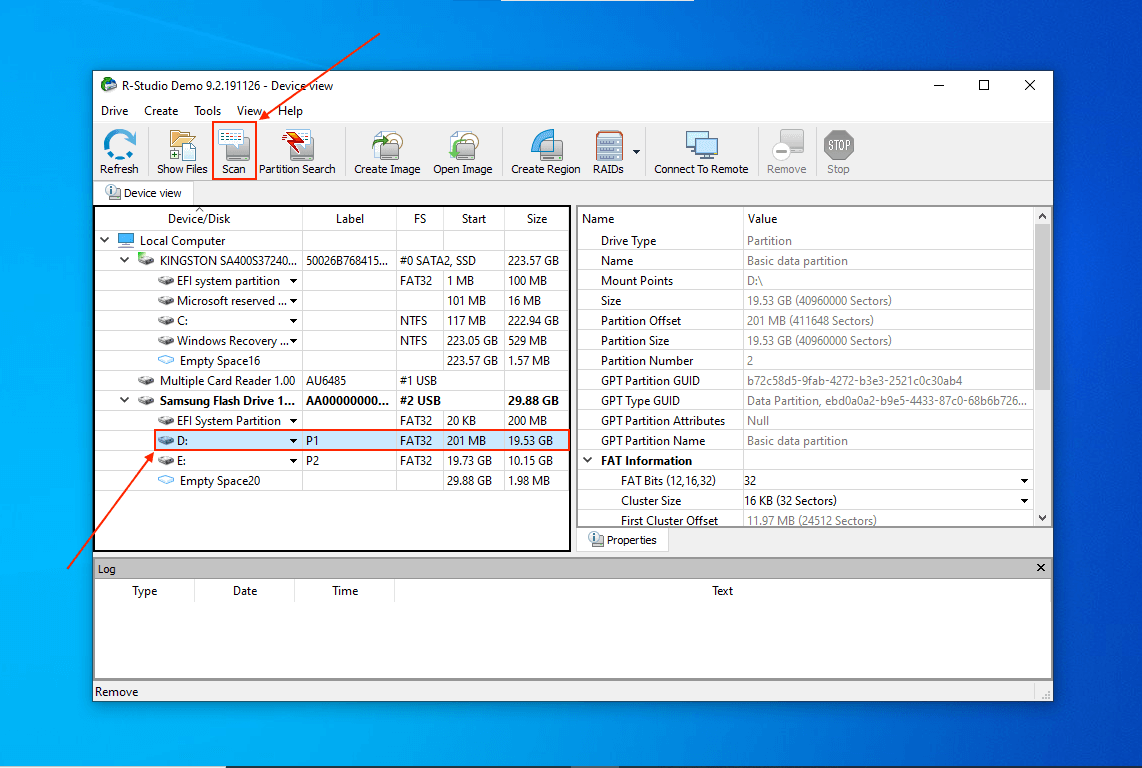
- You can opt to scan the entire drive or scan the selected partition only (make sure to set Start as 0 and Size as the size allotted to your partition – not the whole drive). Select the Detailed Scan view and click Scan.
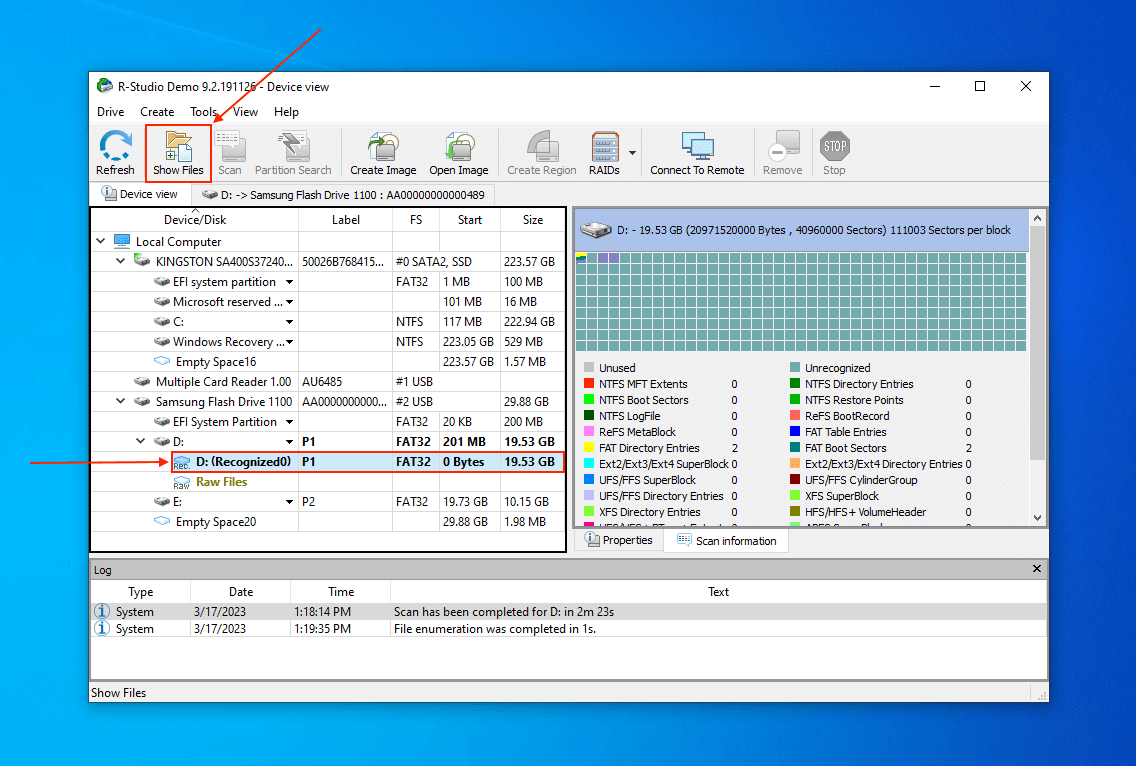
- Once R-Studio is done with the process, select the recovered partition and click Show Files.
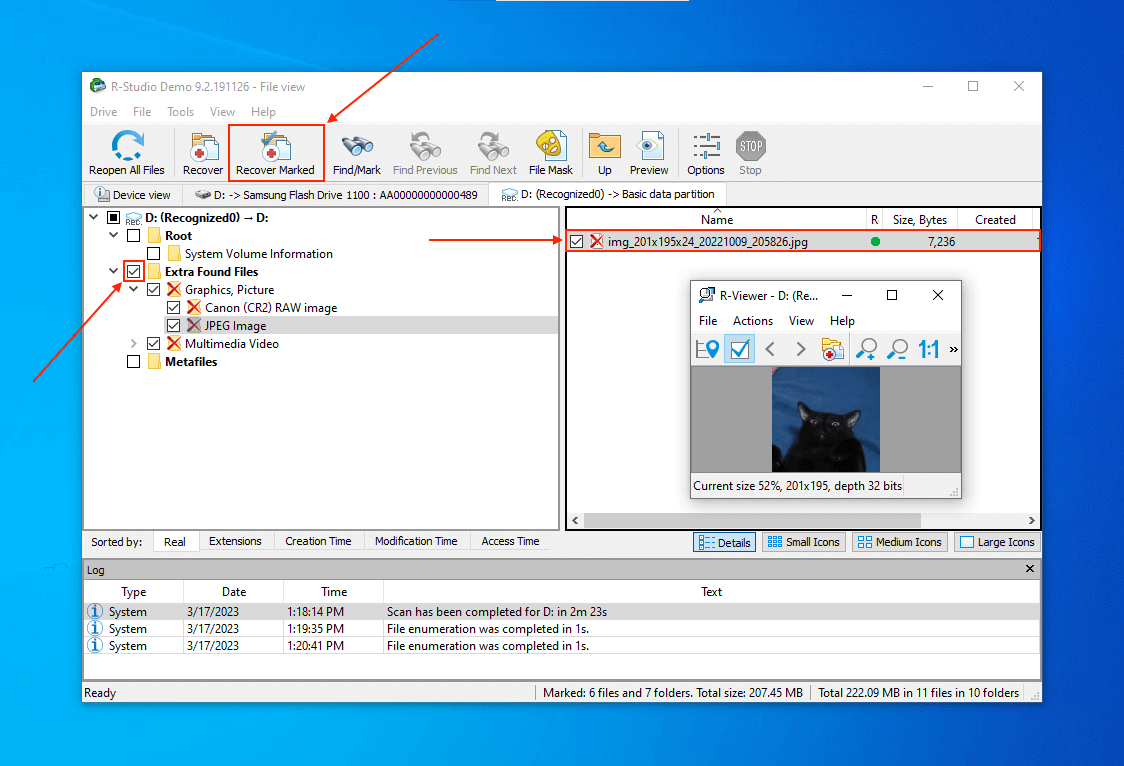
- Expand and select items in the left panel and double-click files in the right panel to preview your files. Then, click Recover to restore all the data R-Studio found in your partition or click Recover Marked to restore your selection only.
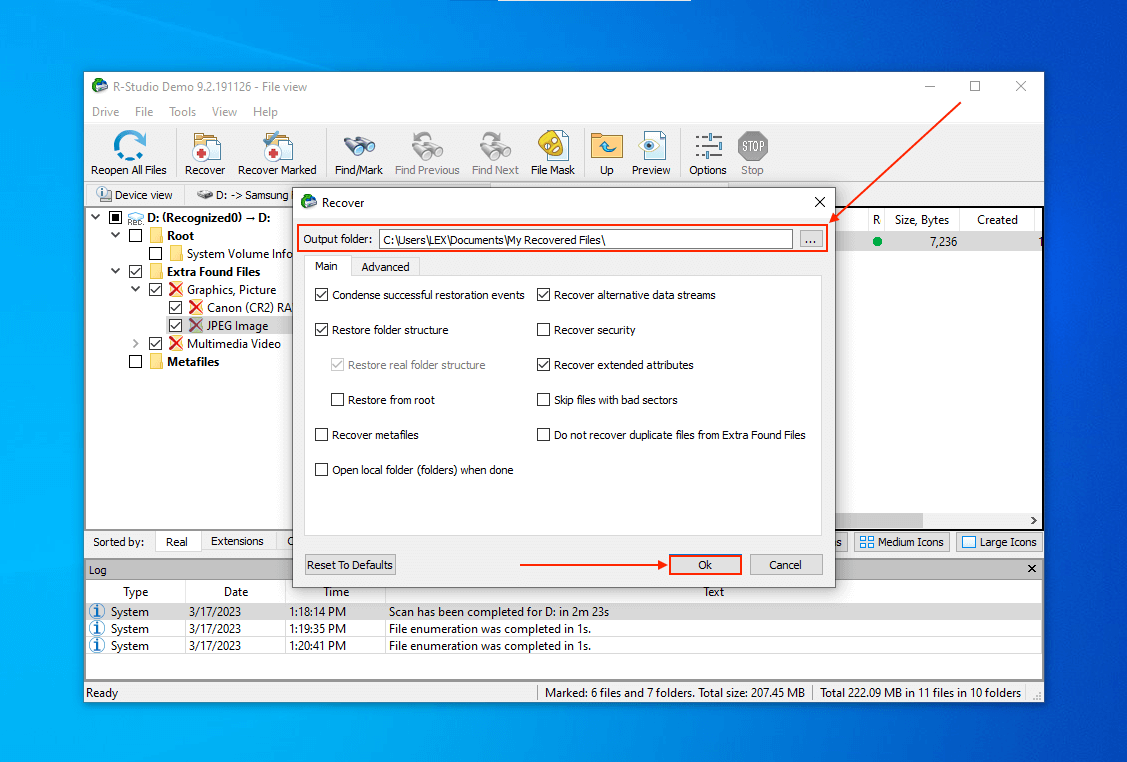
- Select the files you want to recover and select a location on a DIFFERENT drive or partition than the one you are recovering. Then, click OK to proceed.
Method 3: Recover Reformatted Partition Using TestDisk
TestDisk is a 100% free and open-source data recovery tool that works a bit differently than the others. While R-Studio and Disk Drill use algorithms to locate and reconstruct formatted data that hasn’t been overwritten yet, TestDisk restores data by rebuilding the partition table.
TestDisk can be a little intimidating because of its command line interface, but it makes recovering deleted partitions easy. TestDisk’s latest stable version was released years ago (2019) but it works flawlessly with Windows 10 and Windows 11.
To recover your reformatted partition using TestDisk:
- Connect the drive that contains the partition you want to recover. If the partition is on your system drive, connect an external drive to store the recovered files later.
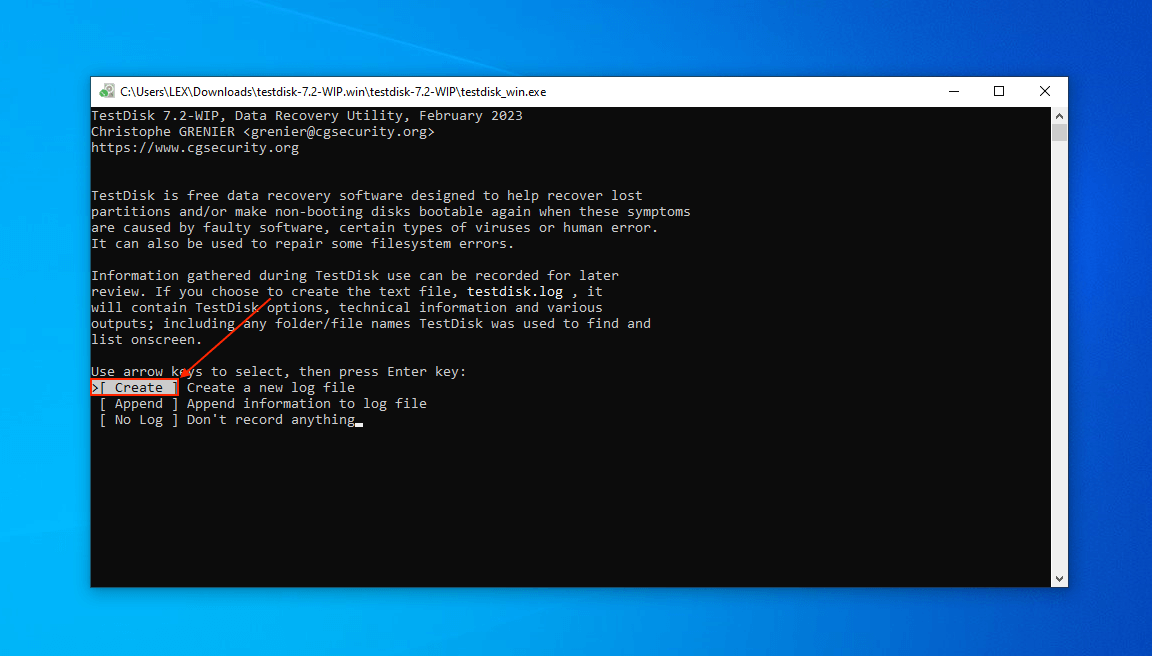
- Download, install, and launch TestDisk as administrator (testdisk_win).
- Hit Enter to proceed with the Create option.
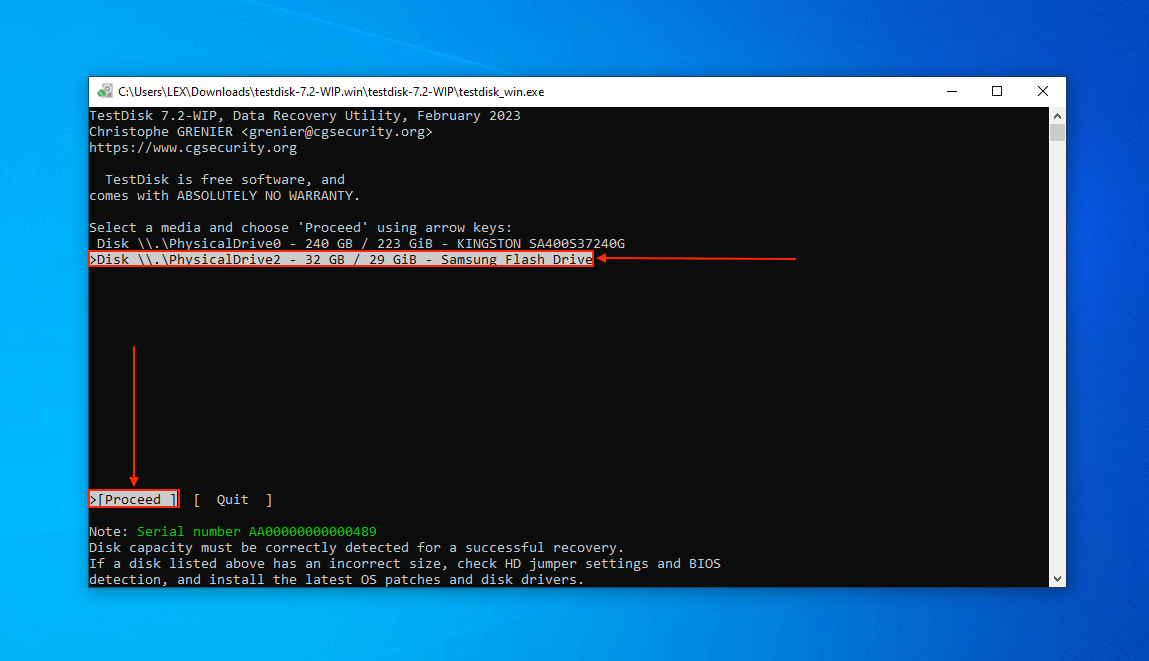
- Using your (up and down) arrow keys, highlight the drive that contains your formatted or corrupted partition. Hit Enter to proceed.
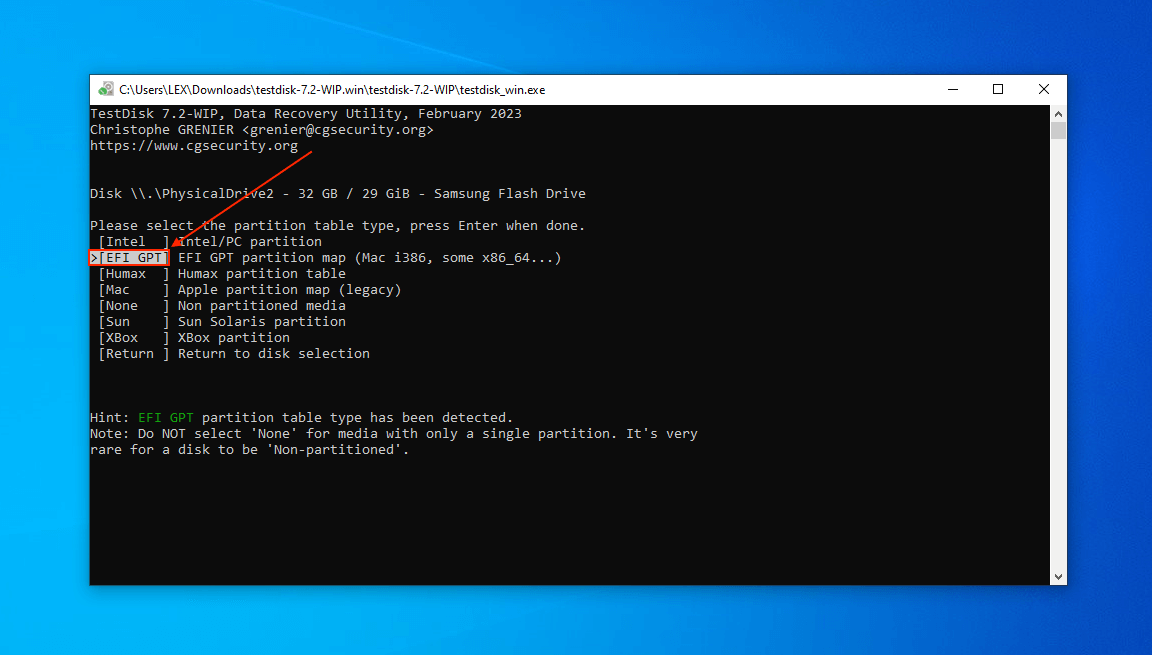
- Hit Enter again to select the partition table type TestDisk detected.
- Hit Enter while the Analyse option is highlighted.

- Hit Enter while the Quick Search option is highlighted.

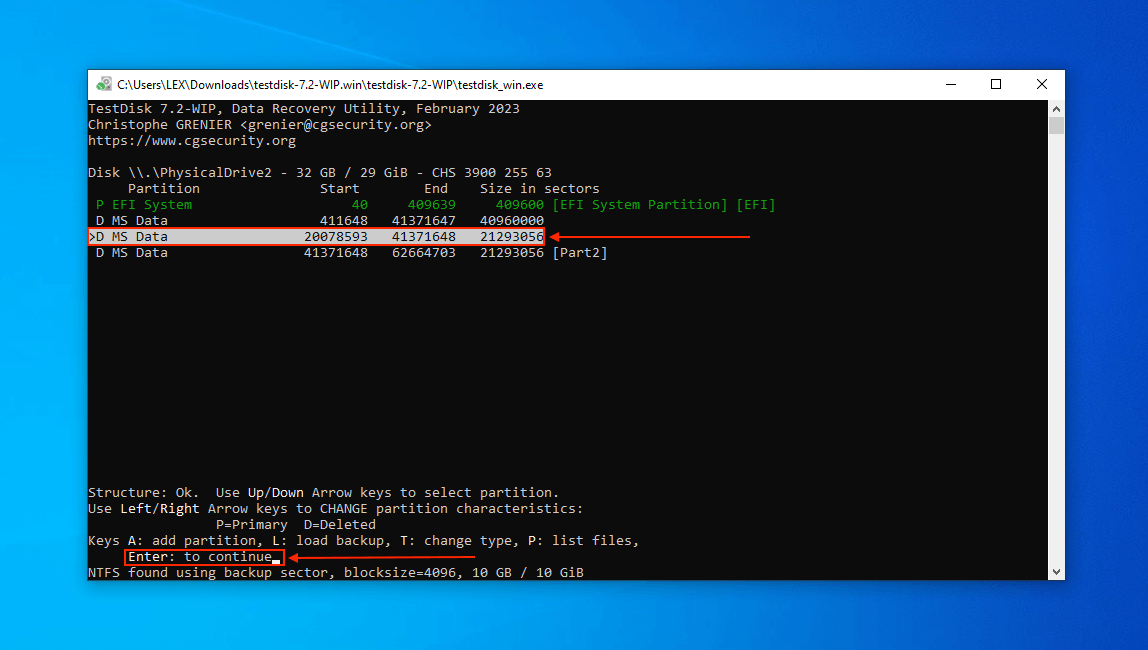
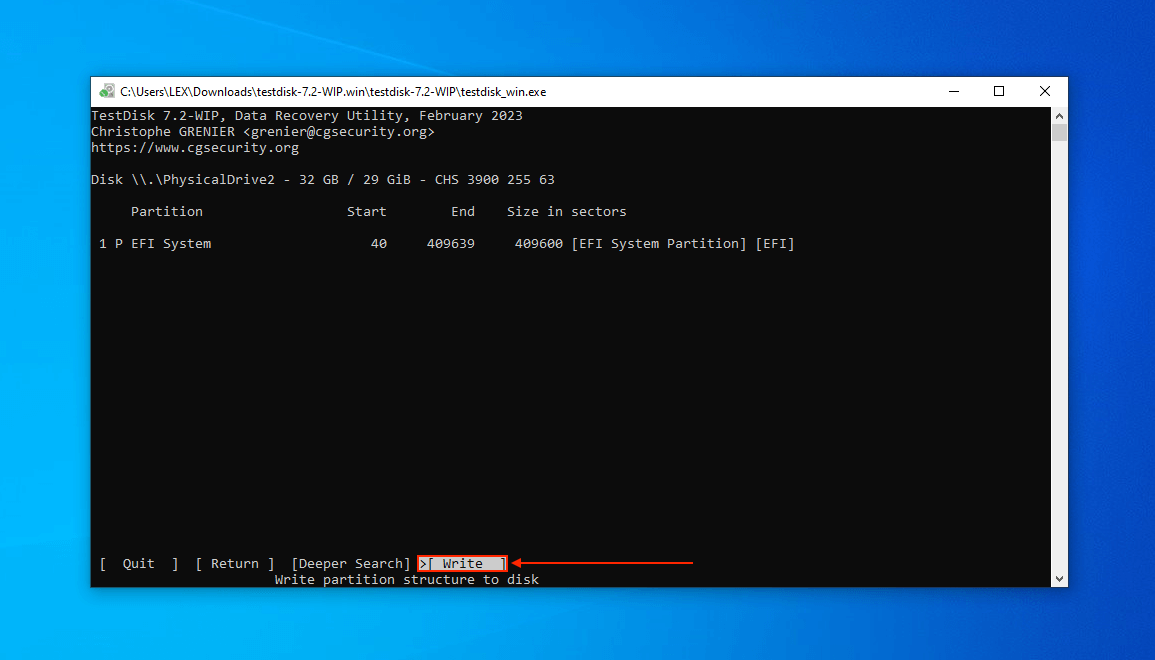
- After TestDisk completes the scan, it should display any partitions it finds. Deleted partitions will appear with a D in the first column. Highlight the deleted partition you want to restore and hit Enter to continue.
- Use the (left and right) arrow keys to highlight the Write option and hit Enter.
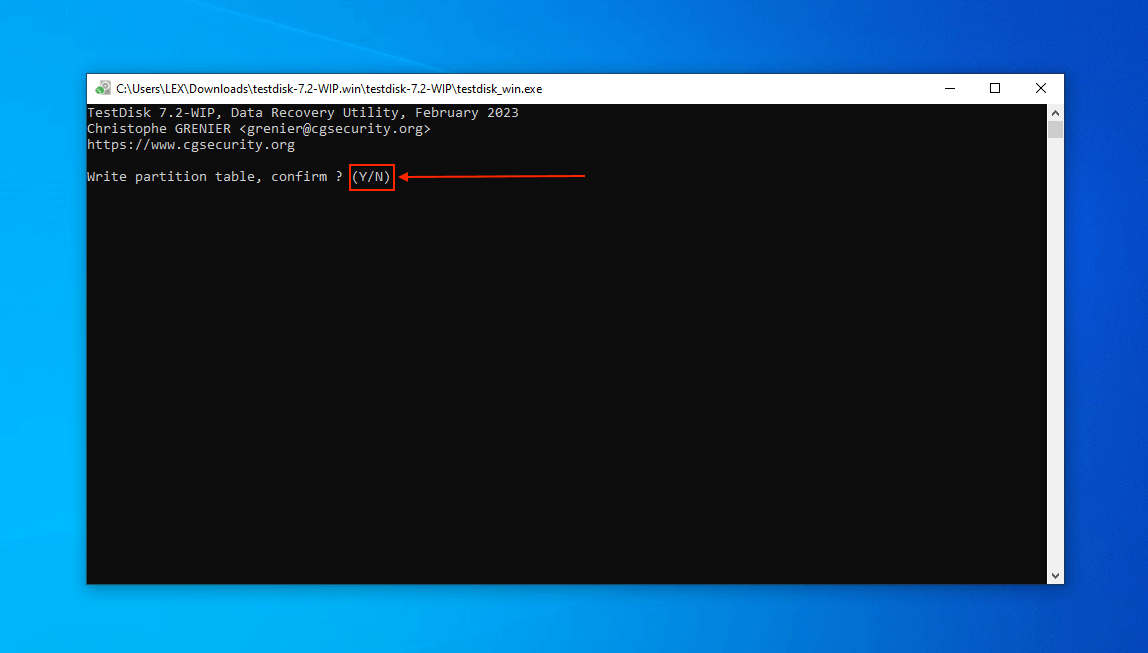
- Hit the Y key to confirm the action.
- Once the writing process is complete, hit Enter to proceed with the Ok option. This will return you to TestDisk’s main menu. Then, close the program and reboot your computer.
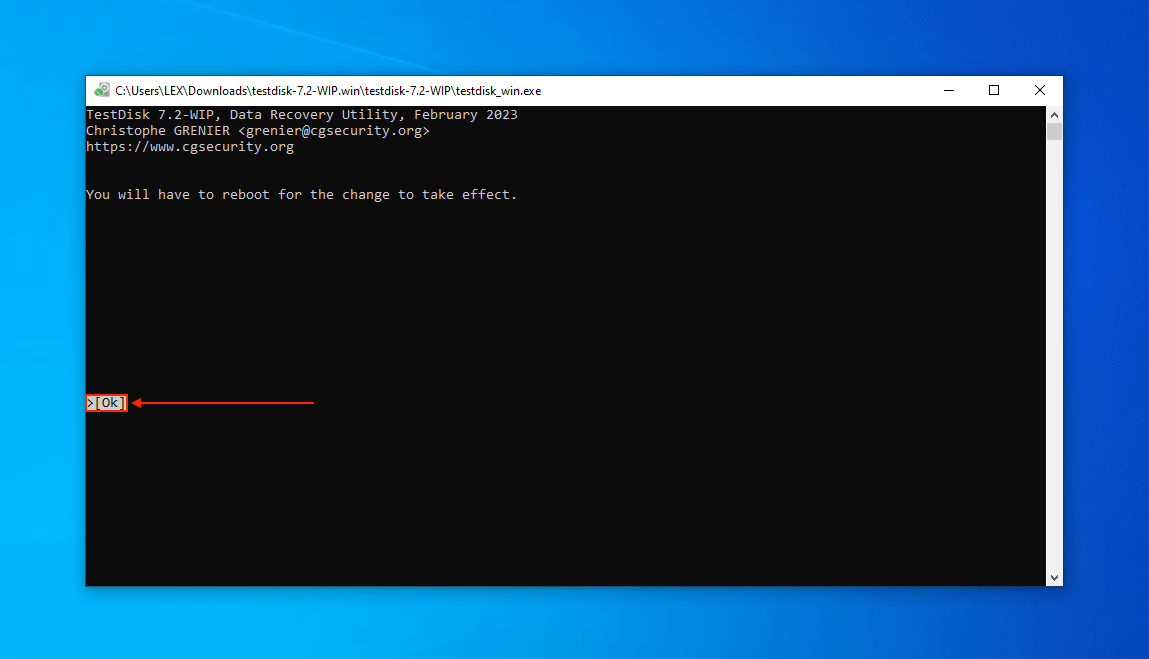
Once your computer is rebooted, you check if you have restored the old partition (it should be using the original file system), along with its data.
Frequently Asked Questions
Can data be recovered after a full format?
No, data cannot be recovered after a Full Format because a Full Format overwrites your data with zeroes and excludes bad sectors from future use (which may contain your data). A Quick Format, on the other hand, simply marks your data to be overwritten by new files and doesn’t actually overwrite anything. This is why recovery is possible after a Quick Format.
How to recover formatted partition on Windows 10 for free?
To recover a formatted partition on Windows 10 for free, use TestDisk – an open-source and 100% free data recovery tool. It specializes in rebuilding partition tables, so it’s a great choice if you reformatted your partition to another file system.
If you only need to recover less than 500 MB of data, you can also try using Disk Drill – it uses different scanning techniques (for ex. by file signature) to locate and reconstruct data that has been deleted as a result of formatting but hasn’t been overwritten.
How much data can be recovered from a formatted hard drive?
Only data that has not been overwritten by new files can be recovered from a formatted hard drive. If you immediately stopped using your drive after performing a Quick Format, you should be able to get all your data back.
How to recover files from formatted Windows 10 partition?
To recover files from a formatted Windows 10 partition:
- Download and install Disk Drill for Windows.
- Scan your formatted partition.
- Once the scan s done, click Review found items.
- Select the file you want to restore and click Recover.
- Save the recovered files to a folder on a different drive/partition.
Is there any reliable format partition data recovery software available?
Here are 3 reliable format partition data recovery software we highly recommend:
- Disk Drill – Multiple advanced search features, beginner-friendly GUI, 500 MB free data recovery.
- R-Studio – Lots of advanced features, recover an unlimited number of files (under 256 KB individually) for free.
- TestDisk – Can restore lost and deleted partitions, open-source, 100% free.
Are there any partition recovery tools available for Linux/Ubuntu?
TestDisk is a well-known and reliable open-source partition recovery tool that works with Linux/Ubuntu-based file systems like ext2, ext3, ext4, XFS, ReiserFS, and more. It’s a good option for users who need to restore reformatted partitions. Another option is R-Studio, which also works with Linux and is better at restoring deleted data that resulted from formatting.
Conclusion
Having to format a partition with precious data is inconvenient, but sometimes it’s necessary. Fortunately, there are multiple ways to restore a formatted or corrupted partition – and most of them are free. Just remember to stick with Quick Formatting instead of Full Formatting if you want to keep your files (and don’t save any new data to that drive or partition until after you’ve recovered it)!

- 22 publishings
Alejandro is a veteran writer with a rich background in technology. He worked part-time in his uncle’s repair and recovery shop as a young boy, and now uses his experience and writing skills to produce content for multiple tech websites – specifically on the topic of data recovery. As an author for Pandora Recovery, he is constantly testing and experimenting with new tools and technology to help his readers find the best software for their needs.
- Frisco, Texas, United States
Yevgeniy Tolkunov is Hardware Engineer at ACE Data Recovery. Yevgeniy has a Master's Degree in Physics, Information Technology; 15+ years of experience.