
How to Recover Deleted Videos for FREE
While it’s great that we can now store countless large video files on a single hard drive, it also means that a single user error or hardware/software failure can instantly wipe out hours’ worth of memories without any obvious way of recovering them back. In this article, we provide a quick step-by-step video recovery guide to help you restore your videos.
Help! My Videos Are Gone
Have you recently lost important video files? You’re not the only one! Countless people just like you experience the same unfortunate situation every single day:
Not thinking clearly, I deleted the video from my Canon HD camcorder (internal hard drive) before I went off to vacation. I recorded hours and hours of great video of my vacation. I am wondering if it’s even possible for me to recover the deleted video from my camcorder without having to send it to a professional company (for obvious reasons).
I just did the unthinkable. I accidentally deleted all files from my SD card. I didn’t format but just deleted. I had a whole day of videos on there. I know there are ways but are video files recoverable? Please let me know.
I accidentally deleted a video from my memory card, and I understand that there is software to help recover files. What actually works?
Continue reading this article to learn answers to these and other questions.
Update Notice (April 2024)
We’ve received a lot of feedback since we first published this article (please keep it coming!), so we decided to update its content to answer even more of your video recovery-related questions.Video Recovery Explained
Video recovery is neither magic nor rocket science. It simply takes advantage of the way modern operating systems, such as Windows and Mac, delete files.
Instead of taking the time to erase the storage space occupied by a deleted file, your PC or Mac simply makes the storage space available so that new data can be stored there. If you begin the recovery process in time, you should be able to recover your videos before they become overwritten.
Since it’s impossible to know how much time you have left before the storage space occupied by deleted videos becomes overwritten, you should start the recovery process as soon as possible. You should also avoid all activities that can cause the overwriting of your videos, such as data transfers and defragmentation.
Before You Begin the Video Recovery Process
We understand that you can’t wait to recover your videos, but there are some things you should always do before you begin the video recovery process:
1. Stop Using the Storage Device
As we’ve explained in the section above, you can drastically reduce your chances of successful video recovery if you continue using the storage device on which the deleted videos were stored.
If the videos you want to recover were stored on a memory card, external hard drive, or USB flash drive, you can simply unplug the device from your computer until you’re ready to start the recovery process. If they were stored on your system drive, we recommend you remove the drive from your computer and connect it as an external drive to a different computer.
2. Check the Recycle Bin (PC) or Trash (Mac)
By default, Windows and Mac computers move deleted files into a special folder whose purpose is to give users a chance to change their minds and recover them with ease. On Windows 10, 8, 7, and older, this folder is called the Recycle Bin, while Apple calls it Trash.
Read this help article from Microsoft if you don’t know how to find the Recycle Bin on Windows or this guide from Apple if you don’t know how to undelete files from Trash on Mac.
3. Go Through Your Backups
Backups are—and always have been—the most effective data loss prevention out there. Before you begin video recovery, go through your backups, and look for the lost videos. Remember that both Windows and macOS feature a built-in backup solution, and it’s possible that you activated it in the past and forgot about it.
Apple calls its backup solution Time Machine, and you can use it to easily restore individual files as well as the entire operating system. The most recent versions of Windows feature File History, a straightforward backup tool whose purpose is to regularly back up versions of your files in the Documents, Music, Pictures, Videos, and Desktop folders.
How to Restore Deleted Videos on Windows
All you need to restore deleted videos on Windows is a free video recovery software solution called Disk Drill. Designed to simplify video recovery as much as possible and still deliver professional results, Disk Drill is the right choice for all Windows users.
To recover deleted videos on Windows, follow these steps:
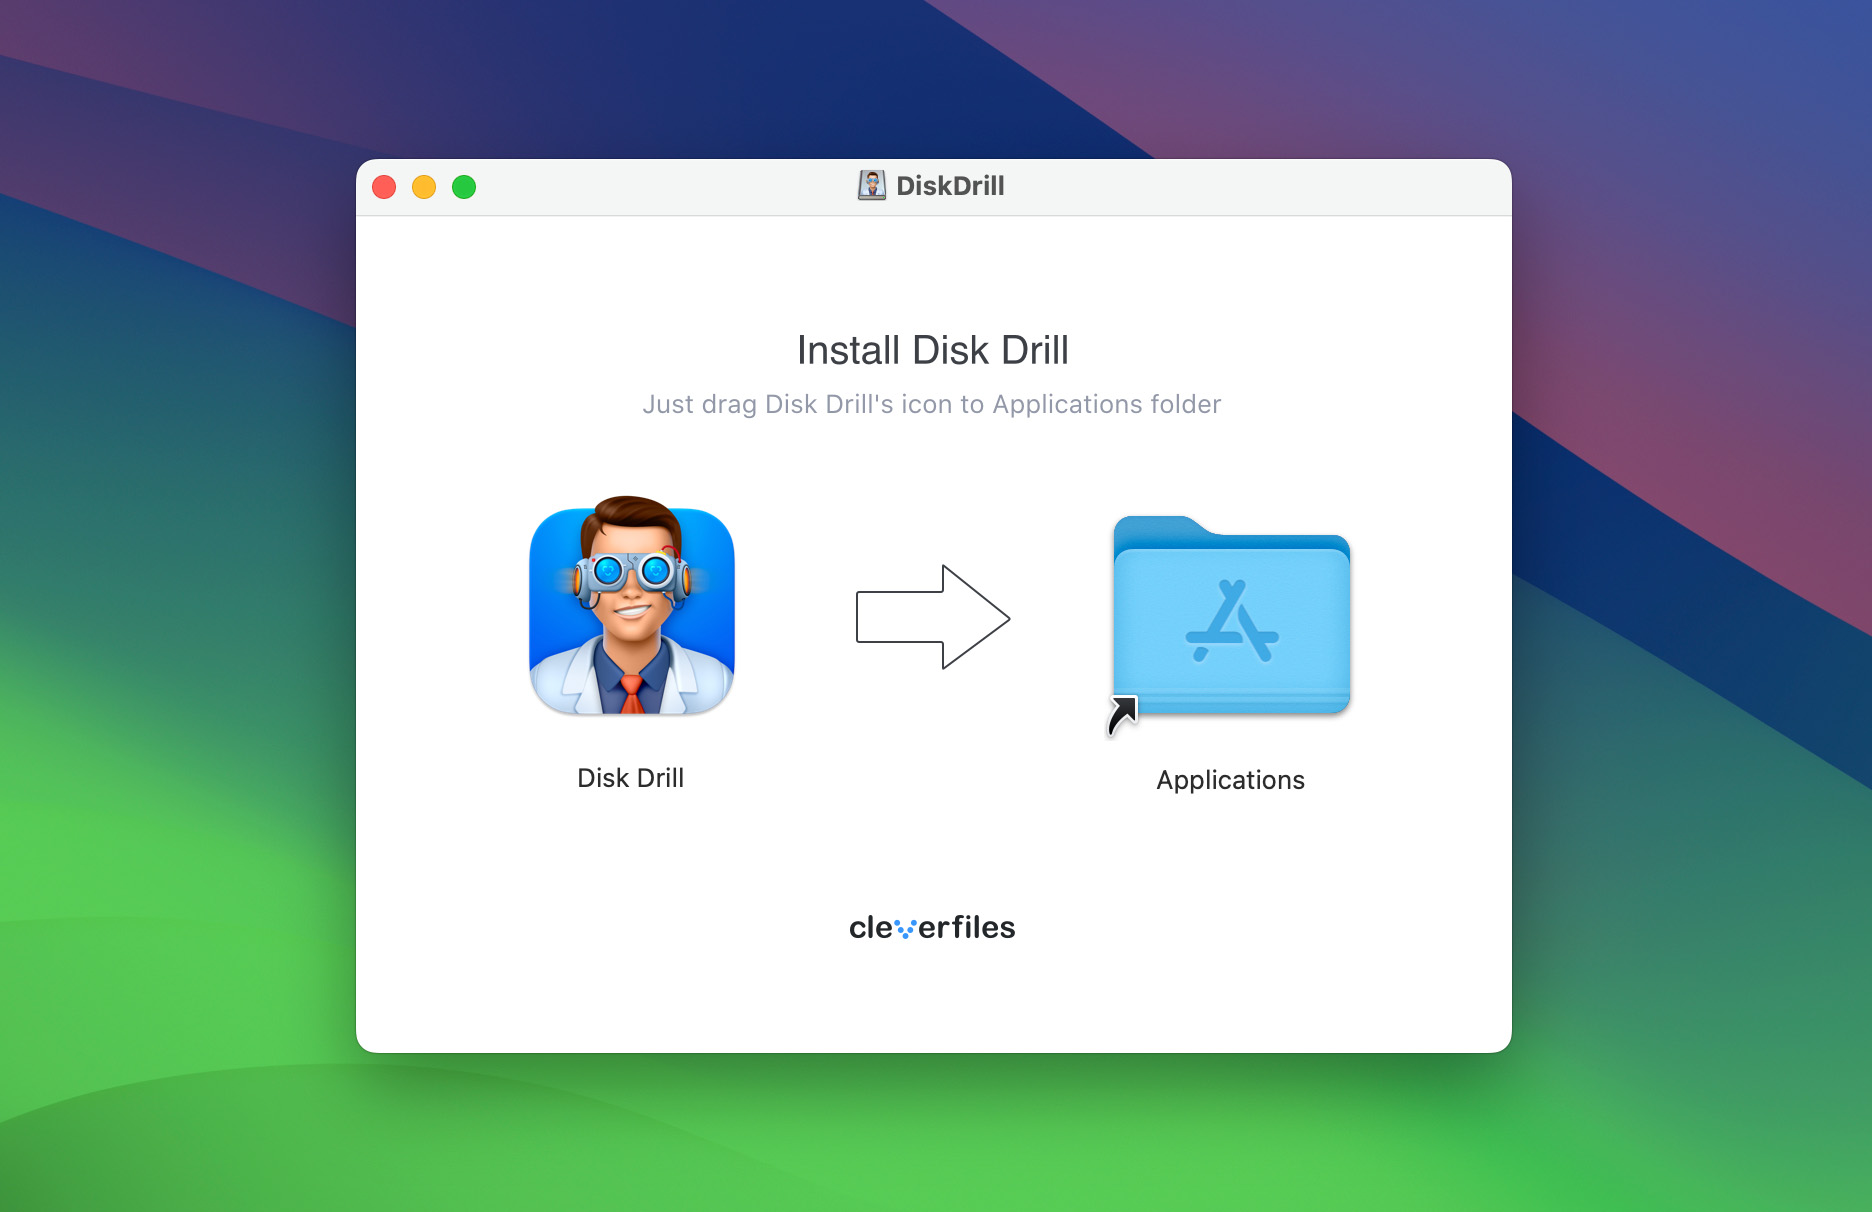
Step 1: Install and Launch Disk Drill for Windows
The first thing you need to do is download and install Disk Drill for Windows. Make sure you don’t download the installer to the same storage device on which your videos were stored because you could overwrite them and make it impossible to recover them. Likewise, you should install the app on a different storage device than the one you want to recover. While the chance of accidental overwriting of your videos during installation is relatively small, you should always do as much as possible to increase the likelihood of successful recovery.
Step 2: Select the Storage Device with the Deleted Video Files
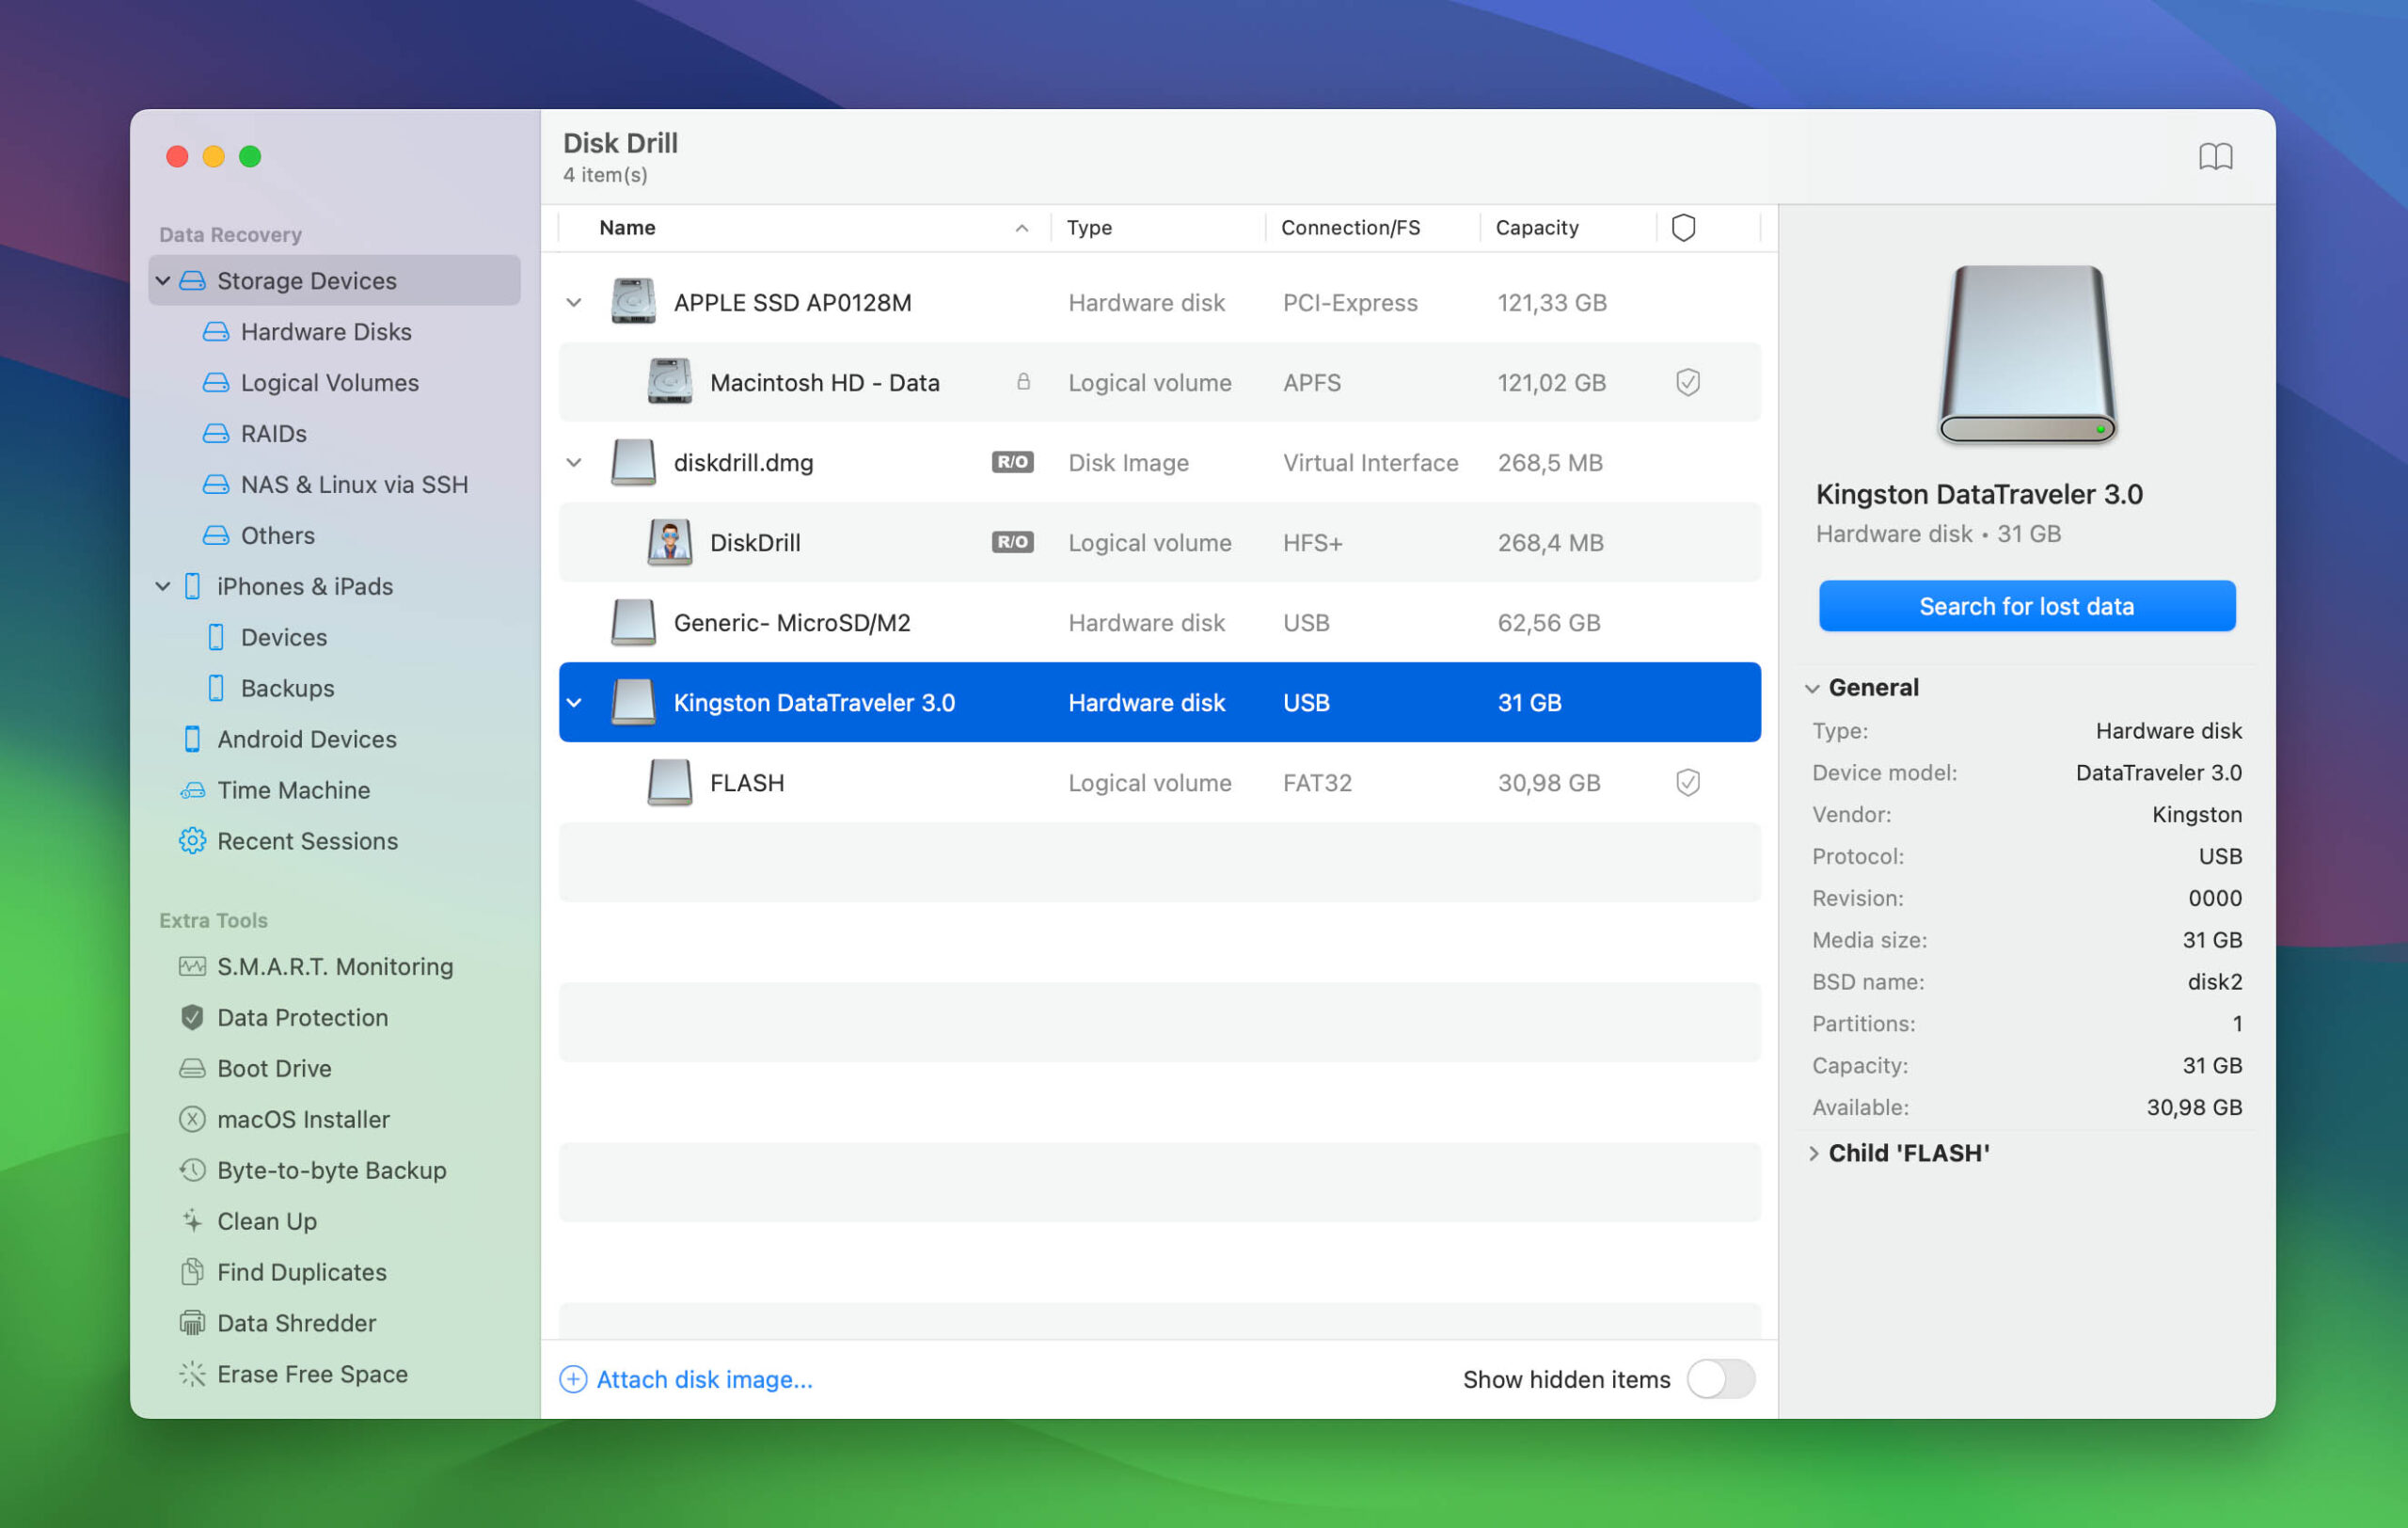
Next, select the storage device on which your videos were stored. Disk Drill lists all available storage devices and their partitions in a tree view for easier visualization, and you can select either an entire storage device or just one of its partitions. If you’re not sure which partition to select, we highly recommend you select the entire storage device even if it means that the scan will take longer. To verify that you’ve selected the right storage device, you can click the Info tab in the right pane to see the exact model and serial number.
Step 3: Click the Search for Lost Data Button and Wait
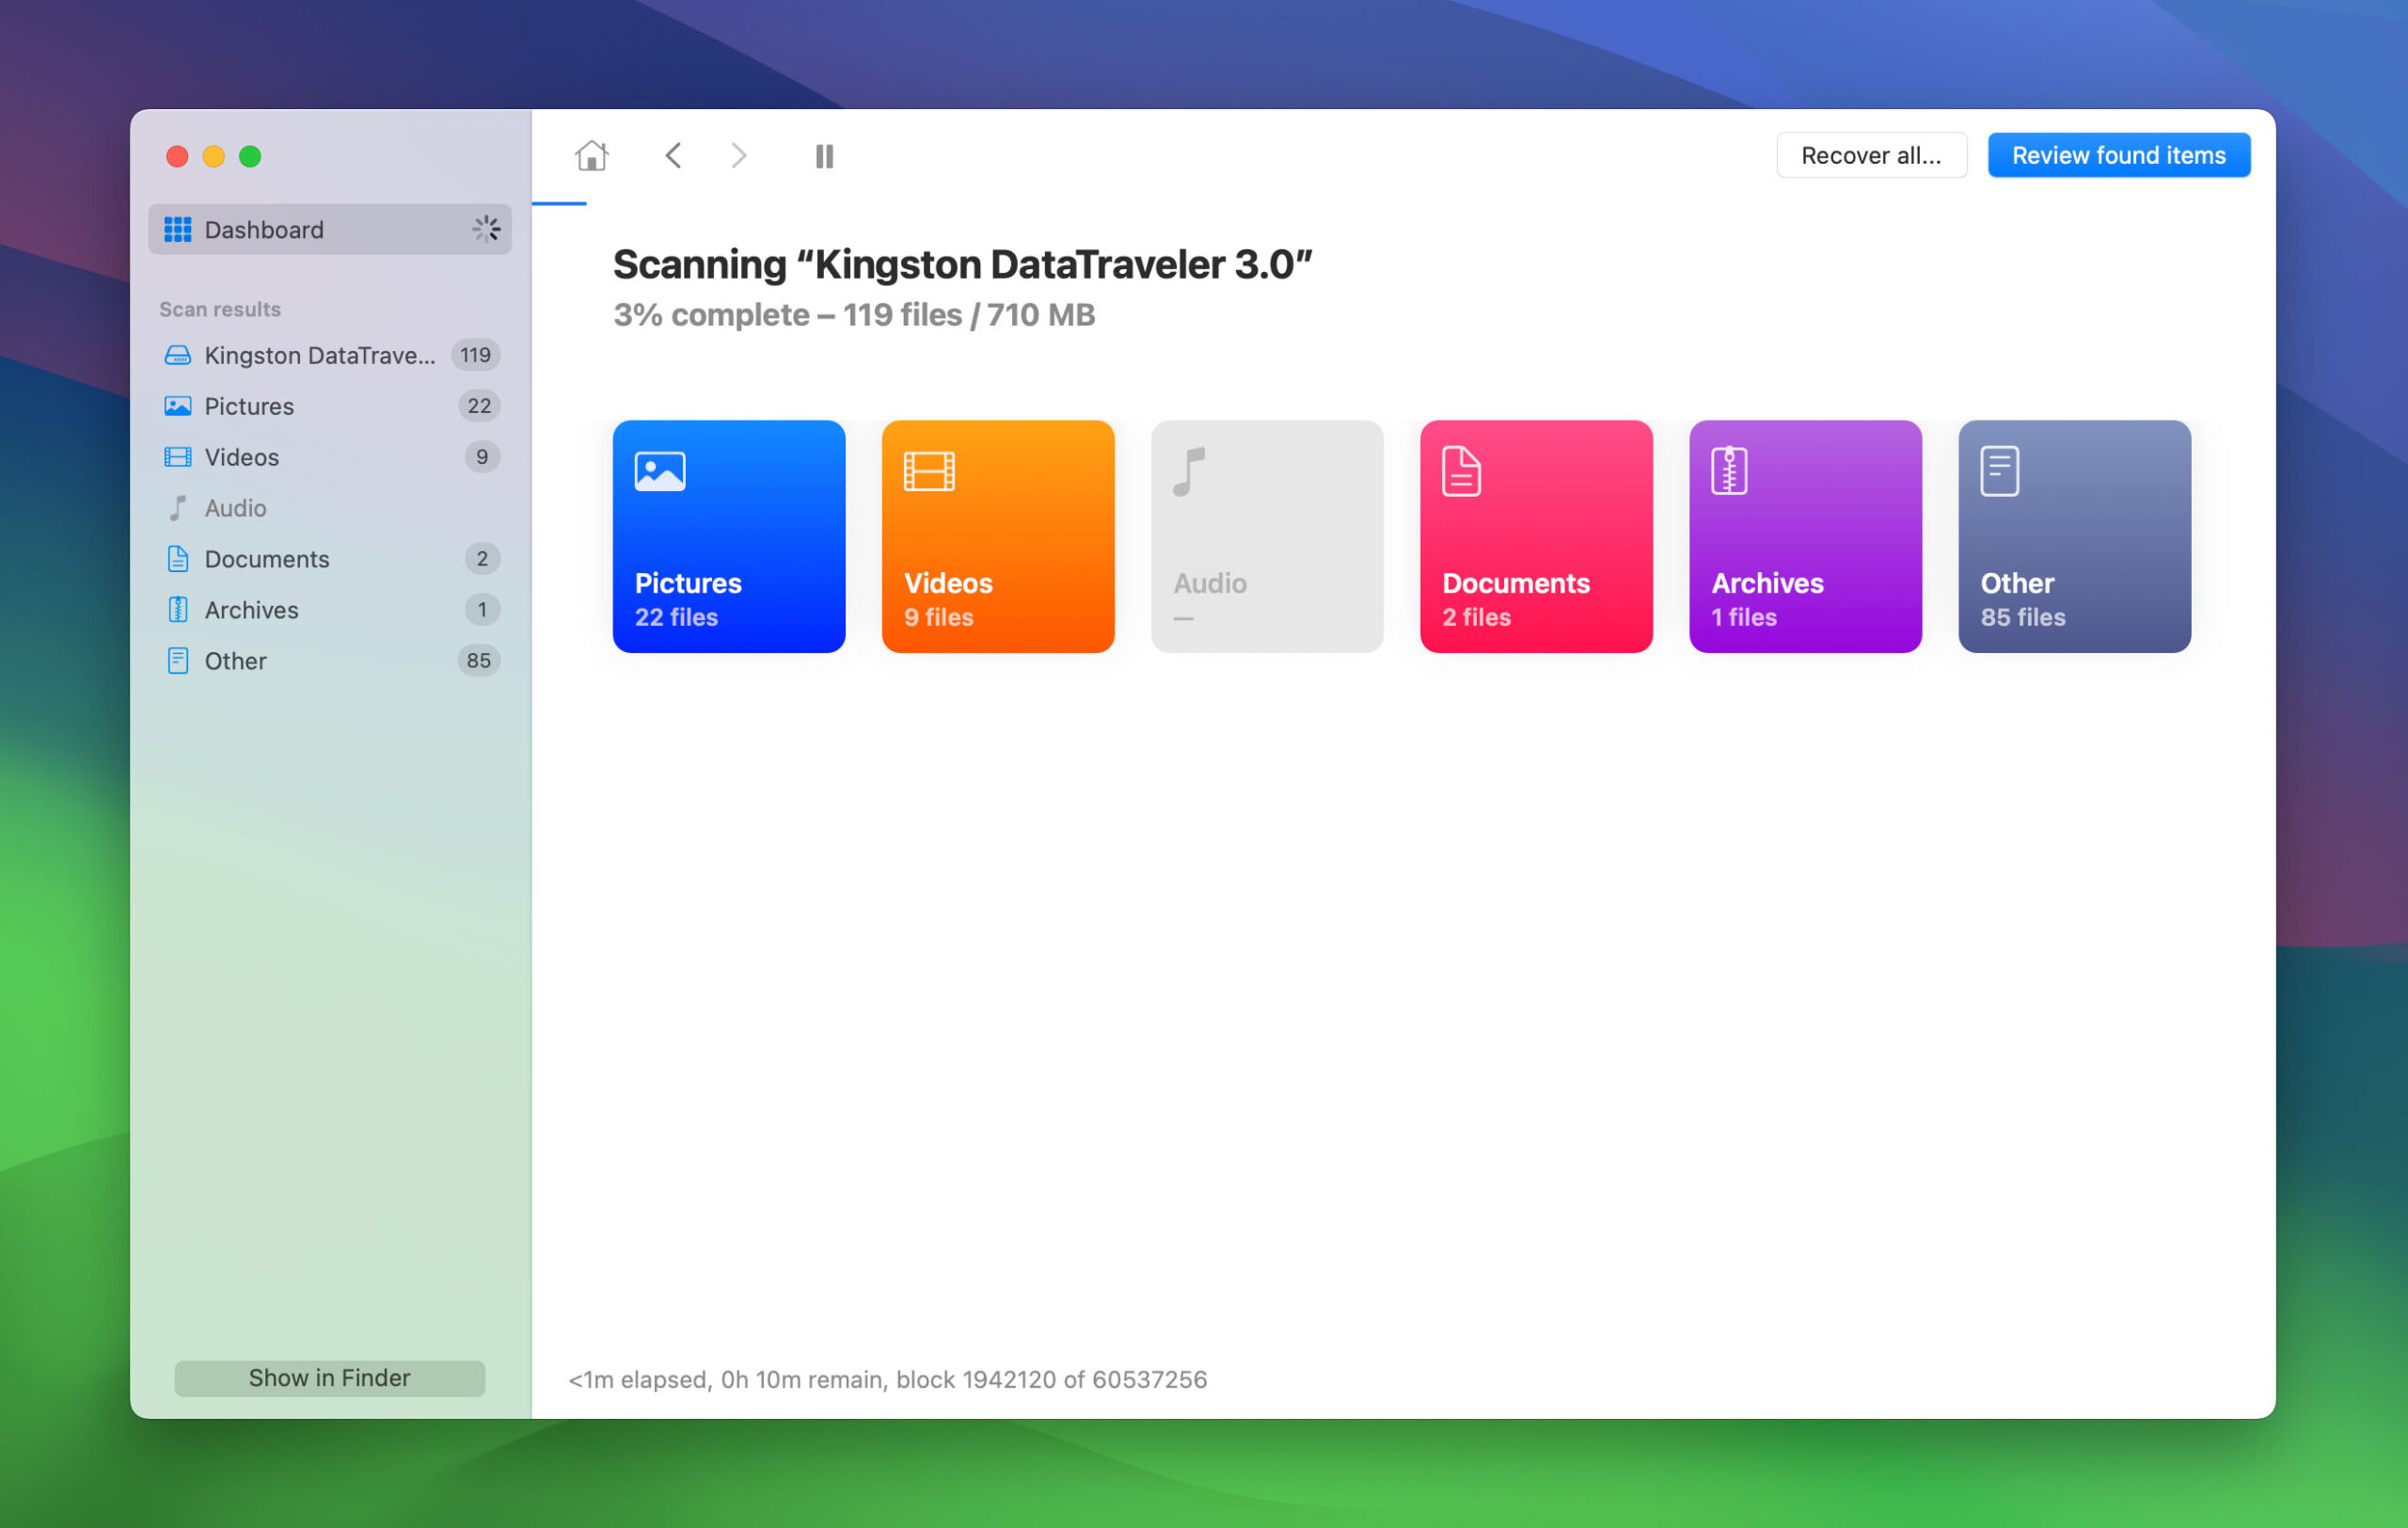
With the right storage device select, it’s time to click the Search for lost data button in the Recovery tab. By default, the tool runs all recovery methods in the optimal order to find as many deleted files as possible. The scan progress is displayed in real-time, and it shouldn’t take a very long time unless you have either a very large or very slow storage device. If you don’t want to wait for it to end, you can click the Review found items button and browse recovered files while the scan is still in progress.
Step 4: Select Videos for Recovery
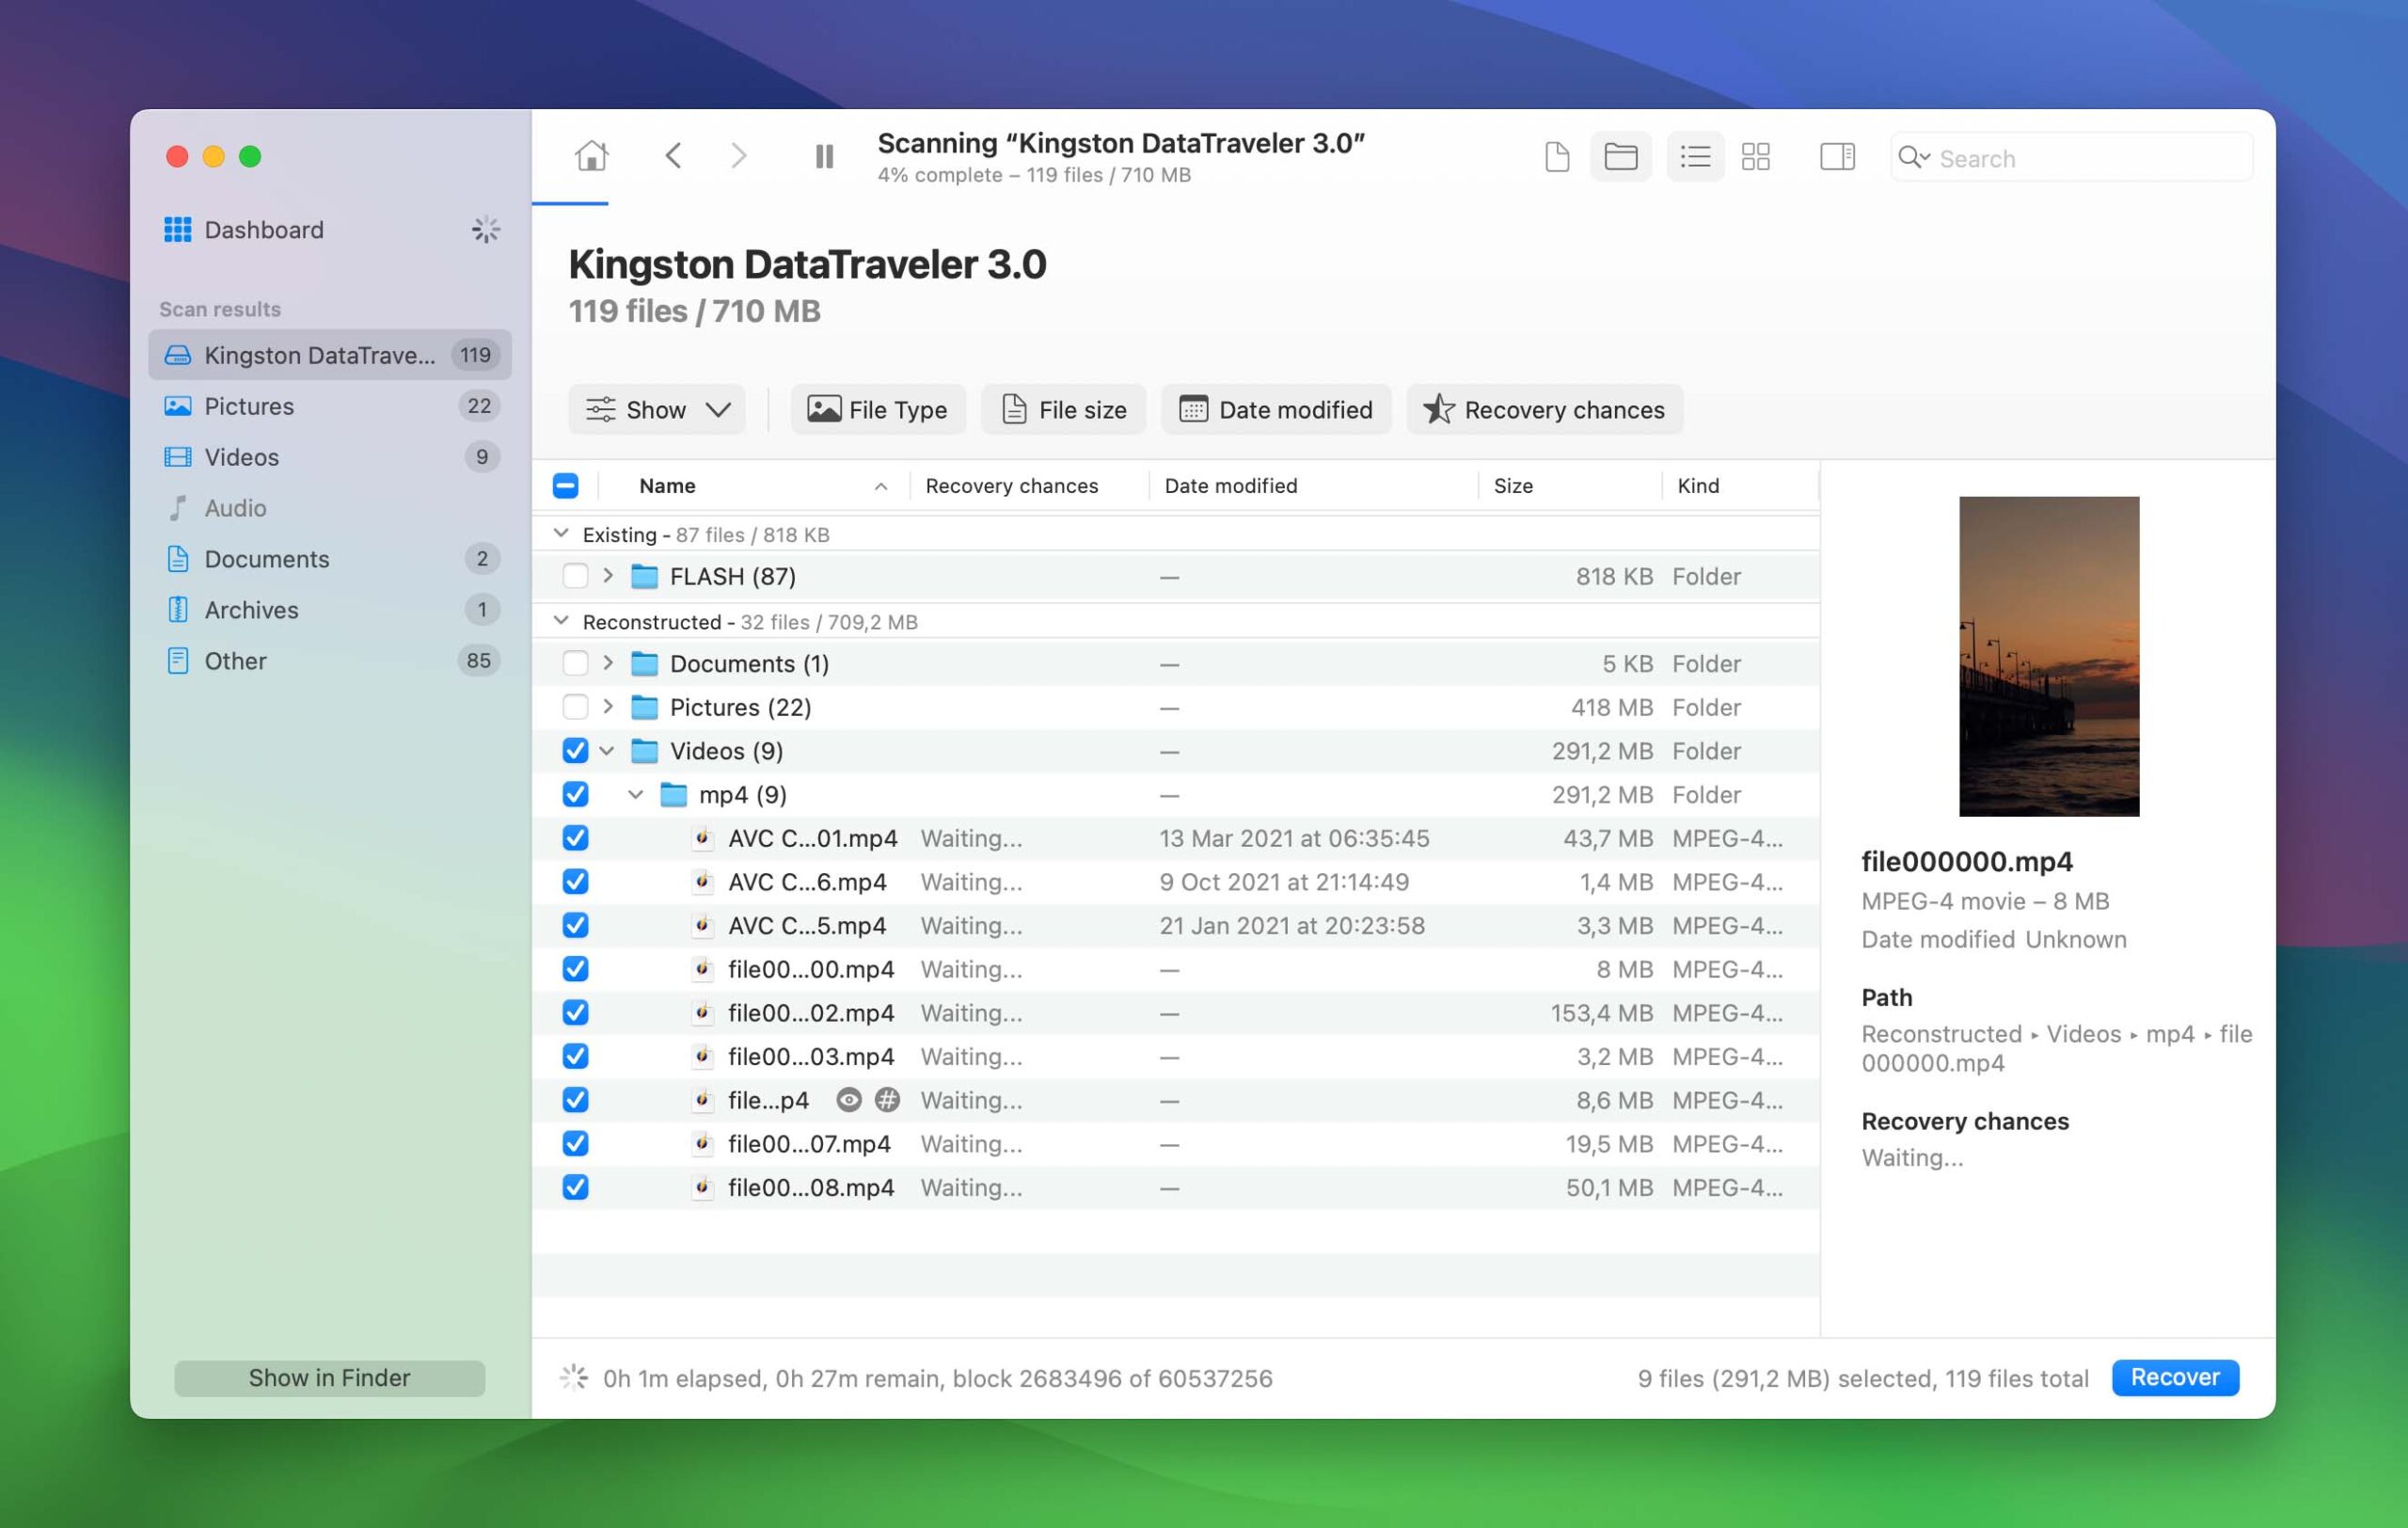
It’s likely that hundreds or even thousands of deleted files will be found, and you can either recover them all or selected only the deleted videos. If you decide for the latter option, start with the filters in the left pane to narrow down the scan results to a more manageable number. Then, go through the recoverable videos and use the preview feature to help you decide which of them you want to recover. To add a video to your recovery queue, simply click the checkbox next to it.
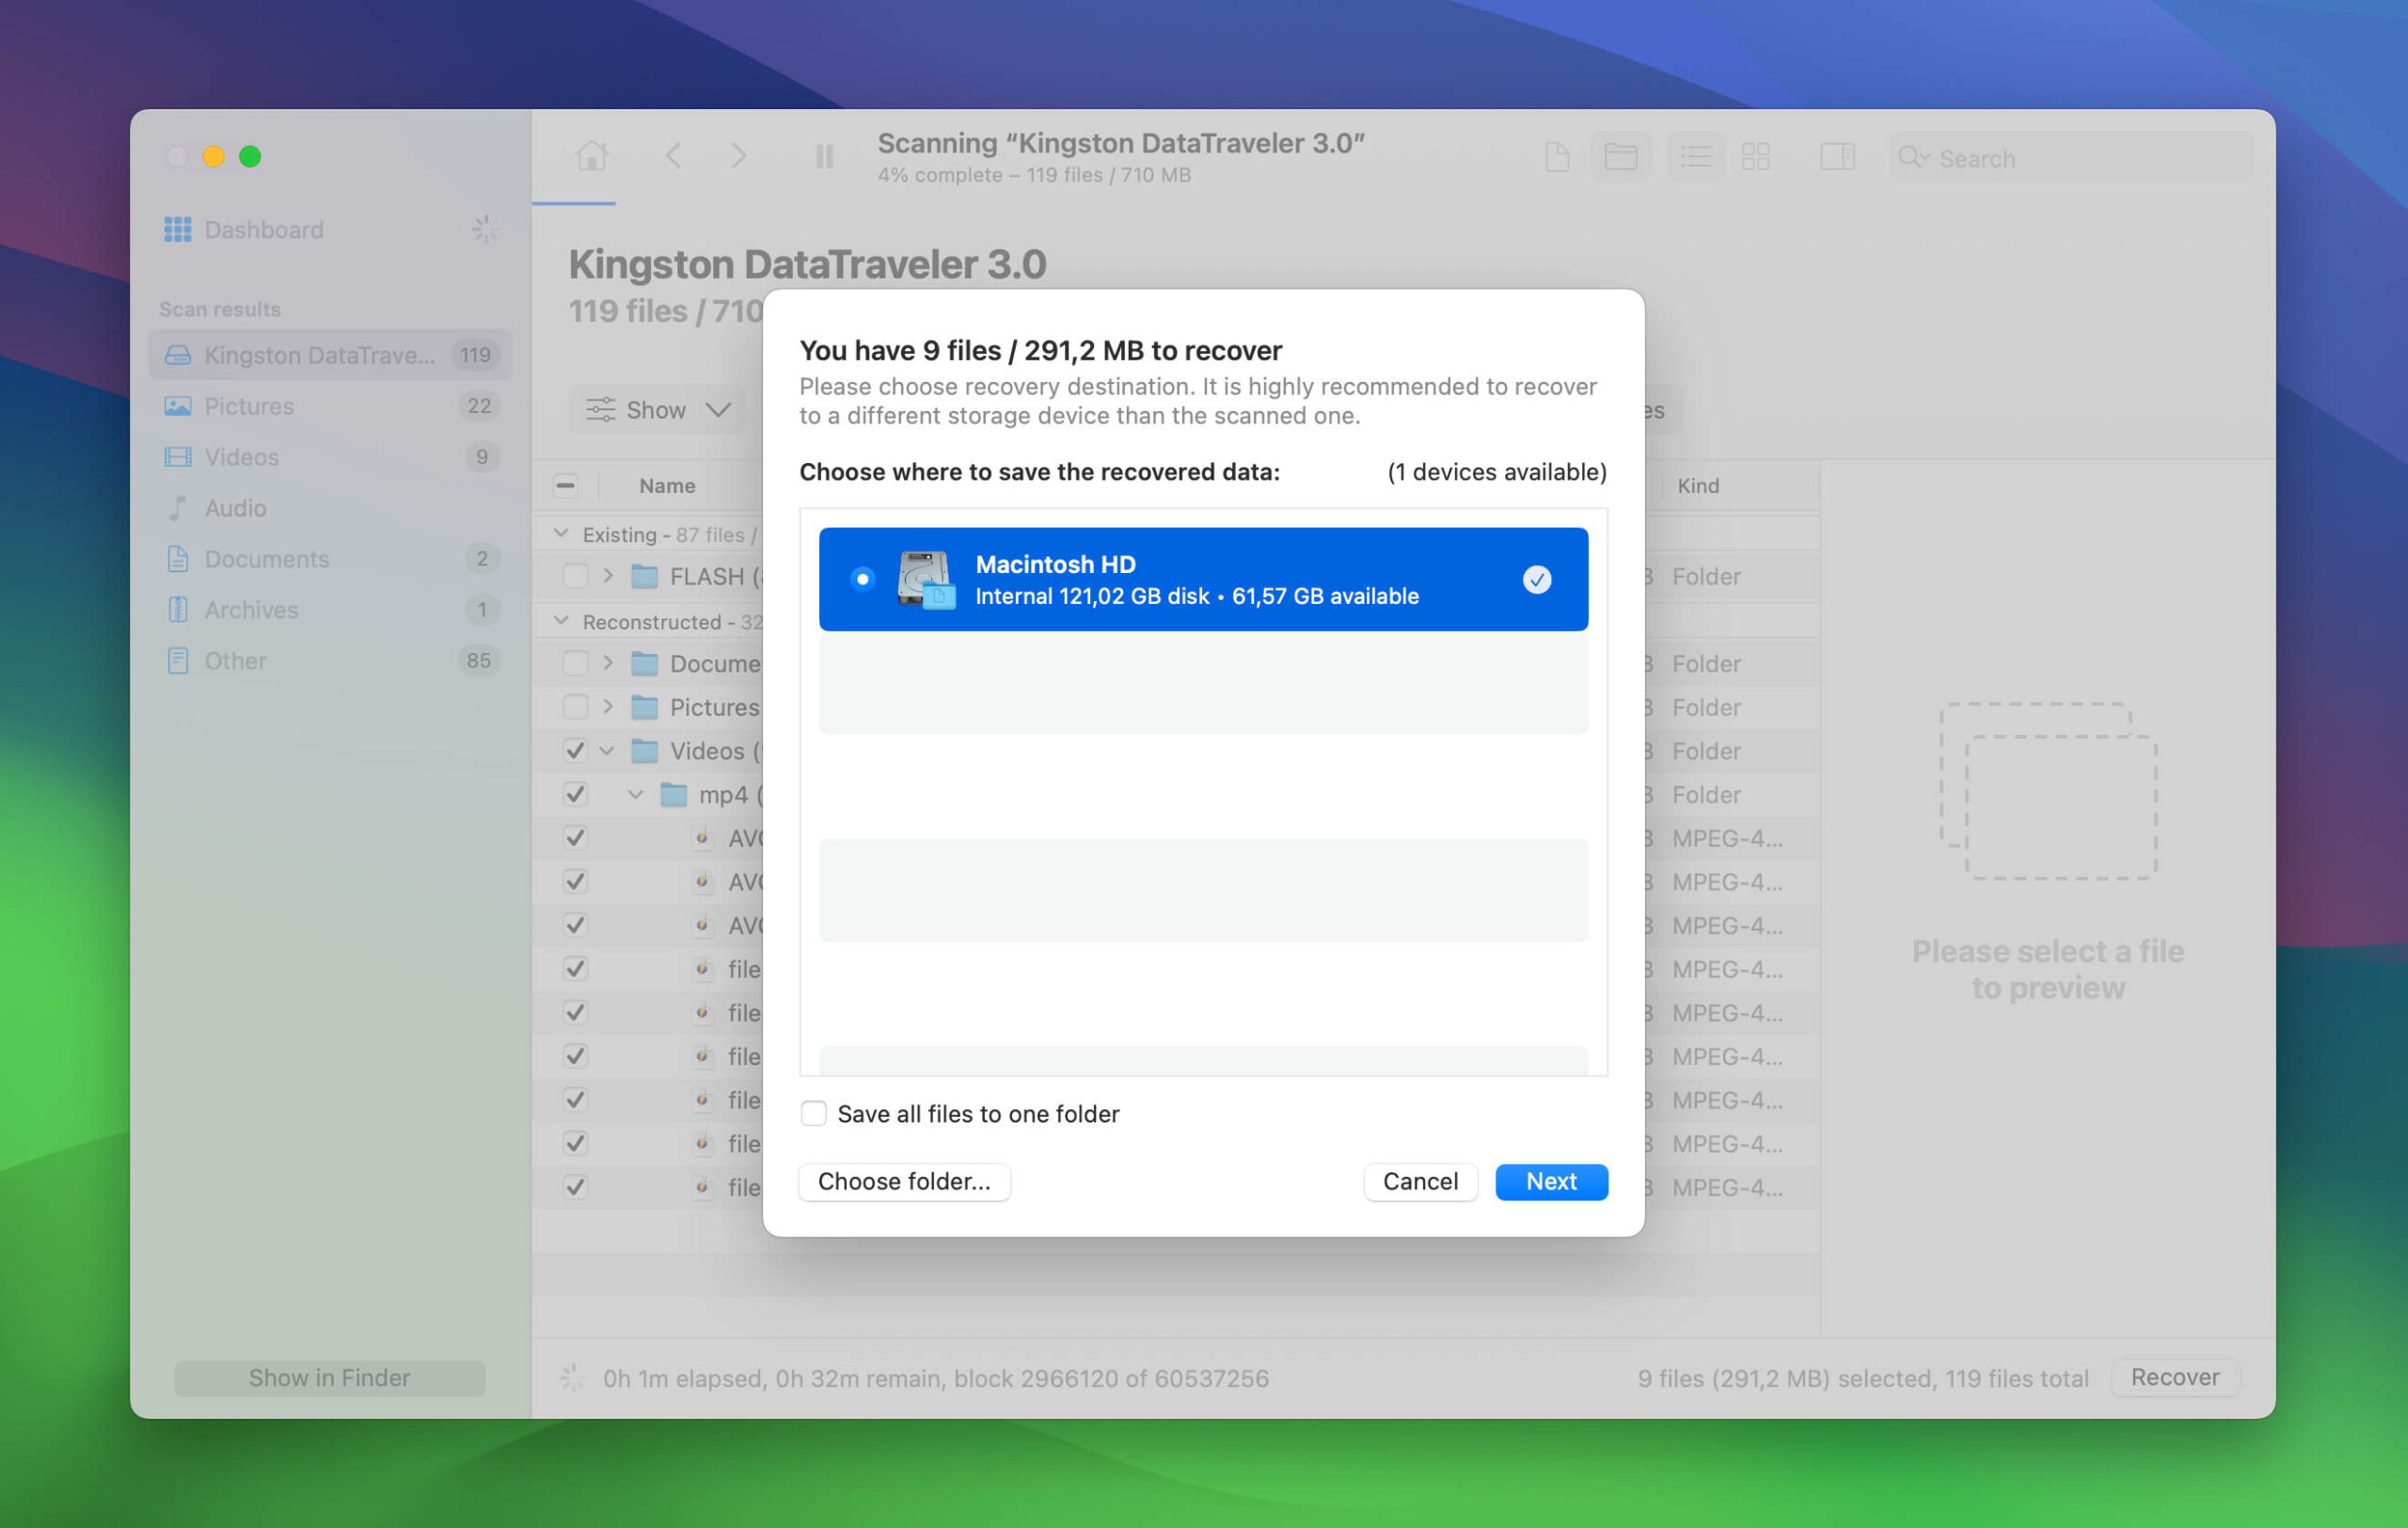
Step 5: Click Recover and Specify the Recovery Directory
Once you’re ready to get your videos back, click the Recover button and specify the recovery directory. Again, you need to make sure to save the recovered videos to a different storage device than the one you’re recovering them from. Disk Drill will tell you if you have selected a suitable storage device or not.
How to Recover Deleted Videos on a Mac
To recover deleted videos on Mac, follow these steps:
Step 1: Install and Launch Disk Drill for Mac
To get started, download Disk Drill from its website and save the installation file on different storage device than the one where your videos are located to avoid overwriting them. If the videos you want to recover are on your system drive, you should to remove the drive from your Mac and connect it a different machine because you can’t safely install Disk Drill on the same drive without risking accidental overwriting of the same files you’re trying to recover. Once you have it installed, go ahead and launch it just like any other app. Disk Drill will ask for admin permissions, which it needs to perform a deep scan of your storage device.
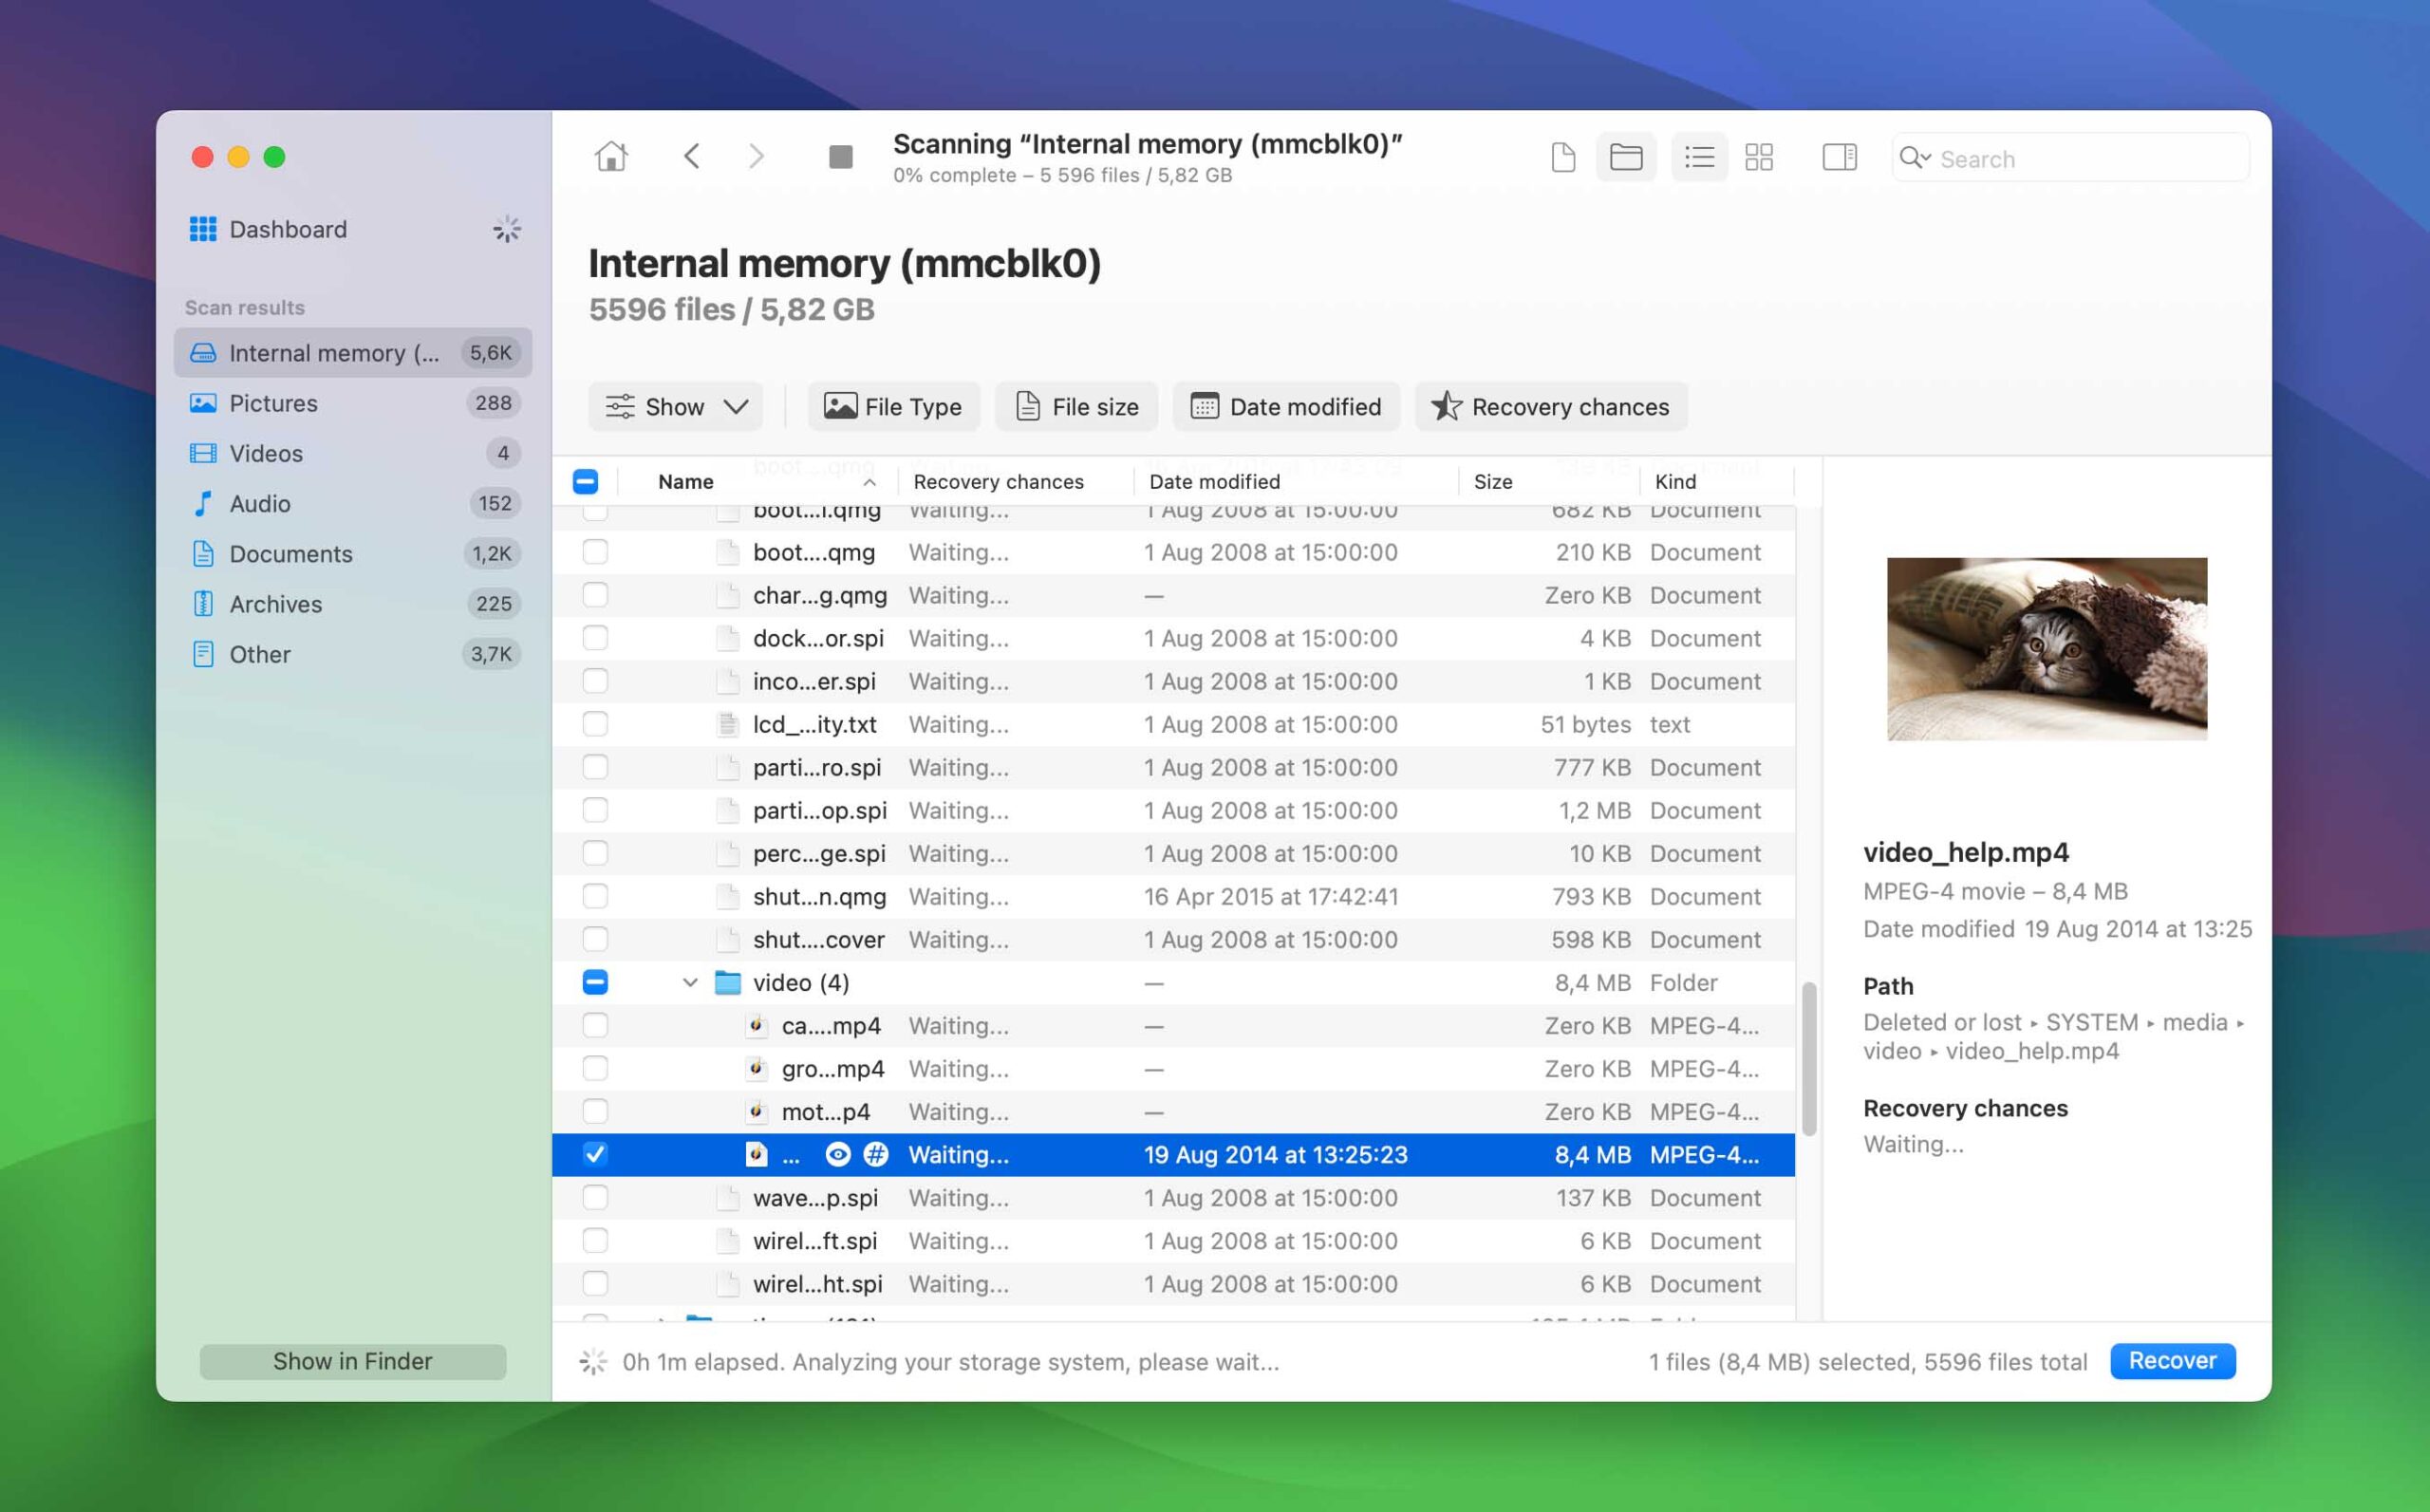
Step 2: Find the Storage Device with the Deleted Videos
Disk Drill’s main window lists all available hardware disks and logical volumes, with the total storage capacity and free storage space of each. You need to find the storage device with your videos and click the Search for lost data button next to it.
Step 3: Wait for the Scan to Finish
As soon as you click Search for lost data, scanning starts, and it may take a while for the scan to finish. Fortunately, you don’t have to wait until the scan is over before you can go through recoverable files. That said, we recommend you give Disk Drill some time to work its magic since it might recover important deleted files you didn’t even know were still present on your storage device.
Step 4: Select Videos for Recovery
Instead of recovering everything, it’s better to select only the videos you care about. To do that, narrow down the scan results using the filters in the toolbar and then preview recoverable files to see their content before you actually recover them. Click the checkbox next to each file you want to recover to add it to your recovery queue.
Step 5: Click Recover and Specify the Recovery Directory
Finally, click the Recover button in the lower-right corner to get back your videos. Disk Drill will ask you to specify the recovery directory and it’s paramount that you select a directory located on a different storage device than the one on which your videos were originally located. Neglecting this could lead to overwriting and failed recovery.
Part 2: Why Use Disk Drill to Perform Deleted Video Recovery on Mac and Windows
There are several reasons why Disk Drill is a great choice for video recovery on Mac and Windows:
- File system support: APFS, HFS/HFS+/HFSX, FAT/FAT32/exFAT, EXT3/EXT4, and NTFS/NTFS5
- Supported video formats: 3G2 / 3GPP2 / 3GP / 3GPP, AVI, BIK, BRAW, CRM, DIR, DV, DXR, FCP, FLA, FLV, FCPEVENT, M2T, M2TS, M4B, M4P, M4V, MKV, MLV, MOV, MP4, MPA, MPG, MTS, MXF, OGM, R3D, RM, RMVB, SWF, TOD, TS, WEBM, WMV and more.
- OS compatibility: Windows (Windows 11, 10, 8.1, 8, 7, Vista, and XP) and macOS (10.8.5+)
- Device support: Internal and external hard drives, USB flash drives, memory cards (SD, SDHC, SDXC, CF, MMC, and more)
Users appreciate its intuitive and simple method of restoring videos on Windows and Mac computers. Disk Drill makes it easy to filter and preview recoverable video files, so you can recover only what you really need and leave the rest behind.
Unlike many other video recovery options, Disk Drill goes a step further by providing extensive data protection with its Recovery Vault feature. The purpose of this feature is to make files instantly recoverable without a full disk scan. You can also create a byte-to-by-partition or disk backup to enjoy guaranteed recoverability under all circumstances.
Part 3: Alternative Free Data Recovery Software Options
While Disk Drill can confidently recover videos from all storage devices on Windows and Mac, it’s not the only data recovery software available. Here are some alternative free file recovery software options that are worth taking a look at:
1. Recuva
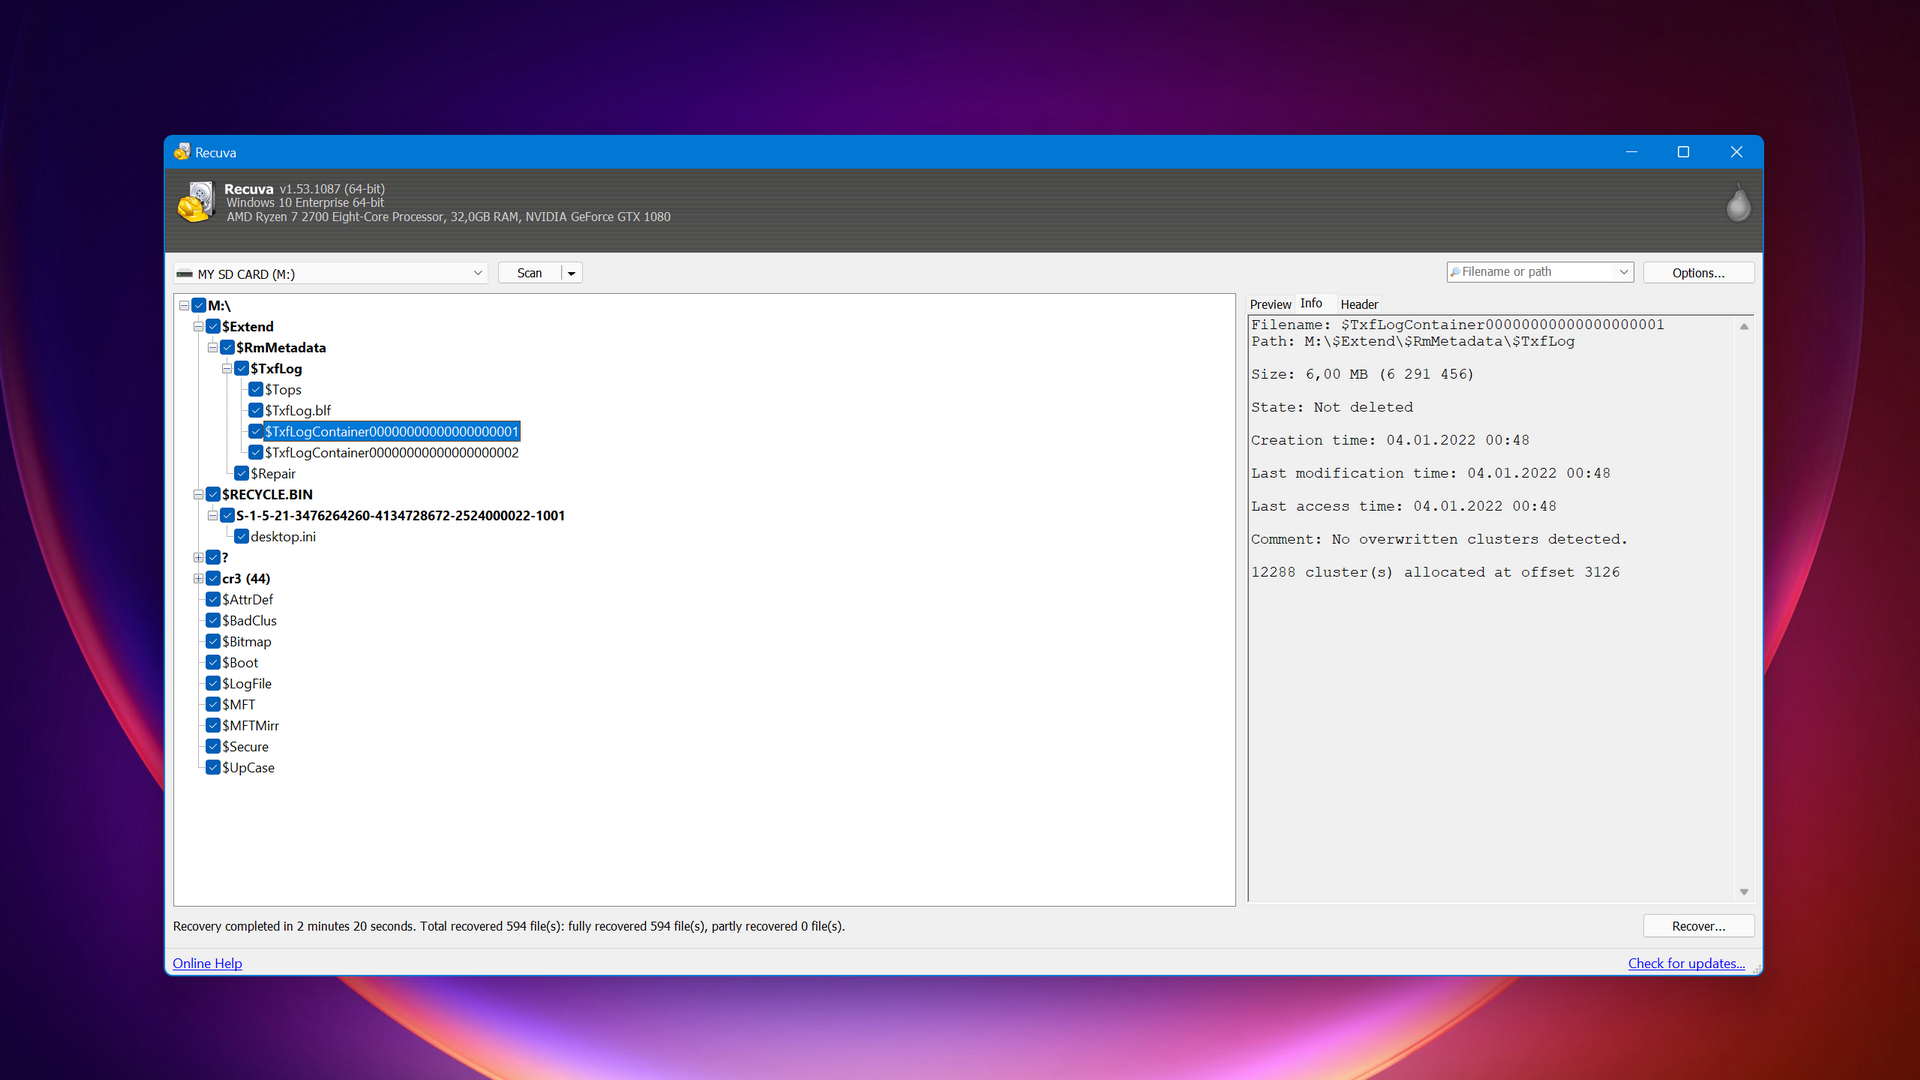
Recuva is a free data recovery software for Windows that doesn’t cost a single dollar to download and use. Its approachable user interface with only a couple of basic options makes this solution very beginner-friendly, which is one reason why we recommend it. While recovering videos with Recuva is straightforward, the recovery results leave a lot to be desired, which can be attributed to the fact that Recuva is not actively developed anymore.
How to recover videos with Recuva:
- Launch Recuva and click Next.
- Tell Recuva that you want to recover only videos and click Next.
- Specify the location of the lost files or simply click Next to let Recuva search everywhere on your computer.
- Consider enabling the Deep Scan option to find more files.
- Click Start to begin the recovery process and wait for it to end.
- Select the files you want to recover and click Recover.
- Select the location for recovery and click OK.
- Easy to use
- Clean user interface
- Deep Scan option
- Works only on Windows
- Not in active development
- Average recovery results
2. PhotoRec
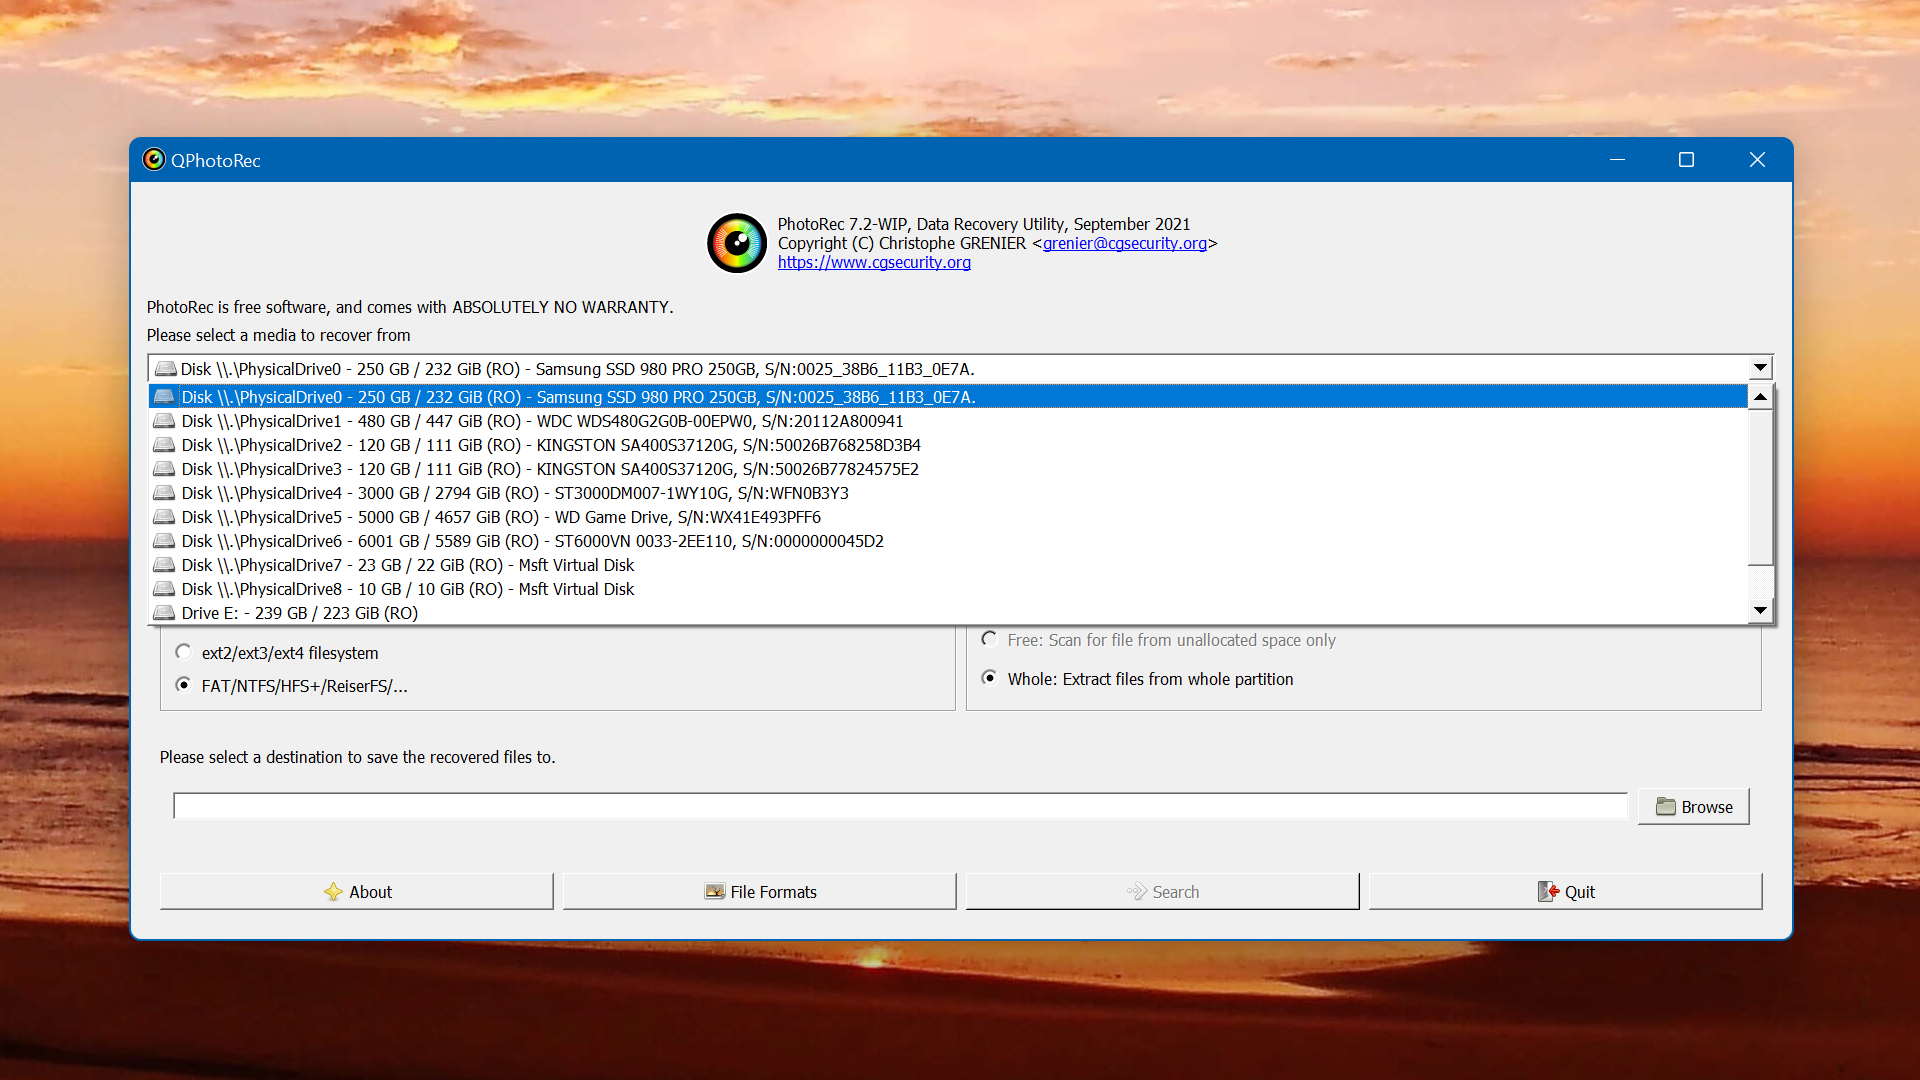
PhotoRec is a surprisingly powerful data recovery tool for Windows, Mac, and Linux. Even though it doesn’t have a graphical user interface, it can recover hundreds of file formats from all file systems used by modern operating systems. PhotoRec is distributed with a partition recovery and disk repair software called TestDisk, and the two solutions work great together, making it possible to solve a variety of data loss situations directly from the command-line.
How to recover videos with PhotoRec:
- Launch the application and select the storage device you wish the scan using the arrow keys. Press Enter on your keyboard to proceed.
- Select the partition you wish to scan using the arrow keys. Press Enter to scan it.
- Select the right file system and press Enter. In most cases, PhotoRec automatically suggests the right option.
- Choose if you want to scan only unallocated space or the whole partition.
- Select a destination to save the recovered files to. Press C on your keyboard when done.
- Open-source
- Wide file format support
- Compatible with Windows, Mac, and Linux
- Difficult to use
- No file selection during recovery
- Can’t preview recoverable files
Part 4: Different Storage Devices and Their Impact on Video Recovery
There are many different types of storage devices, and each type has a certain impact on the recovery process, with some storage devices significantly decreasing the chances of successful recovery. Here’s an overview of the most common types of storage devices.
4.1 External Drives (EX HDD, SD, USB)
External drives, including USB hard drives, memory cards, and flash drives, are commonly affected by data loss because their users often connect them to a wide variety of computers with different operating systems, not all of which may support the same file systems (or at least not equally well).
File system corruption, malware, and improper removal are just three of many causes of video loss from external drives. The good news is that it’s usually relatively simple to recover data from external drives because overwriting happens—at least in most cases—considerably later than it does with internal storage devices.
4.2 Internal Memory
Recovering any data and especially large video files from internal memory is not easy. To start with, modern solid-state drives are designed to be as efficient as possible, and they use the so-called TRIM command to wipe clean unused storage space to prepare it for new data. While great for performance, the TRIM command is bad news for everyone who wants to undelete video files.
What’s more, modern operating systems are constantly writing small files to internal memory, so deleted files are typically overwritten fairly soon, even if the user doesn’t copy any large files to the internal storage device.
4.3 Digital Cameras
Digital cameras save pictures, videos, and other files types to internal memory and/or a removable memory card. If you want to recover deleted photos from internal memory, you need to connect your camera to a computer and use file recovery software to scan it just like you would any mass storage device.
To recover deleted or lost videos, photos, and other files from your digital camera’s memory card, it’s best to remove the card from the camera and insert it into a memory card reader connected to or built into your computer. If your computer asks you to format the memory card, don’t do so because you could overwrite the deleted files and make it impossible for file recovery software to get them back.
Part 5: How to Recover Deleted Videos on Android and iPhone
If you need to recover deleted videos from the internal memory of an Android or iOS device, then you have a couple of other recovery options that are worth exploring.
5.1 Recently Deleted
All iOS devices and some Android phones move deleted videos into a special folder, called Recycle Deleted or Trash, where they stay for a certain amount of time or until the user manually empties the folder.
To recover deleted videos from the Recently Deleted folder on iOS:
- Open the Photos app.

- Tap Recently Deleted under Other Albums.
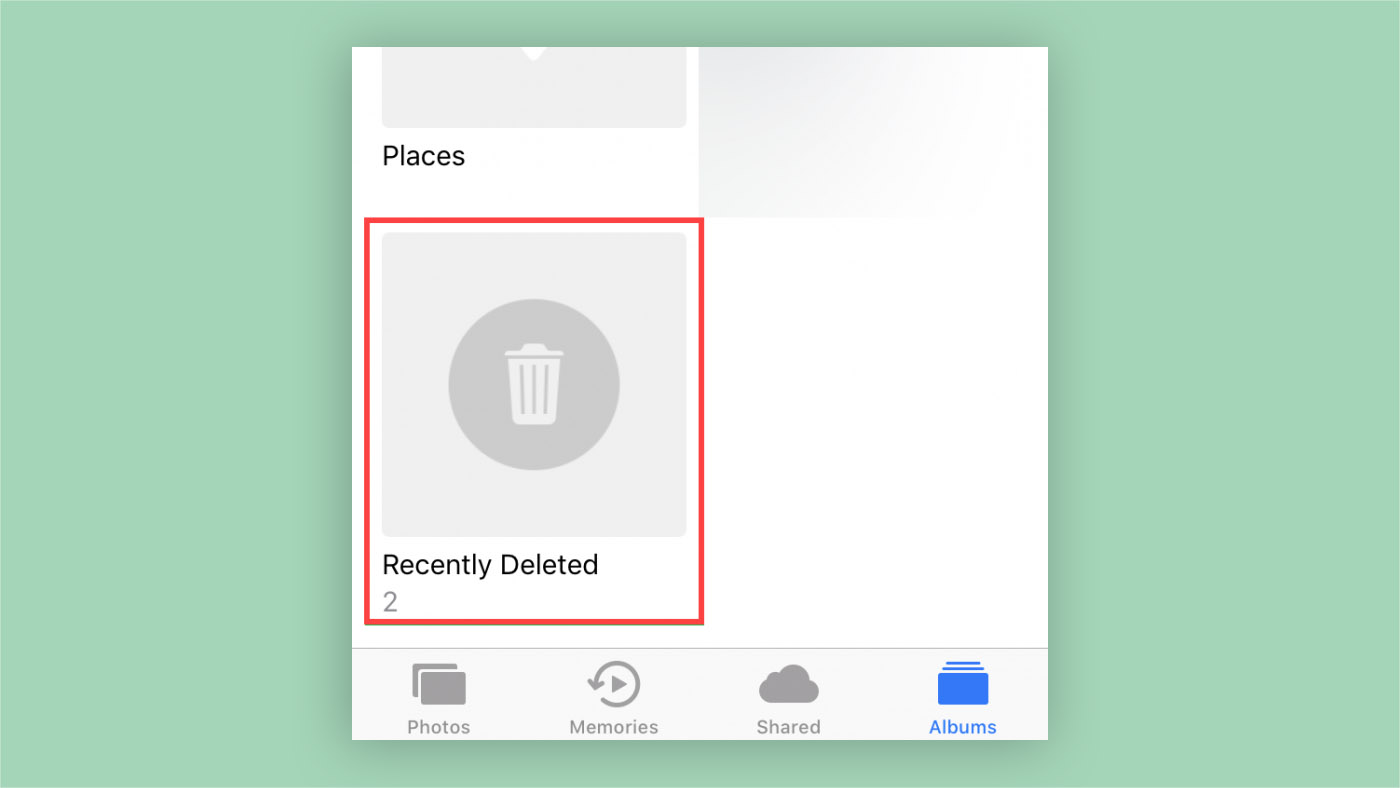
- Tap the Select button at the top-right of the screen.
- Select each video you want to undelete.
- Tap the Recover button in the bottom-right corner.

Unfortunately, the stock version of the Android operating system doesn’t have an alternative to the Recently Deleted folder, so smartphone manufacturers implement it on their own (and many don’t implement it at all). We recommend you open the gallery app on your Android device and look for the folder there. If it’s not there, it might be accessible from the file manager app.
5.2 Cloud Backups
Android and iOS phones make it easy for their users to back up important files to the cloud with Google Photos and iCloud, respectively. Both cloud backup solutions make it easy to recover even permanently deleted videos, provided you don’t wait too long.
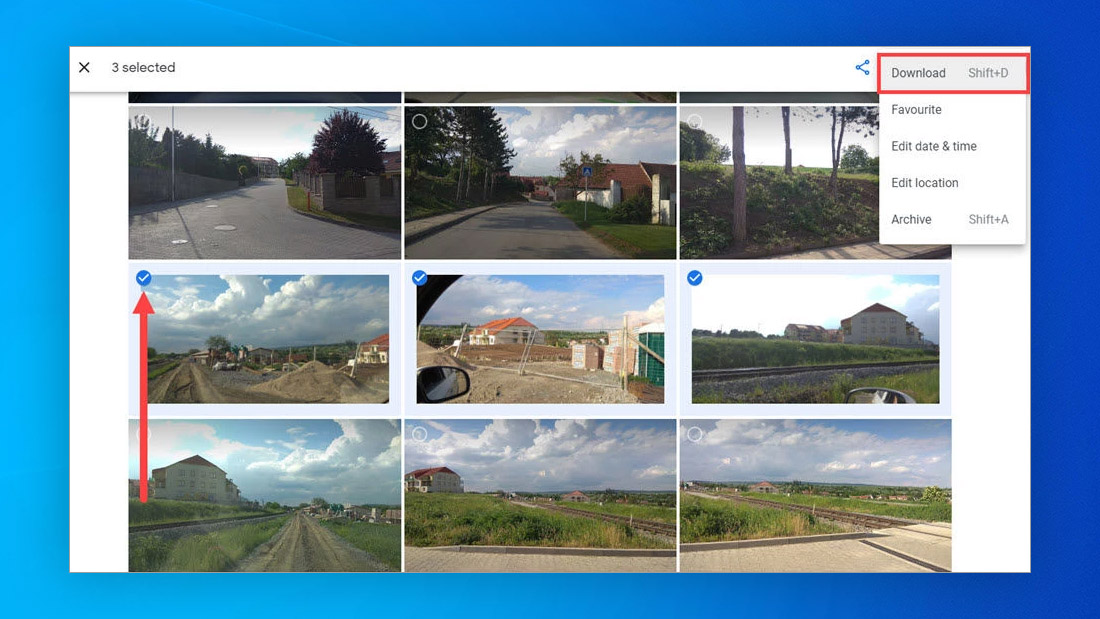
To recover videos using Google Photos:
- Go to: https://photos.google.com/
- Sign in with your username and password.
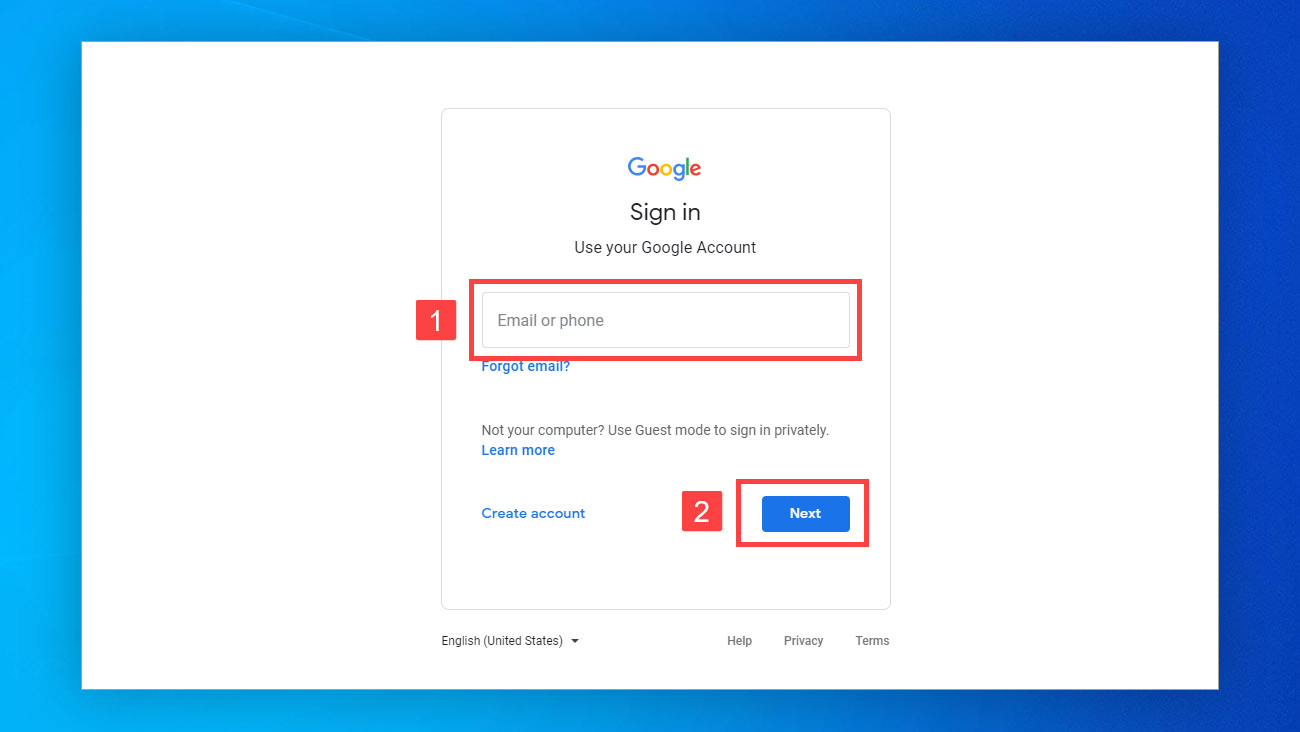
- Select the videos you want to recover.
- Click the three dots in the top-right corner and select Download.
To recover videos using from iCloud:
- Go to: www.icloud.com
- Sign in with your username and password.
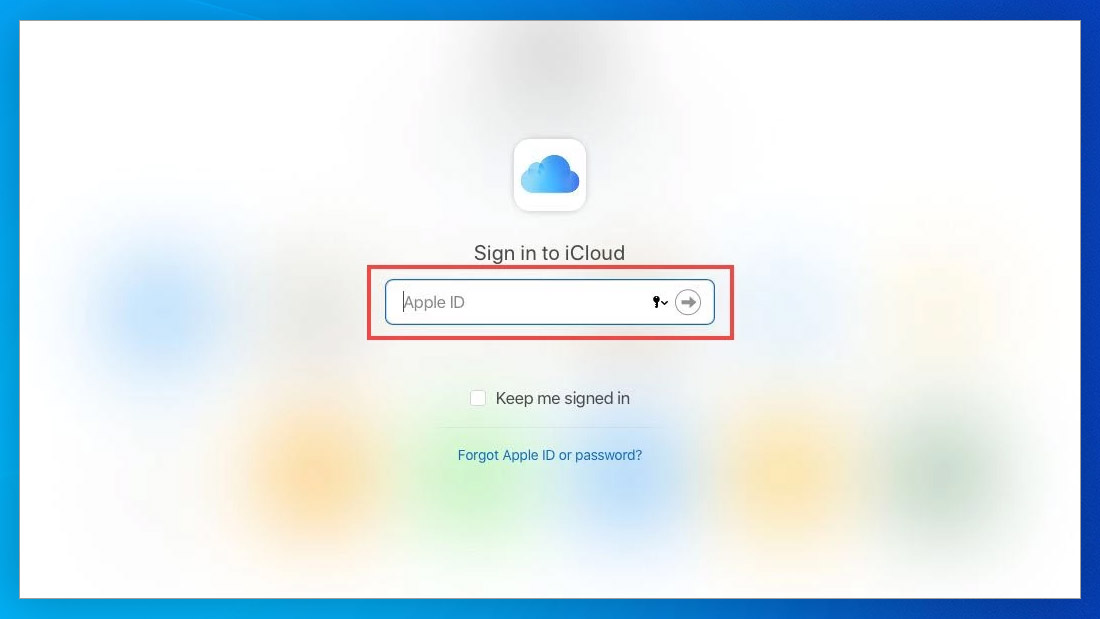
- Click iCloud Drive.
- Select the videos you want to undelete.
- Click the Download button in the toolbar.

5.3 Recovery Software
Your Android smartphone or iPhone contains the same type of memory as a USB flash drive or memory card, which means that you can use file recovery software like Disk Drill to restore deleted videos from it. Since we’ve already described how to recover data with Disk Drill in detail above, here’s just a quick recap.
Here’s how to recover videos from an Android device using Disk Drill:
- Enable Mass Storage mode on your Android device.
- Connect your Android phone to your Windows computer.
- Open Disk Drill, select your Android device, and click Search for lost data.
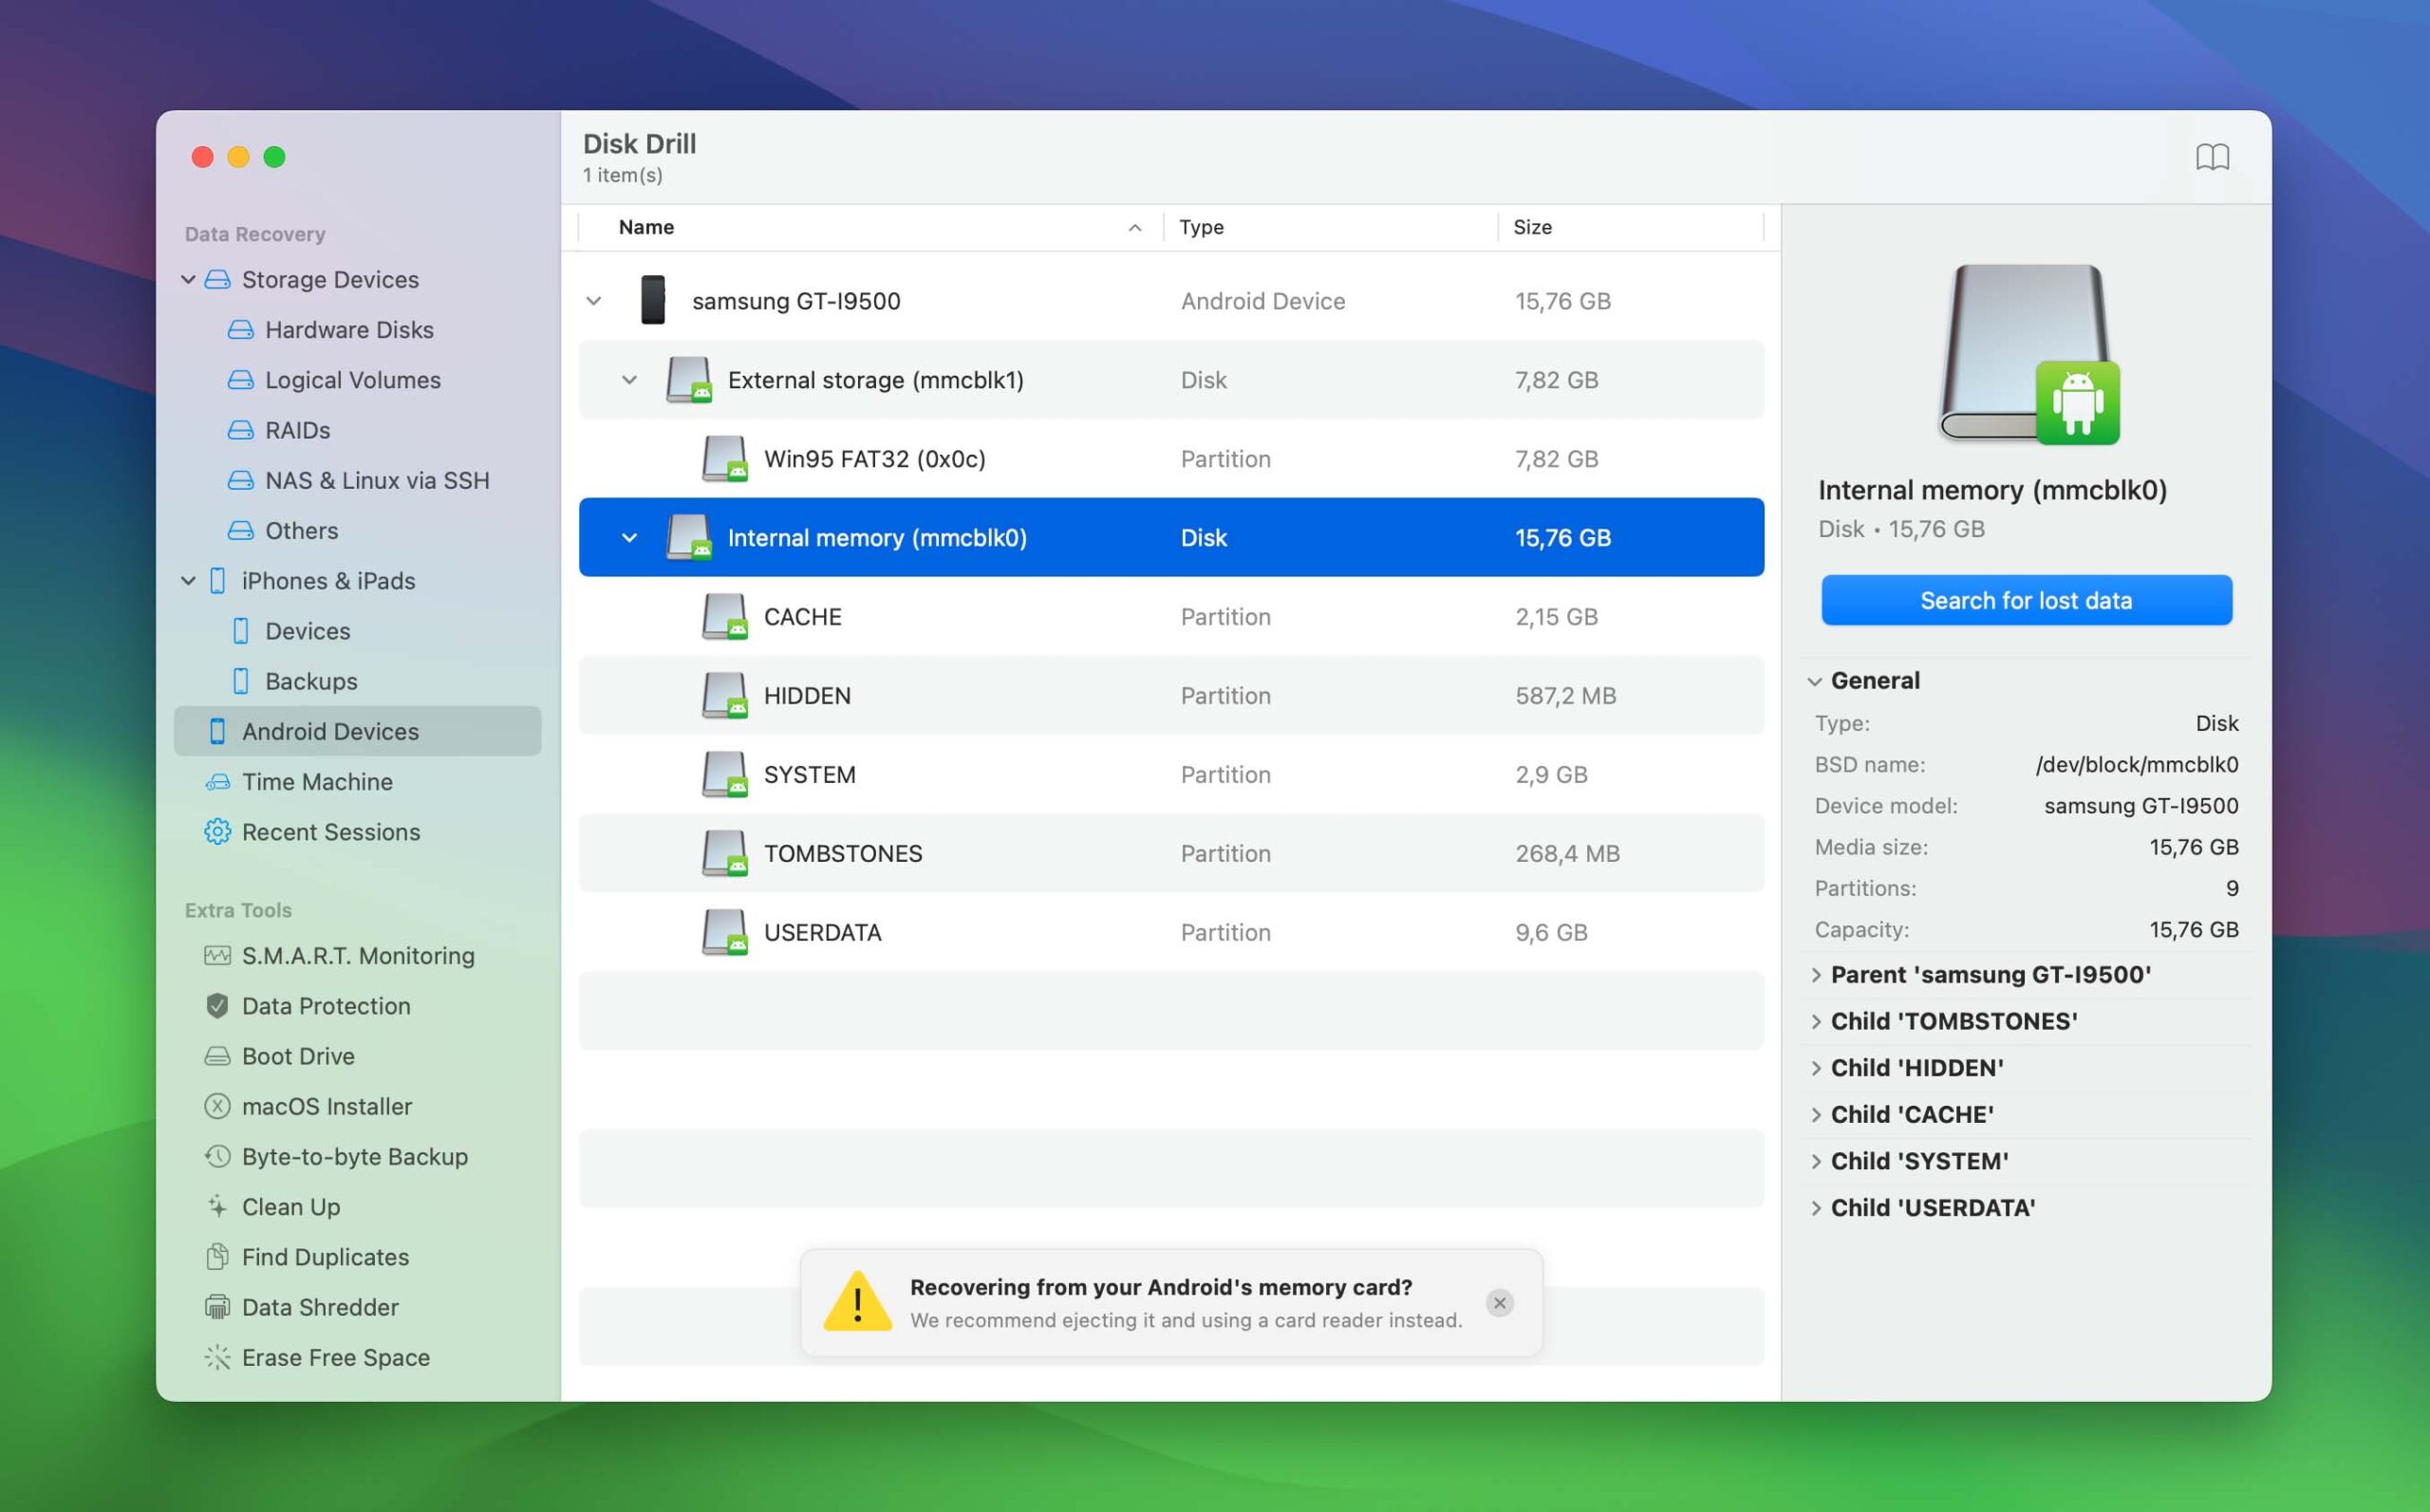
- Select your videos and click Recover.
- Specify the recovery destination.
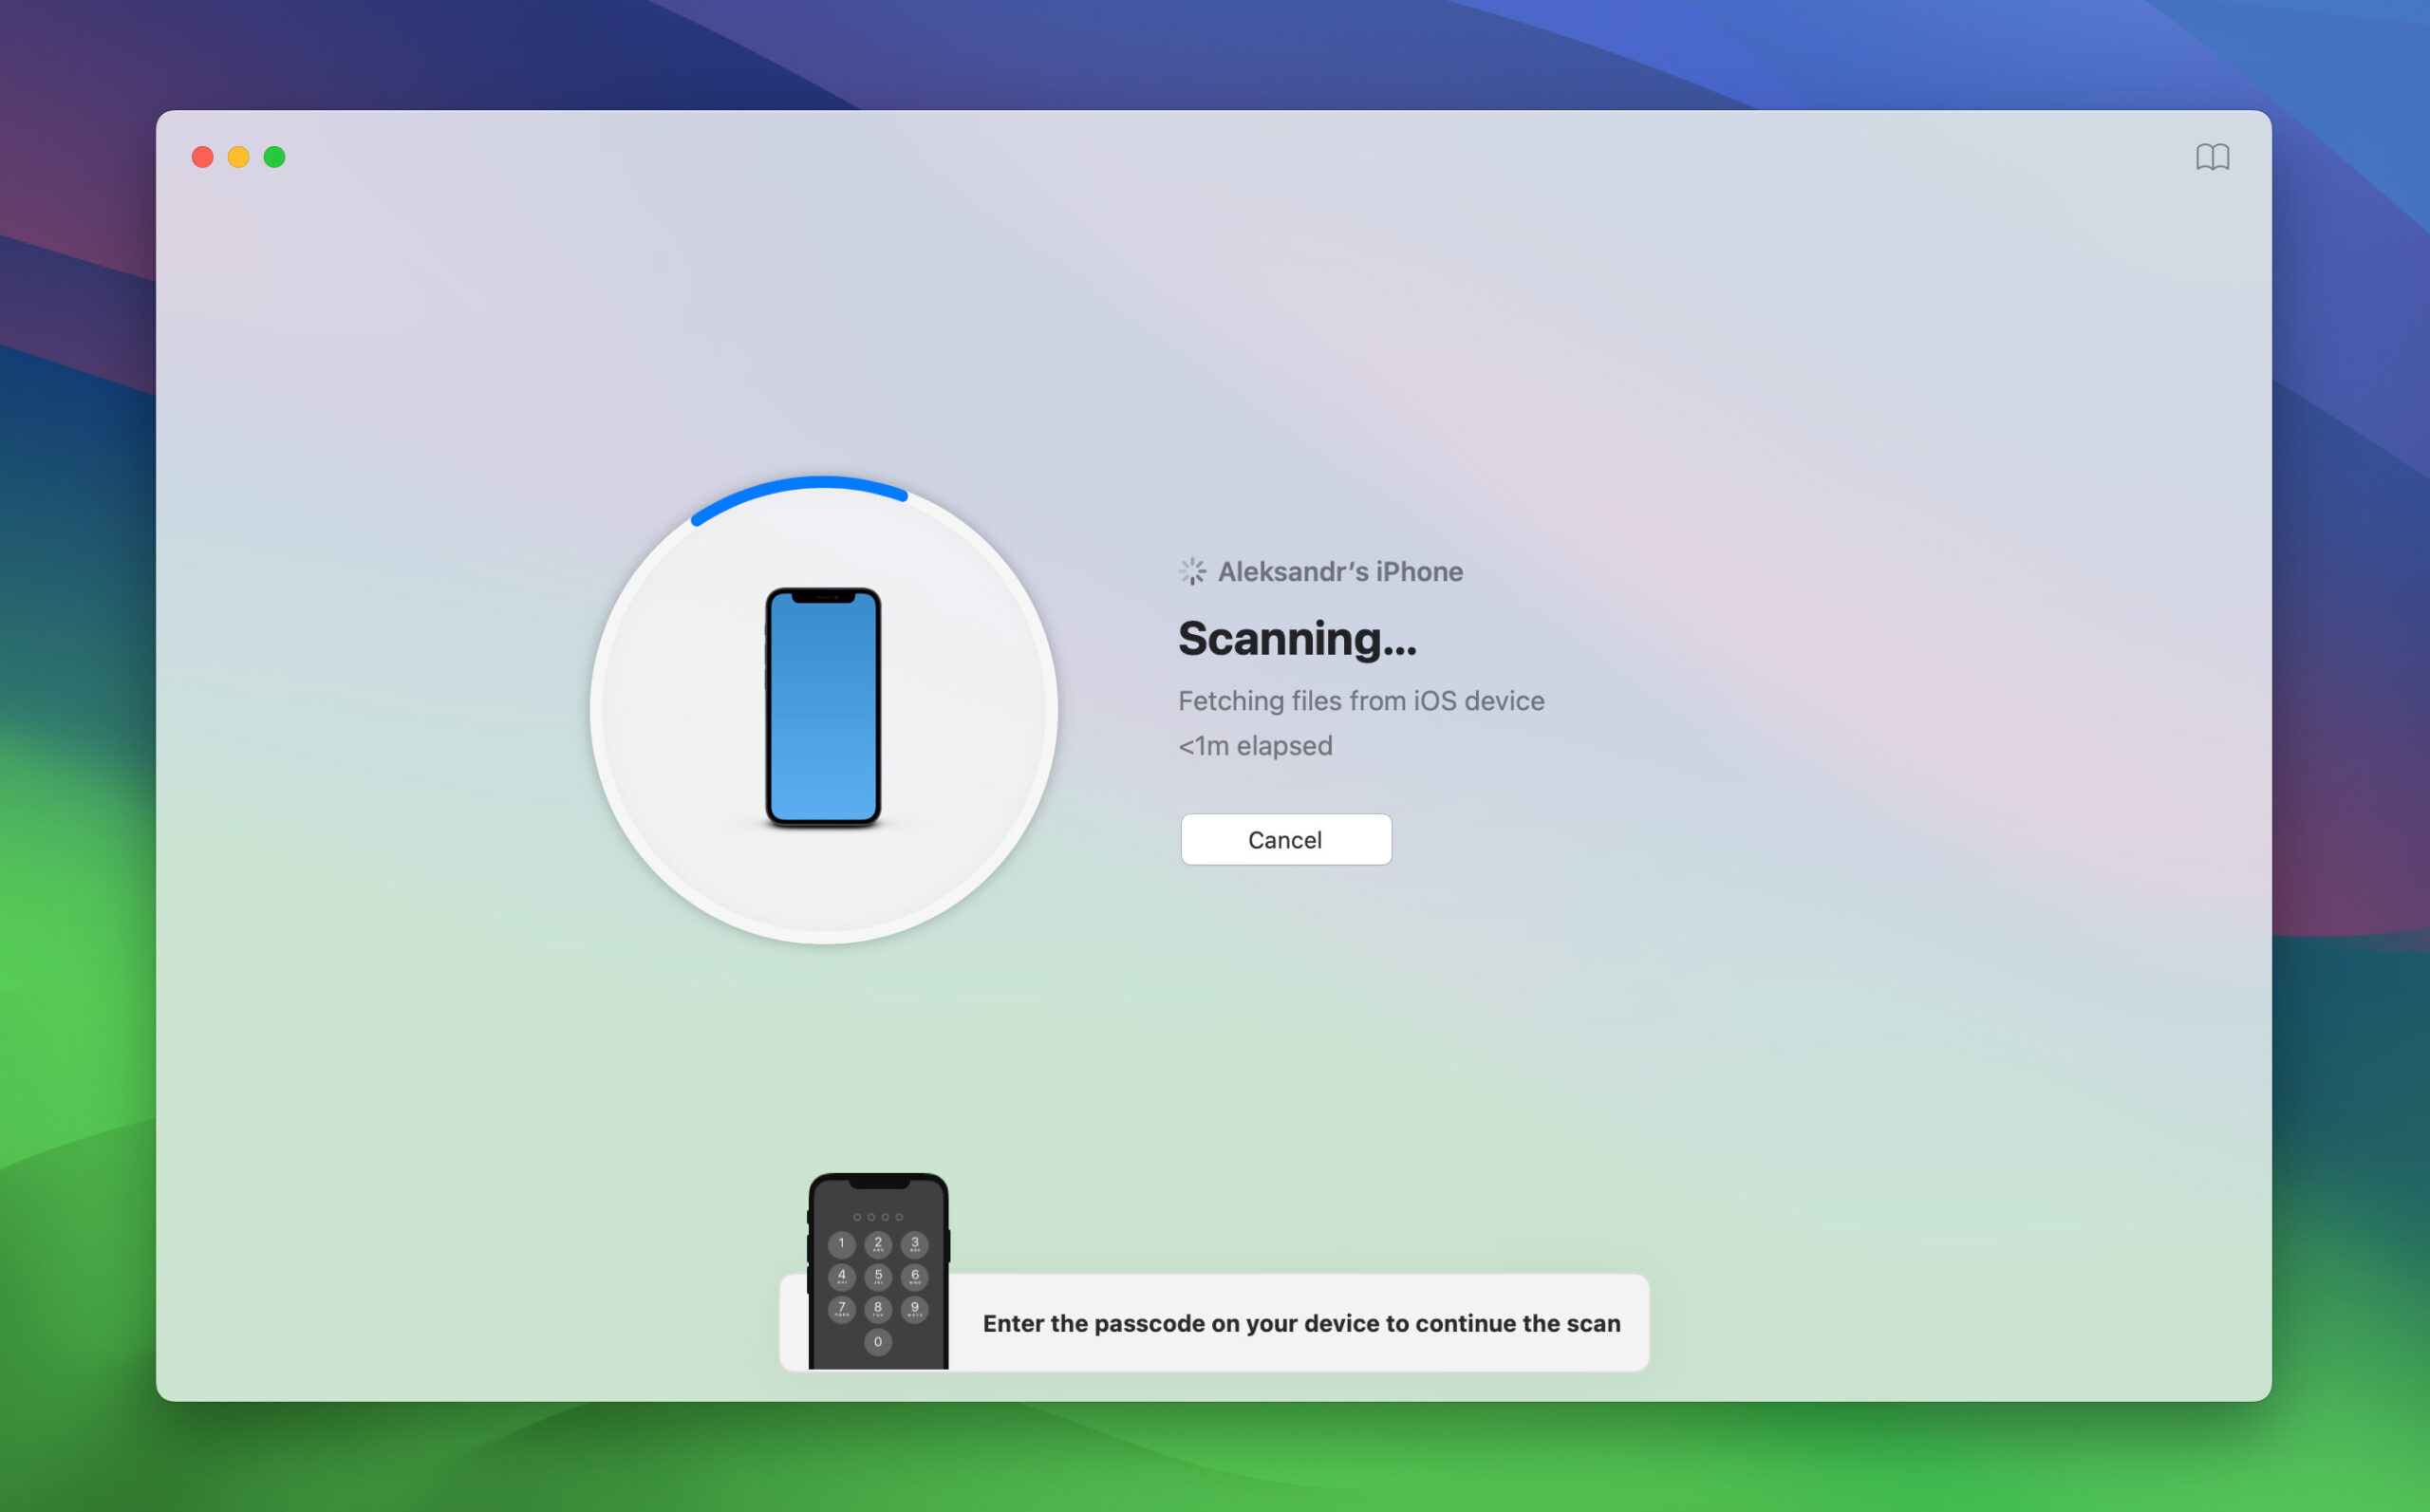
To recover videos from iPhone using Disk Drill:
- Connect your iPhone to your Mac.
- Launch Disk Drill and click Search for lost data next to your iPhone.

- Wait for Disk Drill to scan your iPhone.
- Browse all the files and select those that you want to recover to your Mac hard drive.

- Click Recover and specify the recovery destination.
Why You Should Always Try to Recover Lost Video Files
You can lose important video files for a number of reasons:
- Accidental Deletion
- Malware Infection
- Power Failure
- Mechanical Storage Device Damage
- Software Corruption
All these reasons can result in the loss of irreplaceable video files of immense emotional and sentimental value. There are many posts online from people who have lost the only copy of their child’s first steps, school play, or graduation, and such posts clearly illustrate just how widespread of a problem video loss really is.
Unfortunately, many people don’t exhaust all their options when it comes to recovering permanently deleted video files. They look inside the Recycle Bin or Trash, attempt to restore the lost video files from an old backup, but that’s it.
In most cases, they completely omit the most effective video file recovery solution: free video recovery software. To avoid making the same mistake, always begin by recovering your lost video files using the instructions provided in this article.
What Makes Video Recovery Software So Great
Video recovery software provides a convenient do-it-yourself approach that enables you to quickly and painlessly recover all lost video files. You can avoid paying someone else a lot of money to recover your files for you and rest assured, knowing your data has not left your hard drive.
Best-in-class video recovery software solutions like Disk Drill support all commonly used video file formats, including AVI, WMV, MOV, MP4, MKV, and FLV. With Disk Drill, video file recovery can take less than a minute, and it doesn’t require any expert knowledge or special skills.
Why waste time and money by hiring someone else to do something that you can easily accomplish by yourself from home?
Prevent Video Loss with These Tips & Tricks
Even though modern video recovery software like Disk Drill makes video file recovery a matter of a few simple clicks, you should still follow the tips below to prevent video loss in the first place.
- Back up, back up, back up: Regularly backing up your video files is the single most important video loss prevention measure that you can take. External backup drives have never been more affordable, so don’t wait for the worst to happen and get one right now.
- Use multiple storage devices: All storage devices can fail without warning. If you keep all your videos on a single storage device, you risk losing everything in the blink of an eye. Even if you edit and organize your videos on a laptop, you can still purchase an external hard drive and use it to expand your laptop’s internal storage.
- Save important videos to the cloud: If you can accept storing your video files on someone else’s hard drive, you can use the cloud to reliably back up your video files. As a bonus, you’ll be able to access them from anywhere and on any device.
Frequently Asked Questions
Can I recover deleted video files from an SD card?
Yes, the video recovery software we describe in this article, Disk Drill, can recover deleted video files from an SD card, as well as from all other commonly used storage devices.
Is there any way to recover videos that are permanently deleted?
Yes, there is. Permanently deleted videos (i.e., deleted videos that are no longer present in the Recycle Bin or Trash) can be recovered using video recovery software like Disk Drill. However, their recovery is possible only until they become overwritten by other files, which may happen in a few seconds or a few months, depending on multiple factors.
Is there's a way to recover a video file that was deleted several months ago?
Possibly—it all depends on whether the video file has been overwritten. For example, if you formatted an SD card a few months ago and haven’t used it since then, you will most likely be able to recover all video files that were stored on it without any issues. On the other hand, you probably won’t be able to recover a video file deleted from a computer that you use every day for work.
Is it possible to recover videos from a smartphone?
Yes, you can recover video from an Android smartphone (including devices made by Samsung, OnePlus, Google, Xiaomi, and other manufacturers) or iPhone. Generally speaking, you can either attempt recovery using a smartphone app or connect the device to your computer and use a desktop data recovery software app. Recovering videos from a smartphone without a computer is more convenient, but the results are often subpar.
What is TRIM, and how does it affect SSD video recovery?
TRIM is a performance-enhancing feature supported by modern solid-state drives (SSDs). This feature makes it possible for the operating system to tell the SSD to wipe clean unused storage blocks, which speeds up the writing of new data. Unfortunately for anyone who’s attempting to get back deleted videos, TRIM essentially makes video recovery impossible.
Can I recover videos without a backup?
In many cases, it’s possible to recover videos from digital cameras, smartphones, and computers (both PCs and laptops) without a backup using special software applications, but the results can vary from great to horrible, depending on multiple factors. That’s why you should always back up your data and store the backups someplace safe.
Is video recovery from an Android phone possible without root access?
Yes, video recovery from an Android phone is possible even without root access, but you won’t be able to access the entire Android phone’s internal memory, including the section reserved for system files. In some cases, this limitation won’t have any negative effect on the recovery process, but it’s generally recommended to perform Android recovery with root access. Alternatively, you can connect your Android phone to a PC or Mac and recover your videos using a data recovery solution for Windows or Mac.
When does it make sense to choose a professional video recovery service?
Professional video recovery services tend to be considerably more expensive than DIY solutions, but there are certain cases when spending the extra money to recover lost videos makes perfect sense, such as when a video production company experiences a major disaster and needs to recover a large number of hard drives. Regular home users often use professional video recovery services to recover data from physically damaged storage devices since no DIY solution can repair physical damage.
David Morelo is a professional content writer with a specialization in data recovery. He spends his days helping users from around the world recover from data loss and address the numerous issues associated with it.
When not writing about data recovery techniques and solutions, he enjoys tinkering with new technology, working on personal projects, exploring the world on his bike, and, above all else, spending time with his family.
- Klennet Recovery Review (Formerly Zero Assumption Recovery)
- iBeesoft Data Recovery Review – A Likable Clone With Limited Features
- DMDE Review – A Data Recovery Powerhouse or a Usability Nightmare?
- Cisdem Data Recovery for Mac Review – A Clone in Disguise
- Tenorshare 4DDiG Review – All That Glitters Is Not Gold
- Houston, Texas, United States
Nikolay Lankevich has over 15 years of strong experience in various fields and platform includes Disaster Recovery, Windows XP/7. System analysis, design, application (Inter/Intranet) development, and testing. Provided technical supports on desktop and laptops on Win-XP and Macintosh for about 2000 employees.