How to Format USB Flash Drive Without Losing Data
The situation: (1) you have important data on a USB flash drive. (2) Your flash drive is corrupted, so it asks to be formatted every time you connect it to your computer or attempt to open it in Explorer. (3) However, formatting your flash drive will wipe all its data…. What now?
It takes a few extra steps, but it’s possible to format a USB without losing data – even if that flash drive is corrupted. We’ll show you how.
What Happens When You Format a USB
The term “formatting” gets thrown around a lot, but there are 3 distinct processes that are done on USB flash drives – and other storage devices – to prepare them for use:
- Low-level formatting. Typically done by manufacturers, this process configures the physical structure of the drive (including sector and track layout). Normal users can and should apply low-level formatting if high-level formatting won’t work (more on this later).
- Partitioning. Partitioning divides a physical drive into multiple “logical” or “soft” drives. It’s like slicing a pizza into several pieces, where each piece is considered by the computer as an individual drive.
- High-level formatting. High-level formatting is what most users are familiar with. This process installs the file system (like exFAT, FAT32, NTFS, etc.), sets up the directory structure and file allocation table, and more. This can usually be done very easily via built-in disk management tools.
Of these processes, only partitioning has a good chance of keeping your data intact. However, you can only make a partition out of the remaining free space of your drive to avoid data loss. Even then, it’s not always a 100% success – especially if something goes wrong during the process (like improper partitioning or sudden power loss).
Reasons Why USB Flash Drive Asks to Be Formatted
If your USB is asking to format before use, it’s a sign of severe damage or incompatibility. Specifically, these are the reasons why this prompt appears:
- ⚠️ Corruption – Corruption may be caused by malware, improper ejection, faulty software, and other forms of logical damage. When corrupted, your USB may appear RAW, ask for a format, or may not even appear at all. However, you can recover files from a corrupted USB using data recovery software.
- ❌ File system error – There may be issues with your USB flash drive’s file system or it may be using an incompatible file system. Currently, Windows only supports exFAT, FAT32, and NTFS formats.
- 🦠 Virus/malware infection – Malware alters the behavior of your drive and may cause corruption.
- 💻 System incompatibility – If you used the thumb drive on a different device, it’s possible that configurations were installed that are incompatible with the current device.
- 🔥 Physical damage – USB flash drives are prone to extreme temperatures, water damage, wear and tear, and breakage – all of which may cause your drive to behave unpredictably.
Does Formatting a USB Delete Everything?
Quick formatting and full formatting, while similar on the surface, are actually 2 different processes that produce different results.
- Quick formatting only deletes the file system and leaves the data intact. You will still need data recovery tools to extract it though because you won’t see your data in File Explorer.
- Full formatting, on the other hand, erases everything on the flash drive. Full formatting fills the drive’s sectors with zeroes, making data irretrievable. It also excludes bad blocks from being used afterward, which prevents old errors from being carried over.
How to Format USB Without Losing Files
So, how do you secure your files if your USB asks to be formatted the moment you connect it to your computer?
- Create an image backup of your flash drive – this is a byte-to-byte copy of your data that can be used as a recovery target. We can then recover all the data from the image backup.
- Once the data from the image backup is in a secure location, the USB flash drive can be safely formatted (there are multiple ways to do this).
This process will allow you to format a severely corrupted USB flash drive without losing any files. We’ll go through each step in detail in the sections below.
Step 1. Backup (and Restore) Important Files Using Data Recovery Tool
First, we want to create an image backup that we can use to recover data from later. For this task, we’ll be using an app called Disk Drill. It provides a free image backup tool along with its main feature, data recovery.
We primarily chose Disk Drill for this task for 3 reasons. First, it supports both Mac and Windows file systems likely used for USB flash drives, including ExFAT, FAT32, as well as HFS+ and APFS (signature scan only). Second, it provides a free backup tool, which is not that common for recovery software – even paid ones.
Finally, it has a good chance of recognizing your USB even if it appears as RAW or doesn’t show up in File Explorer (as long as it shows up in Disk Management along with its disk size). We’ll demonstrate how to use it in the guide below.
- Download and install Disk Drill.
- Launch Disk Drill.
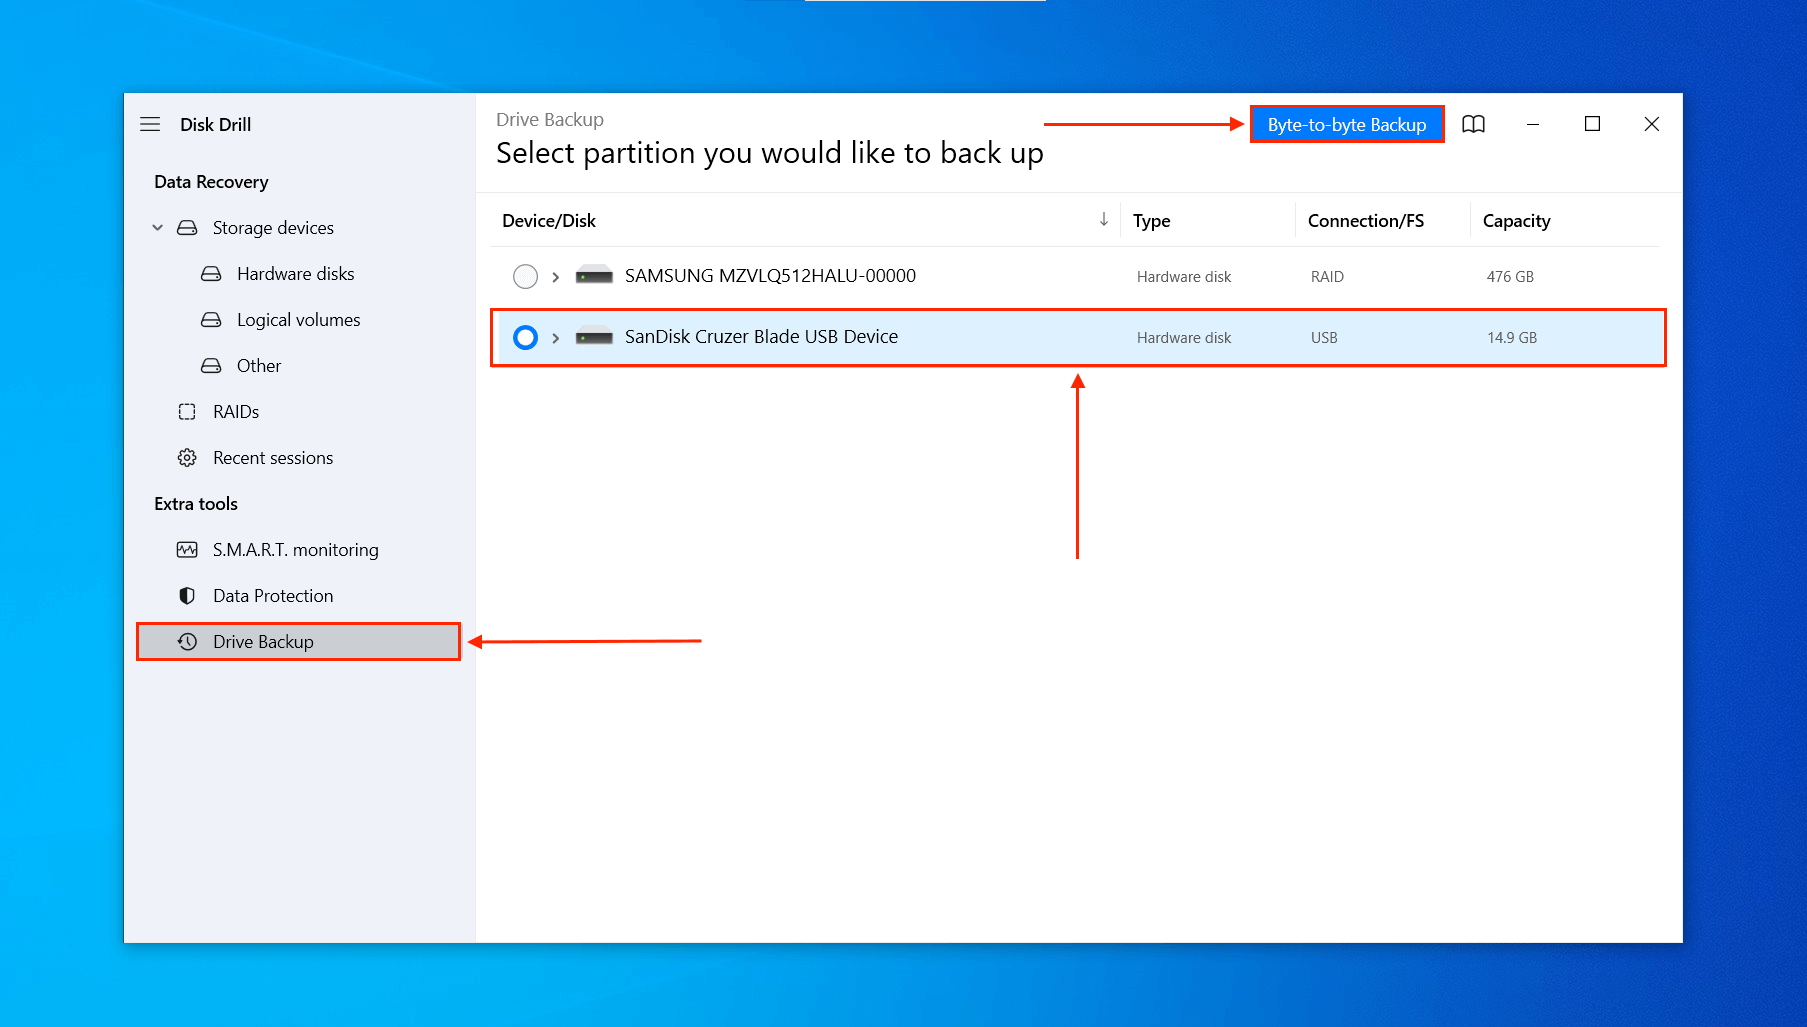
- On the left sidebar, click Byte-to-byte backup. If this is the first time you’re opening this tool, click OK let’s do it. Then, select your flash drive and click Create backup.
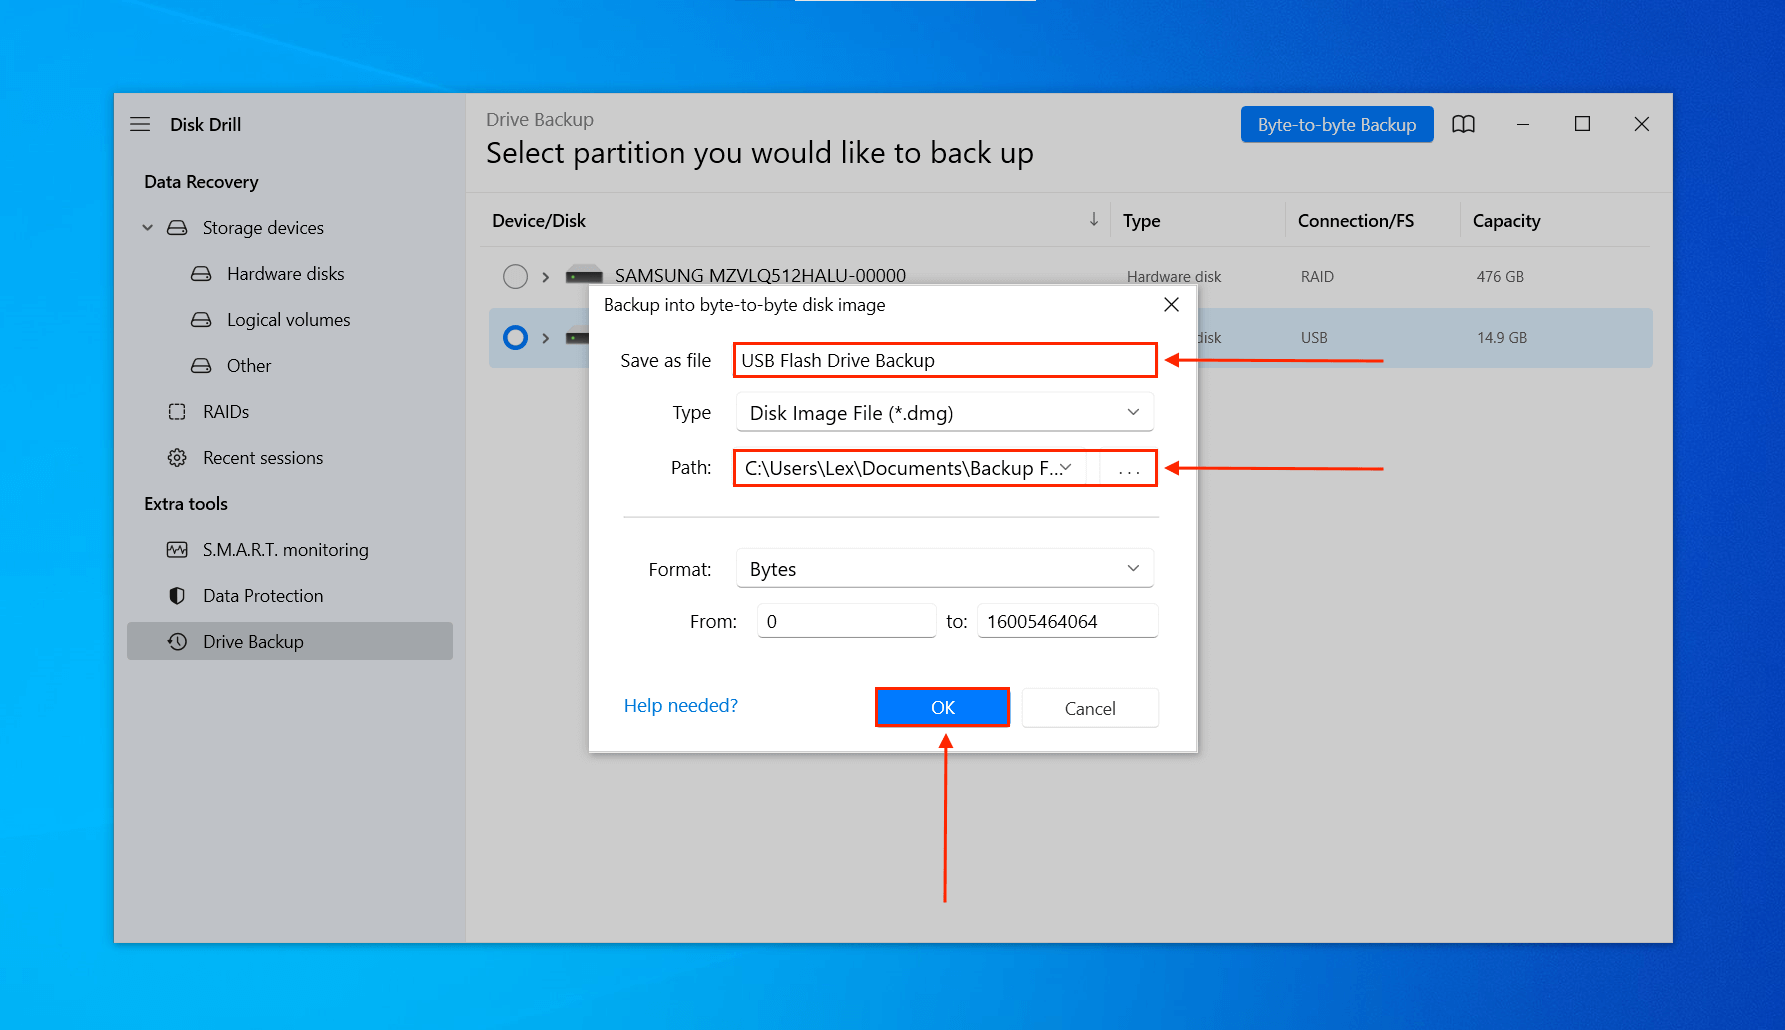
- Choose a folder on your computer where Disk Drill will save the image backup. Then, click OK.
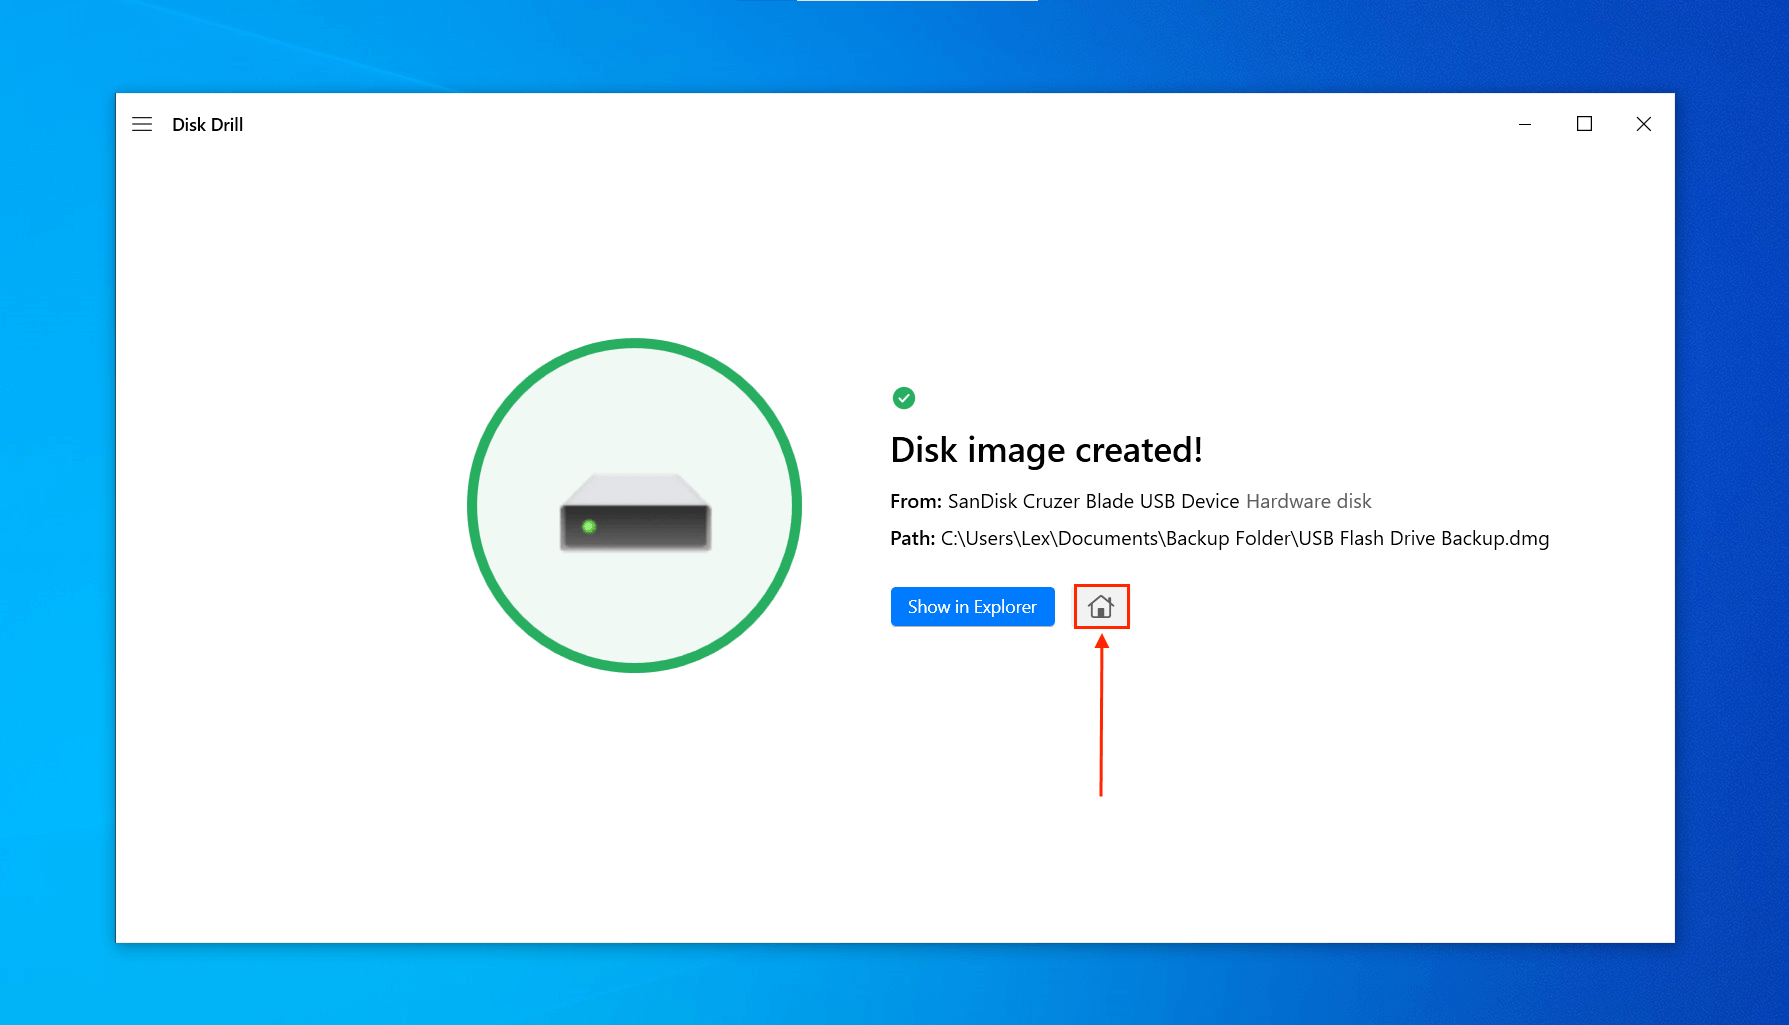
- Wait for Disk Drill to complete the image creation process. Then, click the home button.
Restore Your Image Backup With Disk Drill
Before we format the USB flash drive, let’s restore the data from the image backup we created in the last section. This way, we can be sure that all our files are safe and we can format the pendrive without losing data.
We’ll be using the same app we used to create the backup – Disk Drill. Aside from supporting various file systems, it also recognizes more file signatures than other popular solutions (400+ in total). This is perfect for USB flash drives because they tend to be used to store a variety of file types.
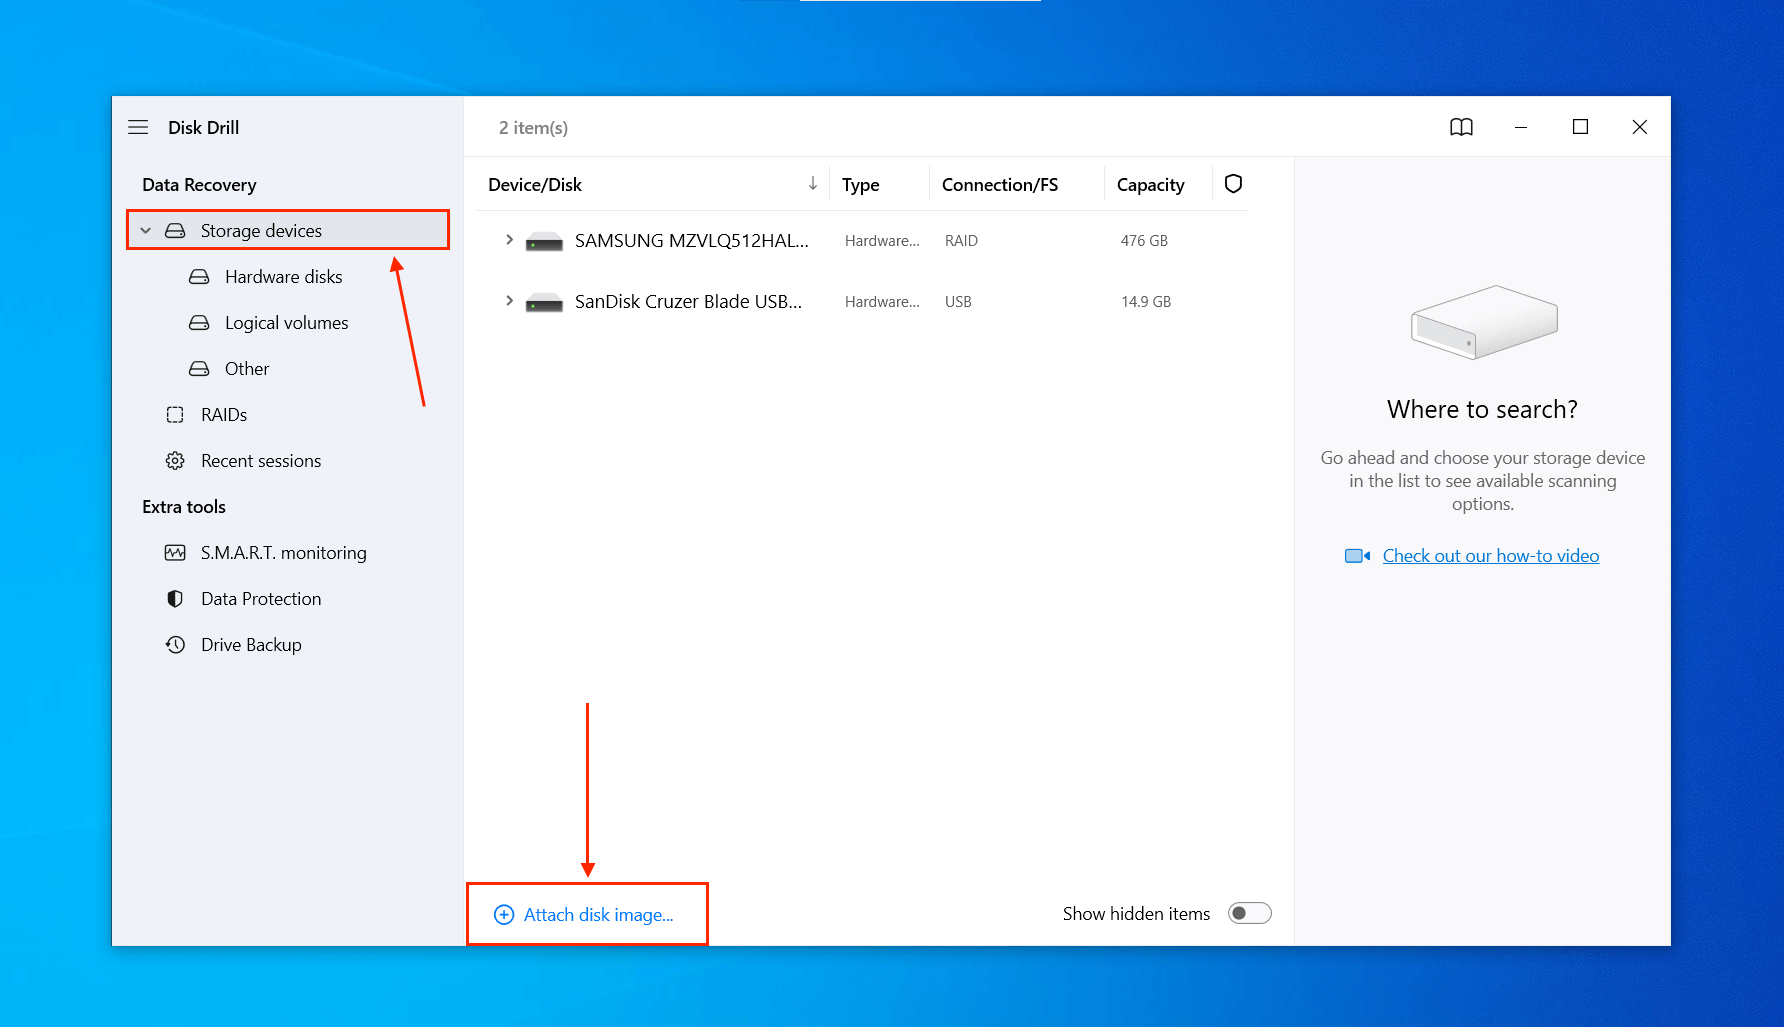
- If you closed the Disk Drill window, launch it again. If you are following these instructions right after creating a backup, click Storage Devices in the left sidebar (under Data Recovery). Then, click Attach Disk Image at the bottom of the window.
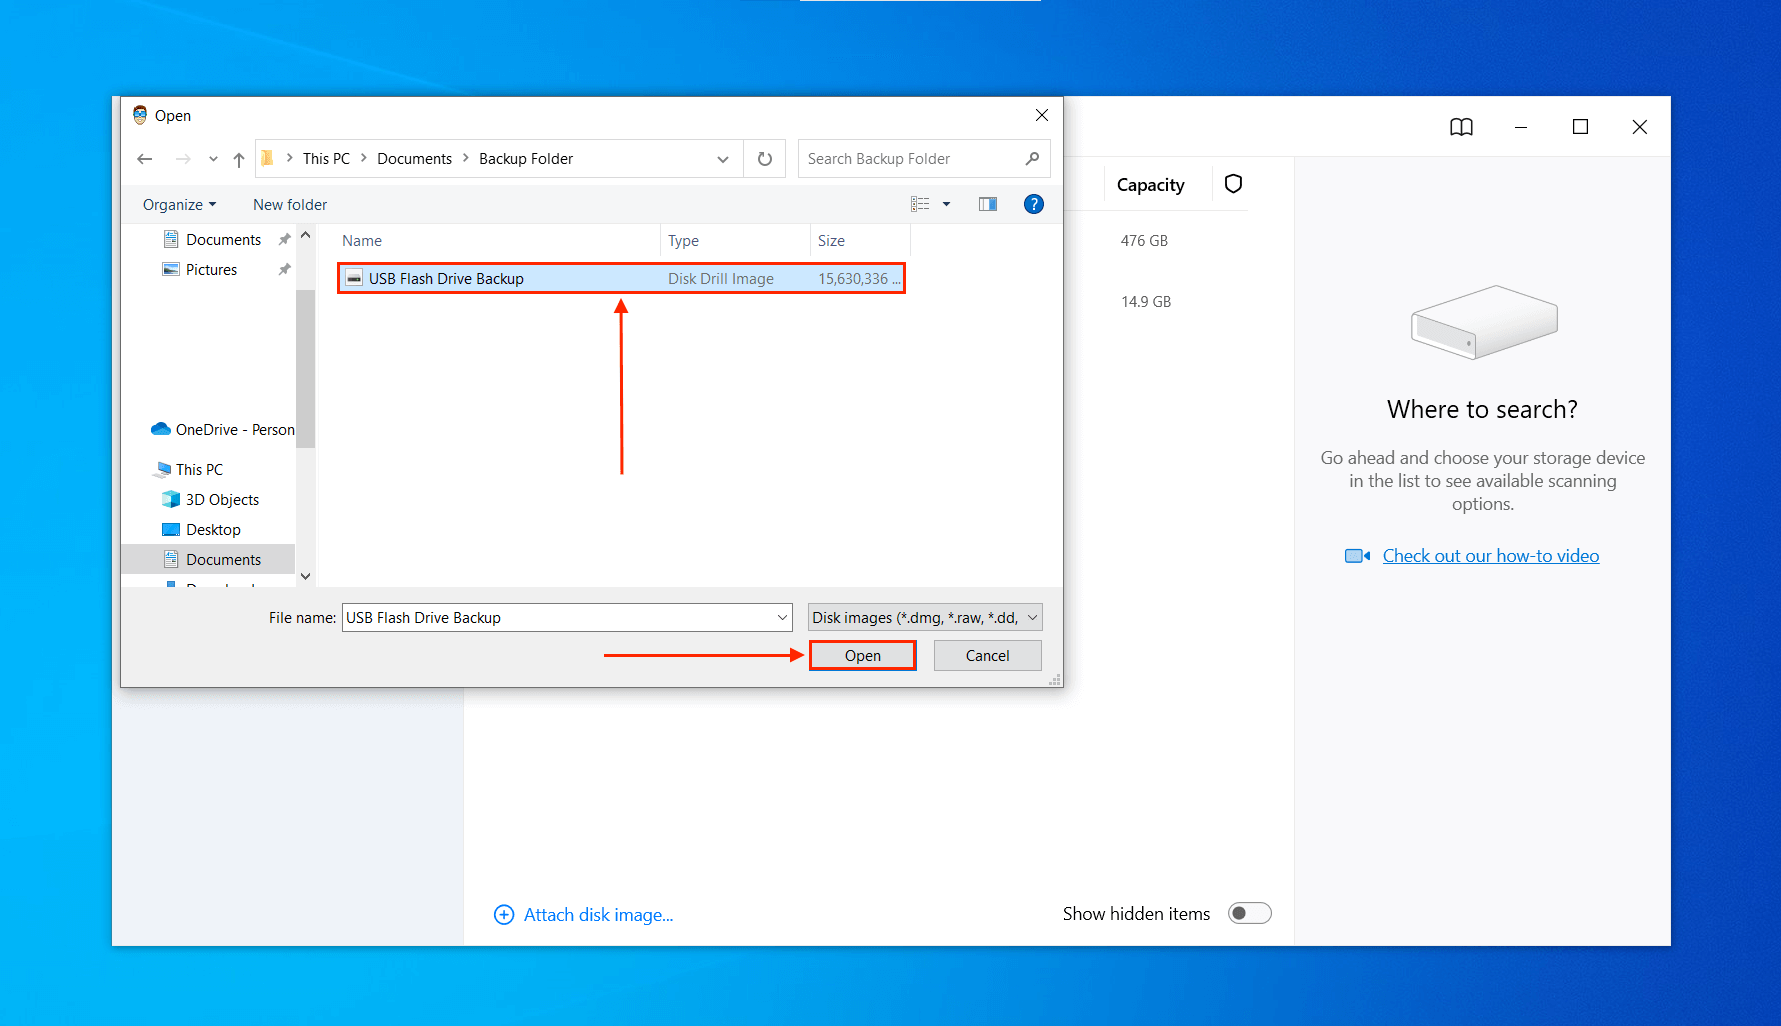
- Select the image backup you created in the last section and click Open.
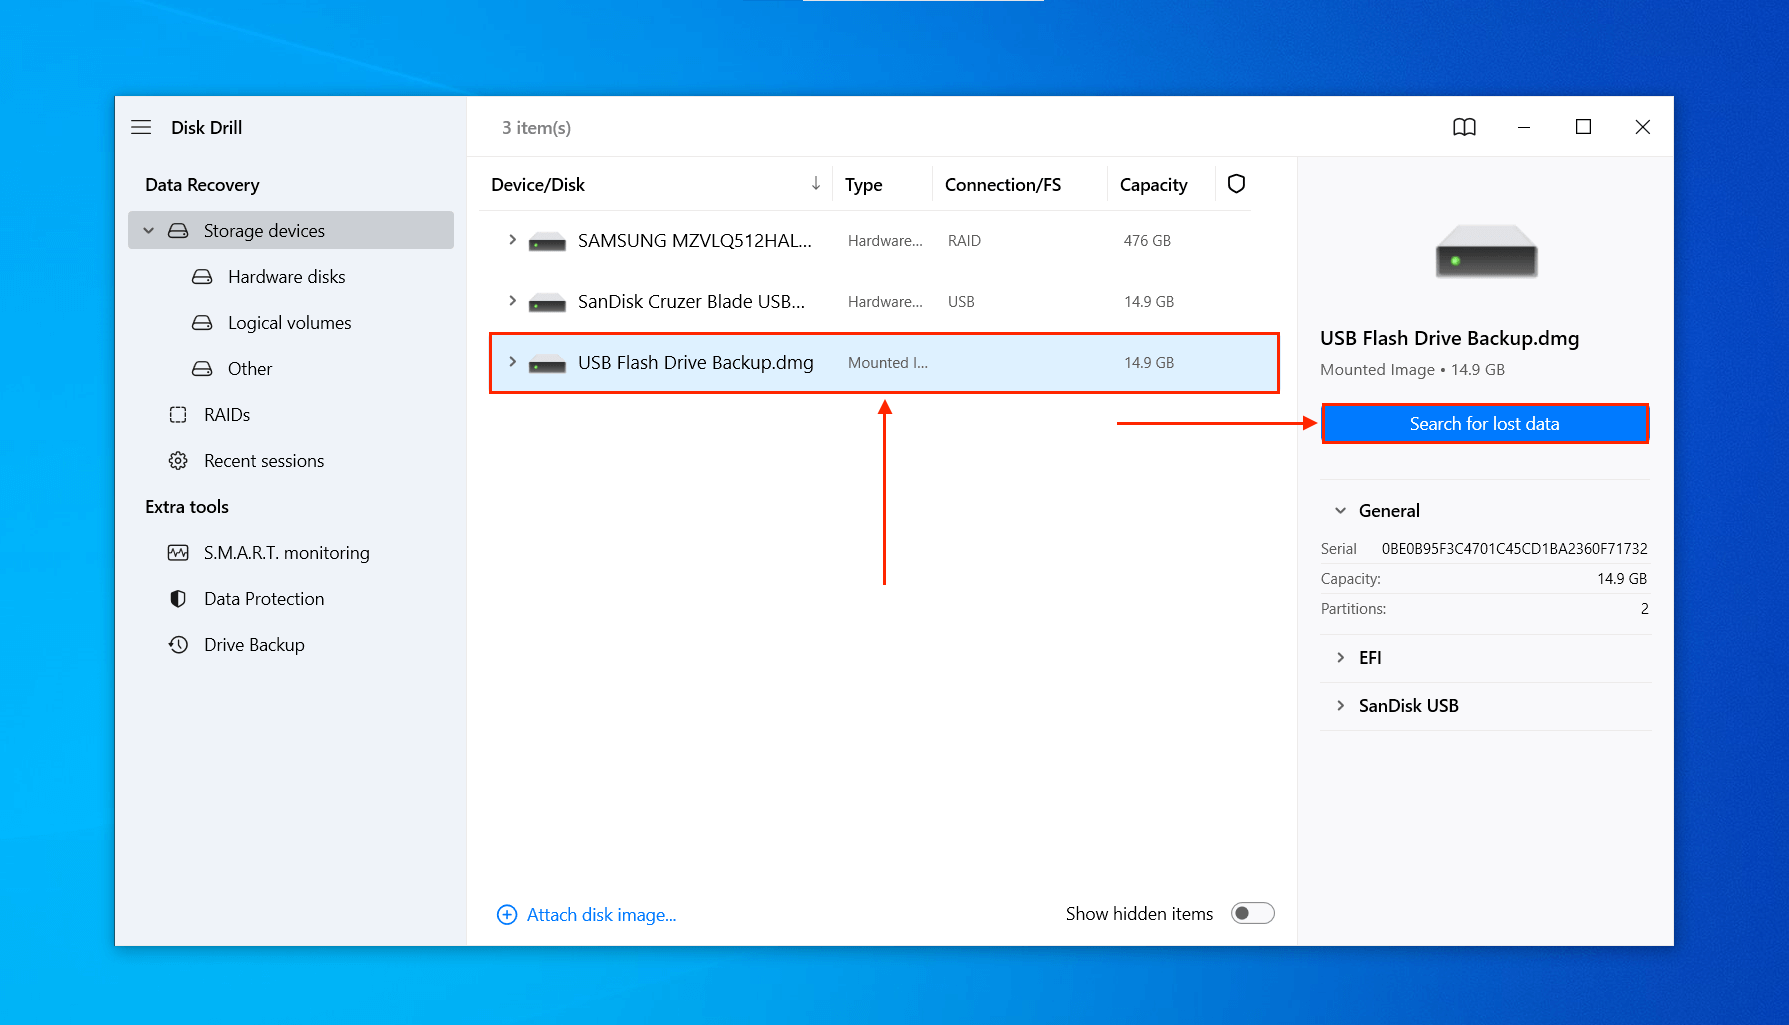
- Select the image backup from the drives list and click Search for lost data.
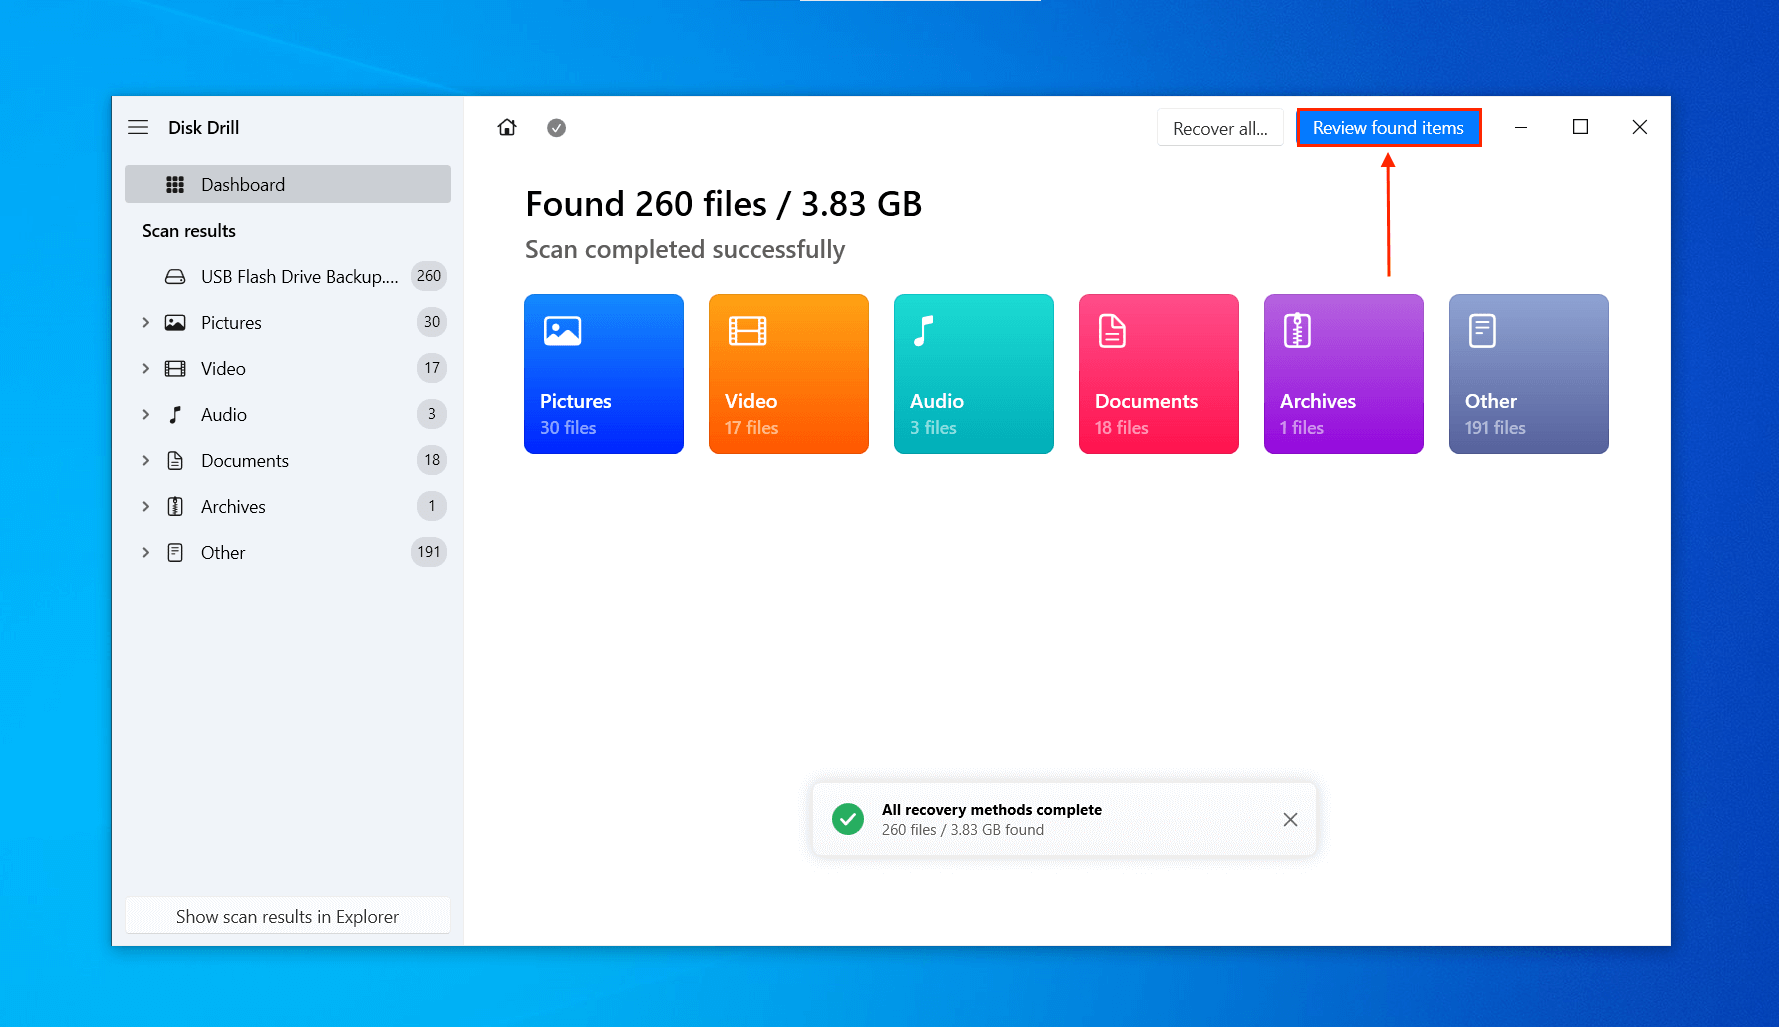
- Once Disk Drill completes the scan, click Review found items.
- Click the arrow beside Existing to expand it. These are the files that were present on your flash drive when the backup was created. You can also check out the Deleted or lost and Reconstructed tabs for files that were deleted due to corruption or accidental reformat. Clicking on any file will display a preview in the right pane.
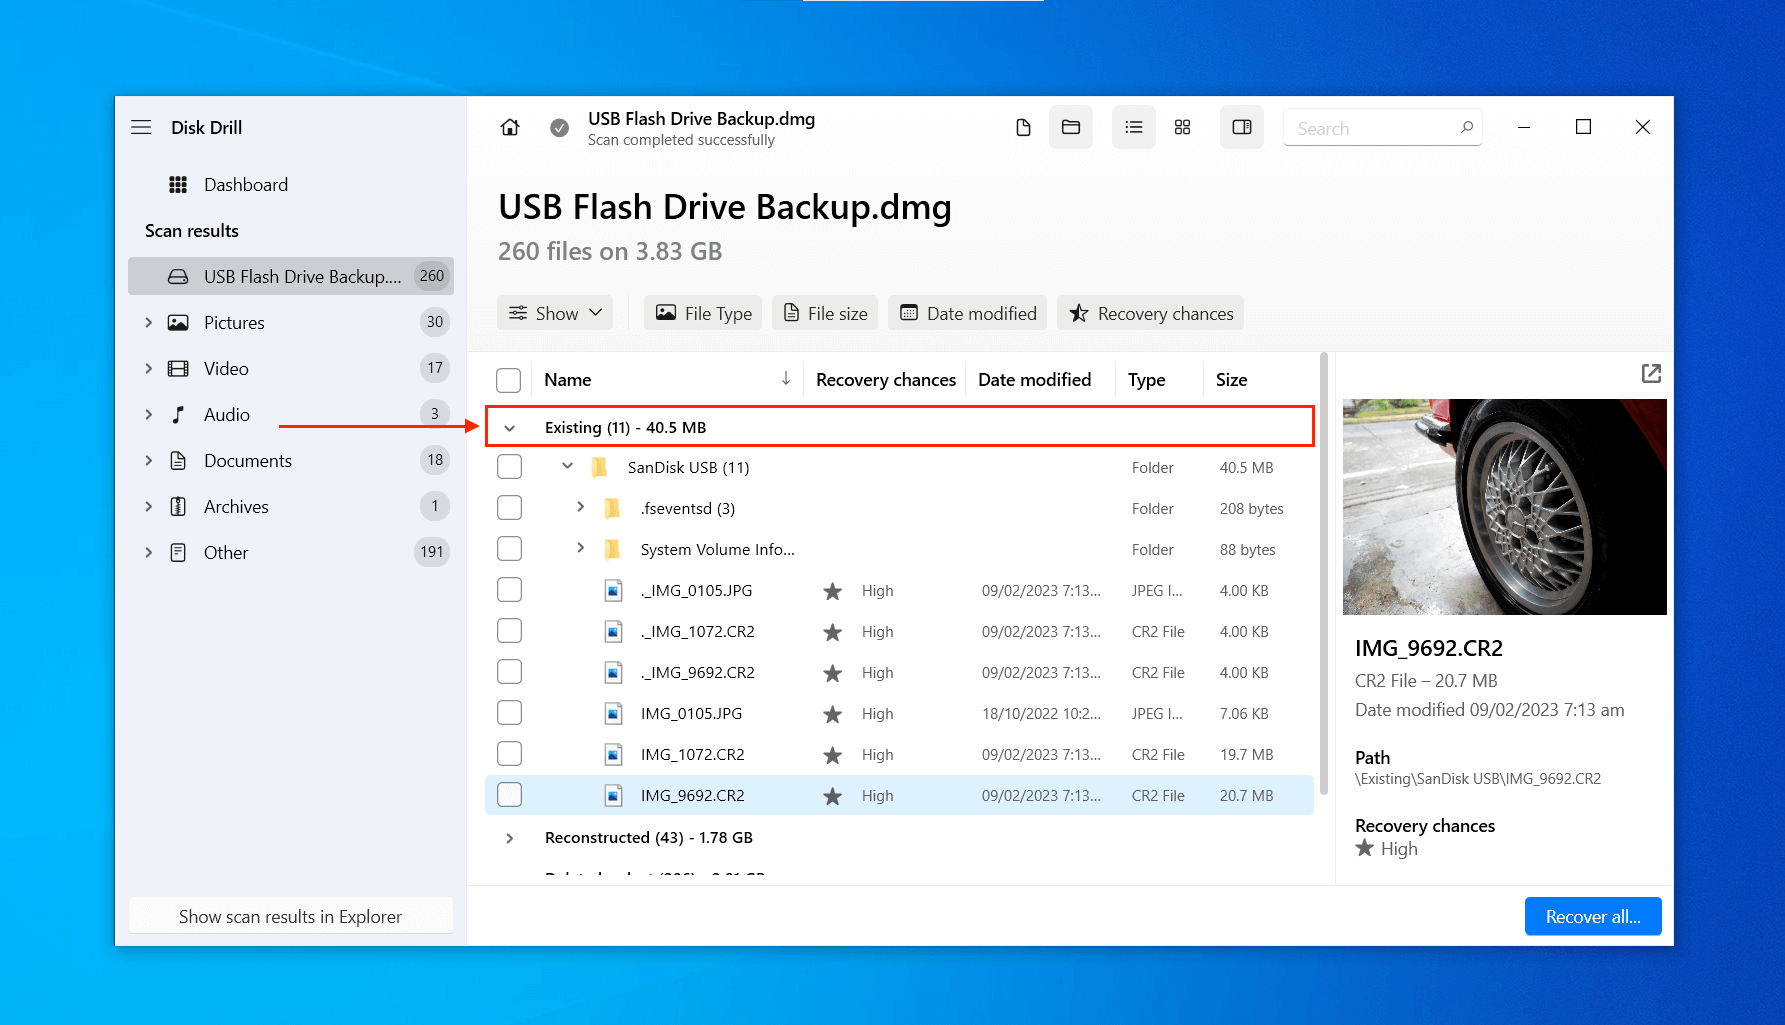
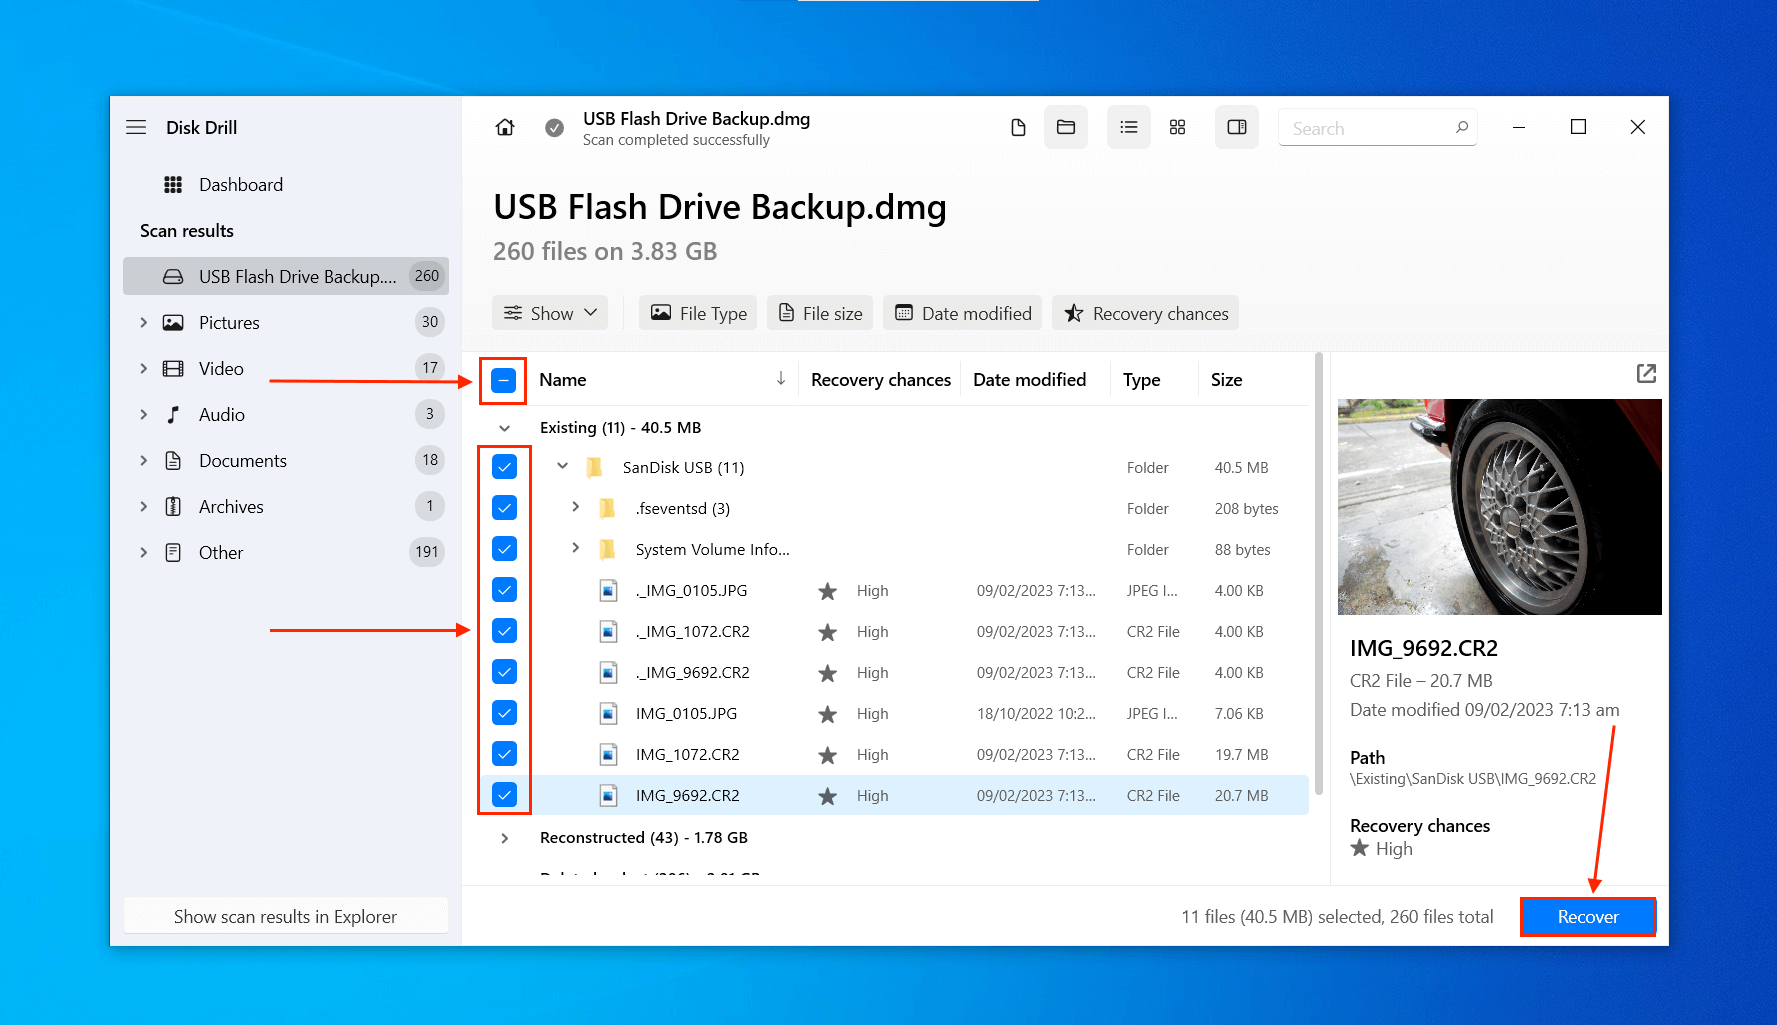
- Select the files and folders you want to restore by ticking the boxes in the leftmost column. You can also tick the box in the column header to select all files. Then, click Recover.
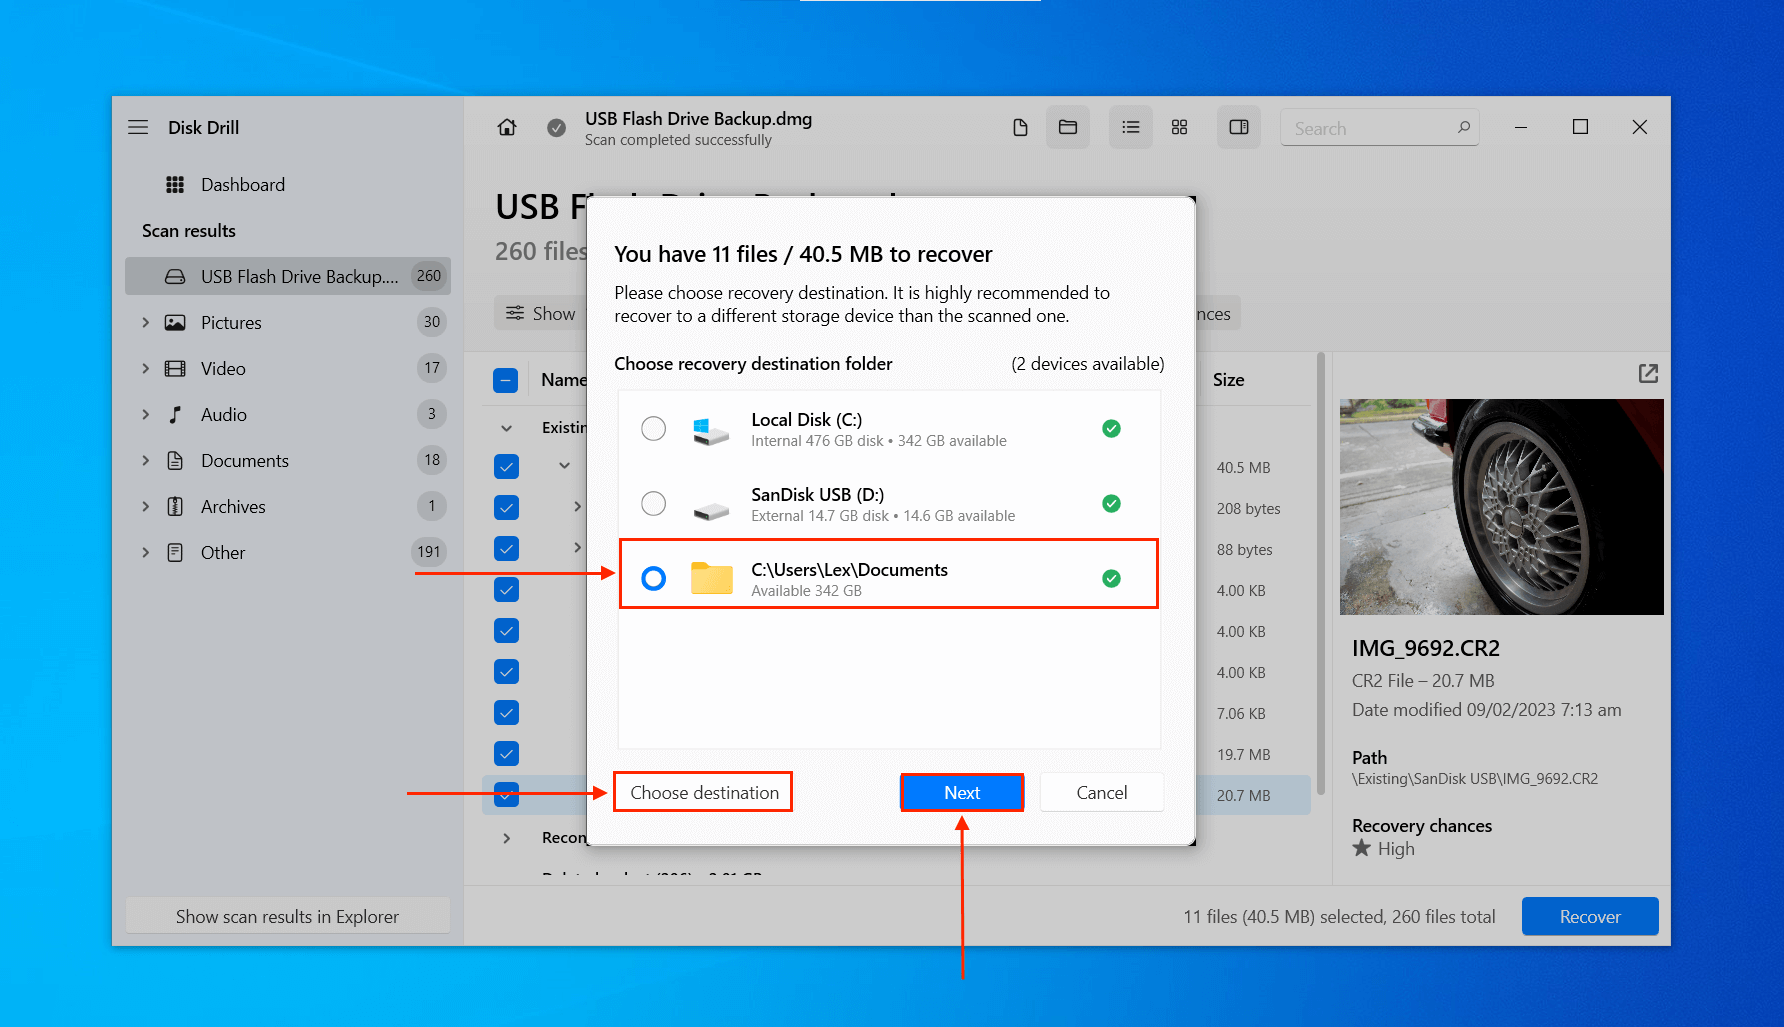
- Choose a destination folder for the recovered files. You can click the Browse button to select a specific folder. Then, click Next.
Once you’re done with the flash drive data recovery process, you can safely format your USB without losing files!
Step 2. Format USB Drive
Once your data is secure, you can safely format your drive without losing your files. Below are 3 different ways to format your USB flash drive using native Windows USB format tools.
2.1. Format Flash Drive Using CMD (diskpart)
Command Prompt (or “CMD”) is a Windows command line program. Using the Diskpart command, users can directly manipulate their disks, partitions, and volumes. We’ll teach you how to use it to format your USB flash drive.
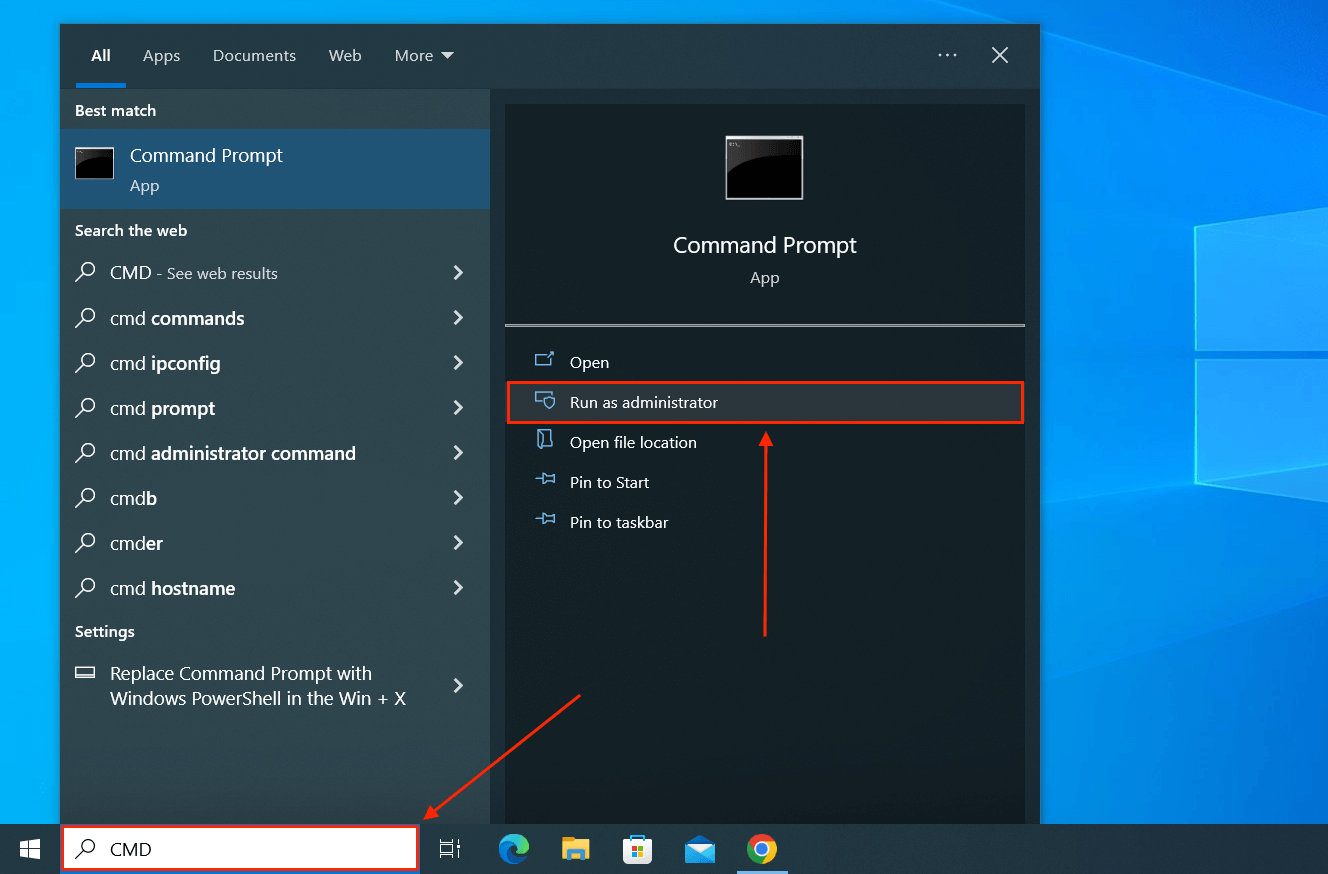
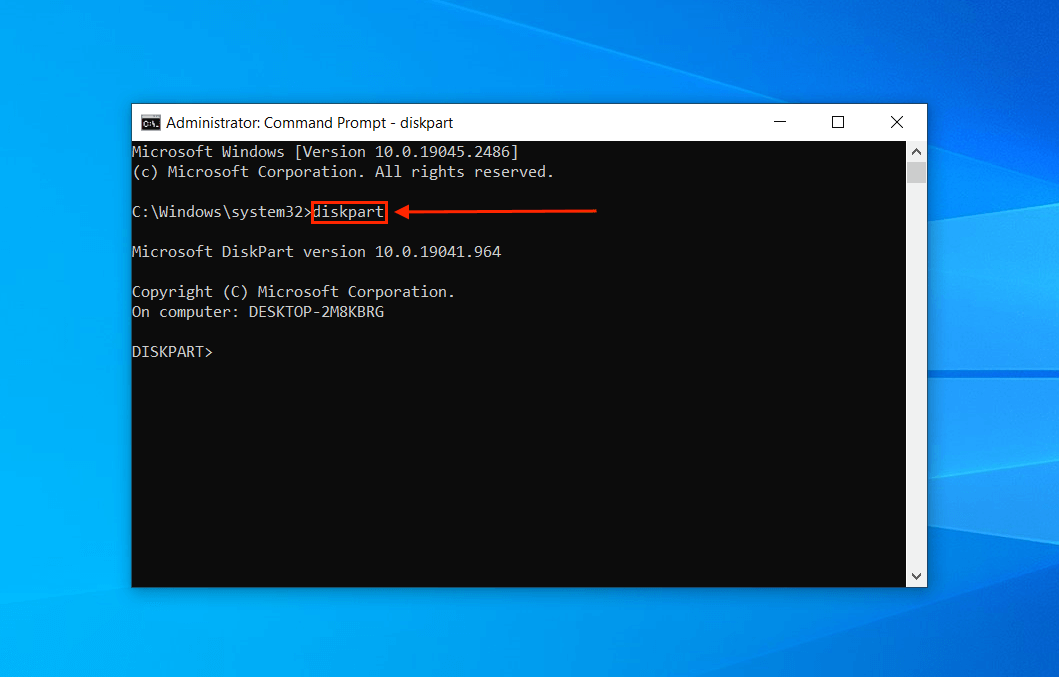
- Launch Command Prompt as Administrator.
- Type the following command and hit Enter: diskpart
- Type the following command Enter: list disk
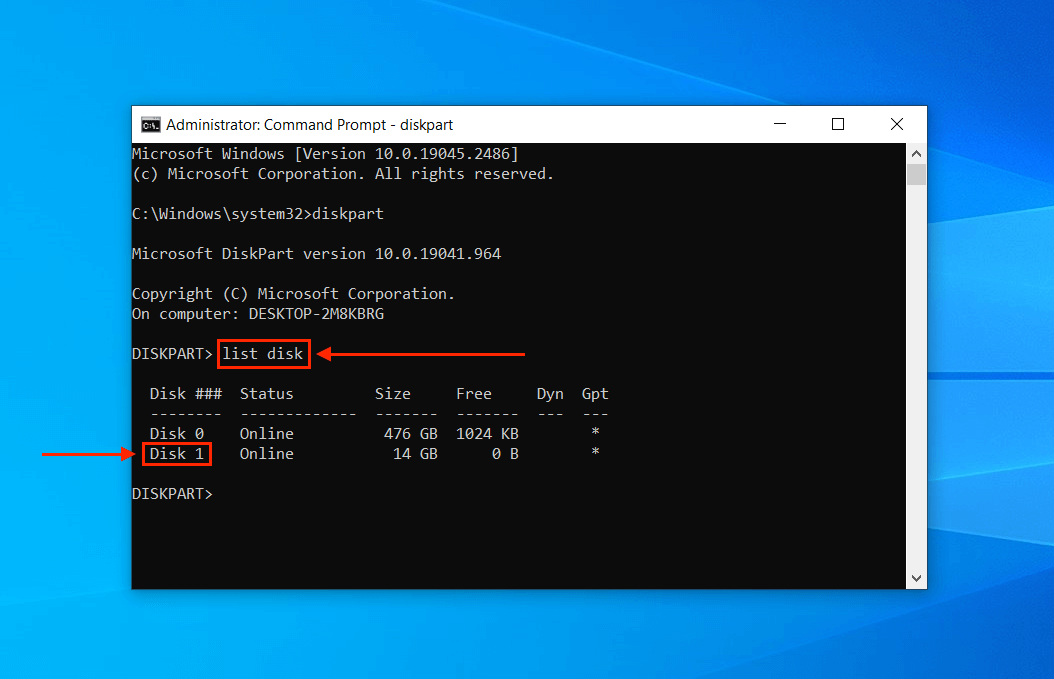
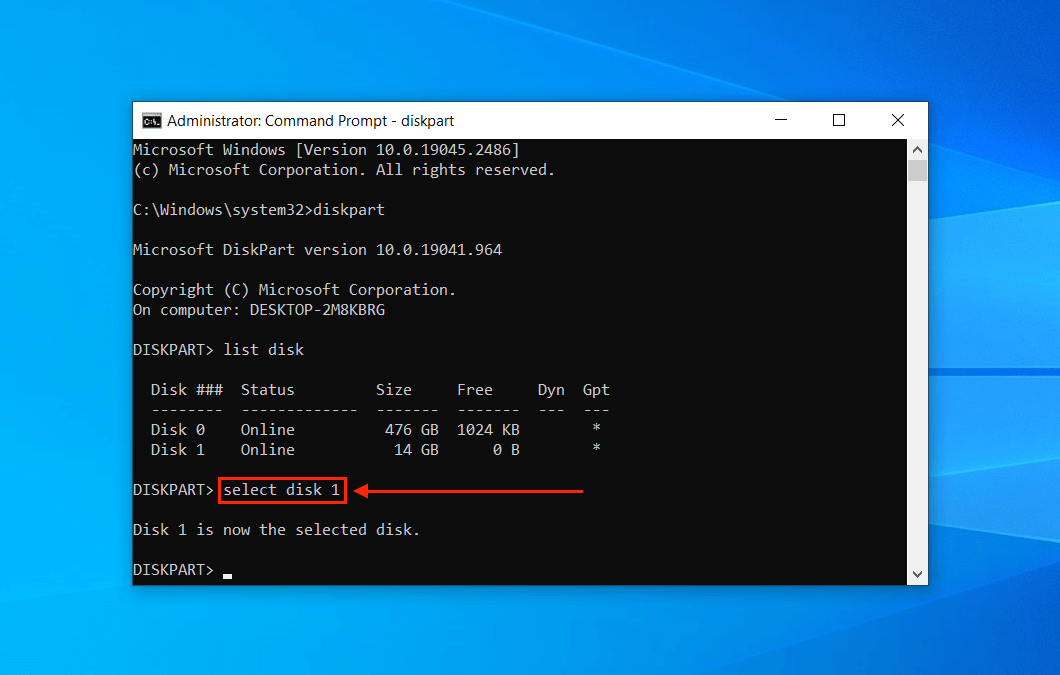
- Take note of your flash drive’s Disk ### in the first column. Then, type the following command (without quotes) and hit Enter: select disk “Disk #”
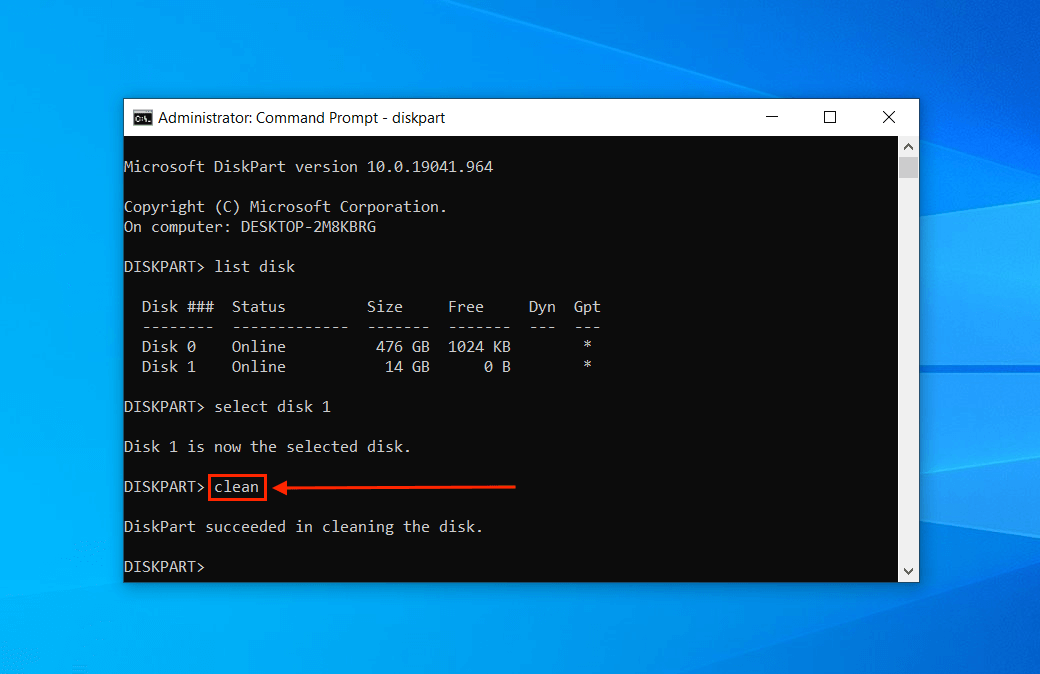
- Type the following command, which clears a USB stick of its data and metadata, and hit Enter: clean
- Type the following command and hit Enter: create partition primary

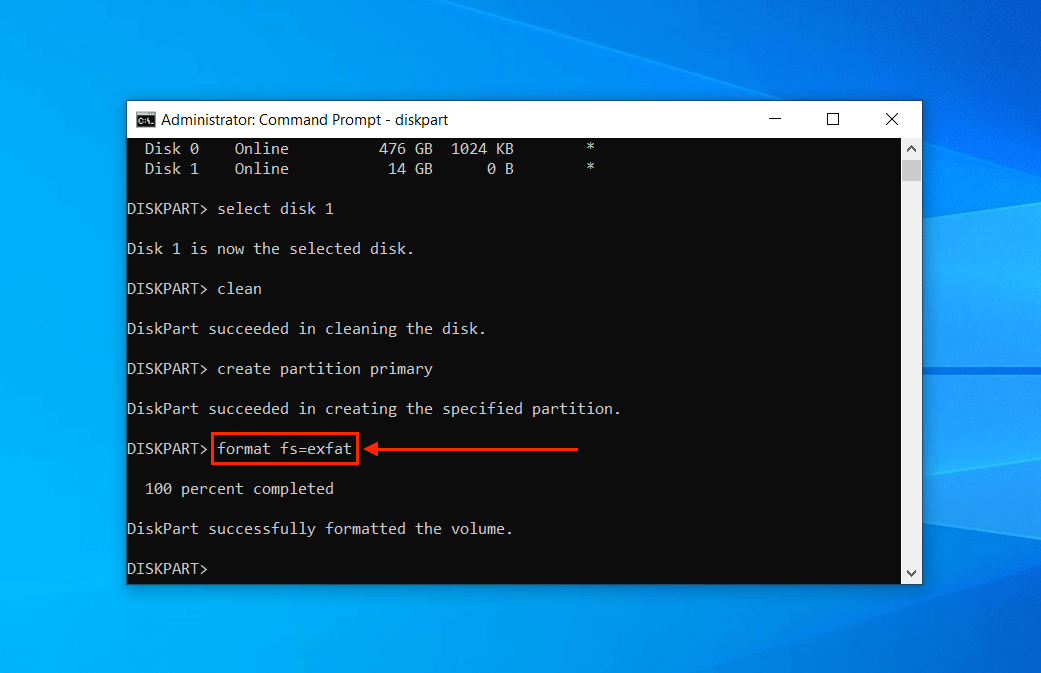
- Type the following command and hit Enter: format fs=exfat
- Type the following command (replace “x” with any letter you want) and hit Enter: assign letter=x
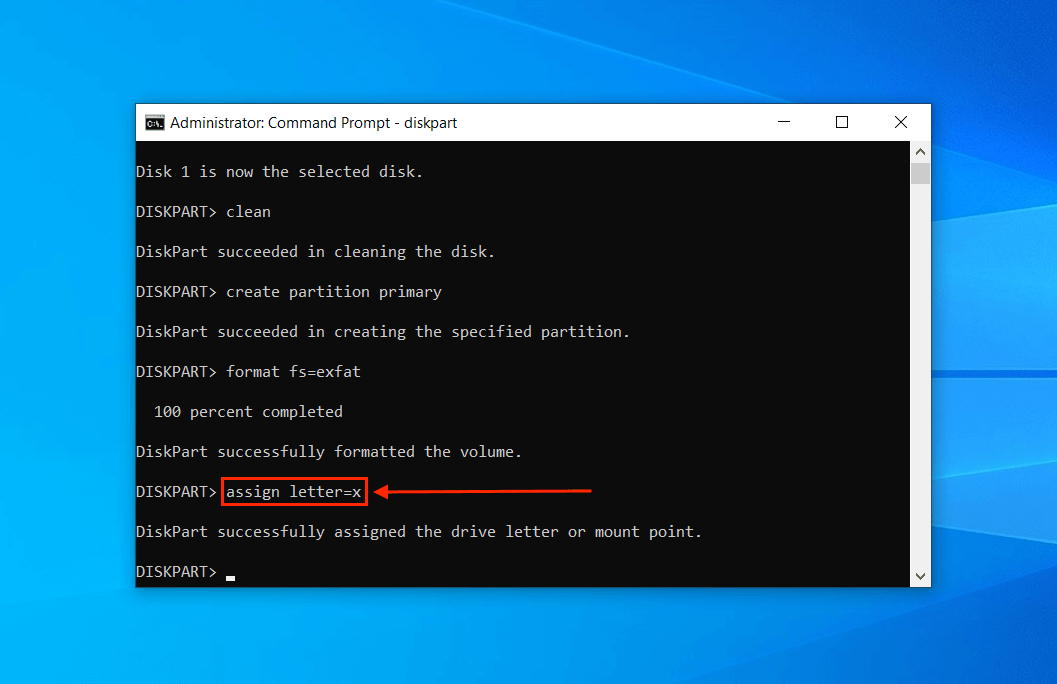
After entering these commands, the formatting process will be complete. Exit Command Prompt and try using your USB.
2.2. Format USB Stick Using Disk Management
Disk Management is another native Windows tool. Unlike Command Prompt, it has a visual interface where users can edit their disks, volumes, and partitions with a few clicks.
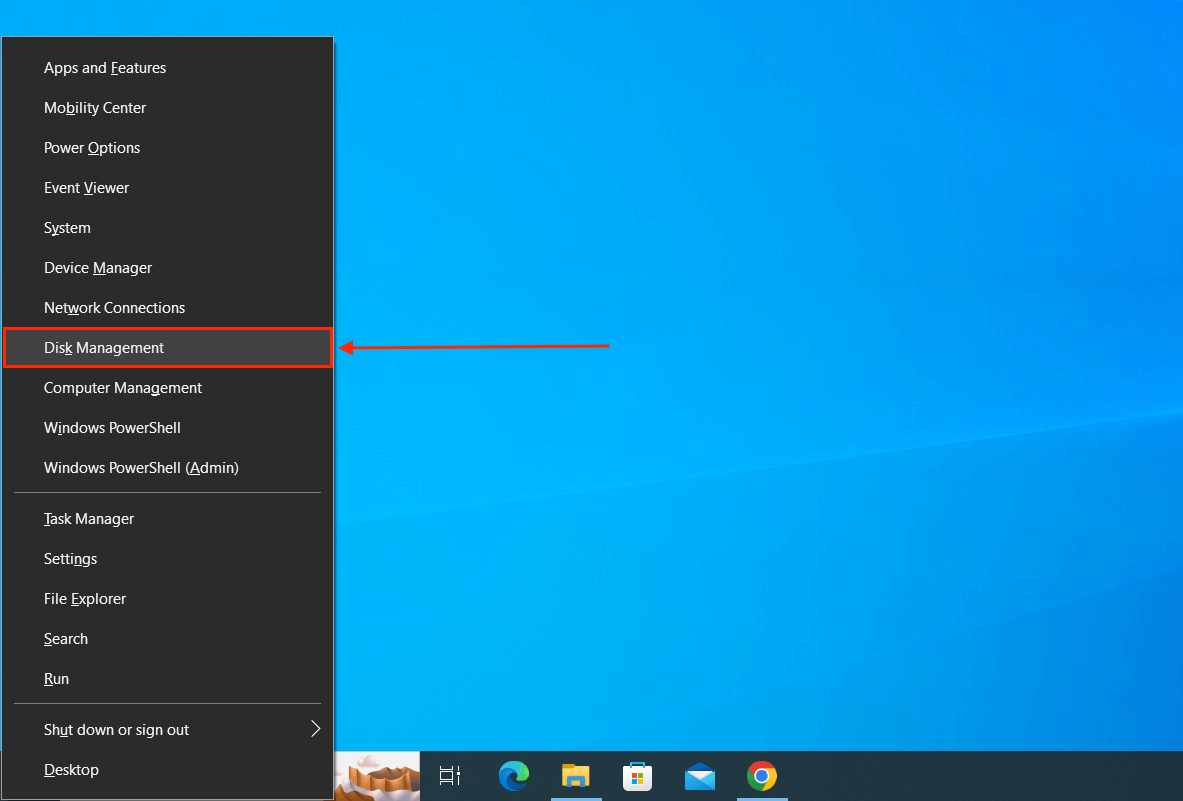
- Launch Disk Management by pressing the Windows + X keys > Disk Management.
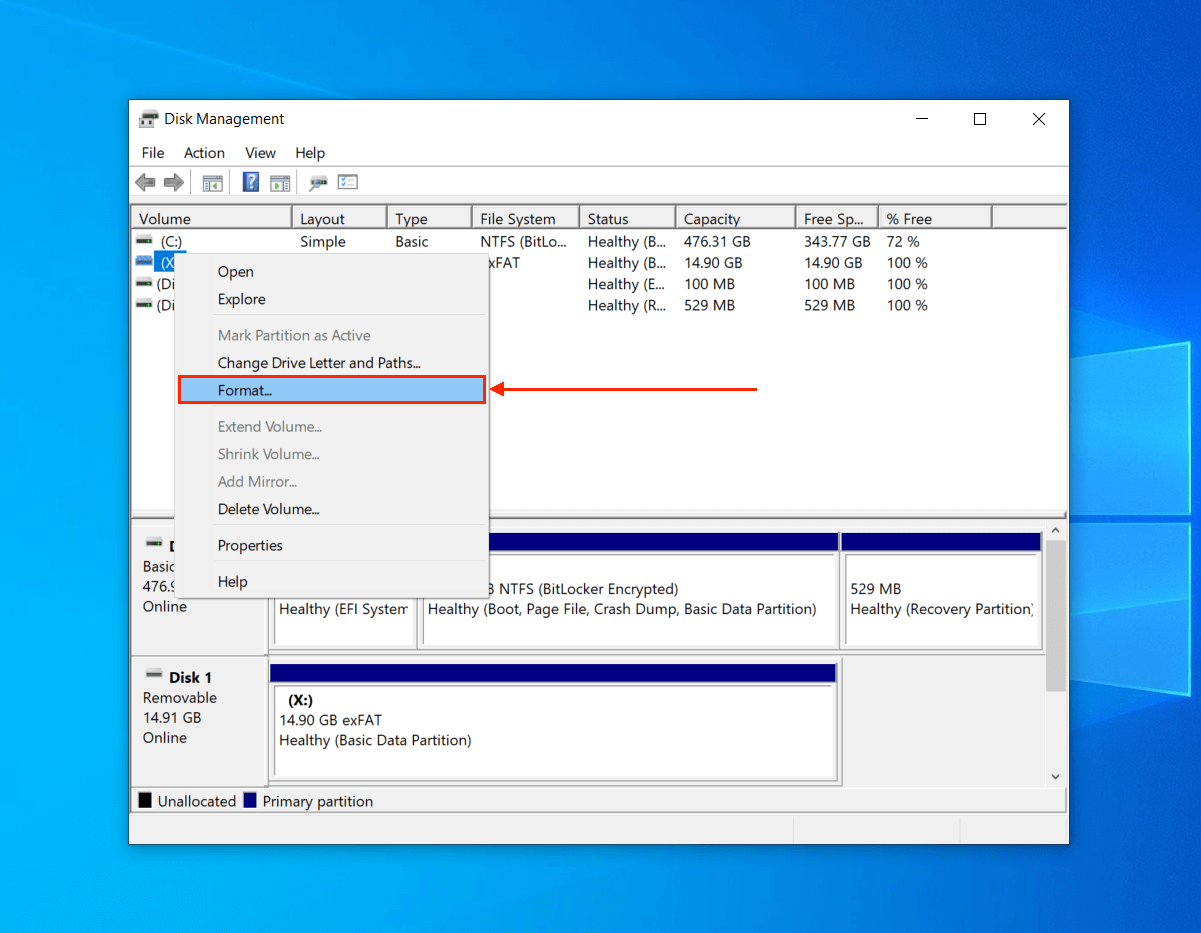
- Right-click your USB flash drive and click Format.
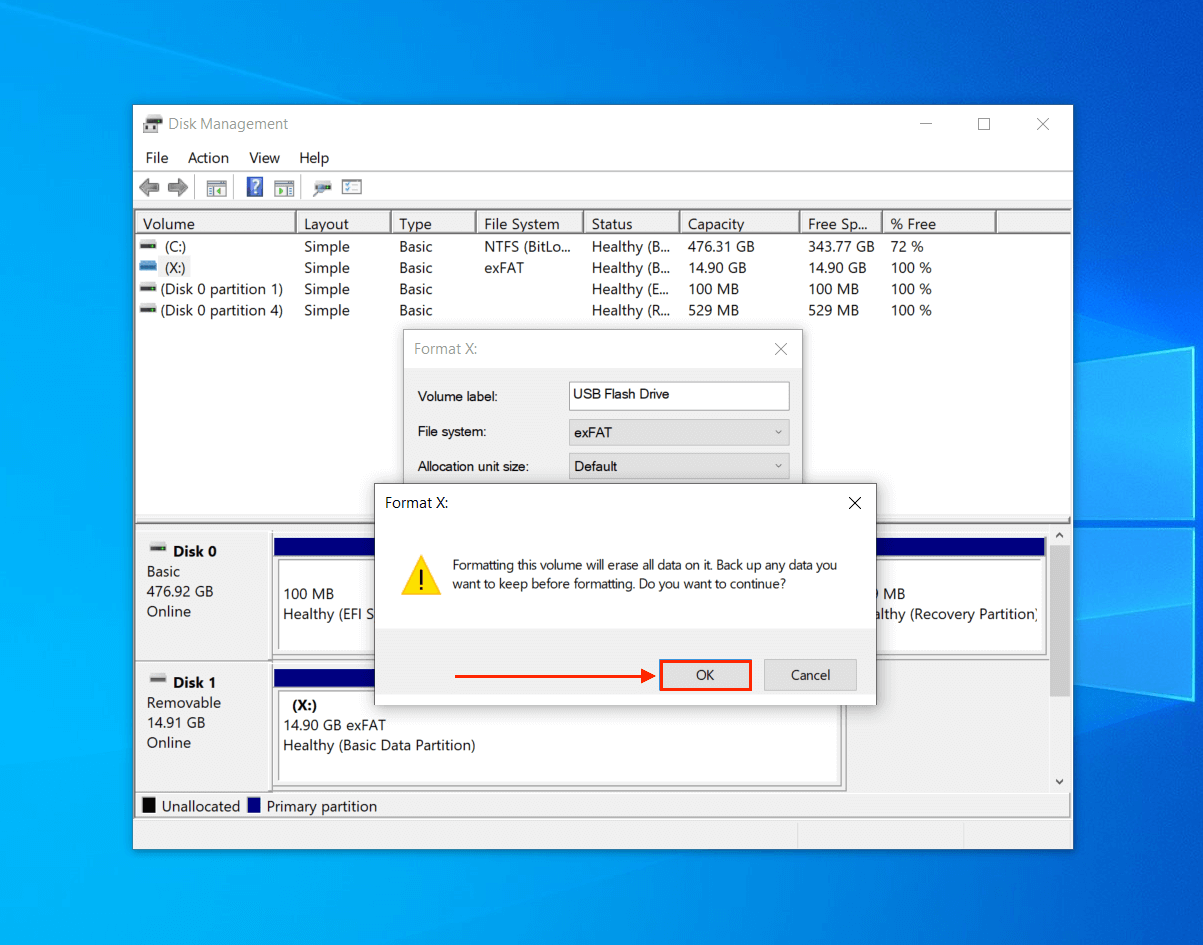
- Label your drive and select ExFAT as its File System. Then, disable the Perform a quick format setting (you can enable it if you want to change the USB format without losing data, but you’ll still need to use data recovery software). Finally, click OK.
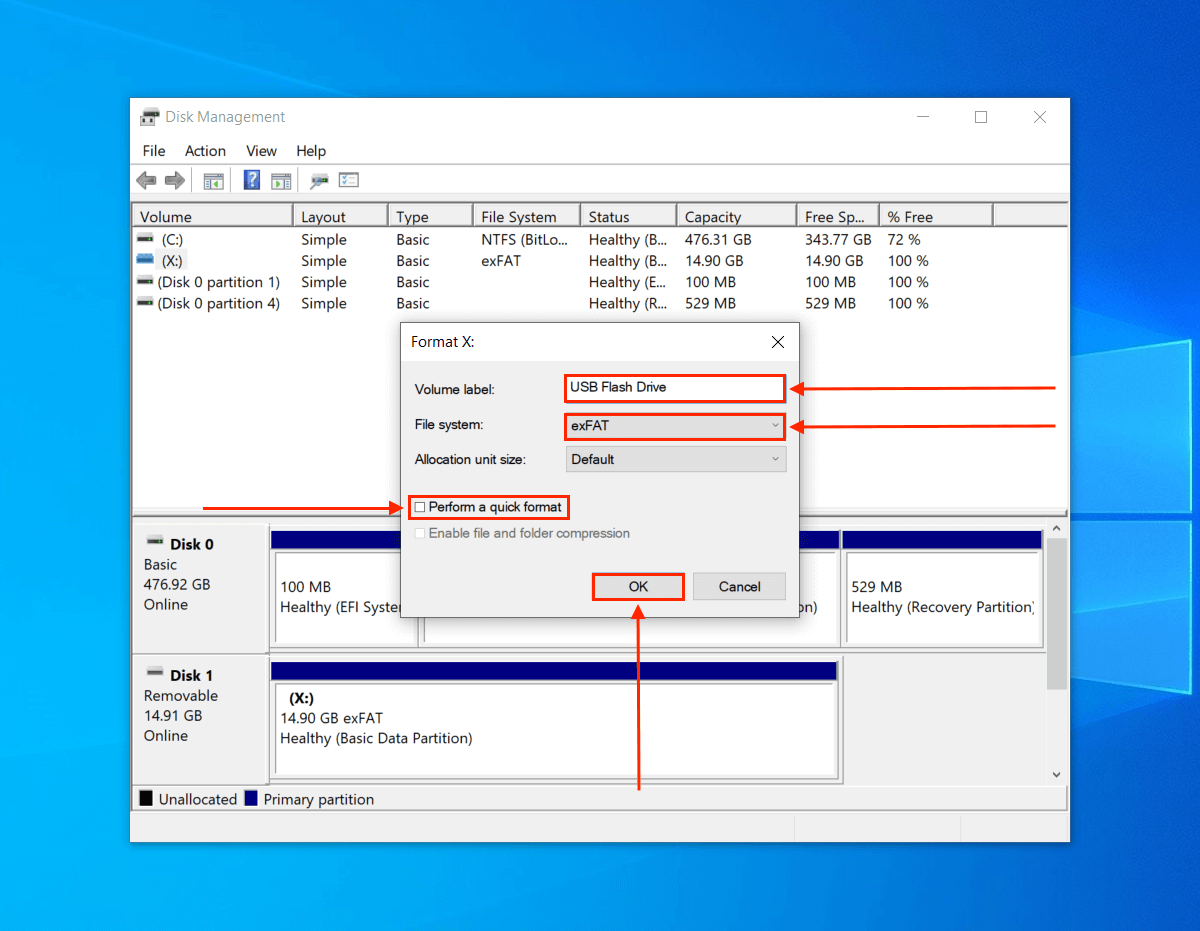
- Click OK again to confirm.
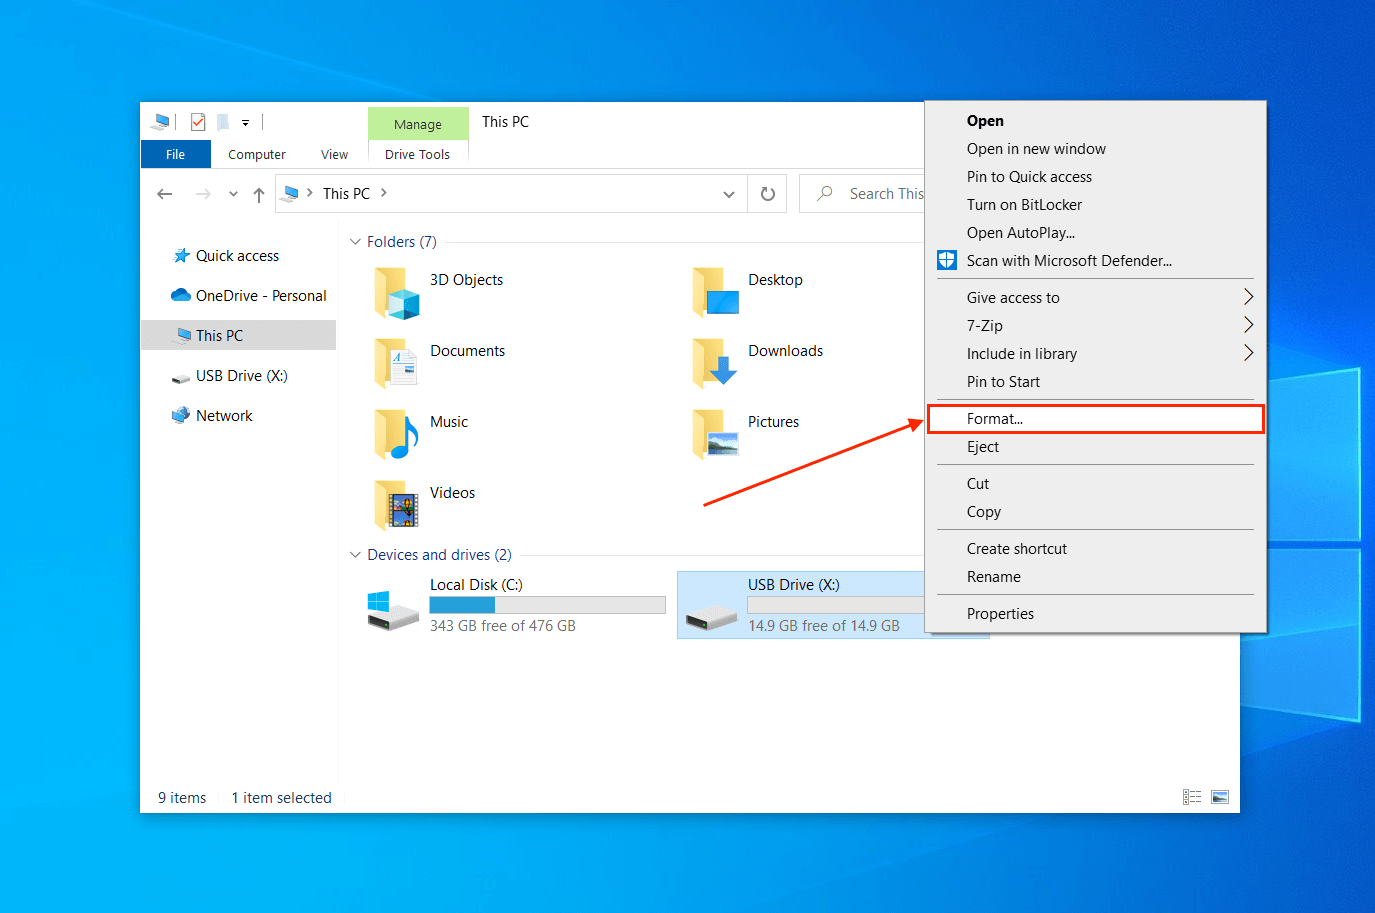
2.3. Format USB Stick In File Explorer
You can also format your drive directly in File Explorer (if it appears there). With your drive connected, launch File Explorer. Navigate to This PC, right-click your drive (or right-click it in the sidebar), and click Format.
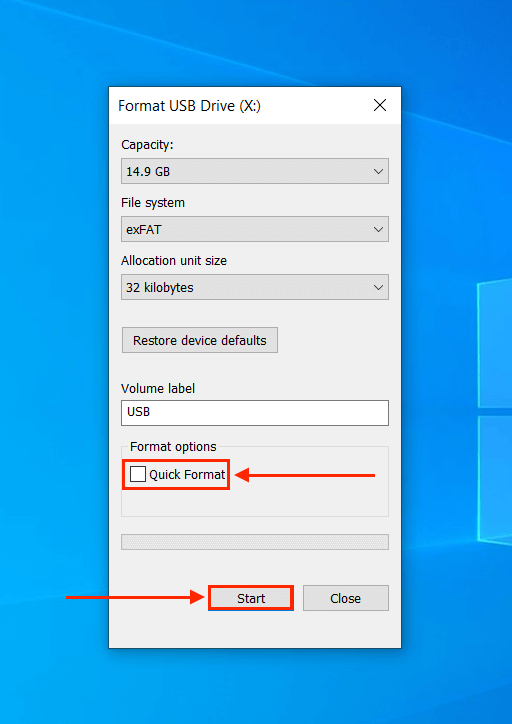
Name your drive, select the exFAT format, and disable Quick format so we can get rid of the errors. Then, click Start.
How to Format Flash Drive That Windows Was Unable to Format
If you encountered errors during the formatting process, try performing a low-level format. Low-level formatting will return your drive to its factory state and delete all stored information. For this task, we can use a free app called the HDD LLF Low-Level Format Tool.
- Download and install HDD LLF Low-Level Format Tool, and launch it from your Desktop or Start Menu.
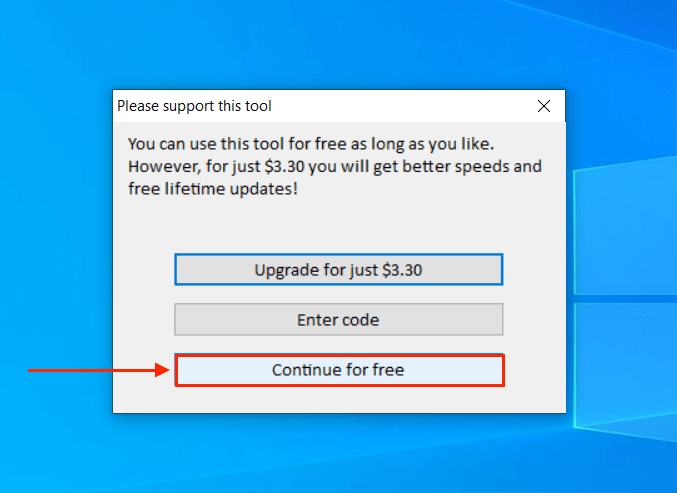
- Accept the license agreement and click Continue for free when prompted to upgrade.
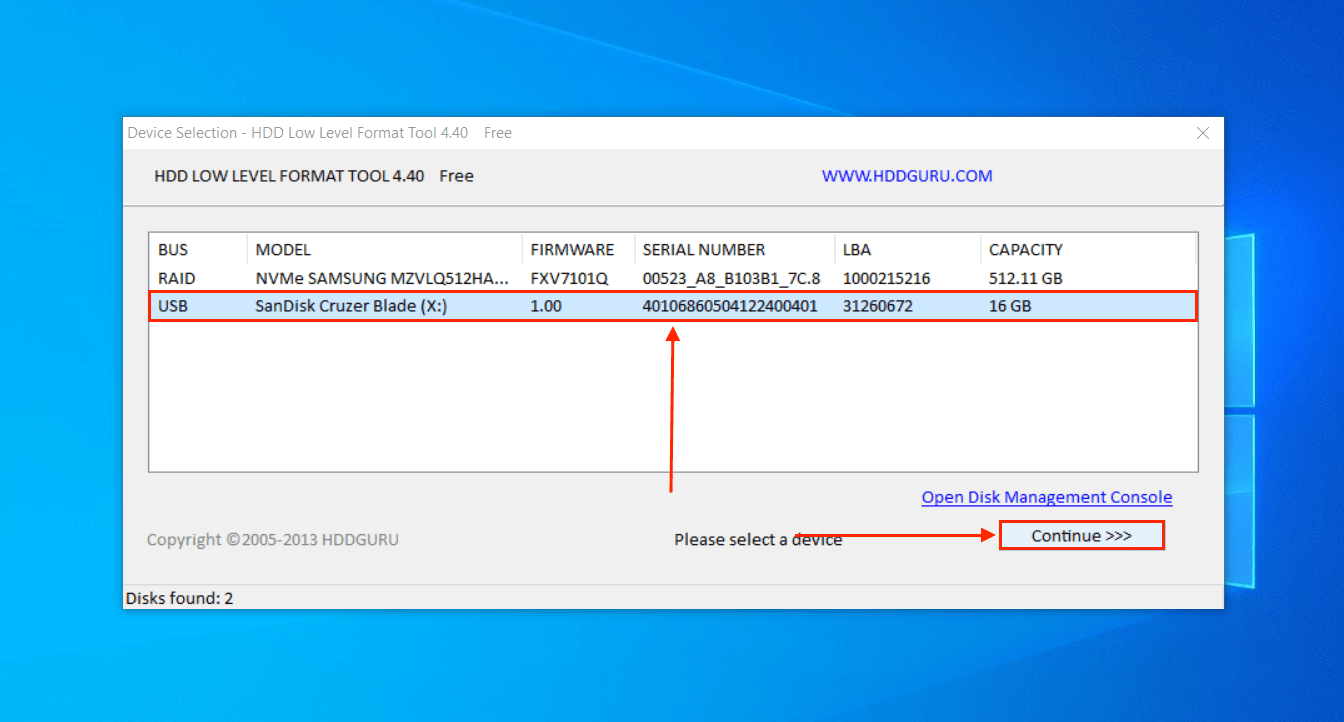
- Select your USB flash drive from the list and click Continue >>>.
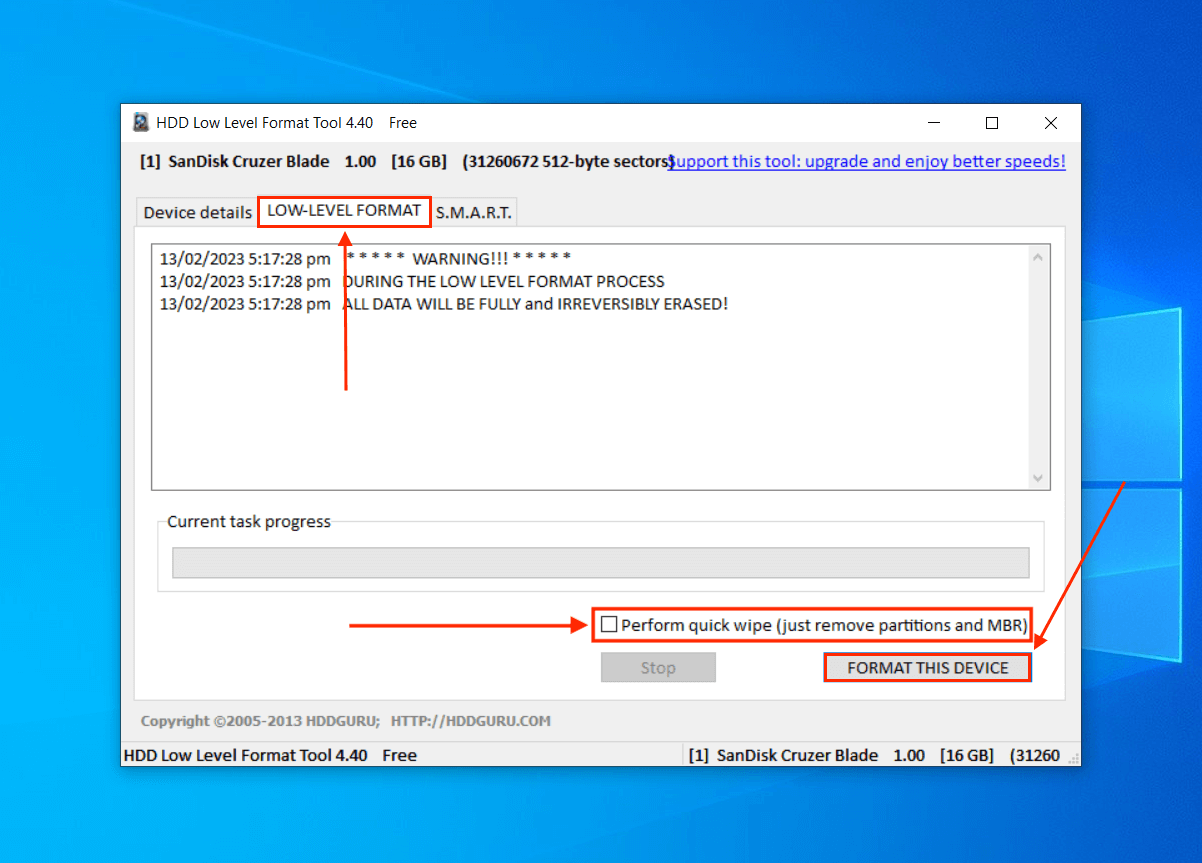
- Navigate to the LOW-LEVEL FORMAT tab and untick the box beside Perform quick wipe (just remove partitions and MBR). Then, click FORMAT THIS DEVICE.
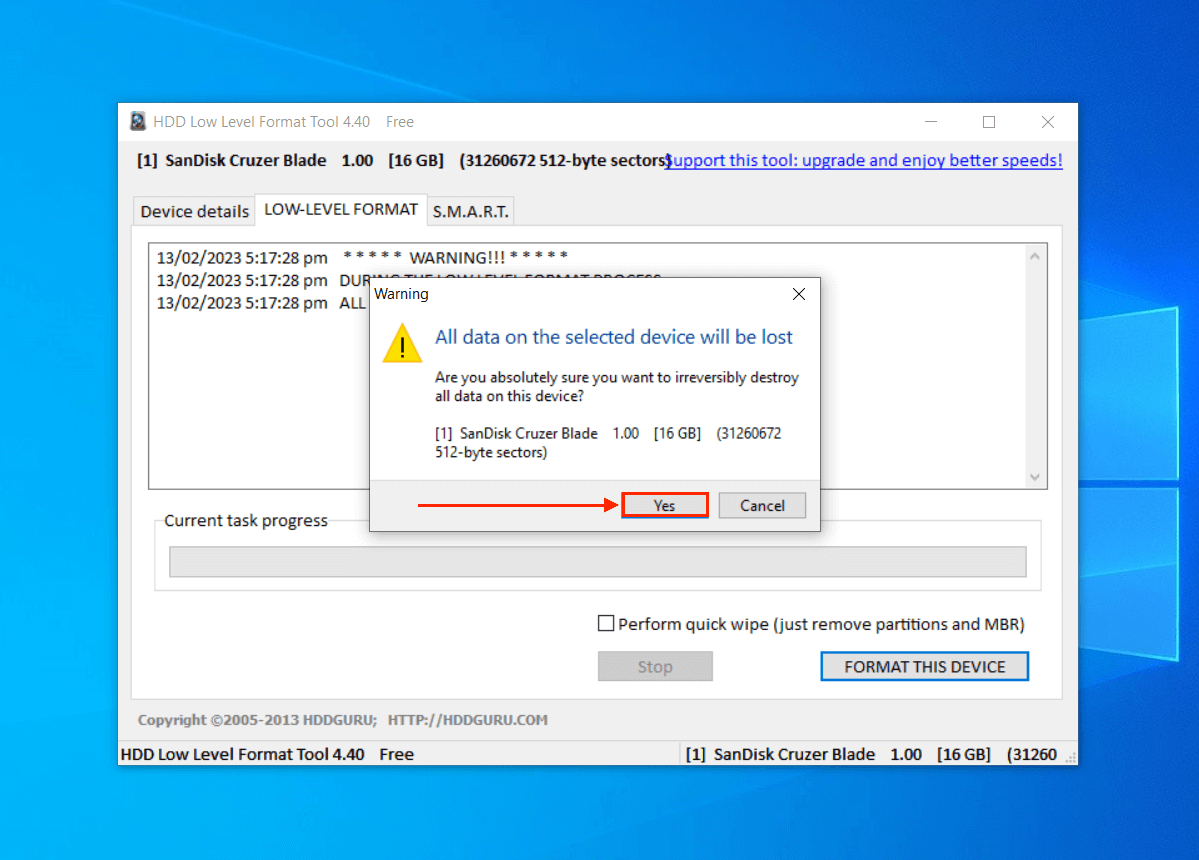
- In the dialogue box that appears, click Yes to proceed with formatting.
Once the process is complete, Windows may prompt you to perform a high-level format when you try to access it in File Explorer. This will allow you to label your drive, assign it a letter for mounting, and install the file system of your choice.
Frequently Asked Questions
Does formatting a USB drive wipe it?
Yes, formatting a USB drive will wipe it. However, Quick Formatting leaves your data intact and allows users to restore their files using a data recovery tool. Full formatting, on the other hand, writes zeroes all over your data – this will make your files pretty much unrecoverable.
How to change USB format without losing data?
To change your USB format without losing data, save your files to another location first! If you can’t access the files on your flash drive, you need to create an image backup of the drive, which you can then restore to a safe location. You may also avoid an irreversible data wipe by performing a Quick Format, but you still need data recovery software to retrieve your files.
How to format USB without losing data on Mac?
To format a USB without losing data on your Mac, try copying the existing files to another location first. If you can’t access your files, use Disk Utility or a third-party application to create an image backup of your flash drive. You can then restore your files after the formatting process.
How to open USB without formatting?
In case of severe logical damage, Windows automatically prompts you to format your USB flash drive upon connection (or clicking it in File Explorer). Cancel the prompt and use third-party software to create an image backup of your drive, which you can restore after formatting.
How to backup a USB drive?
To backup a USB drive, copy and paste your files to another location or use backup software. If you opt to use software (or you have no choice due to errors), we recommend creating an image backup specifically – this type of backup will copy every single byte of data from your drive.
Conclusion
In conclusion, it’s definitely possible to format your USB flash drive without losing data. Just remember the following: (1) back up your data first! Even if you can’t access your files in Explorer, you can create an image backup that you can recover later. (2) Enabling Quick Format will keep your data intact, but you still need data recovery software to restore it.
(3) Finally, even if Windows prompts you to format your drive the moment you connect it, you can cancel the prompt and create a backup before proceeding with the format. Good luck!

- 22 publishings
Alejandro is a veteran writer with a rich background in technology. He worked part-time in his uncle’s repair and recovery shop as a young boy, and now uses his experience and writing skills to produce content for multiple tech websites – specifically on the topic of data recovery. As an author for Pandora Recovery, he is constantly testing and experimenting with new tools and technology to help his readers find the best software for their needs.
- Frisco, Texas, United States
Yevgeniy Tolkunov is Hardware Engineer at ACE Data Recovery. Yevgeniy has a Master's Degree in Physics, Information Technology; 15+ years of experience.