Western Digital Data Recovery: How to Recover WD External Hard Drive
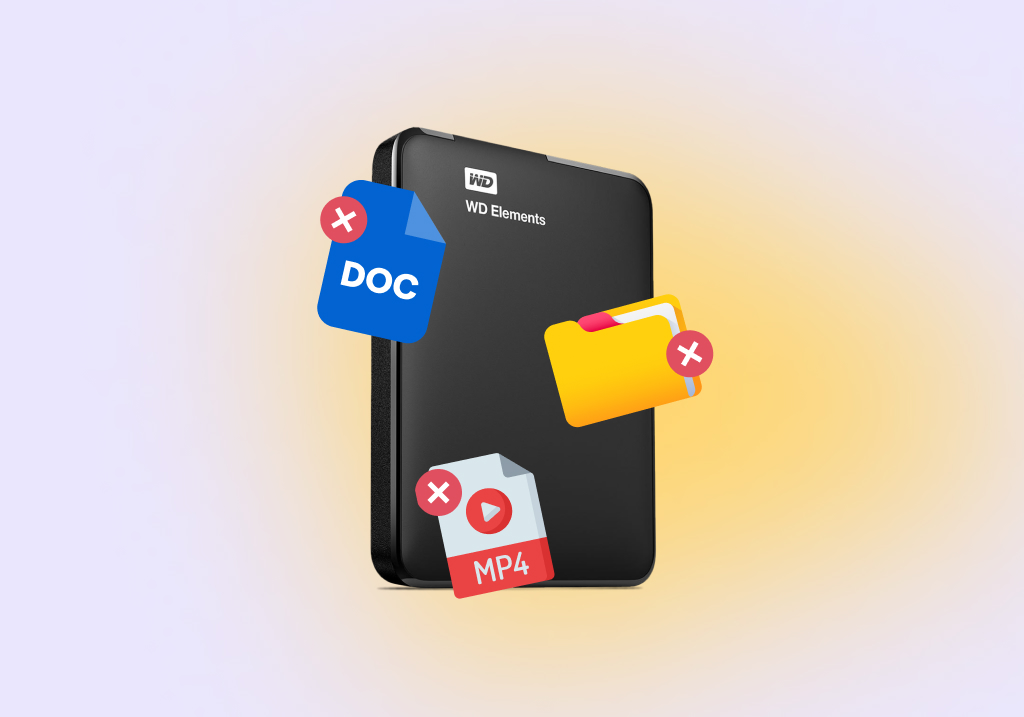
If you have important data on your Western Digital external hard drive and you: (1) accidentally deleted it, (2) formatted your drive, or (3) are experiencing errors that may lead to data loss (such as corruption), this article is for you.
You not only have a limited time to restore the existing data from your drive, but severe corruption may prevent you from saving your files normally. We’ll teach you the proper method for Western Digital data recovery – and, once your data is secure, we’ll show you how to fix it.
Tips For Successful Western Digital Data Recovery
Western Digital hard drive recovery is not only possible, but your chances of success are pretty good as long as your data hasn’t been overwritten. However, one wrong move can spell disaster. To ensure a successful WD drive recovery and get back most (if not all) of your data, keep in mind these 3 useful tips:
Tip 1: Stop Using Your WD Hard Drive
Whether you deleted your files, formatted your drive, or are experiencing errors… Stop using your WD hard drive! Not only might you worsen any existing logical damage, you may permanently erase any data on the drive.
What do we mean by “permanently” erasing data? Well, even if you can’t see your files in Explorer, they still reside on your WD drive’s file system, marked to be overwritten by new data. If you continue to use your WD drive, even downloading a tiny file from the internet can overwrite an important document.
Tip 2: Don’t Apply Any Repair Procedures
Windows provides its users with useful tools to repair a logically damaged drive, such as the CHKDSK command and the Error-checking tool. In fact, we’ll be going through some of them later in the repair section.
However, if you have important data on your drive, DO NOT attempt to repair it. The process of fixing bad sectors, faulty partitions, and other errors may cause data loss due to data corruption or overwriting. Instead, recover your external hard drive first, THEN repair it.
Tip 3: Backup Your Data
Our last tip for a successful Western Digital data recovery is to back up your data. Specifically, we highly suggest creating a byte-to-byte backup – this copies all the data blocks on your drive onto an image file that you can recover later. This way, you get 100% of your data back and you don’t have to cause further stress to the drive itself.
For the purposes of this guide, we’ll be using an app called Disk Drill to create the backup because we’ll be using it again for the data recovery section. Disk Drill is actually a data recovery app that provides a free backup tool – this is uncommon, even for paid solutions. We’ll go over more of its features in the recovery section.
If you can manually copy and paste your files from your drive to your computer, you can do that instead. However, note that severely corrupted drives tend to get worse the more you use them – so make sure you gauge the risk.
To backup your WD external hard drive using Disk Drill, try following these steps:
- Download and install Disk Drill.
- Connect your WD drive to your computer, then launch Disk Drill by double-clicking its icon on your desktop or Start menu.
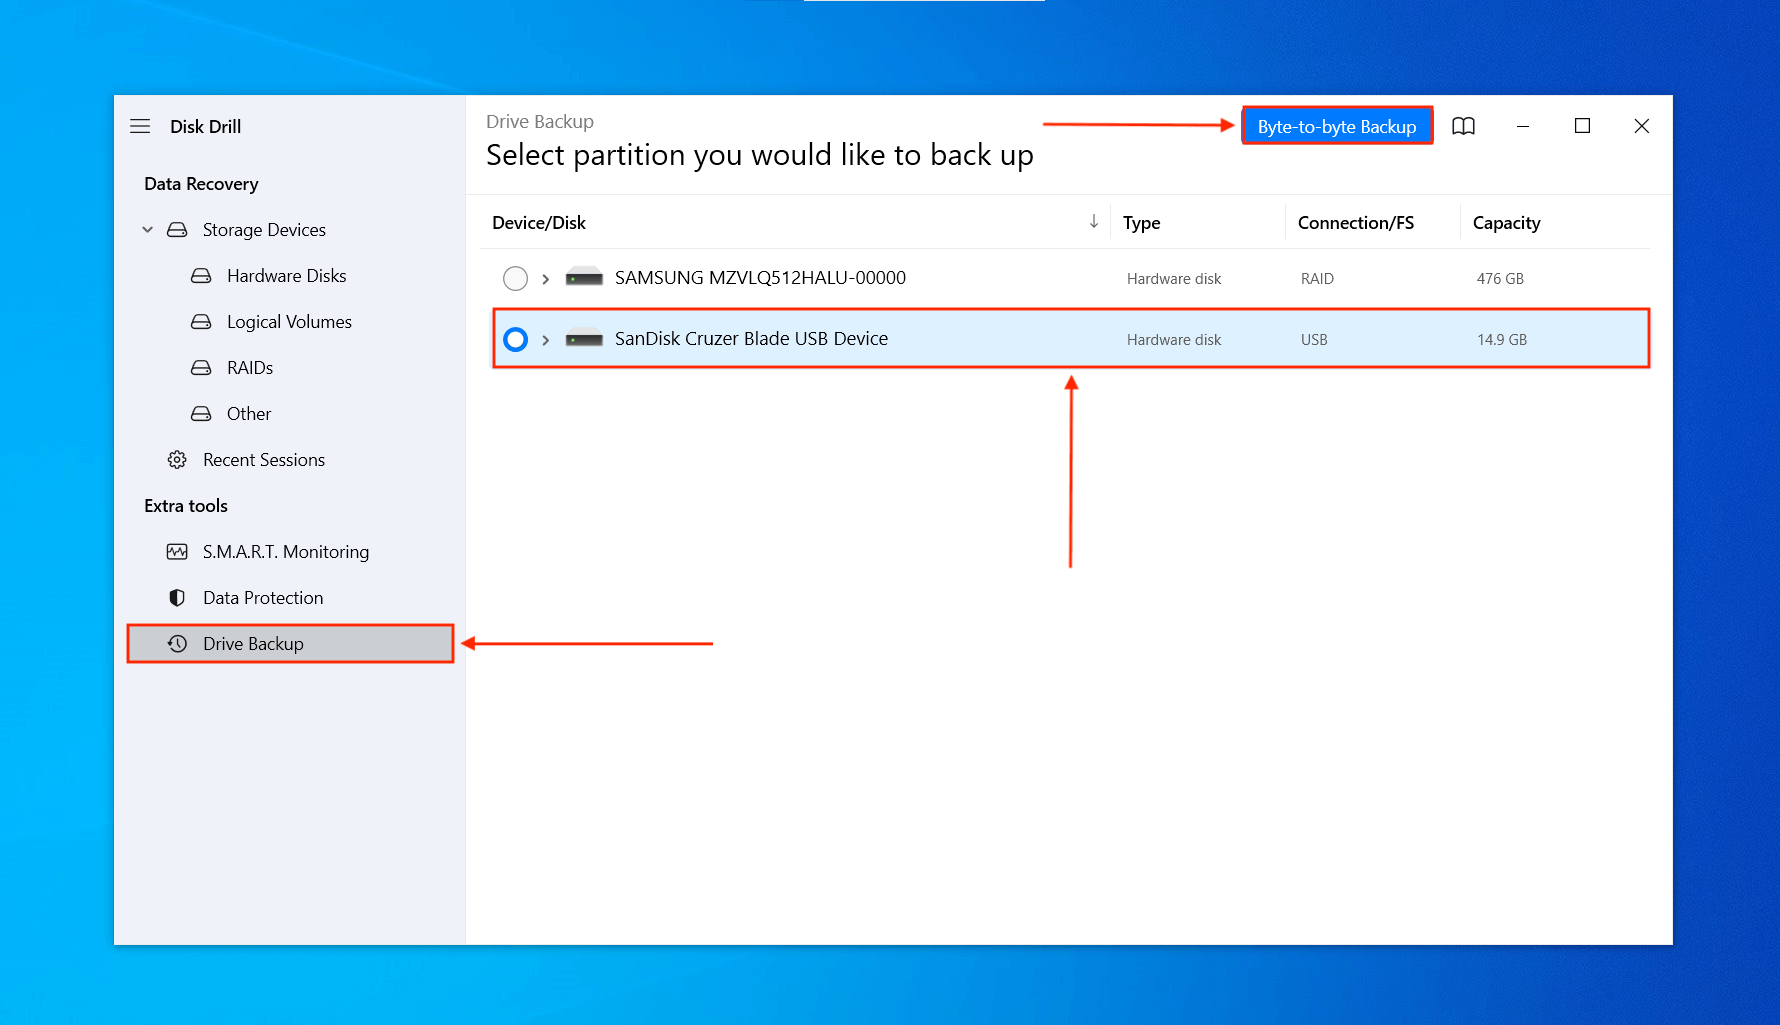
- On the left sidebar, click Drive Backup. If it’s your first time launching the app, click OK let’s do it. Then, select the drive you want to back up and click Byte-to-byte backup.
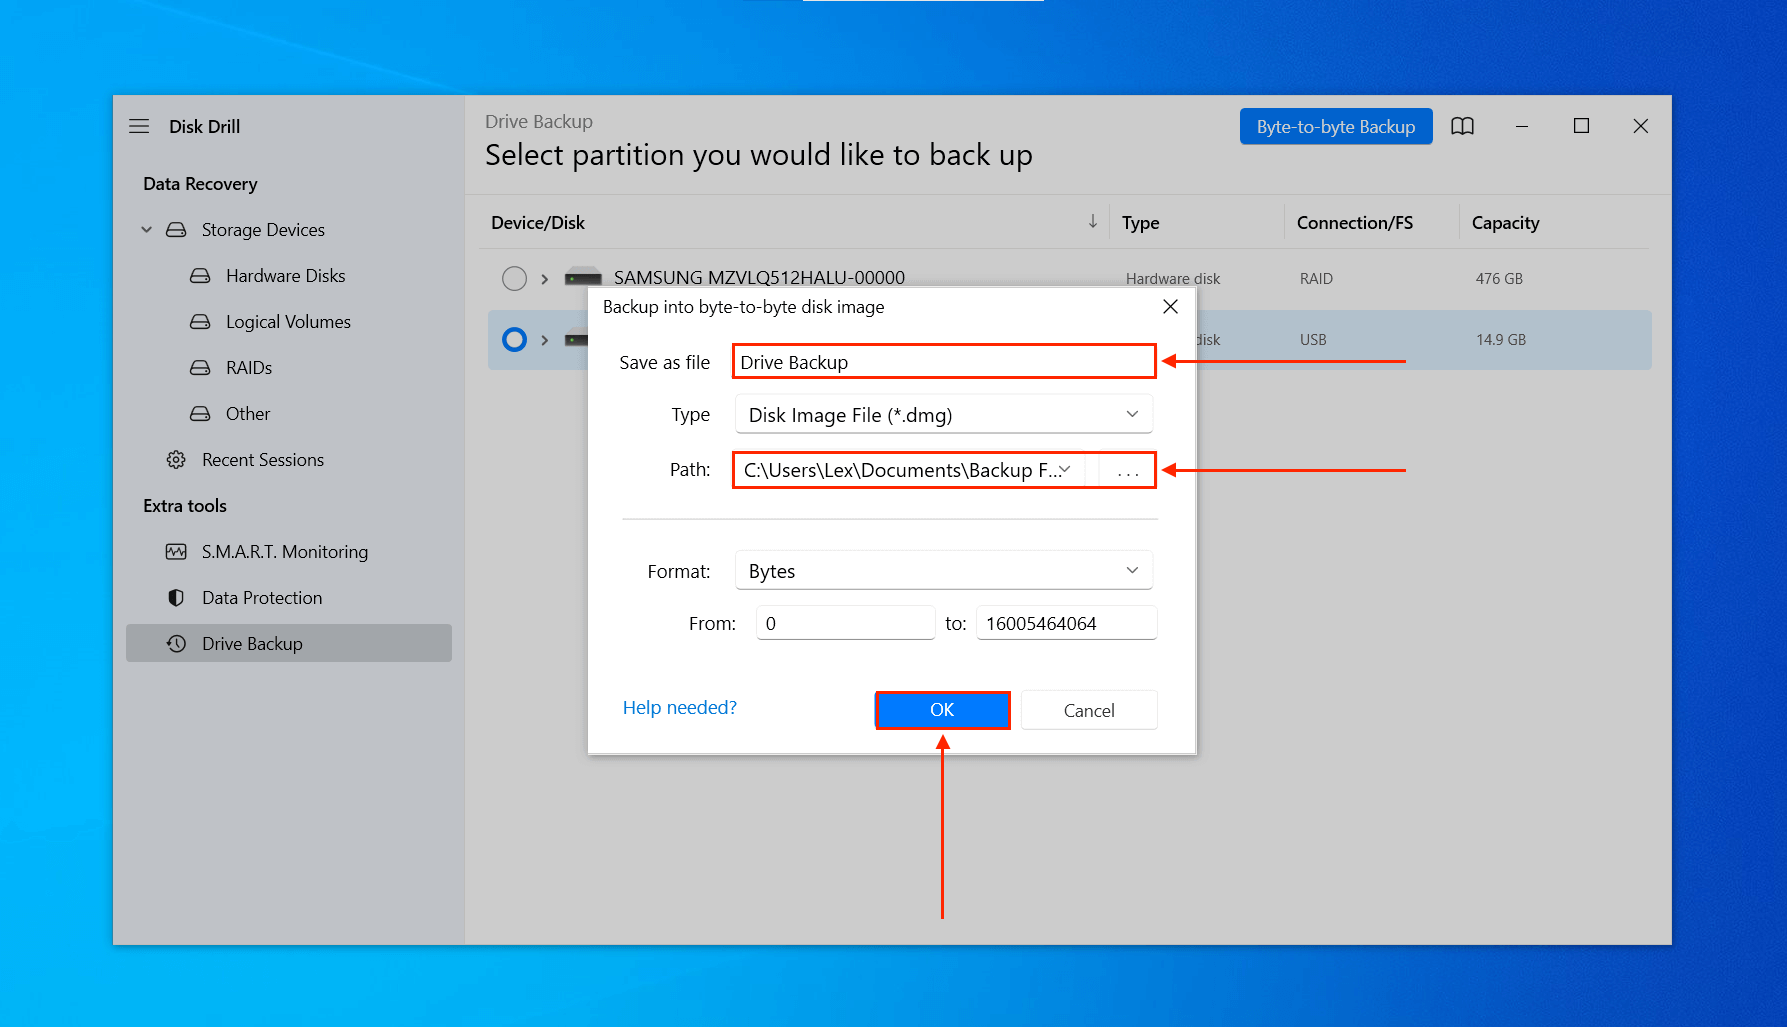
- In the dialogue window that appears, name your backup file, select a location to save it, and click OK.
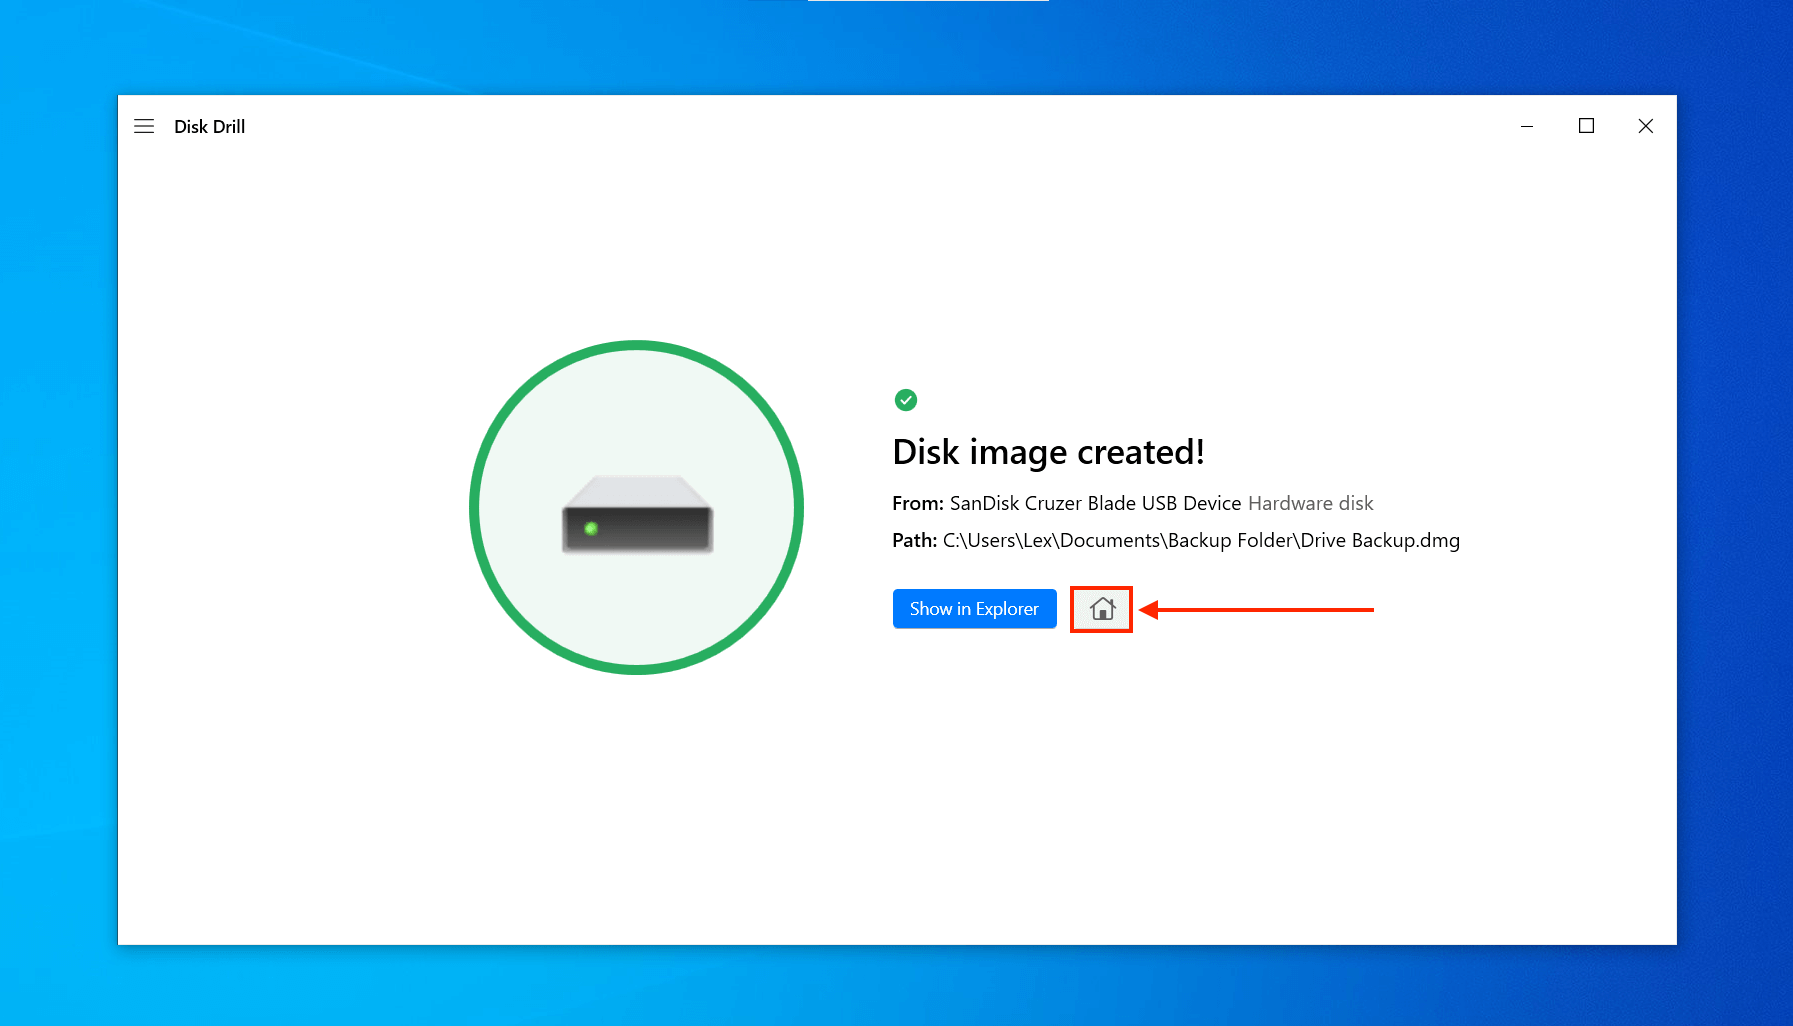
- Once the backup has been created, click the Home button to return to Disk Drill’s main window.
How to Recover Data From Western Digital External Hard Drive
Once you have backed up your data (if you have a logically damaged drive), you can safely attempt to recover your Western Digital external hard drive. This is the last preparation step we need to do before attempting repair (which has a very high probability of wiping your data). And if you have a healthy drive that you need to restore due to accidental deletion or formatting, this is how to do it.
Below, we provide you with guides for 2 very well-known WD data recovery software that we have rigorously tested many, many times with different data types and devices (including faulty drives) on both Mac and Windows systems – Disk Drill and PhotoRec. If you need help deciding which tool to use, read our Disk Drill vs PhotoRec comparison article.
Both apps will work with WD My Book, WD My Passport, WD My Cloud, and other Western Digital storage solutions. They also work with SSDs as long as TRIM did not zero out the drive yet. But if you want to choose software based on YOUR own criteria, check out our totally free data recovery software picker and find the best tool for your needs (download not required).
Option A: Disk Drill
The first data recovery software we’ll demonstrate for you is an app called Disk Drill. There are actually loads of data recovery software on the market (and we’ve written about most of them!), but we chose Disk Drill for this guide based on simple criteria:
(1) It provides a free backup tool, which is uncommon, (2) it supports all common Windows file systems, including ExFAT, FAT32, NTFS, and (3) among the tools we’ve tested, Disk Drill has the most success with restoring original folder structure and file names (if your data was found with a Quick Scan).
Disk Drill will also work even if your drive is unrecognized, not detected, showing up as RAW due to corruption, or not showing up at all in File Explorer (as long as it appears in Disk Management with the right size).
Here’s how you can recover data from Western Digital external hard drive, using Disk Drill:
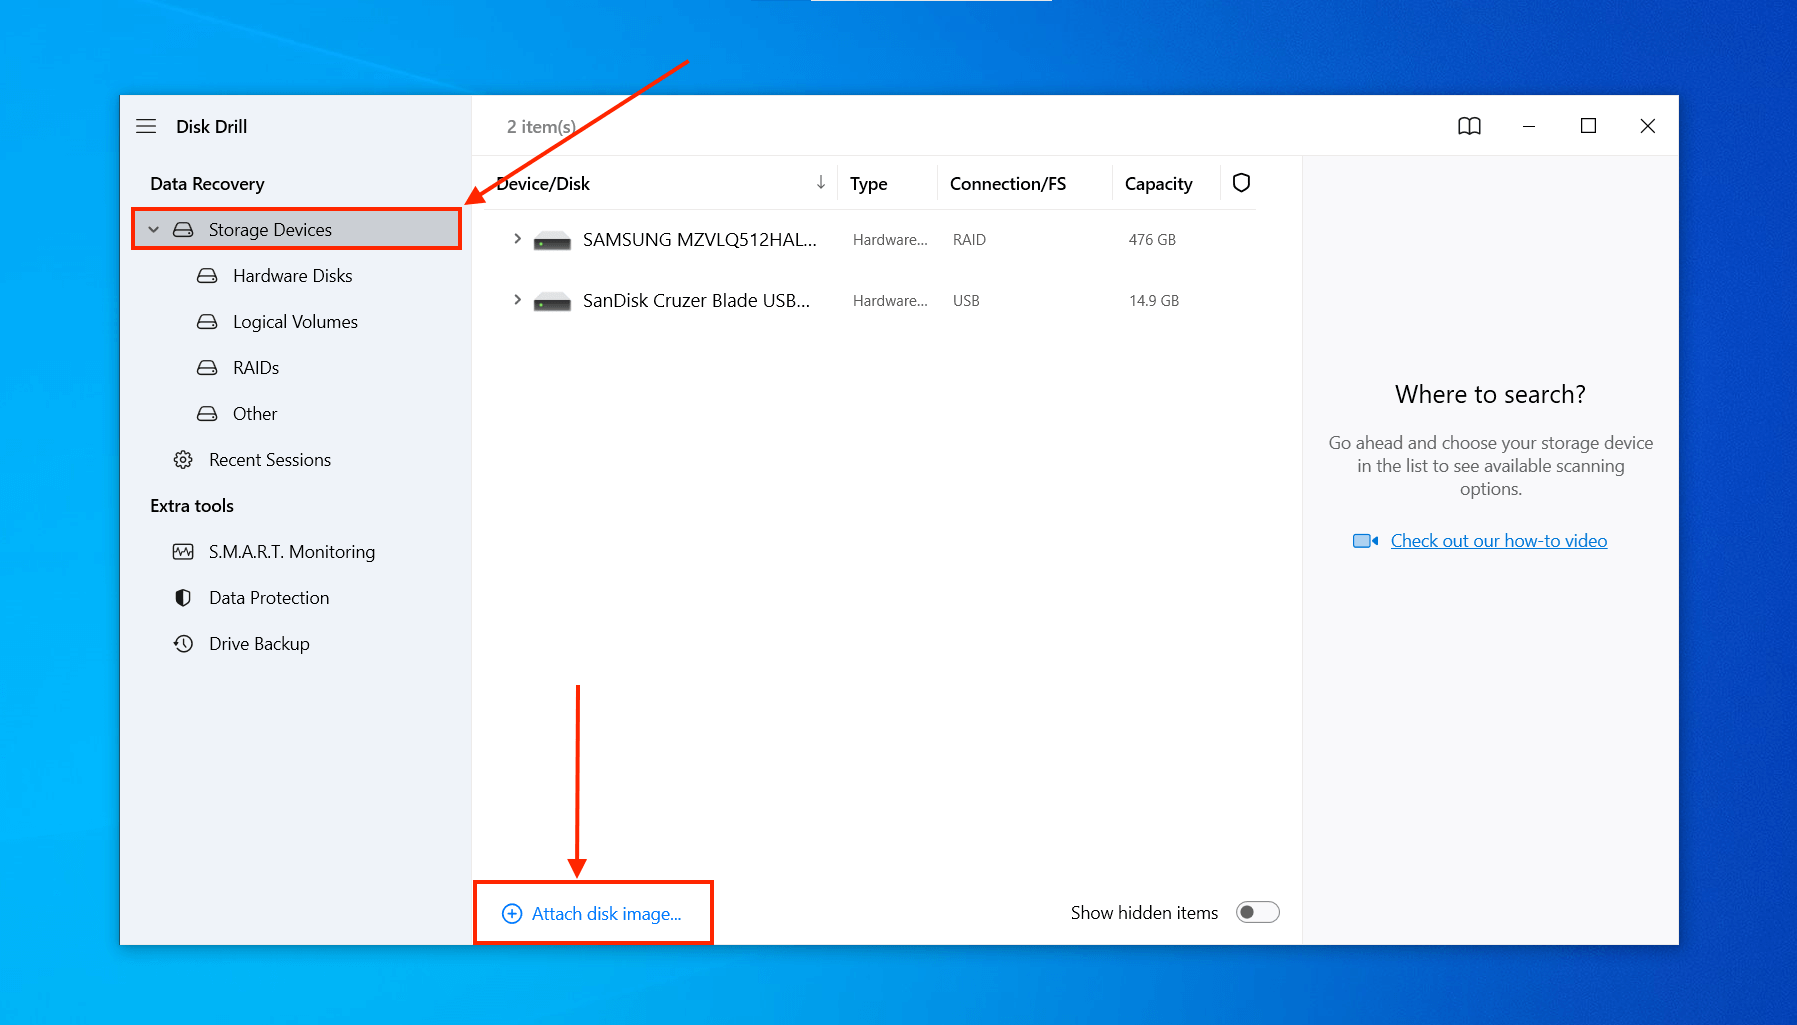
- If you haven’t already, download and install Disk Drill. If you’re coming from the backup section, select Storage Devices in the left sidebar under the Data recovery section. Then, click Attach disk image at the bottom of the window.
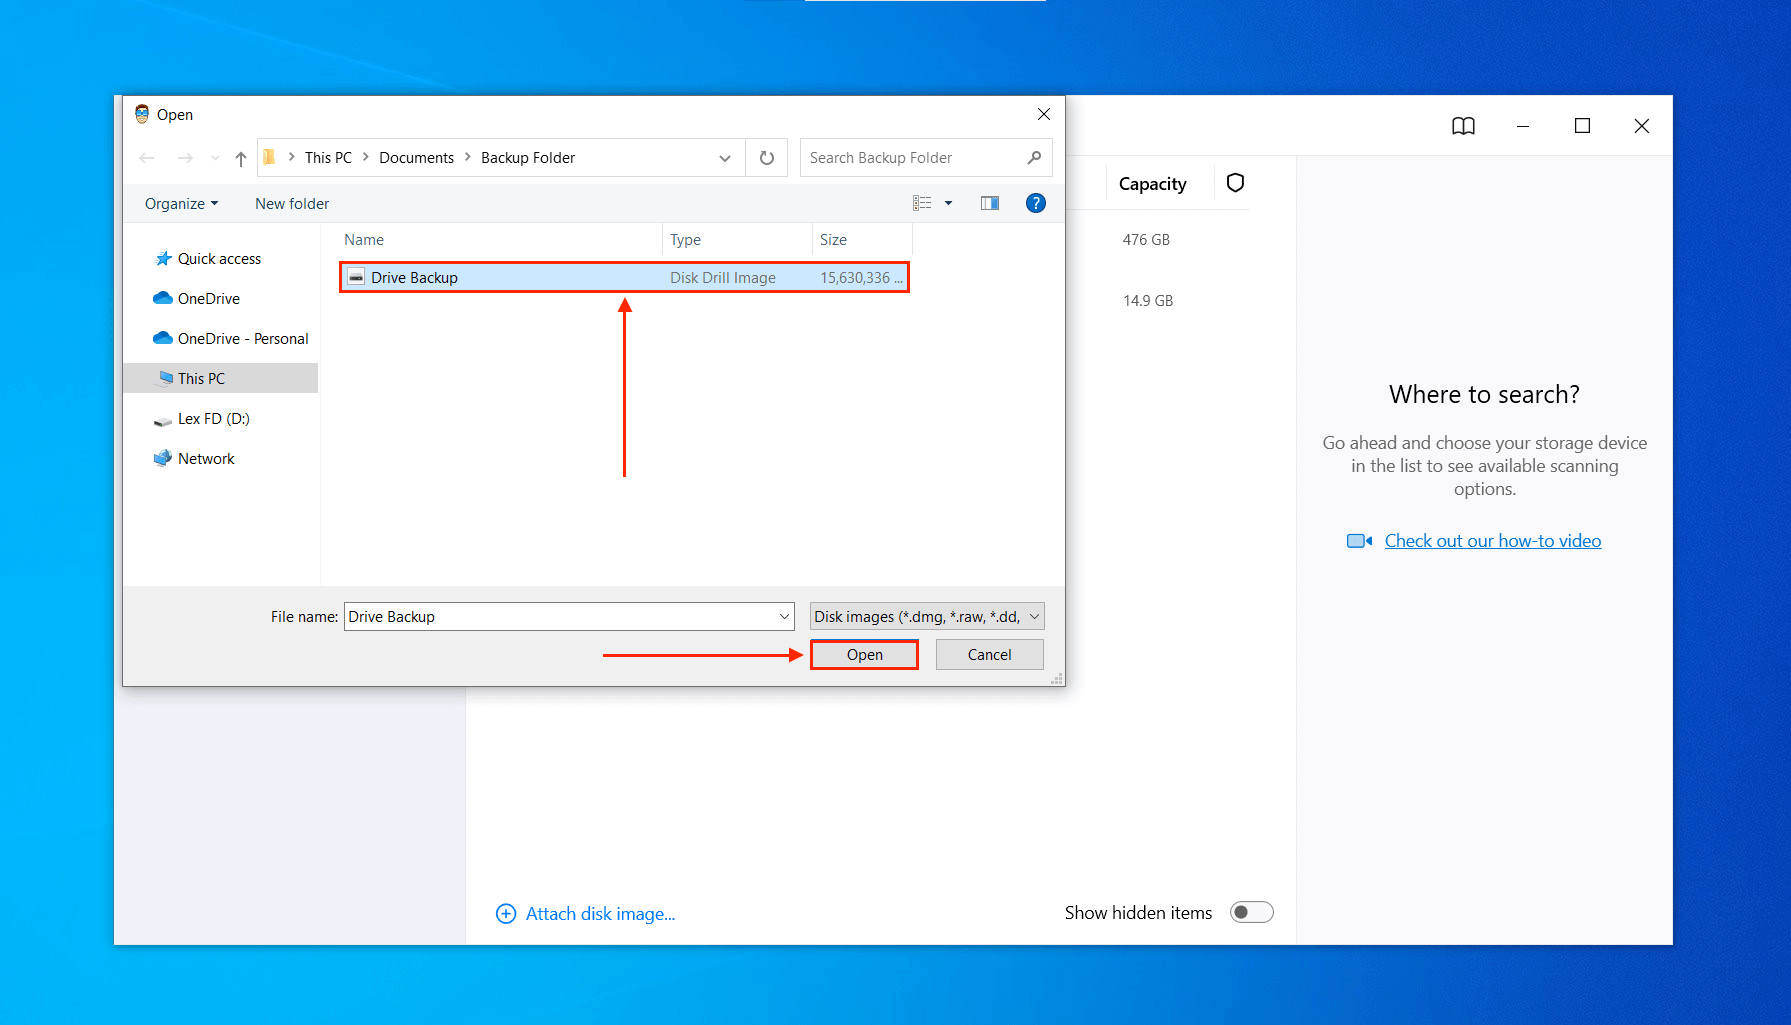
- Locate your backup file (whether you created it with Disk Drill or another software), click it once to select it, and click Open.
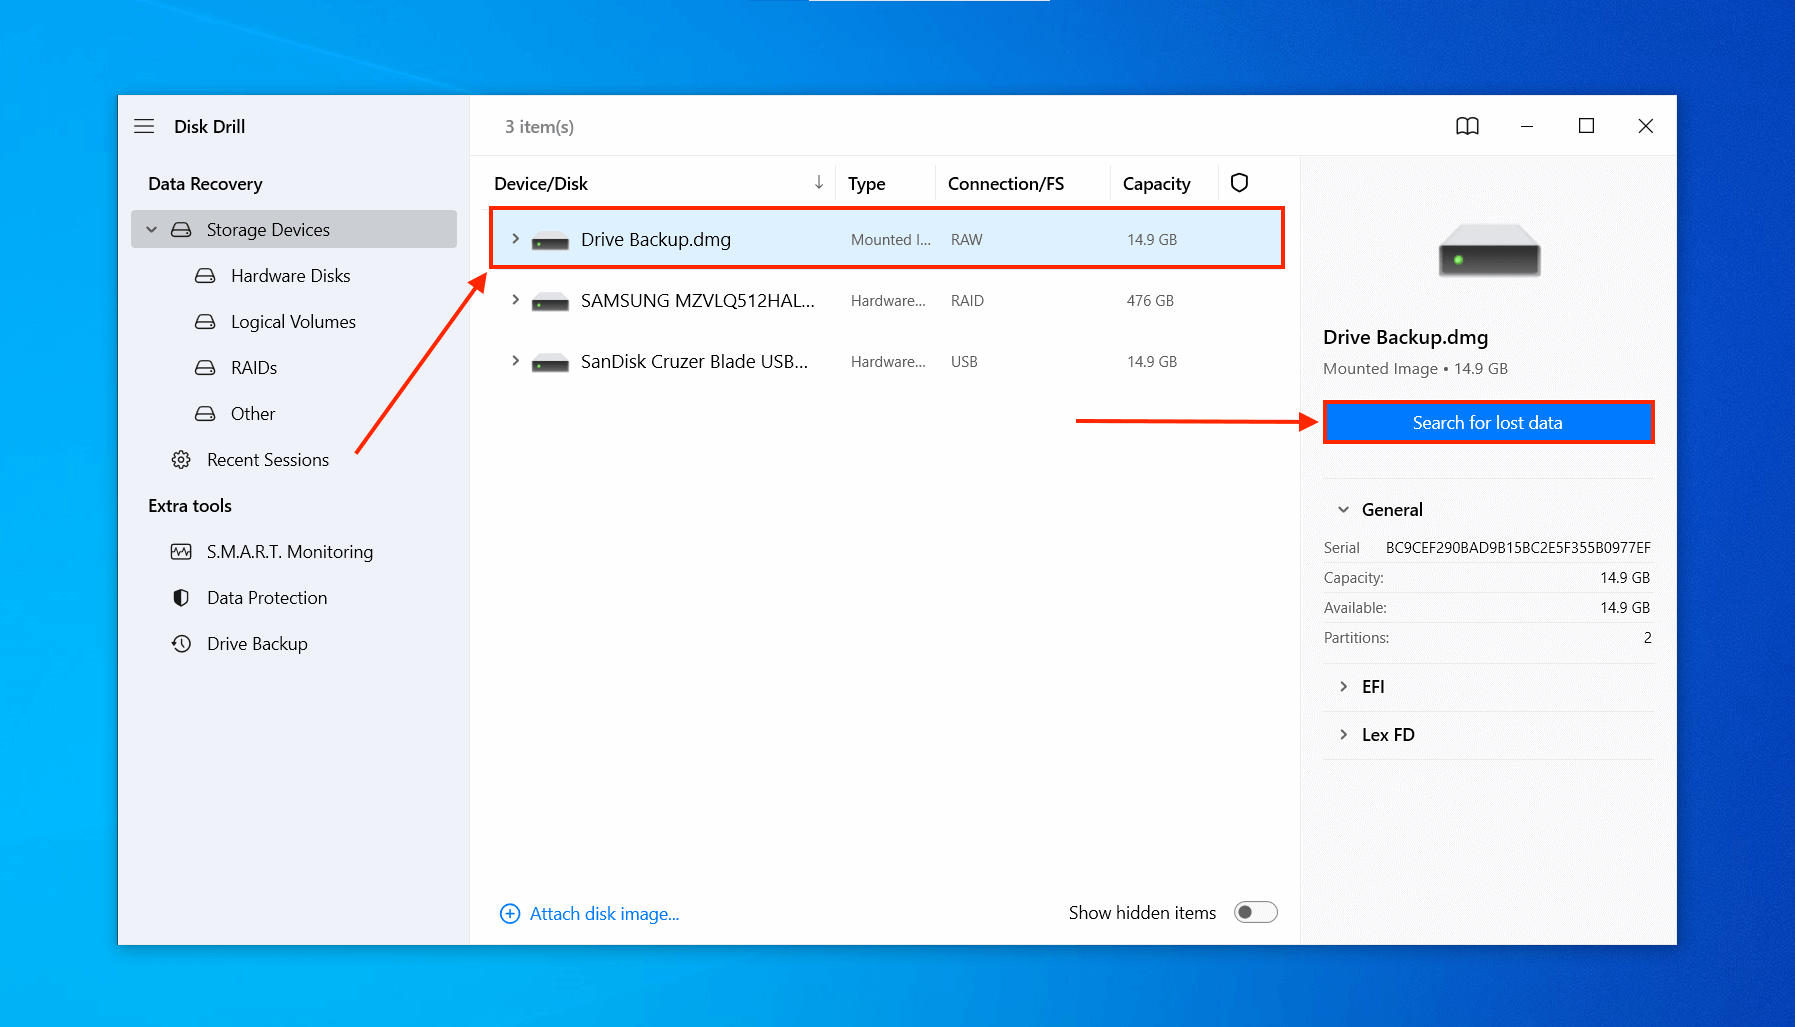
- Select your backup image and click Search for lost data.
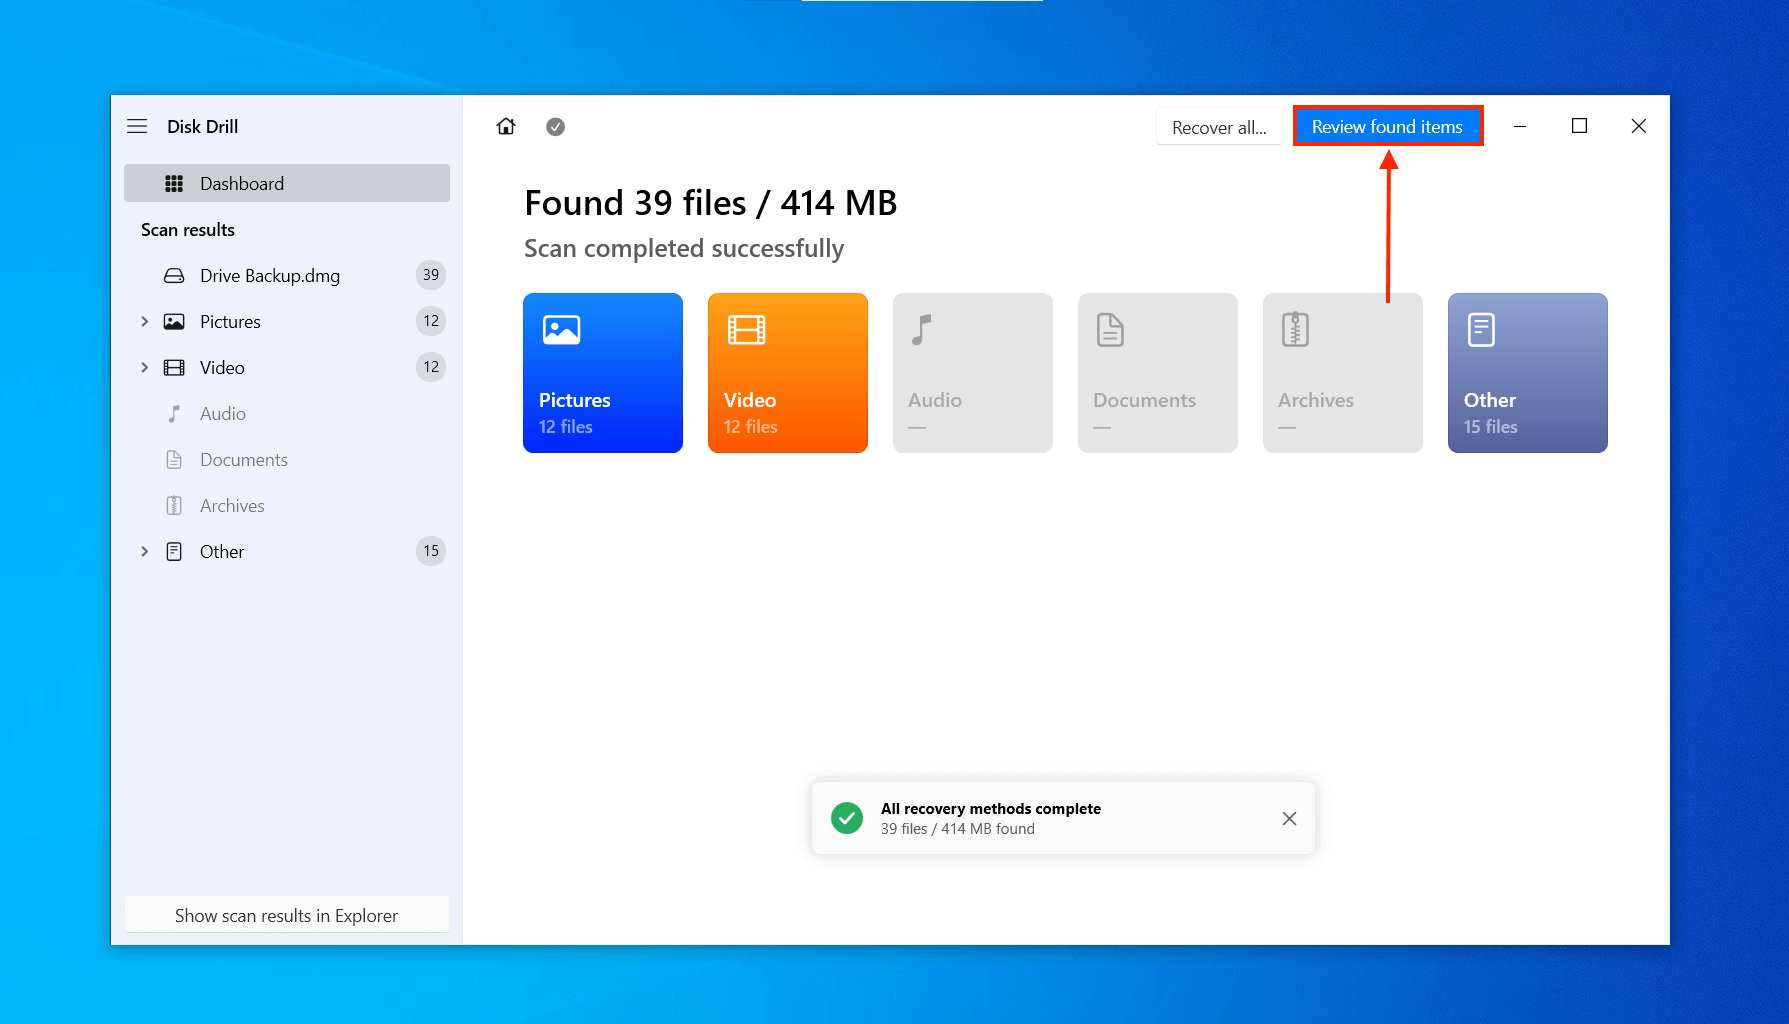
- Once Disk Drill is done scanning the image file, click Review found items.
- Expand the Existing tab to view files that were present on your WD drive when you created the backup. You should also check the Deleted or lost and Reconstructed tabs for data that was corrupted or deleted due to errors.
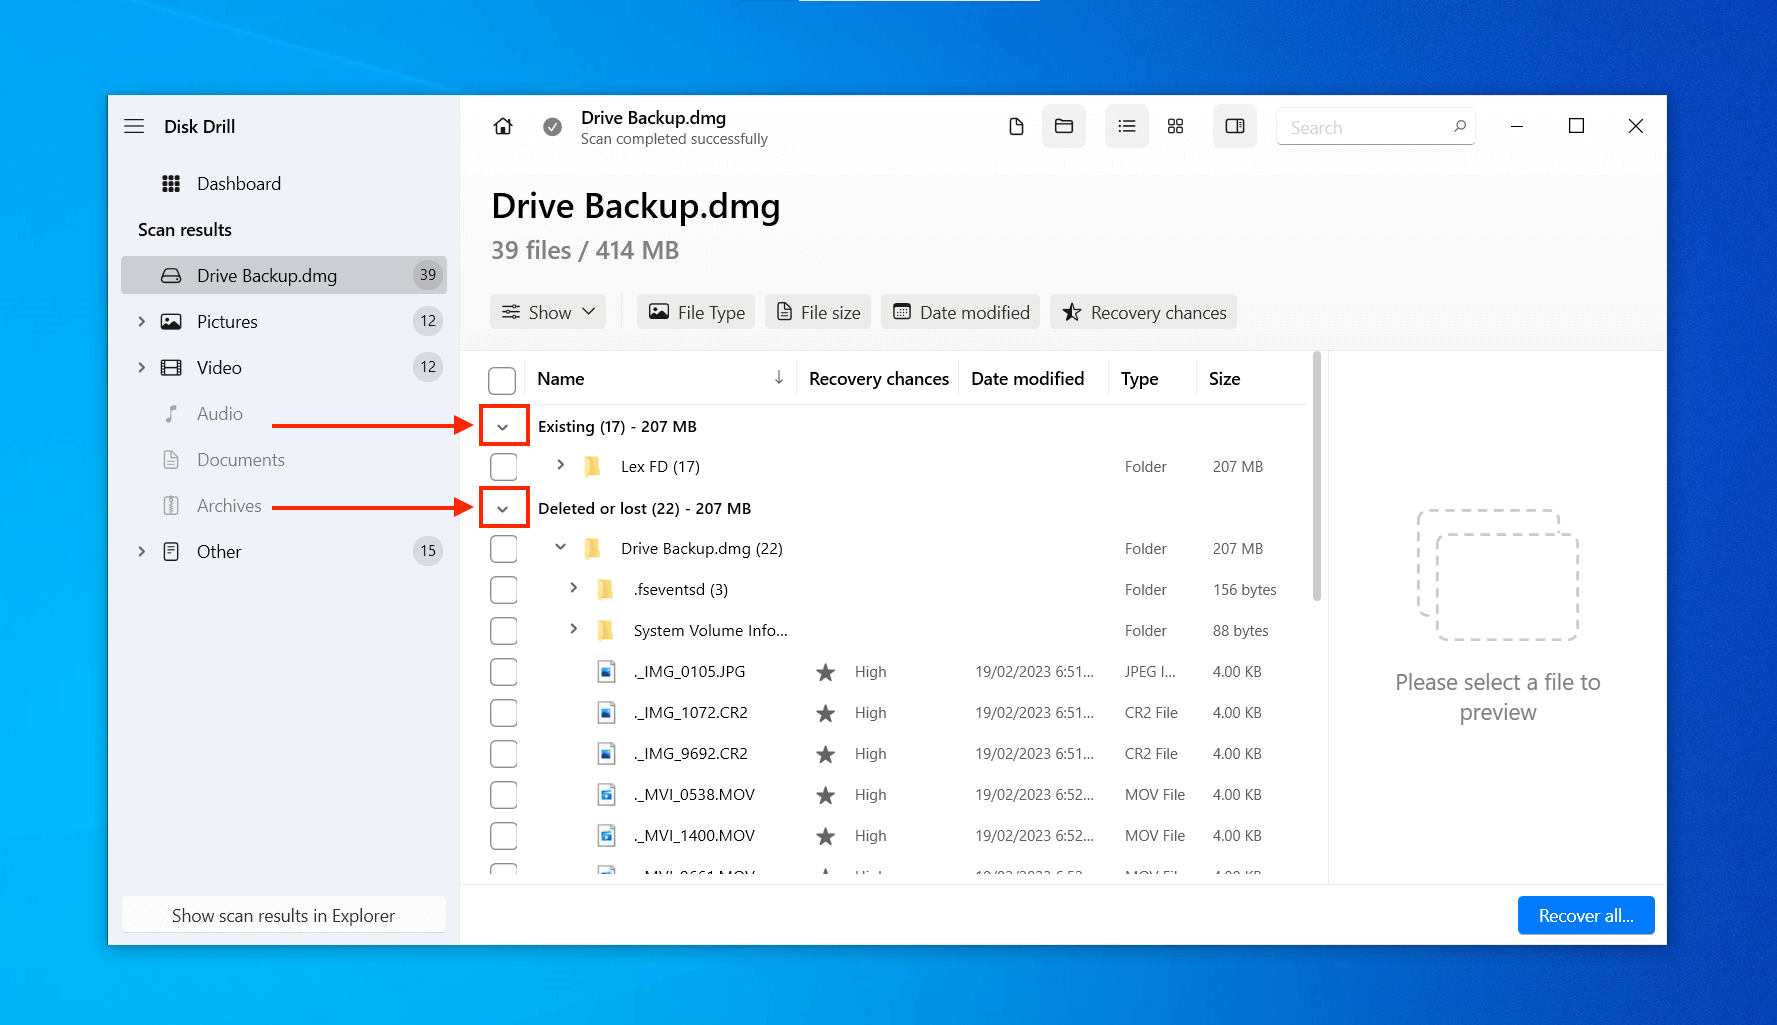
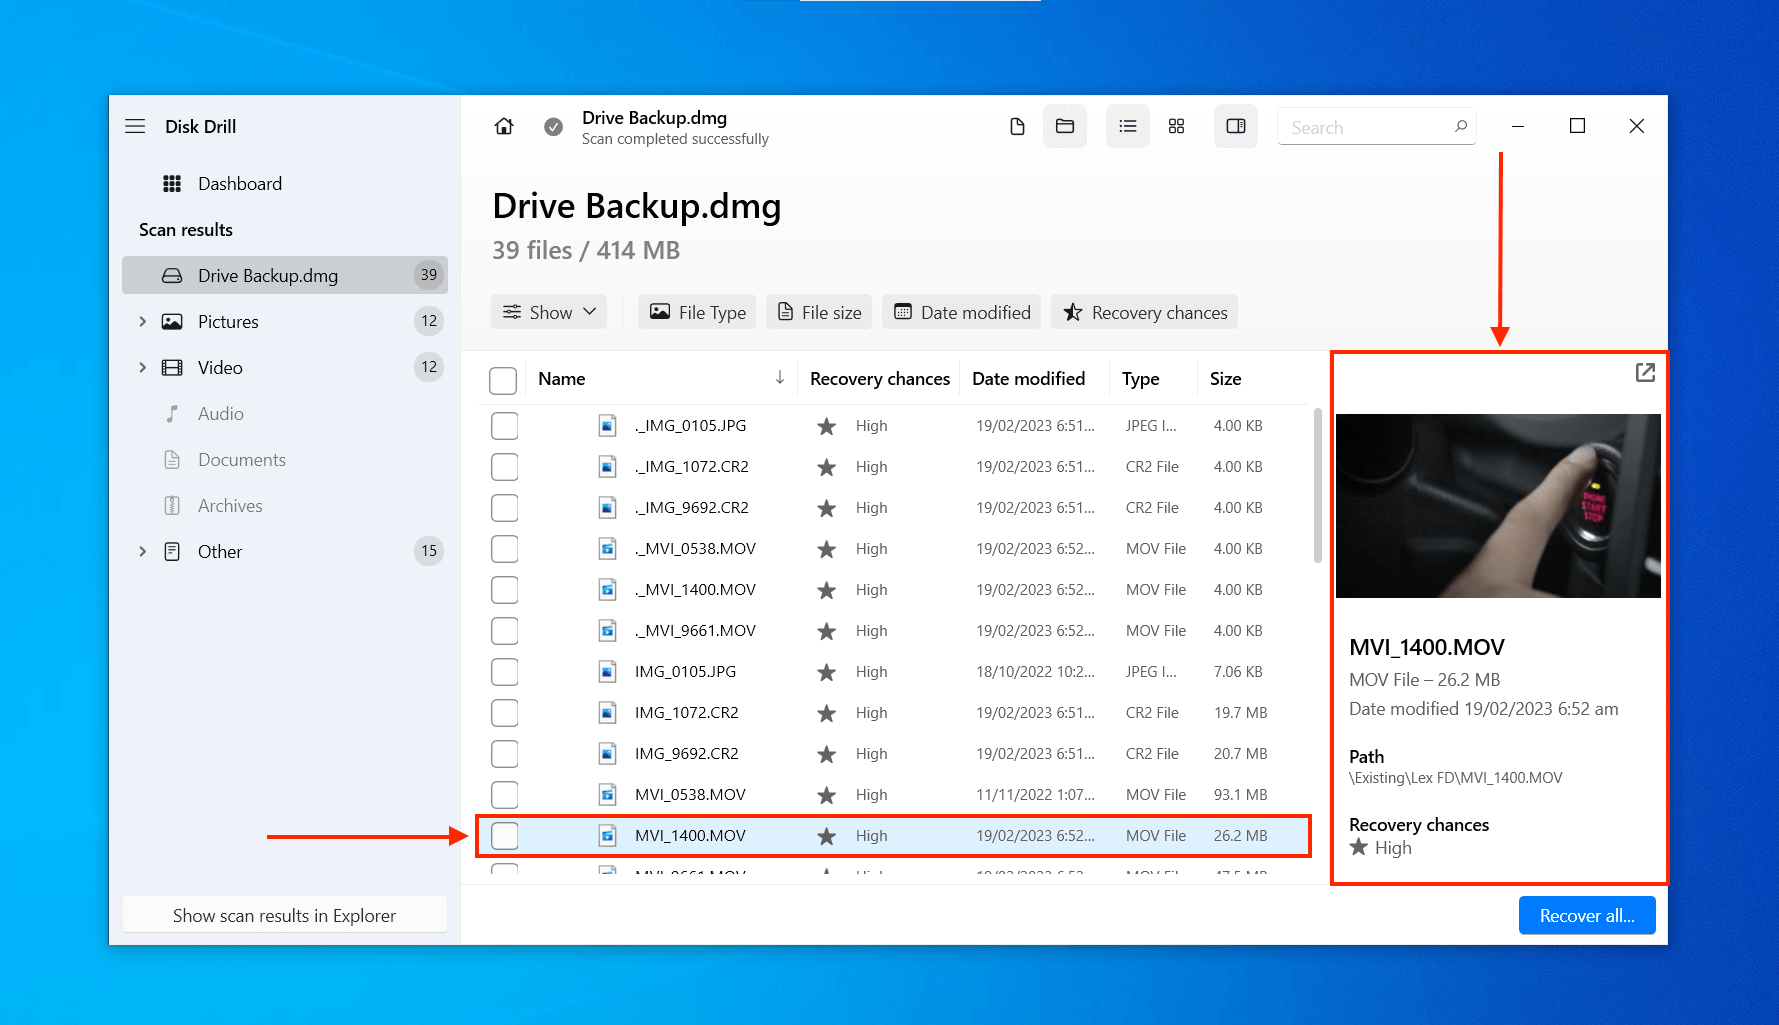
- Before you recover your WD external hard drive, you can preview any file by clicking it once (a display panel will open to the right of the main window).
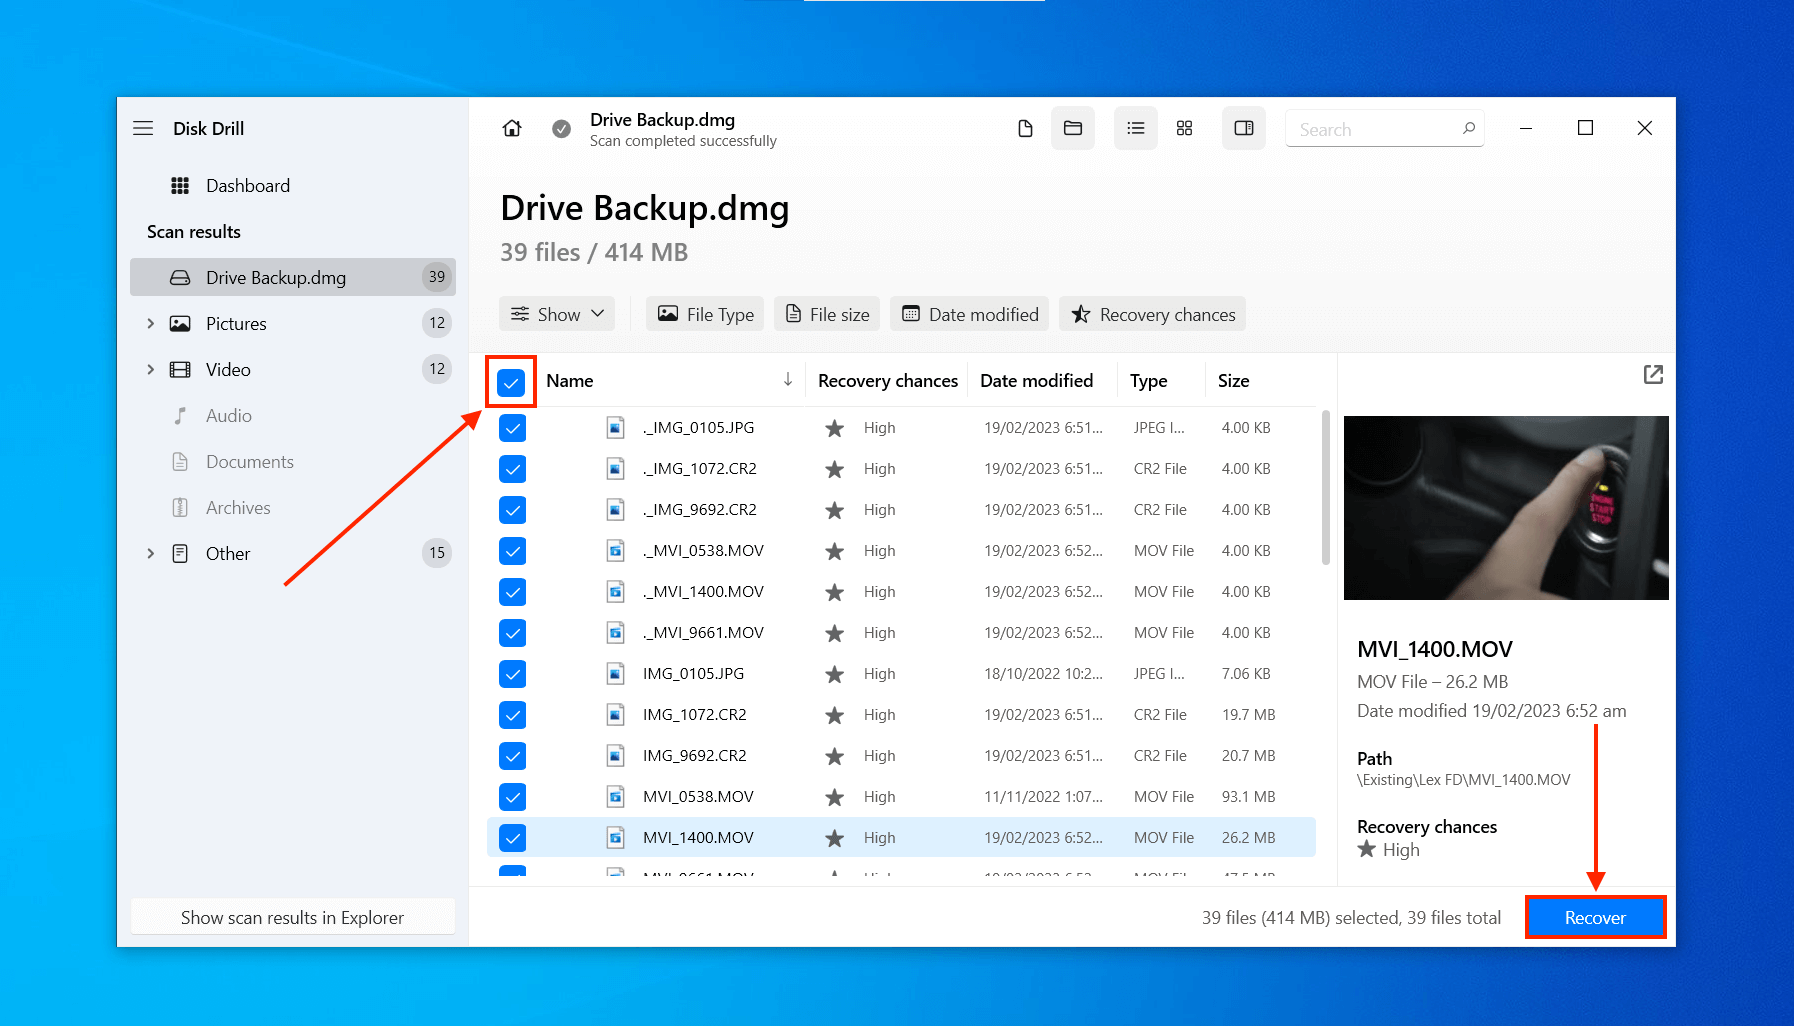
- Once you’ve identified the data you want to restore, tick the box beside it or tick the box in the leftmost column’s header to select all files. Then, click Recover.
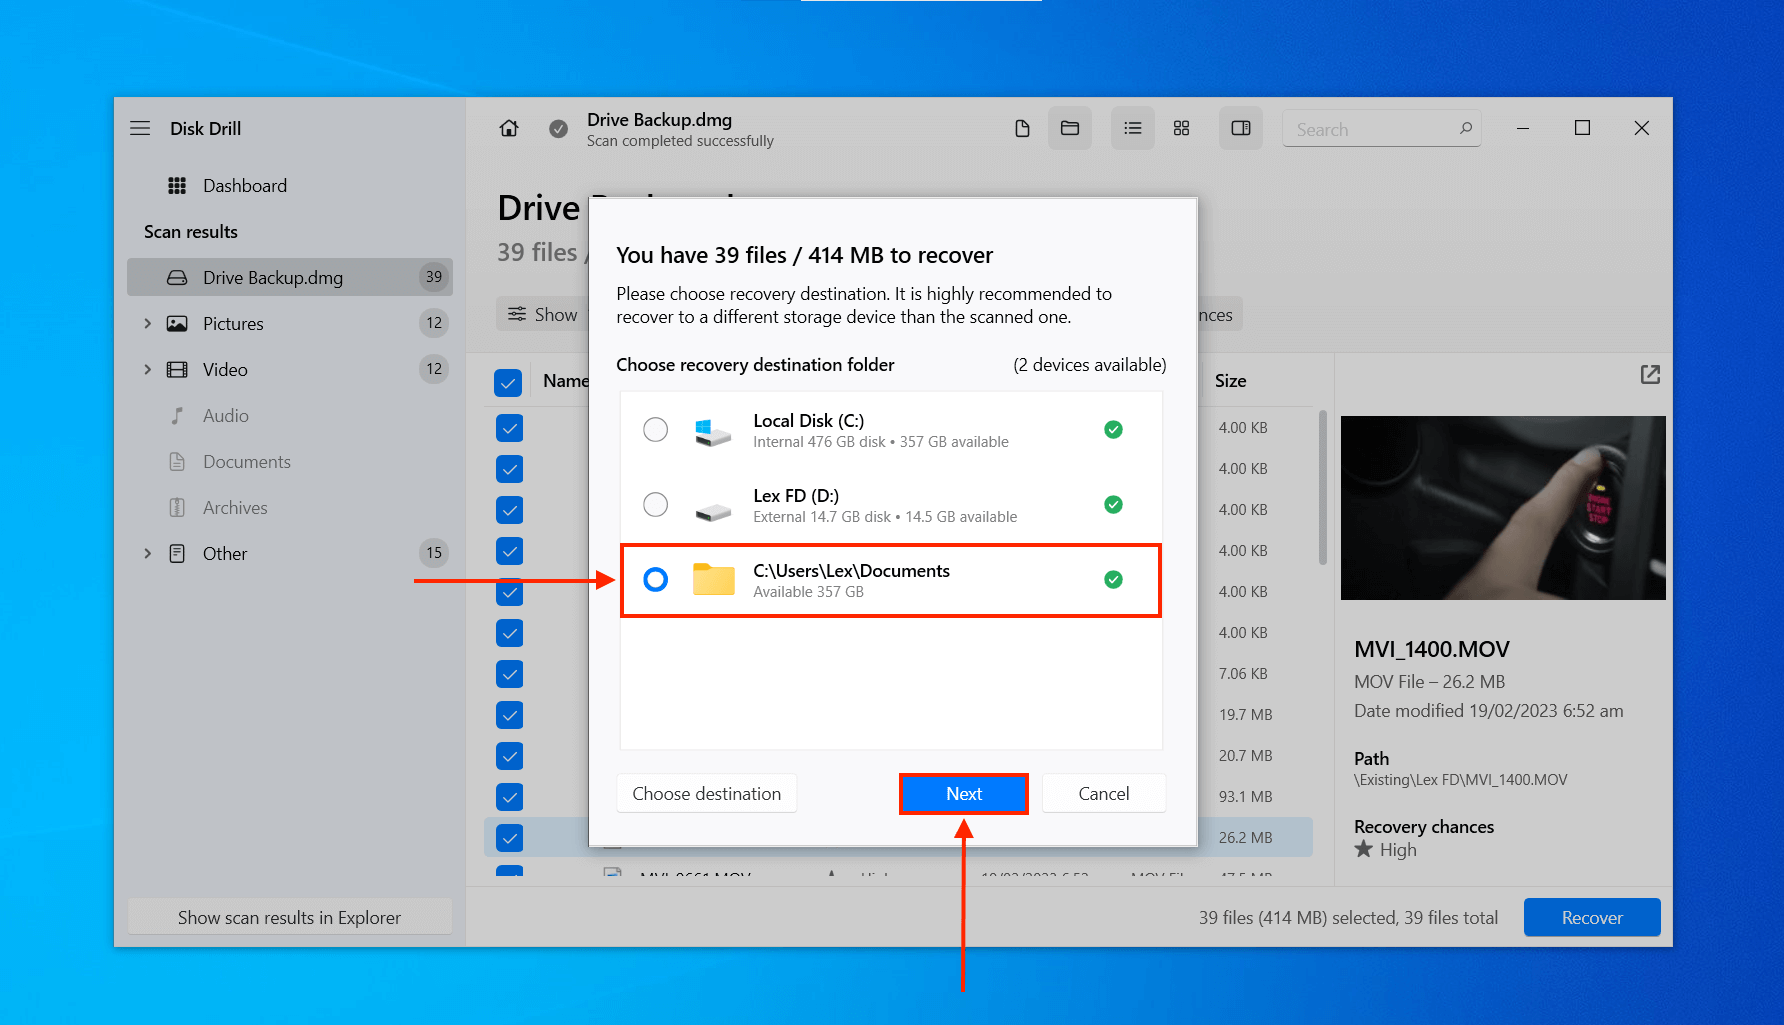
- Select a location where your data will go after you recover files from your WD external hard drive (or its image backup). Do not save it on your WD drive if it’s corrupted or you’re restoring data from the drive directly – instead, choose a location on your computer. Then, click OK.
Option B: PhotoRec
If you want to recover more than 500 MB of data and you don’t have the budget to spend on a Disk Drill license, you can try PhotoRec. It’s a free Western Digital data recovery software available for Mac and Windows.
Like Disk Drill, PhotoRec also works with most common Windows file systems like FAT32, ExFat, and NTFS – however, its primary method of data recovery is based on file signatures, so it can’t recover your data’s original folder structure and file names (which resides in the file system).
PhotoRec’s latest stable version was released back in July 2019, but it does work with Windows 10 and above. If you want to know more about this app’s strengths and weaknesses, read our in-depth PhotoRec review.
If you need to recover files from your WD external hard drive using PhotoRec, follow these steps:
- Download the TestDisk/PhotoRec bundle from CGSecurity’s wiki.
- Extract the downloaded file and launch qphotorec.
- Use the dropdown menu to select the drive or backup image you want to scan. Then, select the entry with the [Whole disk] label and select the option to Extract files from whole partition. Click the Browse button to select a recovery location and click Search to begin the process.
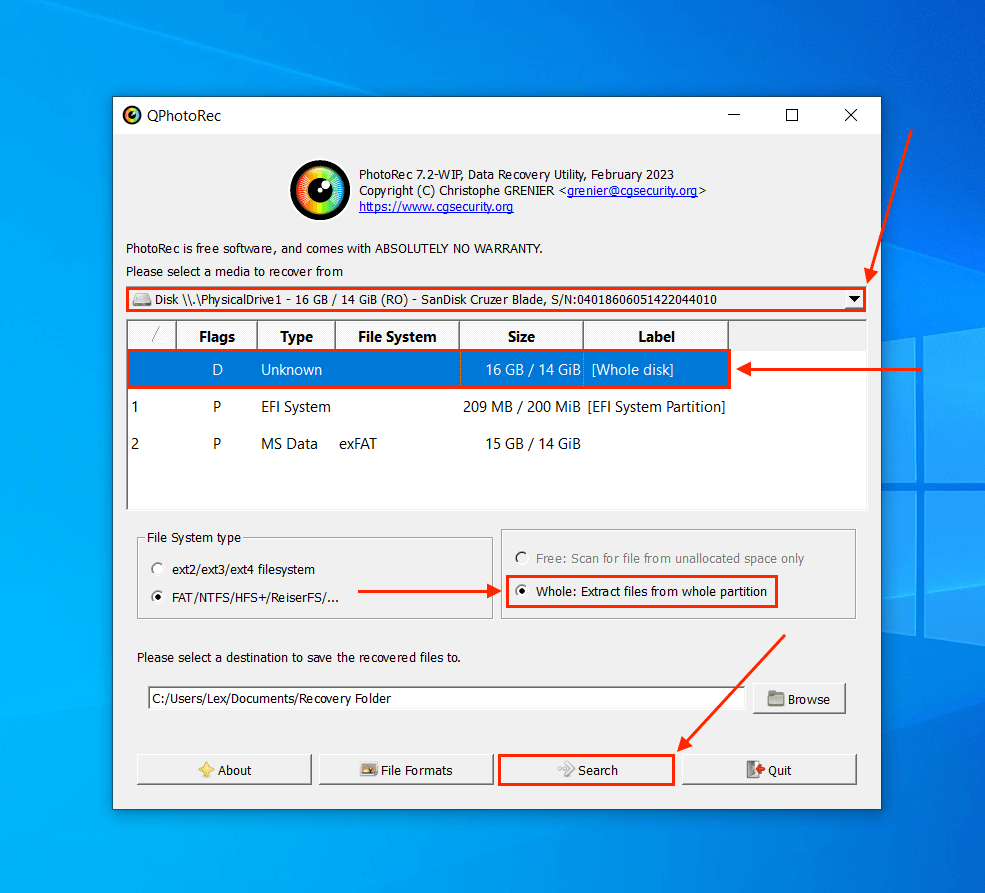
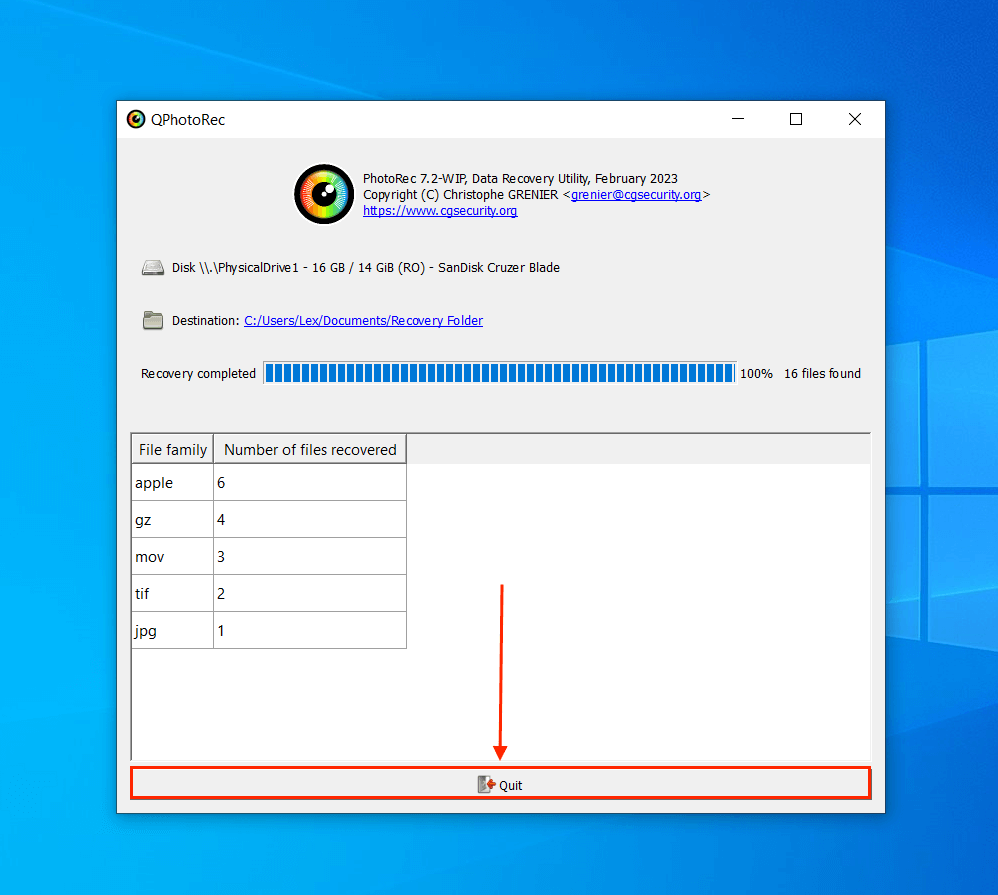
- Once the scan is complete, click Quit. You should find the files you restored from your WD drive in a folder called recup_dir in the location you selected in Step 3.
Best WD Hard Disk Repair Practices
For users with a faulty drive, this section provides 5 methods with step-by-step guides on how to repair your WD hard disk. Note that any WD hard disk repair method will likely result in permanent data loss, which is why we advise you to secure your files first.
Method 1: Check Your WD External Hard Drive Connection
It’s entirely possible that your WD external hard drive is misbehaving due to technical connection problems. Check your cables and ports for any debris or wear and tear — better yet, try connecting your drive to another computer (as long as neither are infected!) and see if it works on different machines.
Method 2: Check Your WD Hard Drive Health
Whether or not you’re experiencing errors, it’s important to monitor the health of your drives. All drives have a finite lifecycle and/or may already be suffering from errors that just aren’t showing up yet.
Fortunately, all modern hard drives (including Western Digital drives) have a built-in monitoring system called S.M.A.R.T. — “Self Monitoring, Analysis, and Reporting Technology.” Using S.M.A.R.T., you can not only figure out what’s wrong with your drive, but you can also pre-empt any errors.
If you used Disk Drill to back up and recover your data, you can use its free S.M.A.R.T. Monitoring tool to check your system drive’s health. For external drives, we recommend the following third-party apps:
Method 3: Fix Errors With Error Checking Tool
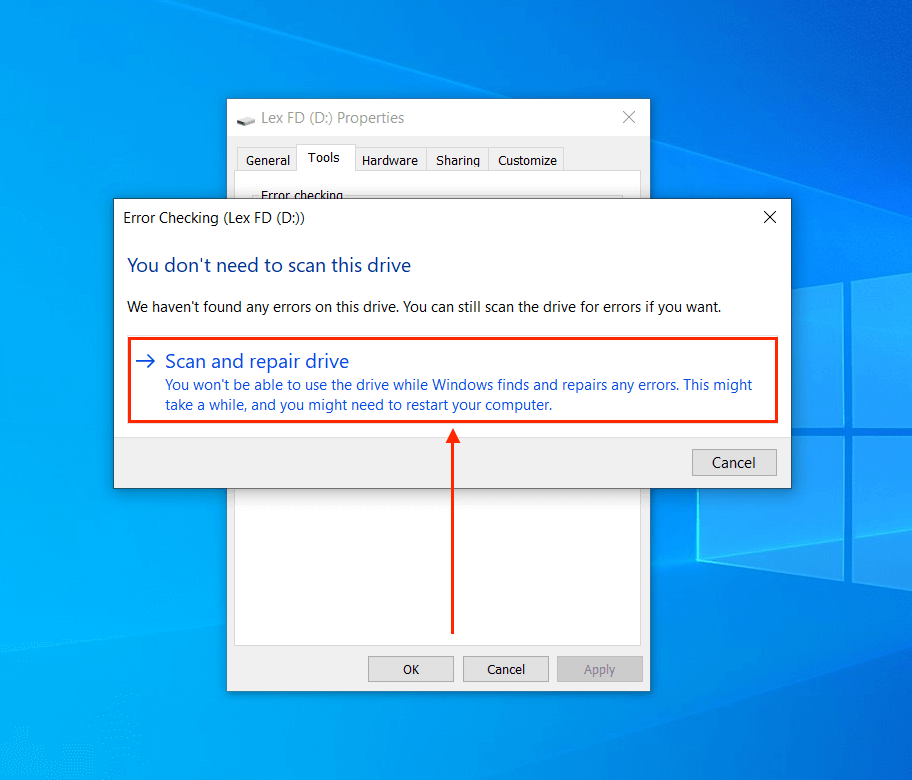
If you’re experiencing file system errors or other disk-related issues, Windows provides an Error checking program that acts as an excellent WD external hard drive repair tool by automatically diagnosing and fixing file system errors.
You can easily access this tool via File Explorer:
- Connect your WD drive to your computer.
- Open File Explorer and right-click your WD drive > Properties.
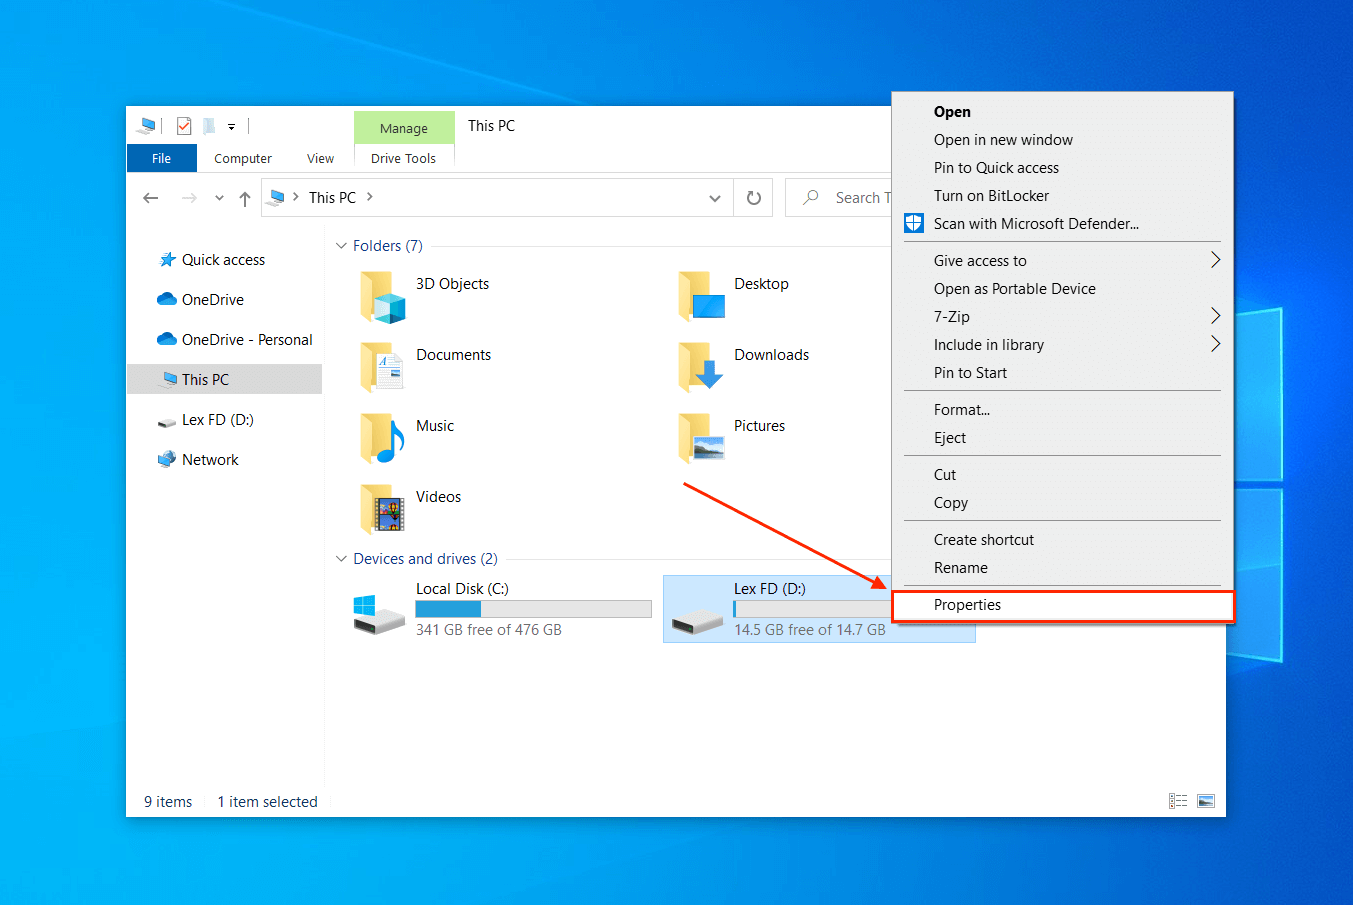
- Navigate to the Tools tab and click Check.
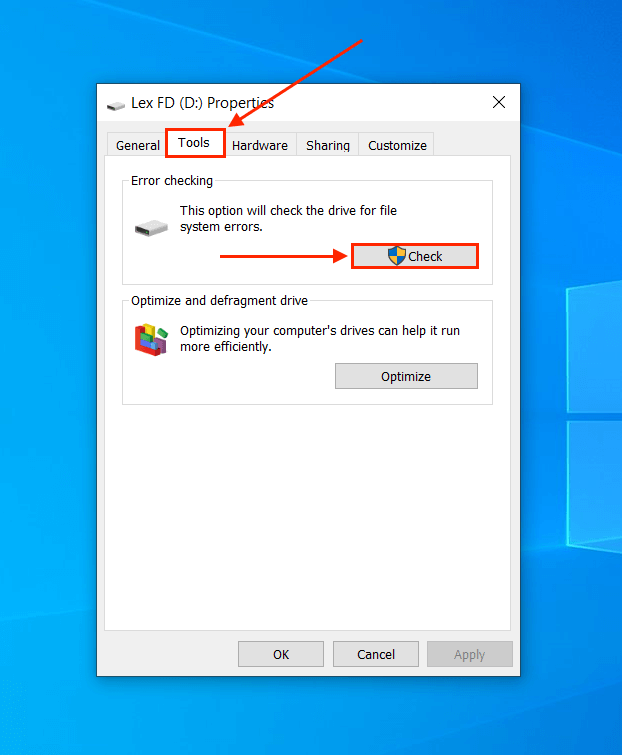
- If errors were found, follow the wizard to repair them. Windows may also report that no errors have been found, but it’s possible that they were just missed by the OS. Click Scan and repair drive.
Method 4: Fix Bad Sectors On WD Hard Drive
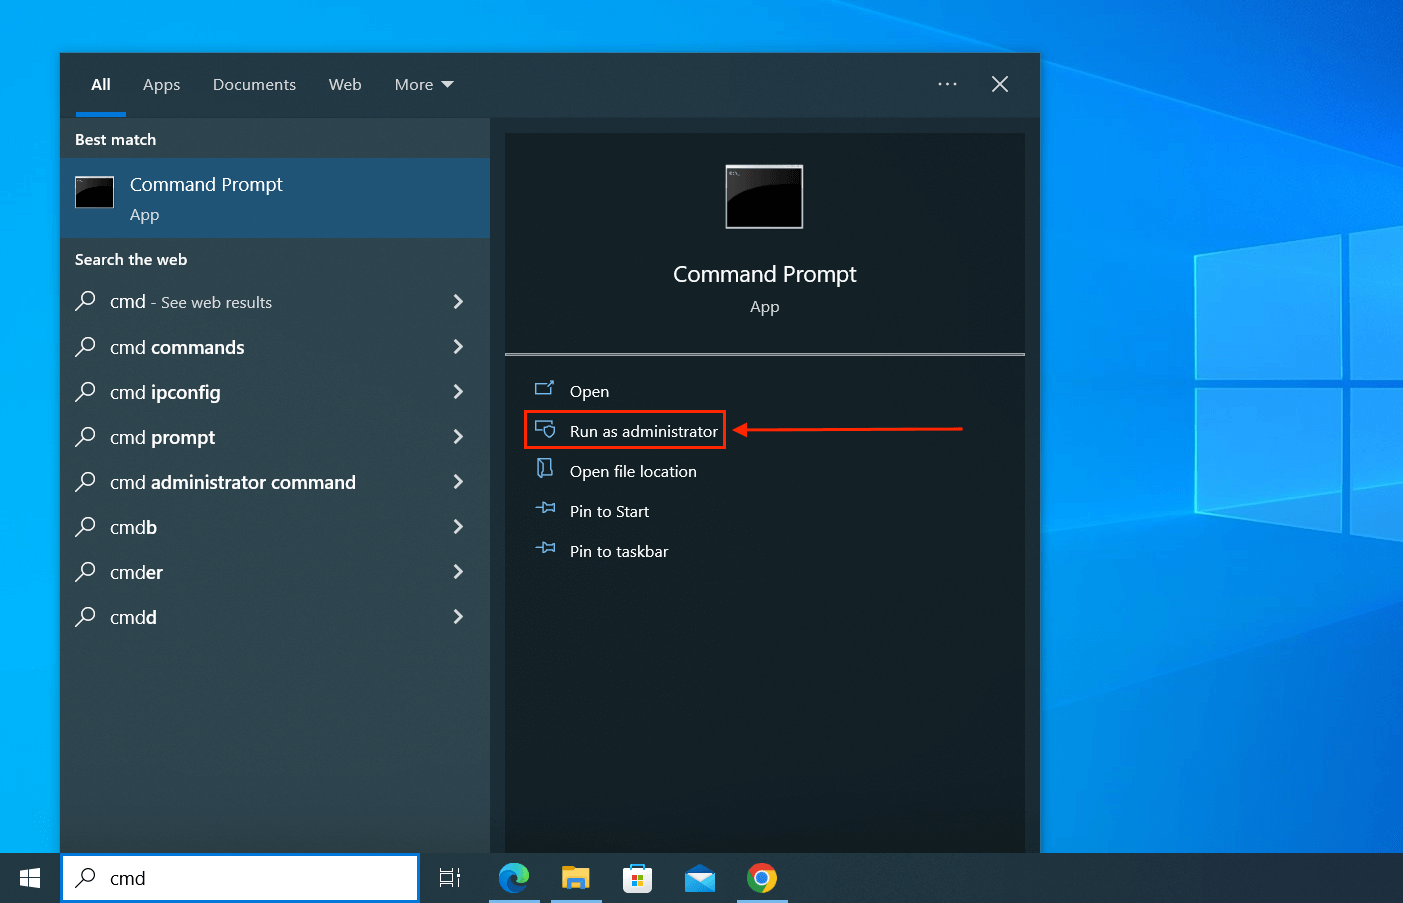
Another native Windows disk repair tool is the CHKDSK command. By executing CHKDSK in Command Prompt, Windows will scan your drive and fix any errors it finds along the way.
- Connect your WD drive to your computer.
- Launch Command Prompt as Administrator.
- Type the following command (replace “d” with your WD drive’s assigned drive letter) and hit Enter: chkdsk d: /f /r
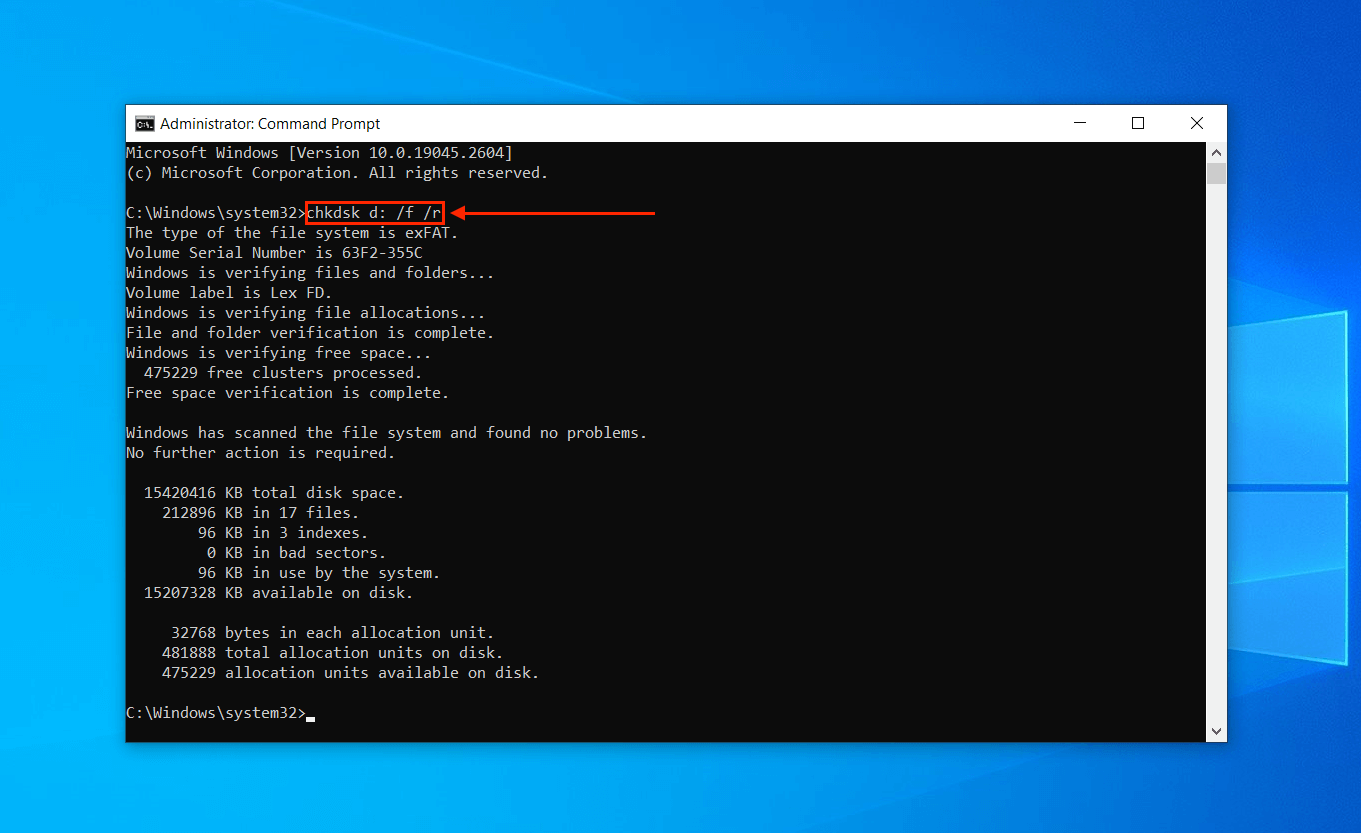
- Once the command has been executed, close Command Prompt and check if your WD drive has returned to normal.
Method 5: Check Your Western Digital HDD Warranty
Western Digital doesn’t provide a warranty period for data recovery. However, if you still encounter errors after attempting to repair your drive, have it replaced under warranty! Just make sure that you recover and secure your data first.
Frequently Asked Questions
How much does WD data recovery cost?
It depends. In the case of logical damage like corruption or infection, you can use data recovery software to restore it. Such tools usually cost under $100 — you can even find free ones, but these tend to come with major limitations.
If your WD drive suffered physical damage, you will need to send it to a professional data recovery service. They have the tools, facilities, and specialists to restore your data safely; they cost an average of $150 an hour. Try to find one that offers a “No Data — No Charge” guarantee.
How to recover data from WD hard disk which is not detecting?
To recover data from a Western Digital external hard drive that isn’t detecting, you will need to use data recovery software. Data recovery software can extract and rebuild data directly from the file system. Most importantly, they can usually detect a hard drive that isn’t showing up in File Explorer.
Can you recover data from a dead WD external hard drive?
You can recover data from a dead external hard drive using data recovery software. However, the following conditions must be met: (1) your drive shows up in Disk Management, (2) it’s not physically damaged, and (3) your data hasn’t been overwritten with new files.
How do I fix a corrupted WD external hard drive?
To fix a corrupted WD external hard drive, try the following repairs:
- Fix file system errors using the Error checking tool (right-click your drive in File Explorer > Properties > Tools tab > Check).
- Run the chkdsk command in Command Prompt.
- Format your drive.
Before trying any of these methods, note that repairing a corrupted drive will likely result in data loss – especially formatting. While it’s possible to recover data from a formatted hard drive, you’ll have better success securing your files first.
Conclusion
Western Digital external hard drives are super reliable, but they aren’t immune to issues all drives encounter — such as corruption, infection, and other logical damage. Fortunately, it’s not only possible to repair a problematic WD drive, but you can also restore most (if not all) of your data under the right circumstances.
However, bad sectors accumulate over time and there will come a day when repair attempts nor recovery will work. To avoid permanent data loss, make it a habit to back up your data every time you make important changes!

- 22 publishings
Alejandro is a veteran writer with a rich background in technology. He worked part-time in his uncle’s repair and recovery shop as a young boy, and now uses his experience and writing skills to produce content for multiple tech websites – specifically on the topic of data recovery. As an author for Pandora Recovery, he is constantly testing and experimenting with new tools and technology to help his readers find the best software for their needs.
- Frisco, Texas, United States
Yevgeniy Tolkunov is Hardware Engineer at ACE Data Recovery. Yevgeniy has a Master's Degree in Physics, Information Technology; 15+ years of experience.