
How to Recover Deleted Desktop Files and Folders
The desktop work area as we know it today from Windows 11 has been with us since the release of Windows 95. It took little time for users to embrace it as a convenient place to store files and folders. In fact, some users now rely on the desktop as the primary location to save their data.
However, the ease with which desktop folders and files can be accessed is a double-edged sword because it makes accidental deletion more likely to happen. The good news is that accidentally deleted desktop folders and files are usually not gone for good, and we explain how to recover them in this article.
Can You Recover Deleted Files From Desktop?
Quick answer: Yes, it’s often possible to recover deleted files from the desktop. That’s because such files sometimes remain physically present on the storage device where the desktop folder is located for a long time after their deletion. What’s more, they’re normally moved to the Recycle Bin first before their actual deletion happens.
Detailed answer: By default, the desktop in Windows represents the content of the following folder: “C:\Users\User\Desktop”
Just like regular folders, the desktop can store both files and sub-folders. Even though these files and sub-folders all appear to be located in the same place on the hard drive, the reality of how data is physically stored on hard disk drives (HDDs) and solid-state disks (SSDs) is quite different.
The content of the desktop folder is physically scattered across the surface of HDD drive platters or SSD memory cells. When a desktop file is permanently deleted using the Shift + Delete key combination or is too large to fit the Recycle Bin, the file doesn’t become erased immediately. Instead, the space it occupies is marked as available so that new data can be stored there.
This isn’t true only when it comes to TRIM-enabled SSDs, which automatically erase the space occupied by deleted files. You can check if TRIM is enabled on your system drive using the following command: fsutil behavior query DisableDeleteNotify (a result of zero means that TRIM is enabled).
That said, you might be able to recover deleted desktop files even without data recovery software because most files are deleted without the Shift + Delete key combination and are small enough to fit the Recycle Bin. In such cases, deleted files are first moved to the Recycle Bin, from which they can be effortlessly retrieved.
And even if permanent deletion did in fact happen and failed to act quickly enough to avoid overwriting, then you might still be able to restore your data from local or cloud backups. We explain these and other methods in the following sections, and you can use the links in the table below to quickly navigate to them:
Type of deletion | Suitable Solution |
Desktop files were deleted normally | Recover from the Recycle Bin |
Desktop files were deleted normally, but the Recycle bin was emptied | Use data recovery software or recover from a backup |
Desktop files were deleted using the Shift + Delete combination | Use data recovery software or recover from a backup |
Desktop files were too large to fit the Recycle Bin | Use data recovery software or recover from a backup |
Desktop files were deleted using Shift + Delete but TRIM has already been triggered | Recover from a backup |
How to Recover Accidentally Deleted Desktop Files and Folders
The following methods can help you recover both regularly and permanently deleted files from the desktop.
Method 1: Use Desktop Data Recovery Software
Desktop data recovery software applications for Windows represent the most effective method for recovering accidentally deleted files and folders from your desktop because they undelete data even if it’s not located in the Recycle Bin or a local/cloud backup location.
Our Pandora Recovery review team has tested many data recovery applications using our unique and comprehensive testing methodology, so we know which can retrieve accidentally deleted desktop folders and files the best.
If you would like to learn more information about the two desktop data recovery software applications described below, then we encourage you to read their full reviews and take advantage of our side-by-side software comparison feature.
Option A: Disk Drill
![]() Time is your enemy when it comes to recovering deleted desktop data because the desktop folder is typically located on the system drive, so the risk of overwriting is always dangerously high unless you know how to remove the drive from your computer and recover it using a different one.
Time is your enemy when it comes to recovering deleted desktop data because the desktop folder is typically located on the system drive, so the risk of overwriting is always dangerously high unless you know how to remove the drive from your computer and recover it using a different one.
That’s why you want to use a data recovery application that can deliver fantastic results on the first try, and Disk Drill is your best option. Why? Because it received the most points out of all data recovery applications we’ve ever reviewed (4.54 out of 5).
Disk Drill also stands out with its support for both RAID arrays and Windows Storage Space, allowing you to recover the content of your desktop folder no matter where it’s located in just a few simple steps.
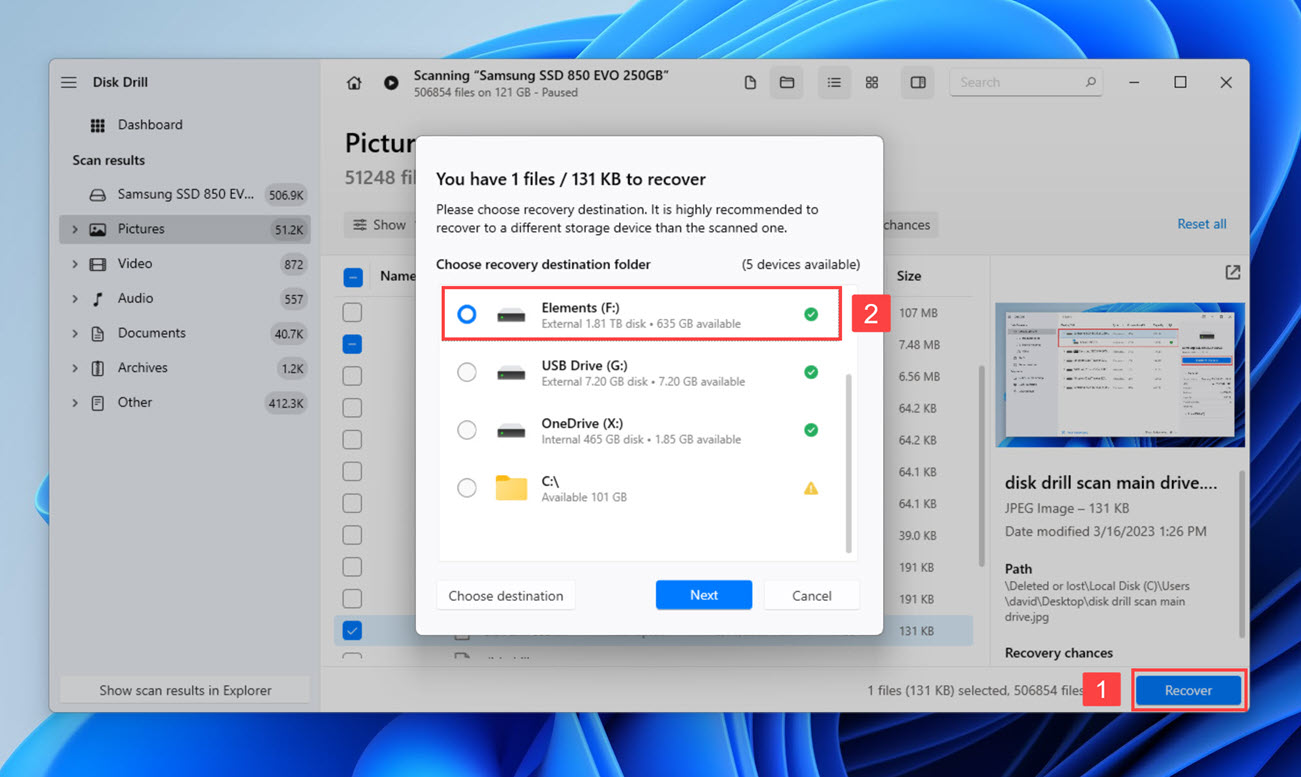
Follow these steps to recover deleted files from your desktop using Disk Drill:
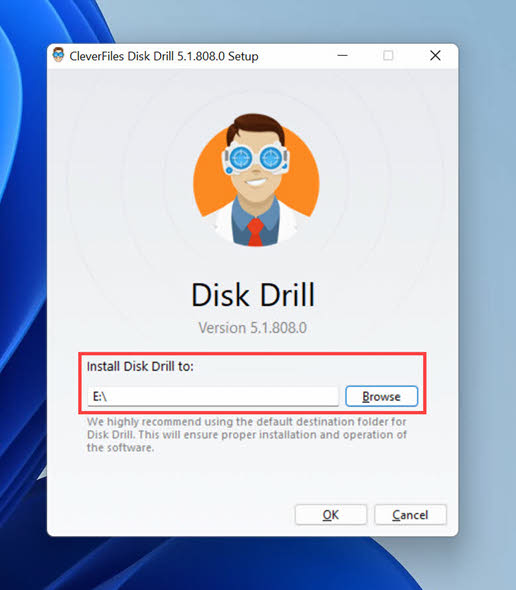
- Visit Disk Drill’s official website and download the free version of the software. The free version can recover up to 500 MB of data and preview an unlimited number of files to verify their recoverability.
- Install Disk Drill on a different storage device than the one where your desktop folder is/was located. Since the desktop folder is located on the system drive by default, then you should install Disk Drill on an external storage device.
- Connect a suitable external storage device to your computer. You will use this storage device as a destination for your lost desktop files.
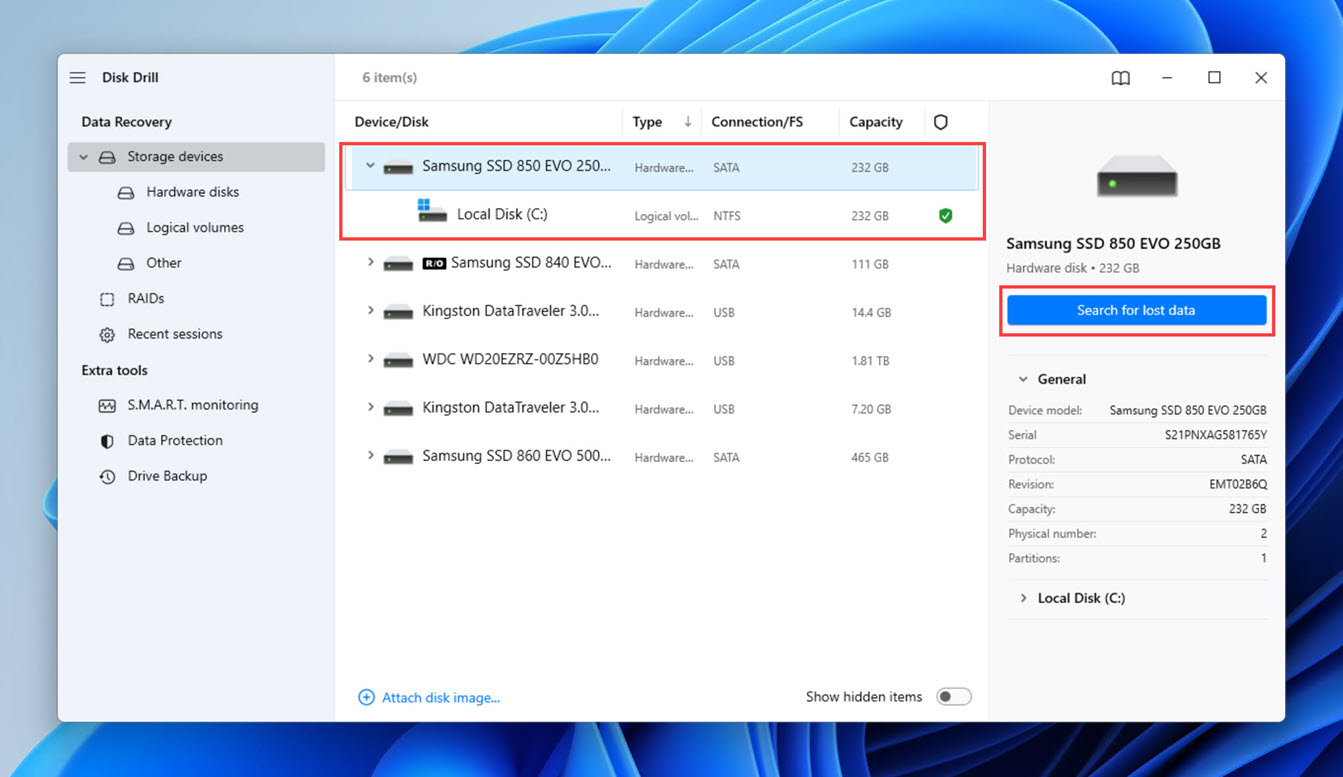
- Launch Disk Drill and scan the storage device with your desktop folder (your system drive C in most cases). To do that, click on the storage device you want to scan and then use the Search for lost data button to start scanning.
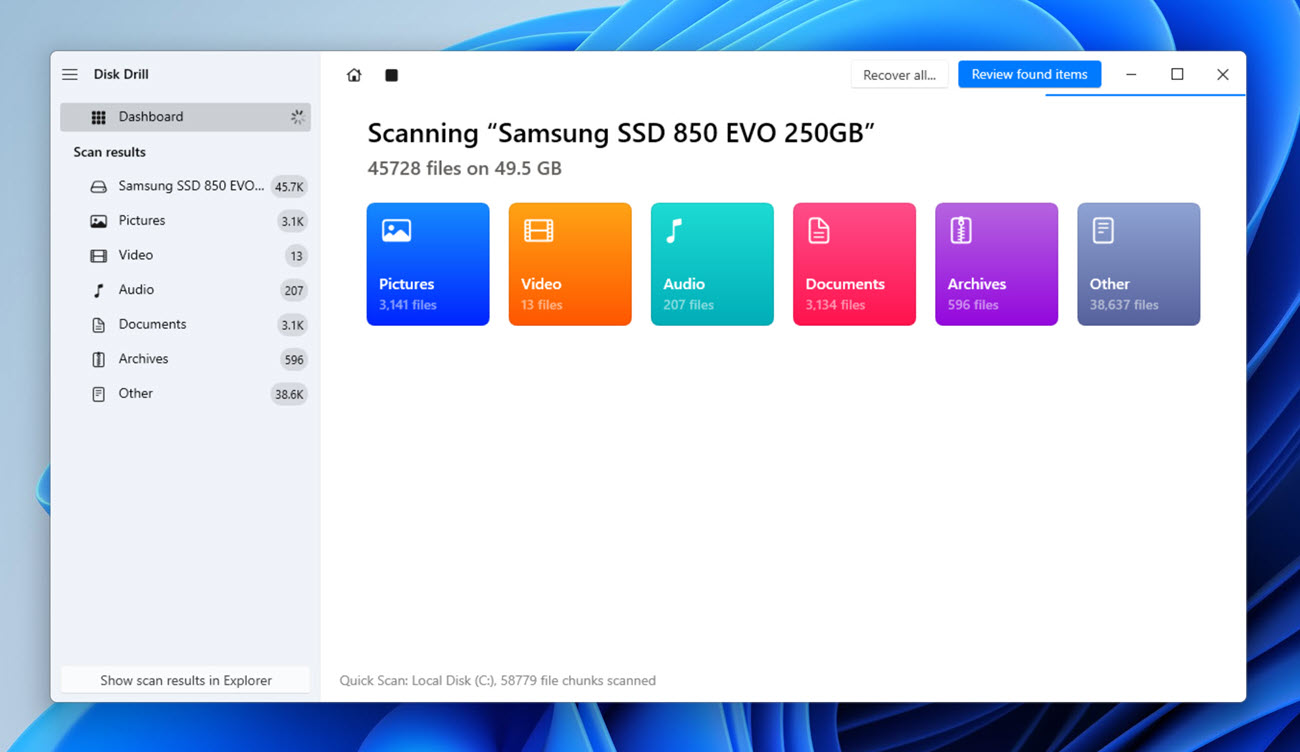
- Give Disk Drill some time to find your lost desktop files. You can choose to see recoverable files immediately or let scanning finish—it’s completely up to you.
- Select each lost desktop file you want to recover using the corresponding checkboxes. We recommend you take advantage of the available scan results filters and search bar to quickly locate what you want to recover.
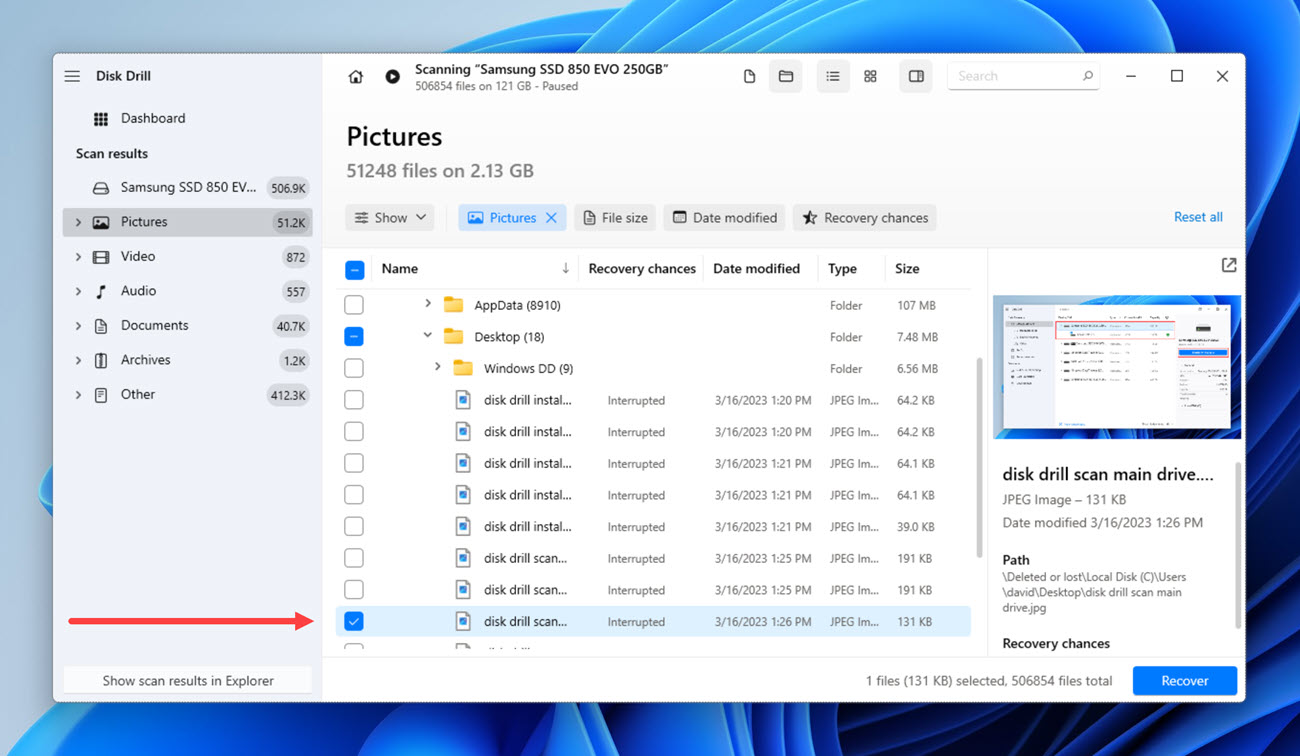
- Click the Recover button in the bottom-left corner and choose a suitable recovery destination. Again, you should recover your files to a different storage device than the scanned one to avoid overwriting.
Option B: Windows File Recovery Tool
![]() Not many Windows users know that Microsoft has released its own data recovery application, called Windows File Recovery. The main reason why this application isn’t more popular is the fact that it doesn’t have a graphical user interface. It also doesn’t perform all that well, offering support for only the most commonly used document, video, audio, and photo file formats.
Not many Windows users know that Microsoft has released its own data recovery application, called Windows File Recovery. The main reason why this application isn’t more popular is the fact that it doesn’t have a graphical user interface. It also doesn’t perform all that well, offering support for only the most commonly used document, video, audio, and photo file formats.
So why recommend it at all? Because it’s completely free, unlimited, and conveniently available in the Windows Store, making it well worth a try even though you should keep your expectations in check.
To perform desktop folder recovery using Windows File Recovery, you need to:
- Launch Microsoft Store and download the Windows File Recovery tool from it. If your desktop folder is/was located on the system drive, then you should change the location where new apps are installed first to avoid writing new data to the same drive.

- Connect a suitable external storage device to your computer. You will use this storage device as a destination for your lost desktop files.
- Open Windows Terminal in Windows 11/10 or CMD in older versions of Windows as administrator.
- Enter the following command and press enter: winfr source-drive: destination-drive: /n /Users/username/Desktop
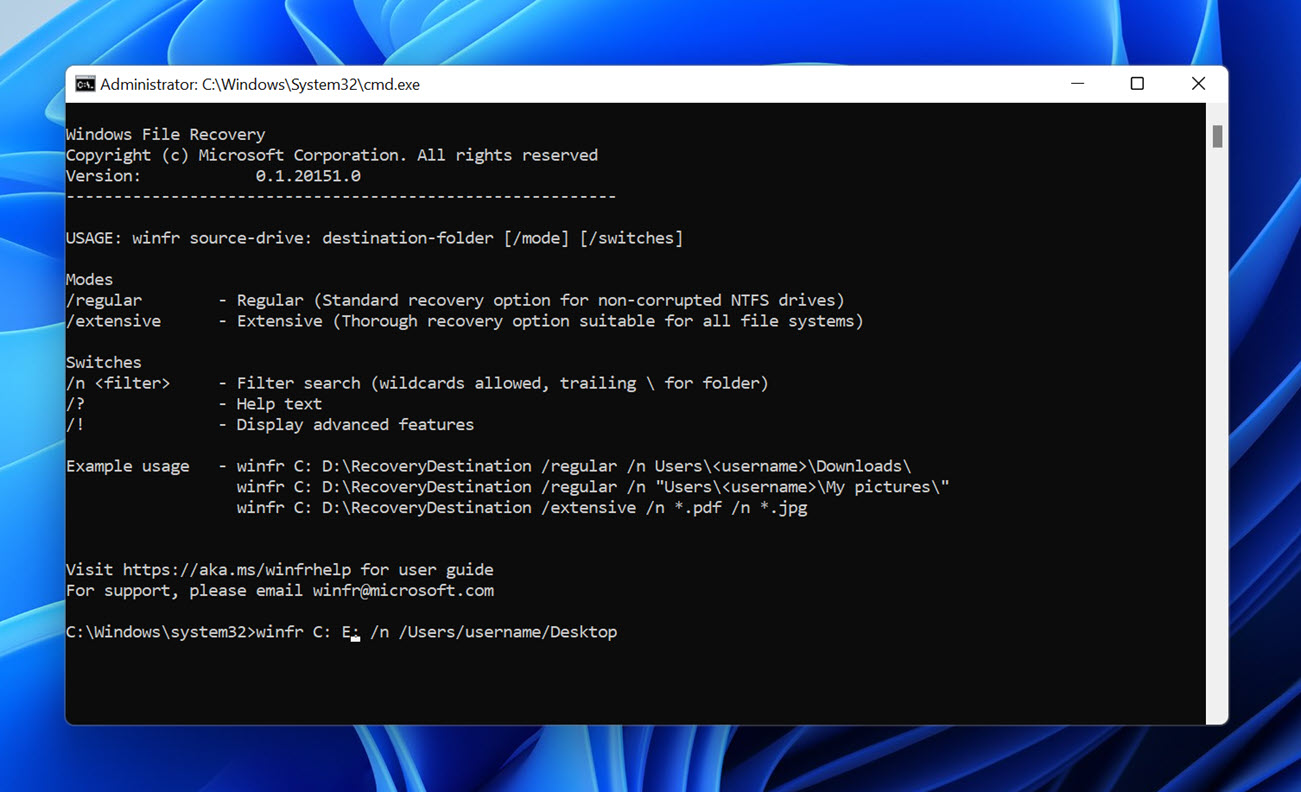
In the command above, source-drive is the drive where the desktop folder was located before deletion, destination-drive is the drive where you want to restore the desktop folder, and username is the name of the user account on the PC. You need to change these variables to reflect your system configuration. The /n switch tells Windows File Recovery to scan only the desktop folder.
Method 2: Get Back Deleted Files & Folders From Recycle Bin
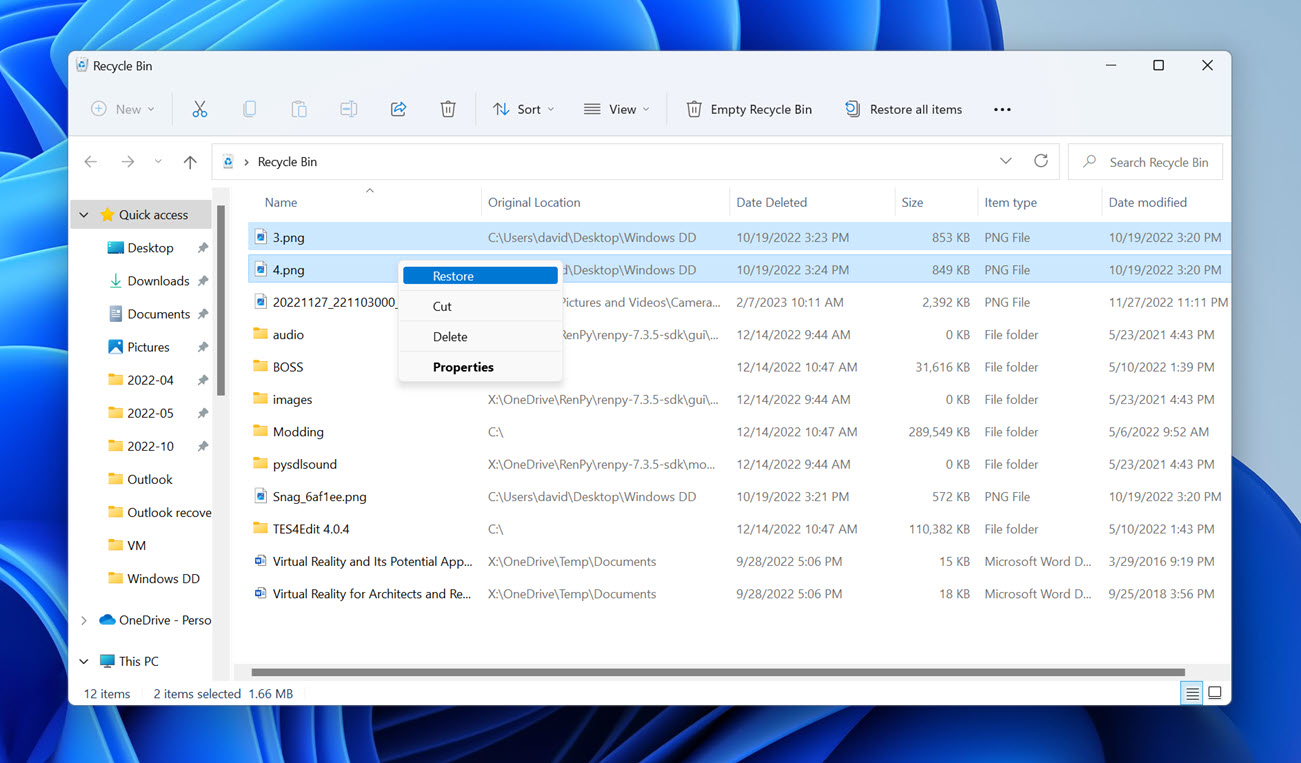
Have you recently deleted desktop files and folders by pressing the Delete key on your keyboard or by clicking the Delete option in the context menu? If so, then it’s very likely that the missing can be painlessly recovered from the Recycle Bin.
Here’s how to get back deleted files and folders from the Recycle Bin:
- Double-click the Recycle Bin icon on your desktop.
- Select the files and folders you want to restore. To select multiple files, you can either hold down the CTRL key on your keyboard and then click each file you want to select.
- Click any of the selected files and move the selection to a suitable location, such as your desktop. Alternatively, you can click the Restore the selected items button to move them back to their original locations.
Method 3: Restore Deleted Files Using File History
Introduced in Windows 8 and still available in Windows 10 and 11, File History is Microsoft’s modern local data backup solution that, when enabled, automatically creates incremental backups of the following folders:
- Desktop
- Libraries: Documents, Music, Pictures, Videos
- Favorites
- Contacts
- OneDrive (if you have OneDrive enabled)
Here’s how to recover deleted desktop files using File History:
- Open the Start menu.
- Enter the following in the search bar: file history
- Open the File History control panel from the list of search results.
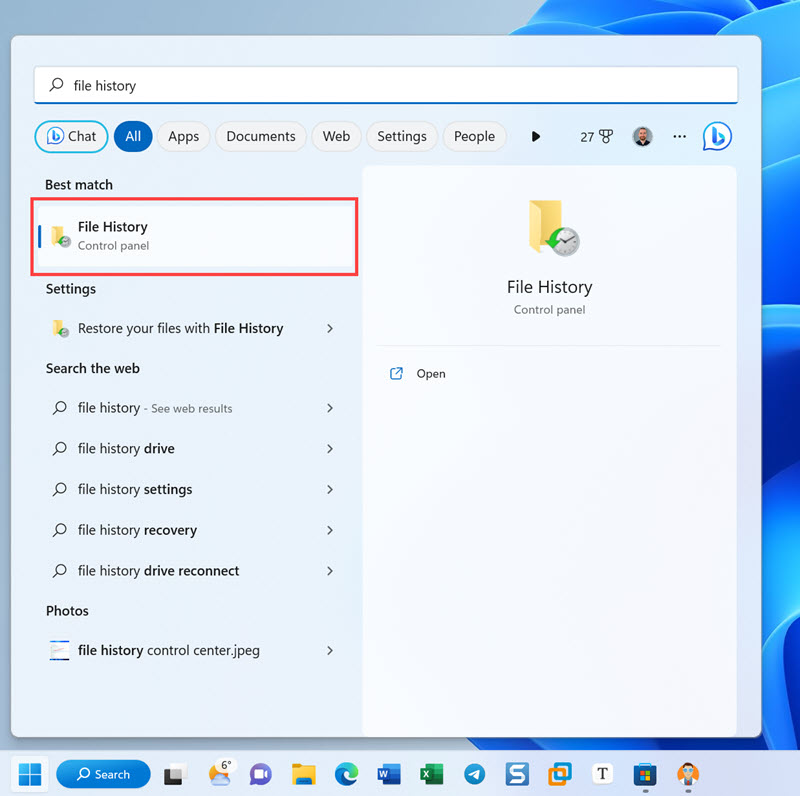
- Verify that File History is turned on. If it is, then you should be able to recover your deleted desktop files.
- Click the Restore personal files option in the left pane.
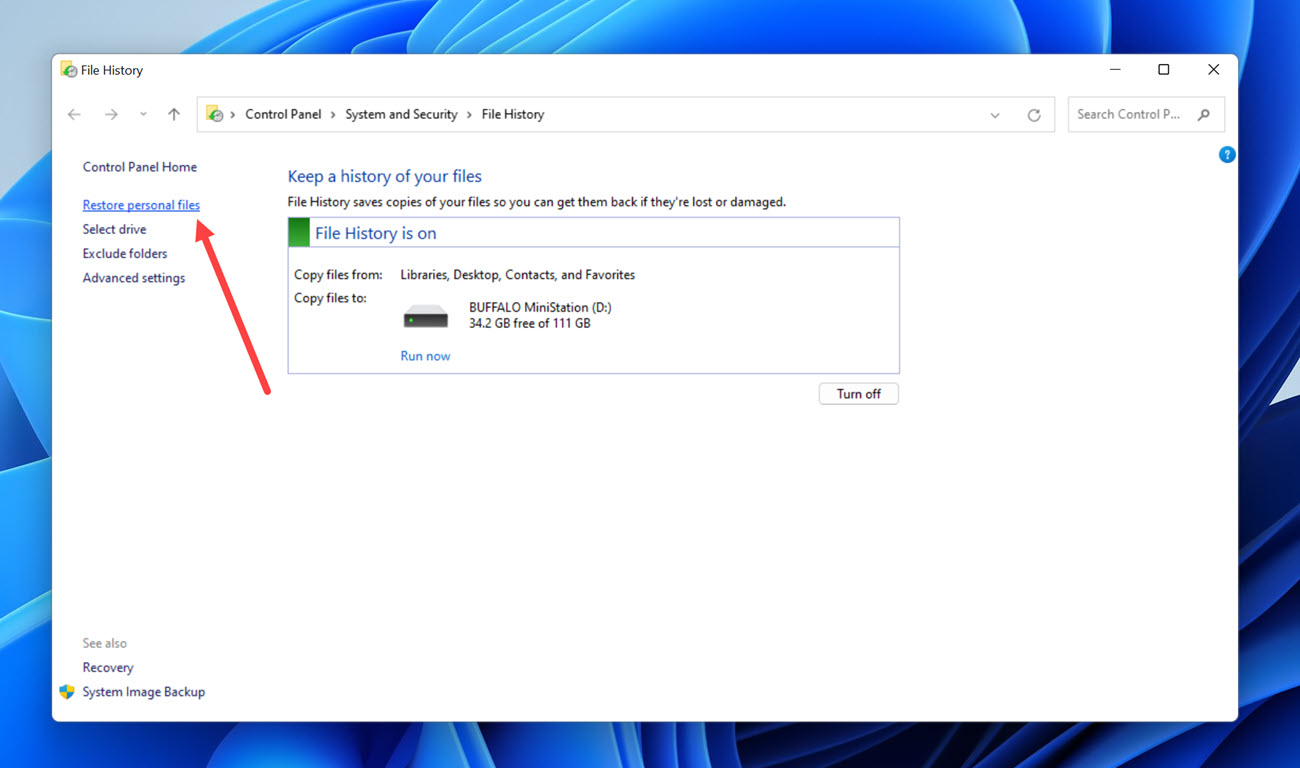
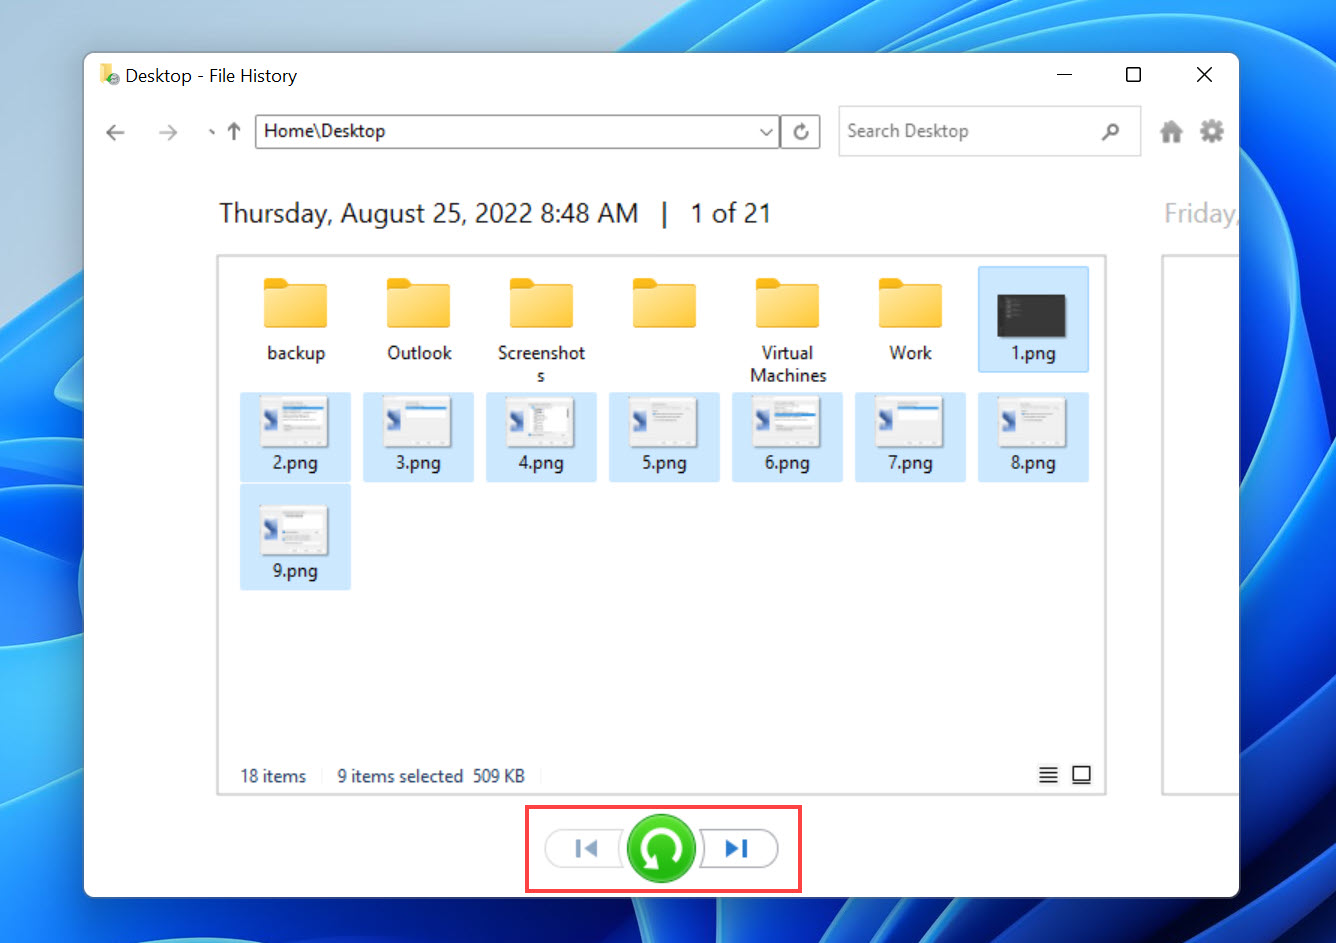
- Navigate to your desktop folder.
- Use the arrows at the bottom to see previous versions of the desktop folder.
- Select the missing desktop files.
- Click the green restore button to move them back to the desktop.
Method 4: Retrieve Deleted Desktop Folder Using Backup & Restore
Backup & Restore is a legacy backup feature that’s still present even in the newest versions of Windows, so you can use it to retrieve deleted files from the desktop in Windows 10 and Windows 11.
The Backup & Restore feature is based on backup images containing files saved on the desktop, in libraries, and in default Windows folders. The backup images also contain system data, so they can be used to restore a computer that has stopped working properly.
You can follow the steps below to retrieve deleted desktop folder using Backup & Restore:
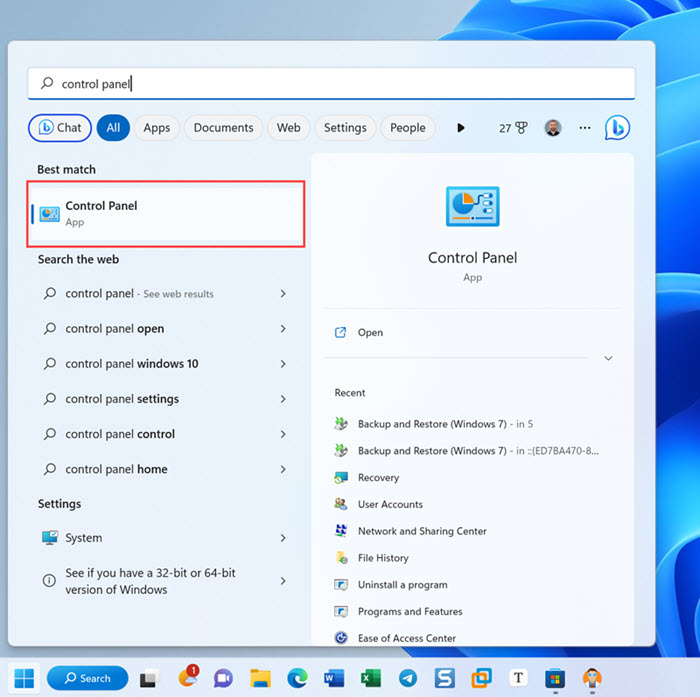
- Open the Start menu.
- Enter the following in the search bar: control panel
- Open the corresponding search result.
- Navigate to System and Security > Backup and Restore (Windows 7).
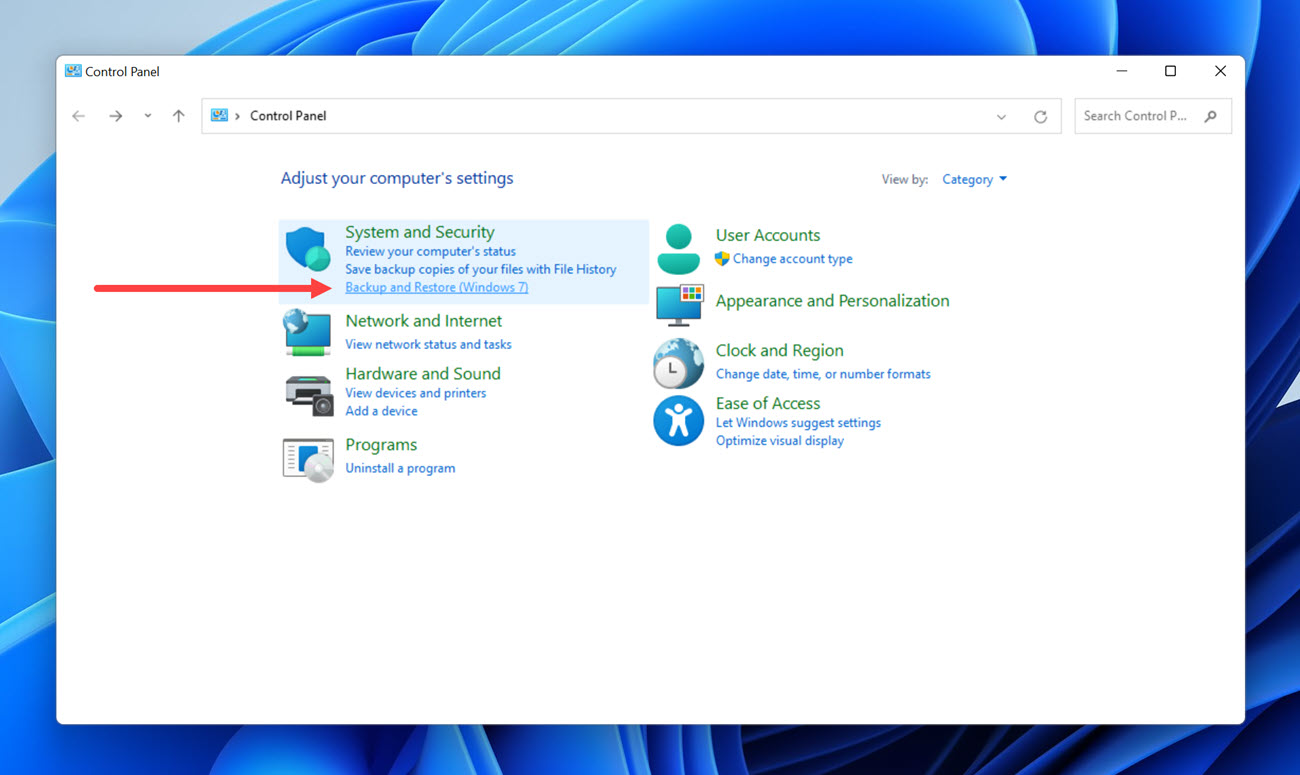
- Click the Restore my files option.
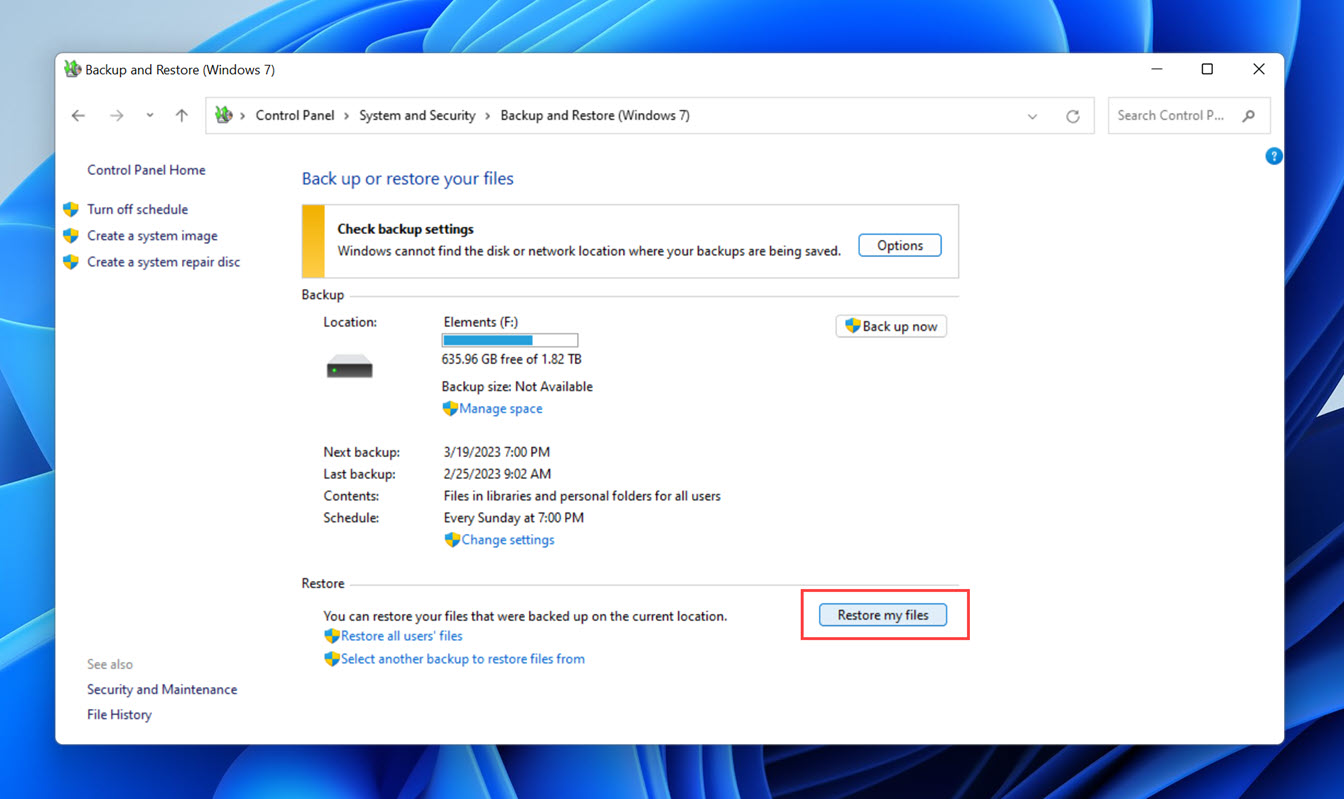
- Click Browse for folders, select a backed-up version of the desktop folder, and then click Add folder.

- Click Next and choose where you want to restore your files.
- Click Restore to continue.
Method 5: Recover Deleted Files & Folders From OneDrive
If you need to recover deleted files in Windows 10 and newer, you have one more recovery option available: OneDrive, Microsoft’s cloud storage service that lets you store files on the company’s servers and seamlessly sync them between computers.
The desktop folder is synchronized by OneDrive by default, so there’s a good chance that your lost files are safely backed up even if you don’t realize it.
This is what you need to do to recover deleted files and folders from OneDrive:
- Go to: https://onedrive.com/
- Log in with your Microsoft account.
- Navigate to the Desktop folder in OneDrive.
- Choose the files you want to recover.
- Click the Download button.
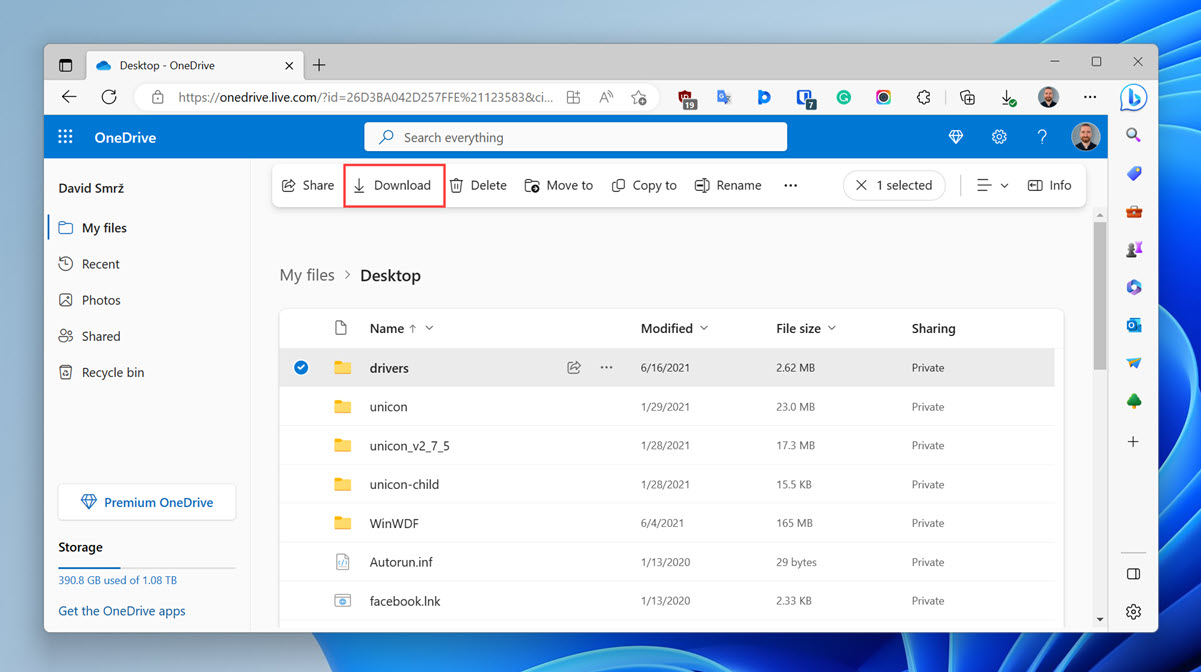
OneDrive will then download your lost files from the internet, so the speed of their recovery will depend primarily on the speed of your internet connection.
Conclusion
Microsoft is well aware that many users of its operating system keep more valuable files and folders on the desktop than they probably should. To minimize the chance of their accidental deletion, Windows provides multiple safety nets in the form of the Recycle Bin and backup features like File History and OneDrive. Users can also take advantage of specialized data recovery software to recover files from the desktop even if they are not present in the Recycle Bin or any backup location.
Frequently Asked Questions
What happens if you delete the desktop folder?
When you delete the desktop folder, all desktop data is moved to the Recycle Bin. This doesn’t happen only if the size of the deleted desktop data exceeds the maximum size of the Recycle Bin folder.
What happens if I delete my desktop folder on Mac?
The macOS operating system doesn’t make it easy for users to delete the desktop folder. Terminal commands and admin privileges are necessary to remove it from the system, and, as a result, its content can’t be easily recovered from Trash.
How do I recover permanently deleted folders from my desktop?
Use data recovery software to recover permanently deleted folders from your desktop:
- Download, install, and run Disk Drill.
- Scan your system drive where permanently deleted files and folders were located.
- Wait for the scan to finish.
- Select the lost desktop files and folders.
- Recover them to a safe location.
How do I find the missing desktop folder?
If your desktop folder has disappeared, then it’s possible that it has become hidden (not deleted). To display hidden files:
- Open File Explorer.
- Navigate to View > Show.
- Click the Hidden files option.
Will deleting desktop icons delete everything?
Icons are just shortcuts to executable files, documents, or other data, so deleting them will not delete the actual files they represent.
David Morelo is a professional content writer with a specialization in data recovery. He spends his days helping users from around the world recover from data loss and address the numerous issues associated with it.
When not writing about data recovery techniques and solutions, he enjoys tinkering with new technology, working on personal projects, exploring the world on his bike, and, above all else, spending time with his family.
- Klennet Recovery Review (Formerly Zero Assumption Recovery)
- iBeesoft Data Recovery Review – A Likable Clone With Limited Features
- DMDE Review – A Data Recovery Powerhouse or a Usability Nightmare?
- Cisdem Data Recovery for Mac Review – A Clone in Disguise
- Tenorshare 4DDiG Review – All That Glitters Is Not Gold
- Houston, Texas, United States
Nikolay Lankevich has over 15 years of strong experience in various fields and platform includes Disaster Recovery, Windows XP/7. System analysis, design, application (Inter/Intranet) development, and testing. Provided technical supports on desktop and laptops on Win-XP and Macintosh for about 2000 employees.