MacOS External Hard Drive Recovery: 3 Proven Ways to Recover Files From External Hard Drive on Mac
I have deleted some important files from my external hard drive. Is it possible to recover them using my Mac?
Yes, it is. There are several methods that you can use to recover deleted files from an external hard drive on Mac. We are going to show you four different methods you can use on an Apple Mac or MacBook that can help you get back files that have been accidentally deleted from your external storage device. With any luck, you can use one of these techniques to successfully recover all the data that you thought you had lost forever.
How to recover files from an external hard drive on Mac
Here are four solutions to recovering deleted or lost files from an external hard drive.
Honorable mention: Restore from the Trash Bin
One thing that’s great about macOS is that deleted files are first moved to the Trash folder, including files deleted from an external hard drive. We know that you’ve probably done so already, but we strongly suggest you check the Trash folder one last time before exploring the three main solutions described below.
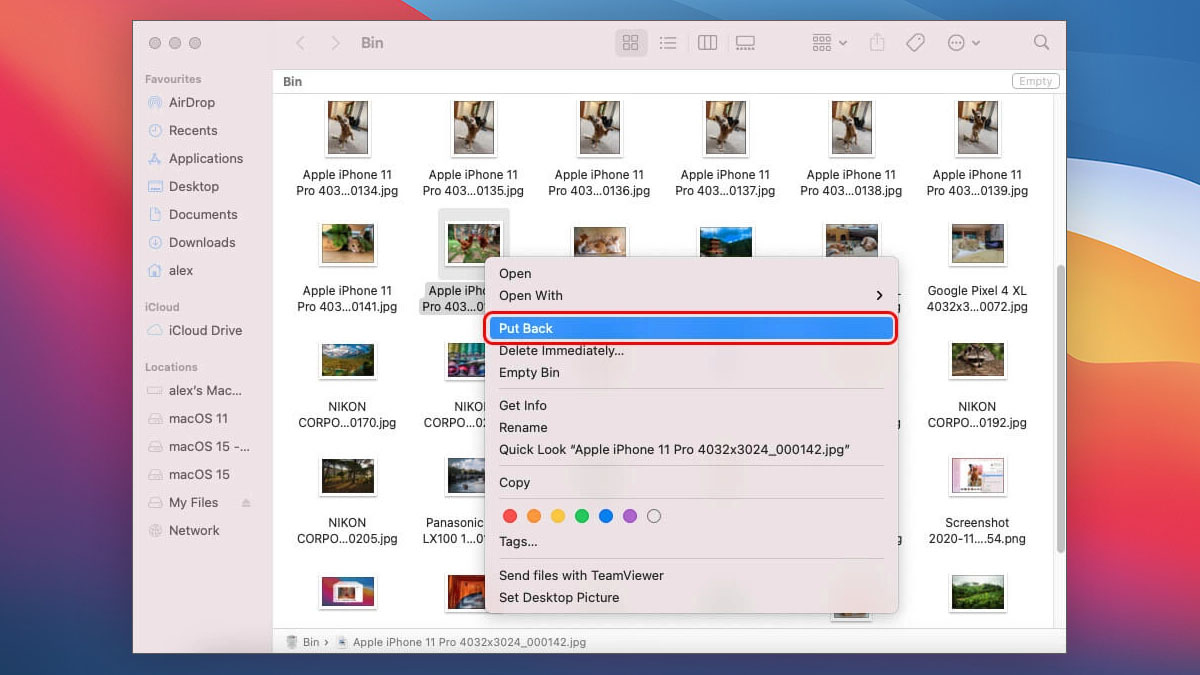
- Make sure the external hard drive is connected to your Mac. Each Mac storage device has its own Trash folder, so this step is critical.
- Open the Trash folder by clicking on its Dock icon.
- Locate the files you want to restore and select them.
- Right-click on your selection and click the Put Back option.
- Verify that the files have been successfully recovered to their original location.
Unfortunately, there’s no guarantee that your files will be present in the Trash folder, especially if the option to automatically remove items from the folder after 30 days is enabled on your system. If that turns out to be the case, then it’s time to explore other recovery solutions.
Solution 1: Restore from a backup file
The best way to recover files from an external hard drive on a Mac for free is through a backup copy you have previously created. Here are several places to look for a backup copy:
- External storage devices: USB flash drives, memory cards, and other external storage devices are commonly used to store backup copies of important files, and there’s a chance that a copy of the files you want to recover from your external hard drive exists on one of your devices without you even realizing it. If you find it, you can simply copy your files to their original location and congratulate yourself for remembering to back up your data at some point in the past.
- Cloud backup services: More and more users these days back up files to cloud backup services like iCloud, Dropbox, Google Drive, or Microsoft OneDrive. Files stored in the cloud can be recovered from anywhere and any device because they’re located on a remote server managed by a third party. This alone makes them perfect for recovering data lost due to, for example, a hardware failure or natural disaster.
- Native backup features: Modern operating systems are equipped with native backup features whose purpose is to help users protect important files. To be more specific, Macs running macOS 10.5 or newer come with Time Machine, and this native backup feature can be a real lifesaver if you need to recover data from an internal or external hard drive on Mac.
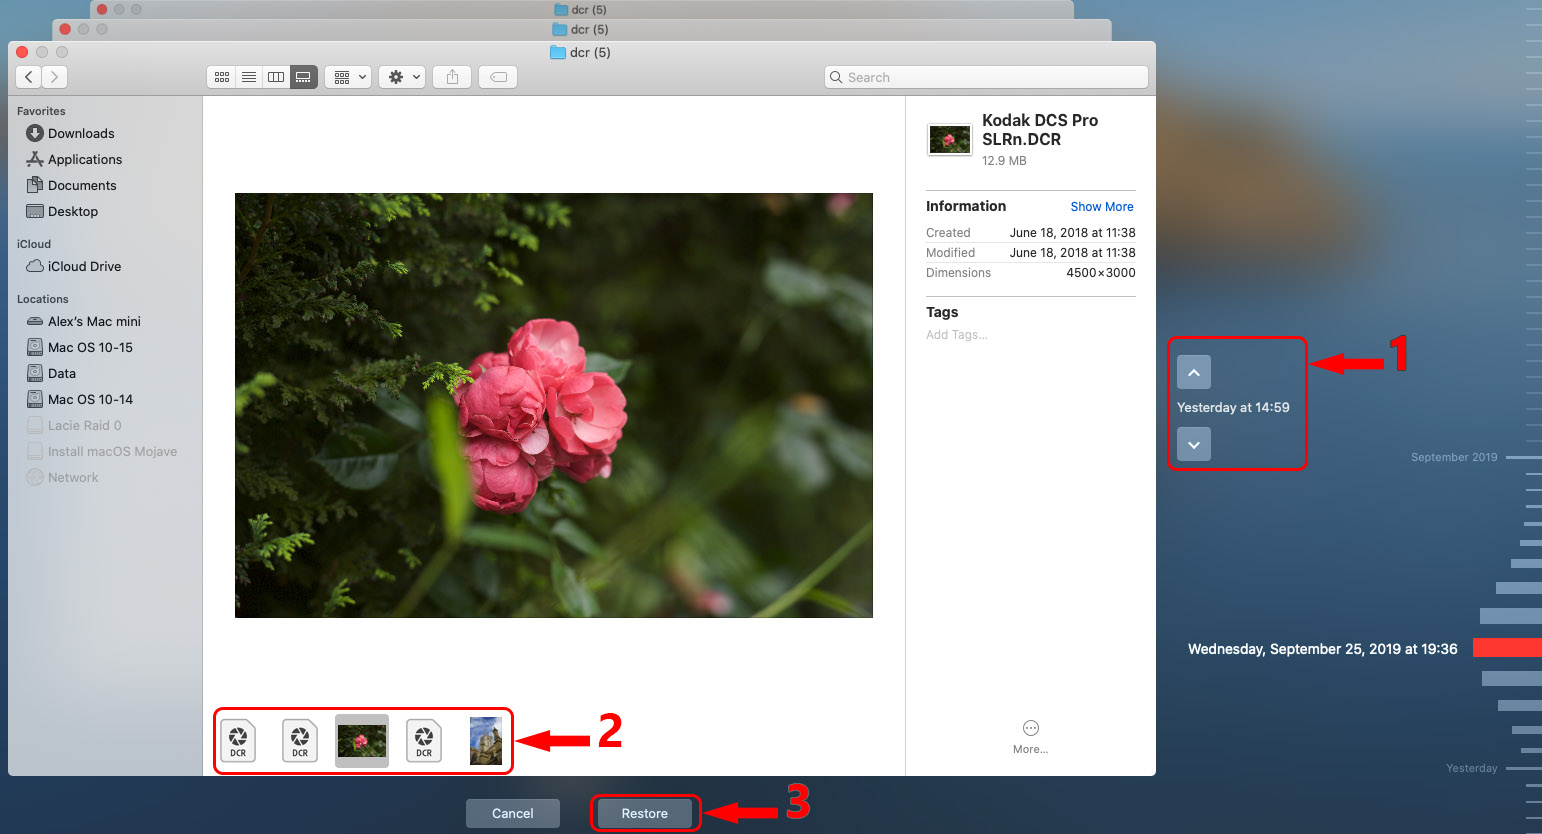
To restore from a Time Machine backup file, you need to:
- Connect the device that contains the Time Machine backup to your computer.
- Open a window that displays the folder which contained the deleted file. For example, if you deleted something from Downloads, open a Finder window of the Downloads folder.
- Open Time Machine by clicking on the clock icon on Mac’s menu bar and select Enter Time Machine.
- Locate the items you want to restore from within Time Machine.
- Select an item and press the Spacebar to preview it.
- Click Restore to recover the selected file or folder.
- The backup tool is freeware that is included with your Mac computer.
- It recovers files that have been permanently deleted from the Trash Bin.
- This method requires you to have created a backup of the affected files.
Solution 2: Restore with the help of data recovery software
MacOS does not erase the data from an external drive when a file gets deleted. It just removes the links that make the data accessible to the operating system and marks the space as available for future use. Until it is overwritten by new data, the original file can be recovered with the scanning techniques of data recovery software.
Data recovery software such as Disk Drill enables you to perform external hard drive data recovery on a Mac even if you don’t have a backup and the files are no longer in the Trash Bin. We will show you how easy it is to recover your lost data with this versatile recovery tool. But before we do that, let us briefly explain why we selected Disk Drill and not some other data recovery software for Mac.
Disk Drill’s features and benefits:
- Wide file system support: NTFS, FAT, FAT32, exFAT, EXT3/EXT4, HFS, APFS
- Multi-language user interface: English, Arabic, German, Spanish, French, Turkish, Italian, Japanese, Korean, Malay, Dutch, Polish, Brazilian Portuguese, European Portuguese, Russian, Swedish, Chinese, Hindi
- Over 400 supported file types: Images, videos, audio, documents, archives, and more
- Sophisticated recovery algorithms: Disk Drill features multiple advanced data recovery algorithms capable of addressing all common causes of external hard drive data loss, including accidental formatting, data corruption, user error, and others.
- Stellar online reviews: With countless raving reviews from users worldwide, Disk Drill is easily one of the most well-rated data recovery software applications currently available.
As you can see, Disk Drill offers many attractive features and benefits that make it an easy choice when it comes to data recovery jobs big and small. Best of all, using it to perform external hard drive recovery on Mac could hardly be any easier.
To restore files using data recovery software, you need to:
- Download and install Disk Drill on your Mac.
- Connect the external hard drive to your computer.
- Launch the program and select the hard drive from the disk list.
- Click the Search for lost data button to scan for deleted files.
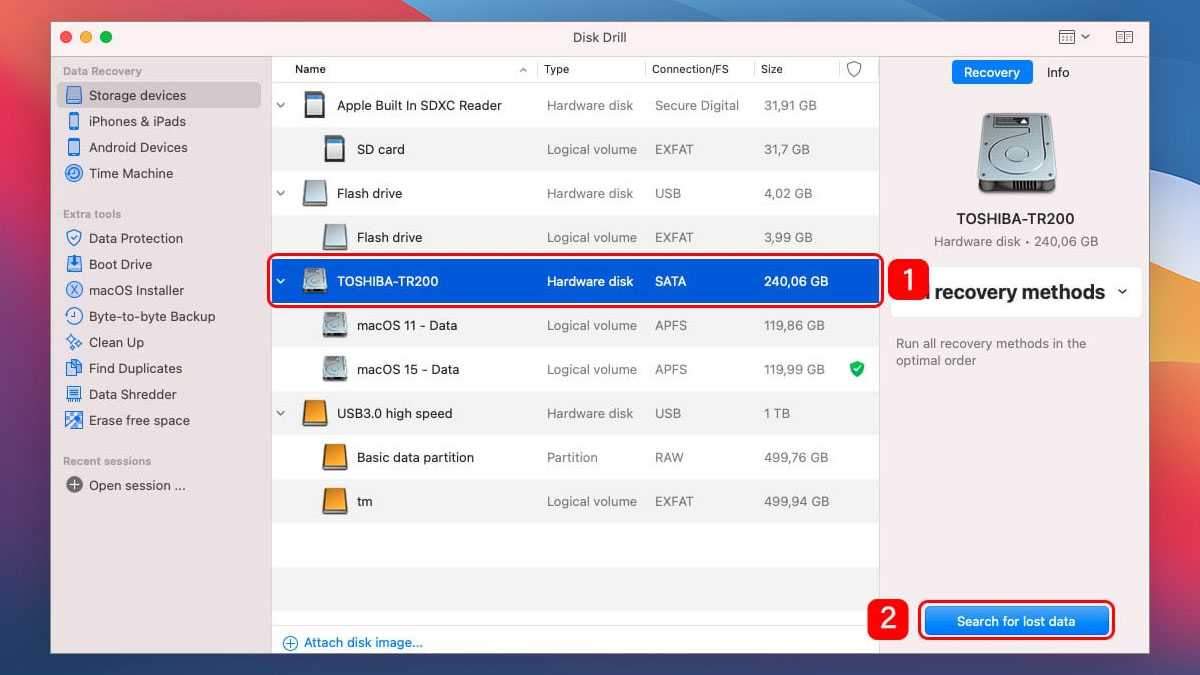
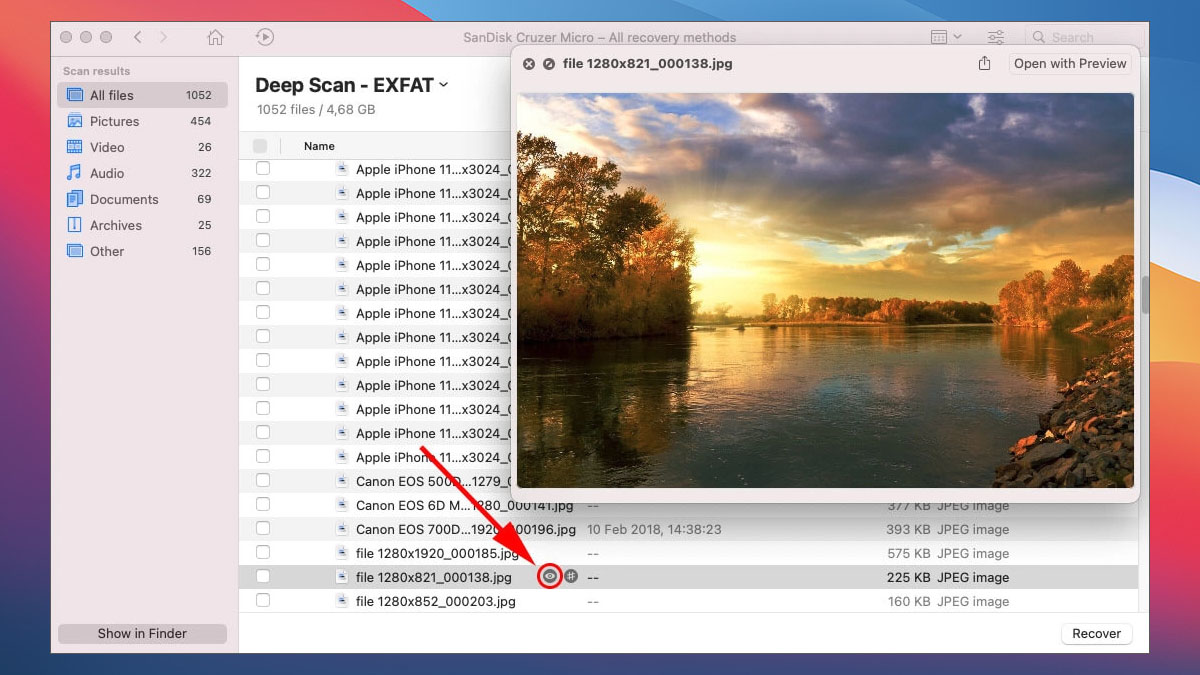
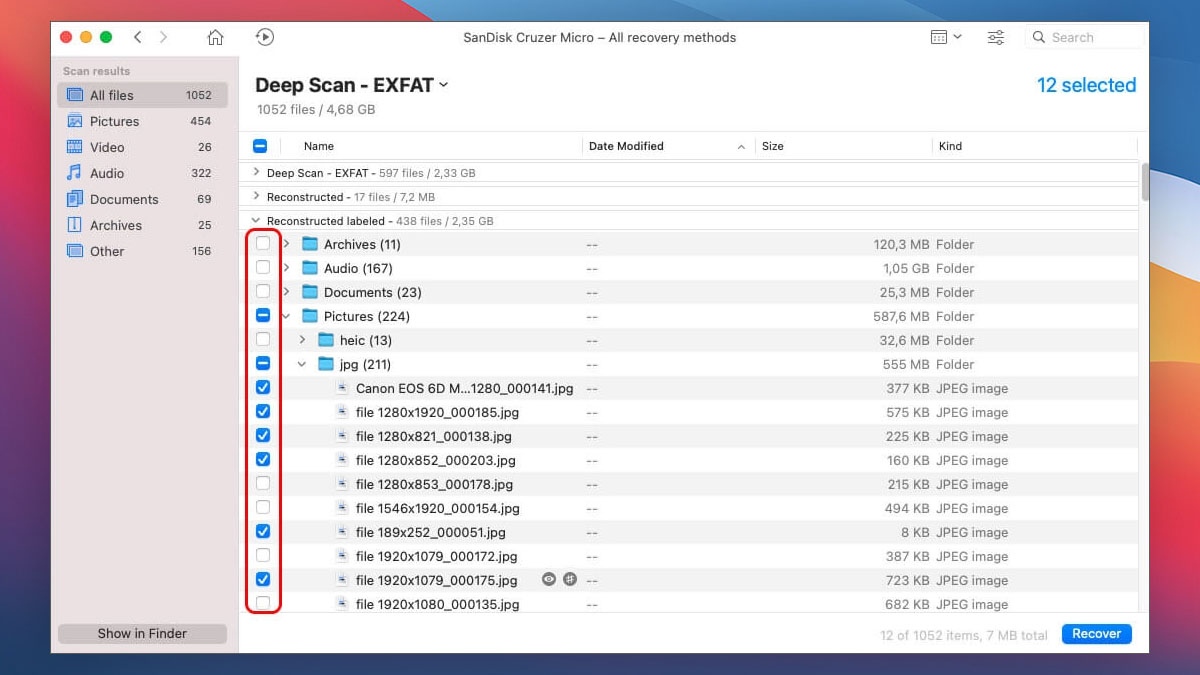
- Preview the found files and select those to be recovered.
- Click the Recover button to choose a new location to save the files that is not on the same external hard disk to avoid file corruption.
- Click the OK button to perform the recovery.
Of course, Disk Drill isn’t the only data recovery software that can help you recover files from an external hard drive on Mac. Also worth exploring are open-source solutions such as TestDisk. Just don’t expect the same level of user interface polish and the same usability. In fact, TestDisk doesn’t even have a graphical user interface. However, it’s completely free, and you can use it to recover an unlimited number of files from external hard drives.
- The tool recovers data no longer in the Trash Bin without the need of an available backup.
- A user-friendly interface enables users of all experience levels to quickly restore their deleted data.
- All types of disk-based storage are supported including internal drives, memory cards, and external hard drives.
- You can preview the data that the tool can recover before committing to a paid license.
- Data recovery software for Mac requires a paid license.
Solution 3: Restore with the help of your local manual data recovery service
If all of these methods to recover files from an external hard drive on your Mac have failed, you can try using a local data recovery service. You should exhaust all other options before going this route, as it is the most expensive option.
How much does professional data recovery cost? The answer to this question depends on several factors, including the exact cause of the data loss, the amount of data to be recovered, and the desired recovery timeframe. Generally speaking, more straightforward data recovery jobs cost between $100 and $1,000, while the cost of more complicated data recovery jobs can easily exceed several thousand dollars.
There are many recovery services available, so we highly recommend you do at least some research before shipping your external hard drive away. Here are several things to look for when choosing a data recovery service:
- References: The internet has made it possible for customers to easily share their past experiences. When choosing a data recovery service, we highly recommend you read online reviews published by previous customers because they can tell you a lot of useful information that you can then use to make an educated decision.
- Equipment and experience: As we’ve explained in this article, just about anyone can recover lost data using readily available data recovery software applications. However, the best data recovery services have certified cleanrooms and state-of-the-art equipment to also address physical damage and other problems that could make it impossible for data recovery software applications to do their job.
- Recovery guarantee: Unfortunately, there are some shady data recovery services that wouldn’t hesitate to take your money just for telling you that your lost files can’t be recovered. To avoid them, consider only companies that are willing to provide a free estimate and return your damaged media at no charge if they cannot finish the recovery.
- Location and availability: Considering that great data recovery services can be found almost anywhere, there’s no point selecting one located on the other side of the world and then dealing with expensive shipping. On the other hand, there’s also no reason not to with a service located in a different state if that seems like the best choice.
- Recovery success rate: The best data recovery services out there proudly display their recovery success for the whole world to see on their website. In general, anything about 98% is considered to be excellent.
By keeping these essential selection criteria in mind when choosing a data recovery service, you should be able to achieve the best recovery results right on the first try.
- May be able to recover data when other techniques fail.
- This is an expensive option and the recovery service will often not quote a final price before investigating the drive.
- It is time-consuming to send your hard drive to the service.
- Your data is exposed to the technical staff employed by the recovery company.
Most Common External Drive Data Loss Causes
Data can be lost on an external drive for a variety of reasons:
- Human error – Accidentally deleting files or formatting the wrong drive is the most common reason that data is lost from external storage devices.
- Malware – Malicious software is another common cause of data loss. Infection with viruses can lead to file corruption and randomly deleted files.
- Physical damage – Over time the physical disk performance may degrade and result in deleted files and folders.
- Theft – External hard drives are subject to being stolen because of their portability. While no data recovery technique will resolve this issue, it should be taken into consideration when using these types of devices for important or sensitive information.
Protect your External Hard Drive From Accidental Data Loss
You can take several steps to protect the data on your external hard drive.
- Make backup copies of the data on the external hard drive. This is considered best practice for any type of storage device. Backups are your best protection against all types of data loss scenarios.
- Keeping an external hard drive away from potential virus infection is critically important. You may have good antivirus software running on your computer, but you don’t know about your friend’s machine. Avoid connecting your drive to any strange machine to avoid potential infection.
- Double-check your work before performing data deletion or formatting an external hard drive. It may save you time later if you end up needing to perform a recovery.
- Secure your external hard drive physically to keep it safe and out of the hands of a potential thief. It’s not paranoia. Someone might steal it if they got a chance.
Frequently Asked Questions
How to recover files from an external hard drive that is not detected (Mac)?
Before performing a recovery, you need to get your Mac to recognize the drive. Try these methods:
- Disconnect the drive and try reconnecting it. Use a different port if one is available or another computer to rule out bad interfaces on the first machine.
- Update Finder preferences to display external drives.
- Run Disk Utility and try to mount, verify or repair the drive.
How much does it cost to recover formatted data from an external hard drive?
Follow these steps to recover files from an external hard drive using the command prompt:
- Connect the external drive to your machine.
- Open the macOS Terminal
- Enter this command: diskutil verifyVolume /Volumes/[drive name] with the name of your external hard drive.
- Disk Utility will report errors if they are found. To repair the disk and recover data, enter this command: diskutil repairvolume /Volumes/[drive name].
How to recover Mac formatted data from an external hard drive to a PC?
To recover Mac formatted data from an external hard drive to a PC you need to use data recovery software. Follow this procedure to recover using Disk Drill for Windows:
- Connect the drive to your PC. Make sure you do NOT format the drive at this point by clicking Cancel if Windows prompts you for formatting.
- Download, install and launch Disk Drill.
- Select the drive from the displayed disk list.
- Click Search for lost data to scan for found files.
- Select the files you want to restore and a new location where they will be stored.
- Click Recover to restore the files to the new folder.
David Morelo is a professional content writer with a specialization in data recovery. He spends his days helping users from around the world recover from data loss and address the numerous issues associated with it.
When not writing about data recovery techniques and solutions, he enjoys tinkering with new technology, working on personal projects, exploring the world on his bike, and, above all else, spending time with his family.
- Klennet Recovery Review (Formerly Zero Assumption Recovery)
- iBeesoft Data Recovery Review – A Likable Clone With Limited Features
- DMDE Review – A Data Recovery Powerhouse or a Usability Nightmare?
- Cisdem Data Recovery for Mac Review – A Clone in Disguise
- Tenorshare 4DDiG Review – All That Glitters Is Not Gold
- Frisco, Texas, United States
Yevgeniy Tolkunov is Hardware Engineer at ACE Data Recovery. Yevgeniy has a Master's Degree in Physics, Information Technology; 15+ years of experience.