How to Format an SD Card Without Losing Data
It’s not just brand-new SD cards that may require formatting. Sometimes, SD cards that have been used previously and currently contain important files also need to be formatted for various reasons. In such cases, it’s necessary to know how to format an SD card without losing data. In this article, we explain the steps you need to follow to achieve formatting success and avoid formatting-caused data loss.
Why Do SD Cards Need to Be Formatted?
When you buy a new SD card, it’s usually already formatted and ready to use, so why would you want to format it again after using it for a while? Well, there are several good reasons why, and we bet that you’re reading this article because one of them applies to you.
You Want to Delete Data in Bulk
Formatting is a great way to erase data in bulk because it always involves the complete recreation of the file allocation table (FAT), which is basically your SD card’s table of contents. With a new, empty FAT, your SD card will appear as if it were brand new, allowing you to take advantage of all of its storage capacity again.
Since it takes just a moment to recreate the FAT, it’s often faster to do that instead of selecting all files stored on the SD card and deleting them manually. This is particularly true, if your SD card contains a huge quantity of tiny files, whose manual deletion could take quite a while.
You Need to Fix Errors
SD cards can become corrupted or otherwise logically damaged over time and trigger errors like:
- X:\ is not accessible. The file or directory is corrupted and unreadable.
- You need to format the disk in drive X: before you can use it.
- Please insert a disk into Removable Disk (X:).
- The type of the file system is RAW.
The underlying issues behind these and other similar errors can make it impossible to access the contents of your SD card. Instead of trying to repair the SD card without losing data using complicated third-party tools like Victoria SSD/HDD, it’s almost always faster, easier, and safer to format it instead. But what if you don’t want to lose the data that is currently stored on the problematic SD card? Then you need to continue reading this article for a step-by-step guide.
You Need to Change the File System
A file system is basically a method for organizing and storing data on an SD card. Multiple such methods have been created over the years, with FAT32 still being the most popular and widely supported file system for use with SD cards. However, the FAT32 file system has some serious limitations, such as the fact that it doesn’t support files larger than 4 GB.
If your SD card is currently formatted with FAT32 and you want to store huge files on it or use it with some device that doesn’t support FAT32, then you need to reformat the SD card without losing data. We recommend you use exFAT to store large files, FAT for maximum compatibility with legacy devices, and NTFS for use with the Windows operating system.
What Happens When You Format an SD Card?
When you format an SD card, you set up the necessary structures to store and organize files on the card, also known as the file system, while simultaneously deleting any existing structures.
Does formatting an SD card wipe it? Well, it depends on what wiping means to you. If it means freeing up storage space for use, then the answer is always yes. But if it means physically erasing the contents of your SD card, then the answer is usually no.
You see, the most commonly used formatting method, called Quick format, doesn’t overwrite the formatted device, and that’s why it’s possible to recover data from a formatted SD card using specialized software.
How to Format an SD Card Without Losing Data
Now that we’ve covered why you might need to format an SD card without losing data, let’s bite into the meat of this article and explain the steps you need to follow to achieve the objective.
Step 1: Back Up Your SD Card Before Formatting
There are many different ways to back up SD card data. The simplest one is to copy all files from the SD card to a safe location using File Explorer, but this approach has one potentially fatal flaw: it won’t help you back up a logically damaged SD card that triggers error messages or isn’t listed in File Explorer at all. Additionally, File Explorer can’t back up files that have been deleted from the SD card but are still physically present on it.
To back up a problematic SD card and preserve the ability to retrieved erased files in the future by performing SD recovery, we recommend you create an exact copy of your SD card that includes all deleted or hidden files using a dedicated imaging tool. As a nice bonus, the entire contents of your SD card will be neatly packaged into a single image file, making it easy to keep your backups organized.
For the purposes of this article, we will describe two tools that have performed particularly well in our in-depth software reviews: Disk Drill and DiskGenius.
Option A: Disk Drill
![]() Disk Drill is an excellent choice for formatting a memory card without losing data because the application can recognize all file systems supported by the Windows operating system (NTFS, FAT32, exFAT). It can also back up RAW SD cards that don’t have any functional file system as a result of corruption or some other logical damage.
Disk Drill is an excellent choice for formatting a memory card without losing data because the application can recognize all file systems supported by the Windows operating system (NTFS, FAT32, exFAT). It can also back up RAW SD cards that don’t have any functional file system as a result of corruption or some other logical damage.
Disk Drill’s Drive Backup feature is a free extra, and it turns any SD card into either a .dmg or .iso image. By default, the Drive Backup feature creates a complete byte-to-byte backup image of the entire storage device, but you can also back up only a specific portion.
To this date, Disk Drill is the only software that has received a perfect usability score from us. Indeed, the application is polished to perfection, and even complete technophobes have no trouble taking full advantage of its backup feature as well as its data recovery capabilities, which include impressive support for over file formats, including RAW photos and videos. This allows you to recover formatted SD cards and their images regardless of what data they contain.
To create a complete backup image of your SD card using Disk Drill:
- Download the latest version of Disk Drill from its official website and then launch the downloaded installer. Follow the prompts to install the application on your system drive.
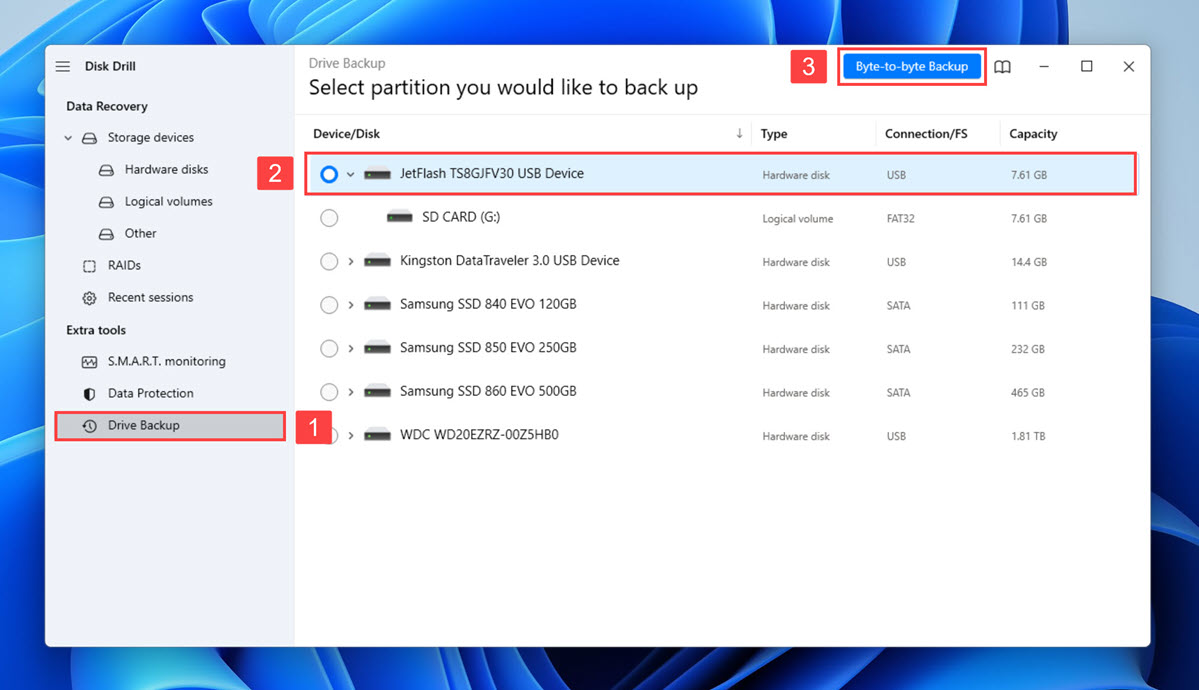
- Launch Disk Drill and choose the Drive Backup tool from the left pane.
- Select your SD card from the list of available storage devices.
- Click the blue Byte-to-Byte Backup button in the top-left corner of the user interface to initiate the backup process.
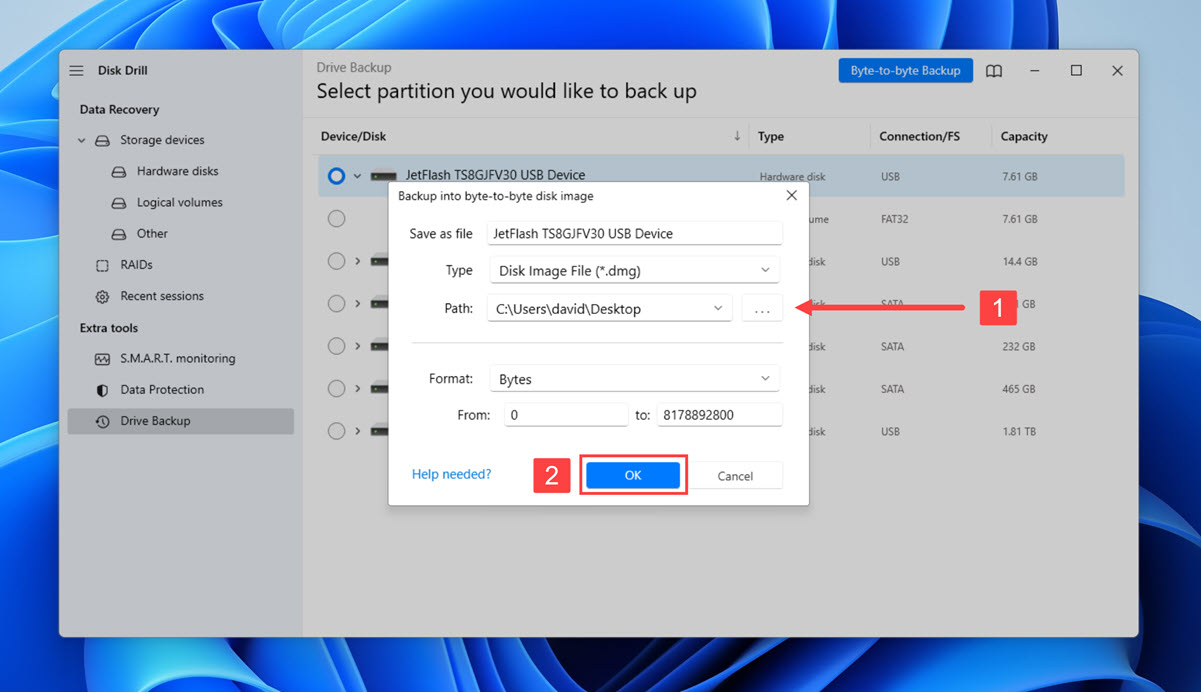
- Click the three horizontal dots next to Path and specify the location where Disk Drill should store the SD card backup image.
- Start the backup process by clicking OK. Be patient and wait until your SD card is completely backed up.
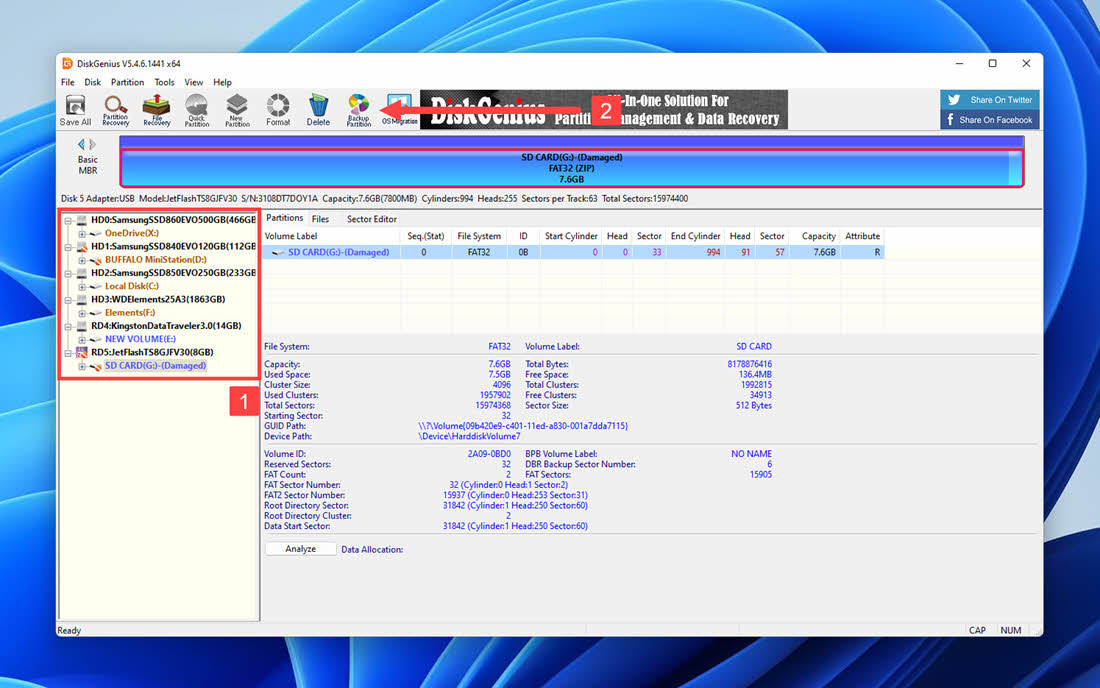
Option B: DiskGenius
![]() DiskGenius is another highly-rated data recovery software with impressive data backup capabilities. While not nearly as pleasant to use as Disk Drill, its partition backup feature stands out with its ability to create both full backups and incremental backups.
DiskGenius is another highly-rated data recovery software with impressive data backup capabilities. While not nearly as pleasant to use as Disk Drill, its partition backup feature stands out with its ability to create both full backups and incremental backups.
Because DiskGenius doubles as a disk management tool, you can also use it to format your SD card. The NTFS, FAT32, exFAT, and ext2/3/4 file systems are all supported, and the tool even gives you the option to perform a surface scan after formatting, which can be useful when performing a corrupted SD card recovery.
In terms of data recovery capabilities, DiskGenius can achieve above-average results, but its limited support for RAW photo and especially video file formats leaves a lot to be desired. What’s also limited is the size of files that can be recovered for free (only up to 64 KB).
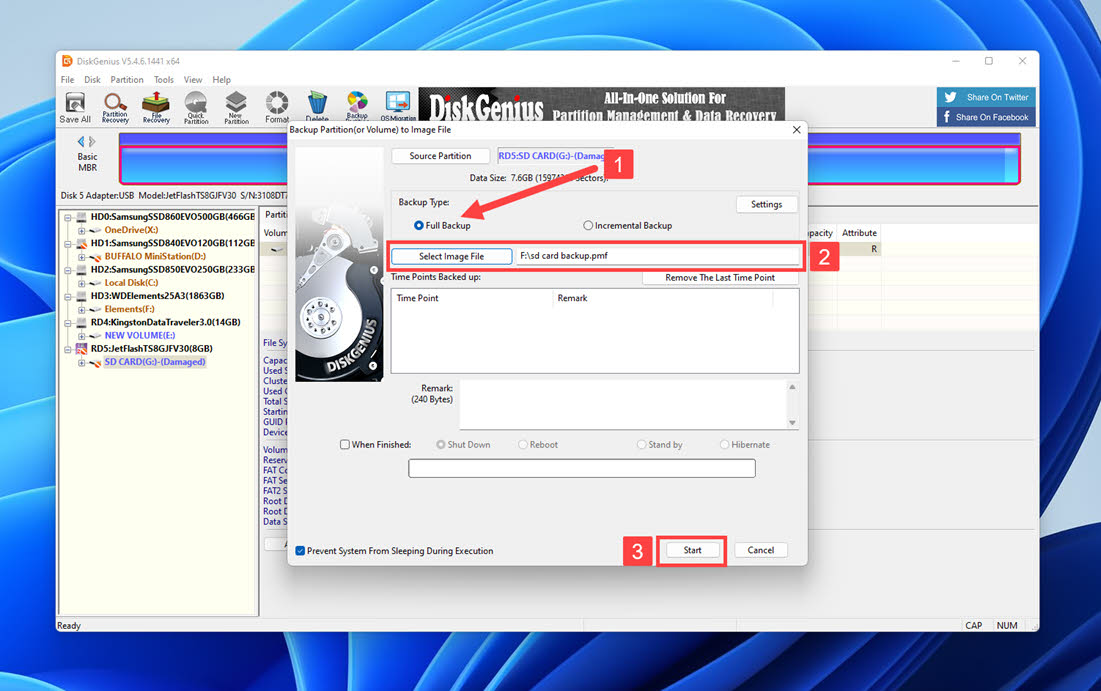
To back up your SD card into an image using DiskGenius, you need to:
- Download the latest version of DiskGenius from its official website and install it on your system drive.
- Launch DiskGenius and select the SD card you want to back up.
- Click the Backup Partition button in the top toolbar.
- Make sure that the Full Backup option is selected to create a complete image of the SD card.
- Click on Select Image File button and specify the location where DiskGenius should save the backup image.
- Click the Start button to begin the backup process. The time required to create the backup image will depend on the size and speed of the SD card.
Step 2: Format Your Memory Card
Now that the entire contents of your SD card is backed up into a handy image, you can go ahead and format it using one of the four methods described below:
- In most cases, Option A is the right choice, and you might already be familiar with it if you’ve ever formatted a storage device.
- SD cards that are not working correctly are sometimes not displayed in File Explorer despite being recognized by the operating system, and that’s where Option B come in.
- If your SD card is larger than 32 GB, then you should use Option C to avoid the limitation imposed by Windows.
- Option D is for those who prefer the Command Line to graphical solutions.
Option A: Format the SD Card in File Explorer
The Windows operating system provides a quick & easy way to format any memory card directly from File Explorer. We recommend you use this method if your SD card is working correctly and is up to 32 GB large.
To format an SD card in File Explorer:
- Launch File Explorer.
- Select This PC in the left pane.
- Right-click your SD card.
- Choose the Format option.
- Specify the desired file system (FAT32 is the best choice in most cases), name the SD card, and click Start.
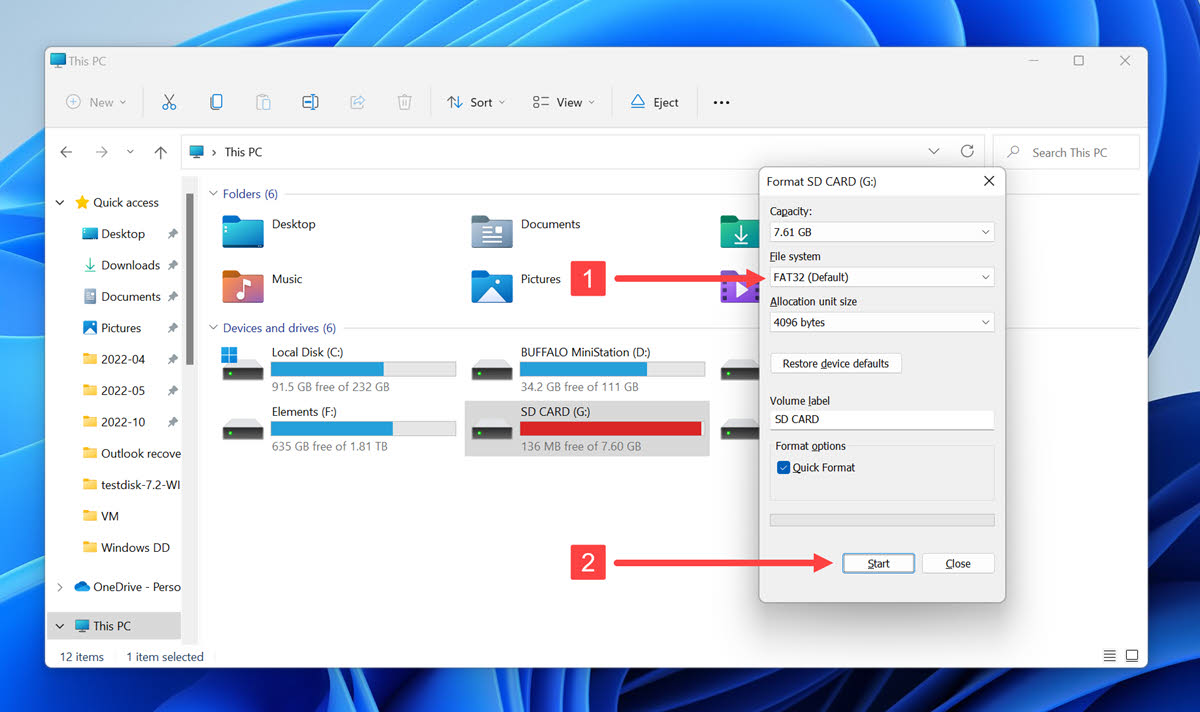
You can select the Quick Format option to save time by only recreating the file allocation table instead of also zeroing the entire SD card.
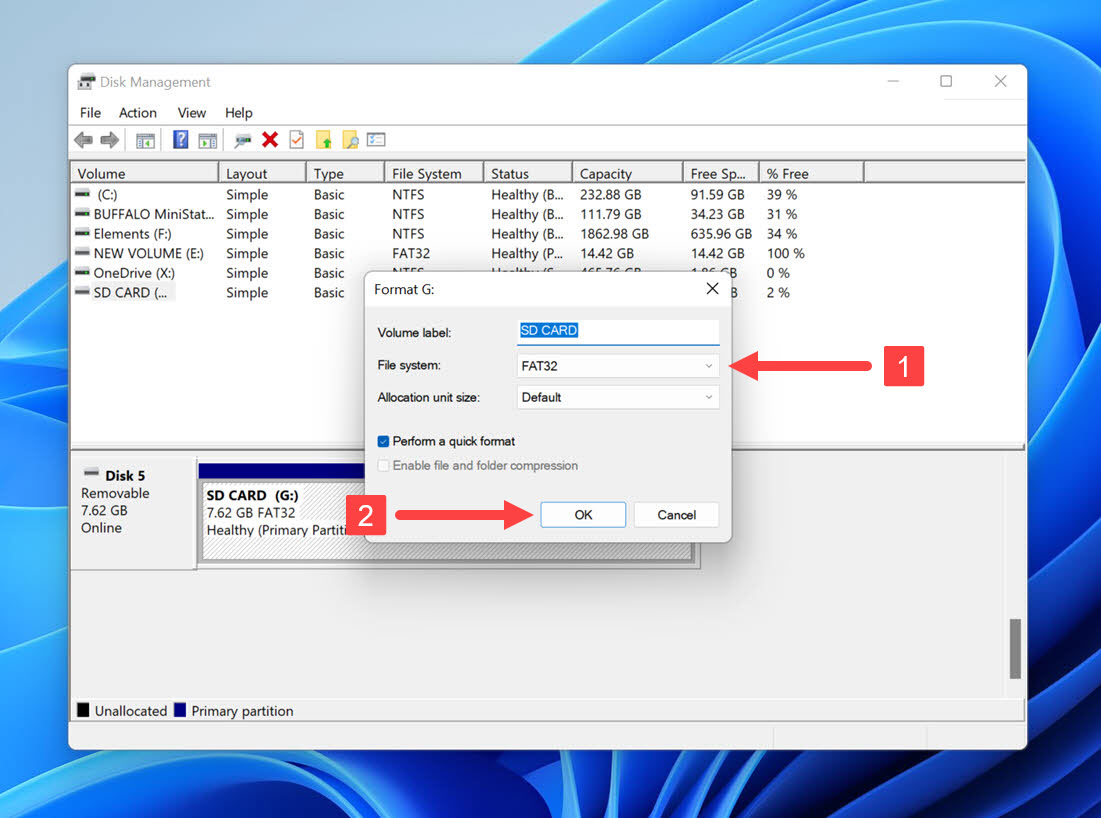
Option B: Format the SD Card Using Disk Management
Aimed at system administrators and power users, the Disk Management tool in Windows provides a detailed overview of all attached storage devices and their partitions while giving you the option to format them. The biggest advantage of this tool is the fact that, unlike File Explorer, it lists even RAW SD cards with no file system.
To format your SD card using the Disk Management tool:
- Press the Windows key + X on your keyboard and click the Disk Management option.
- Locate your SD card and right-click it.
- Select the Format option from the context menu.
- Name the SD card if you want to and choose the desired file system. You can also instruct Disk Management to perfect a quick format if you want to save some time.
- Click OK to start the formatting process.
Option C: Format the SD Card With a Third-Party Tool
There are many third-party tools for formatting memory cards and other storage devices. One popular option is the SD Memory Card Formatter. Developed by the SD Association (SDA) in compliance with the SD File System Specification.
This free tool supports SD, SDHC, and SDXC cards in the standard, mini, and microSD form factor. Unlike the format option in File Explorer, the SD Memory Card Formatter can take advantage of the theoretical 16 TB maximum volume size of the FAT32 file system, making it a great choice for those whose SD cards can rival smaller hard drives in terms of storage capacity.
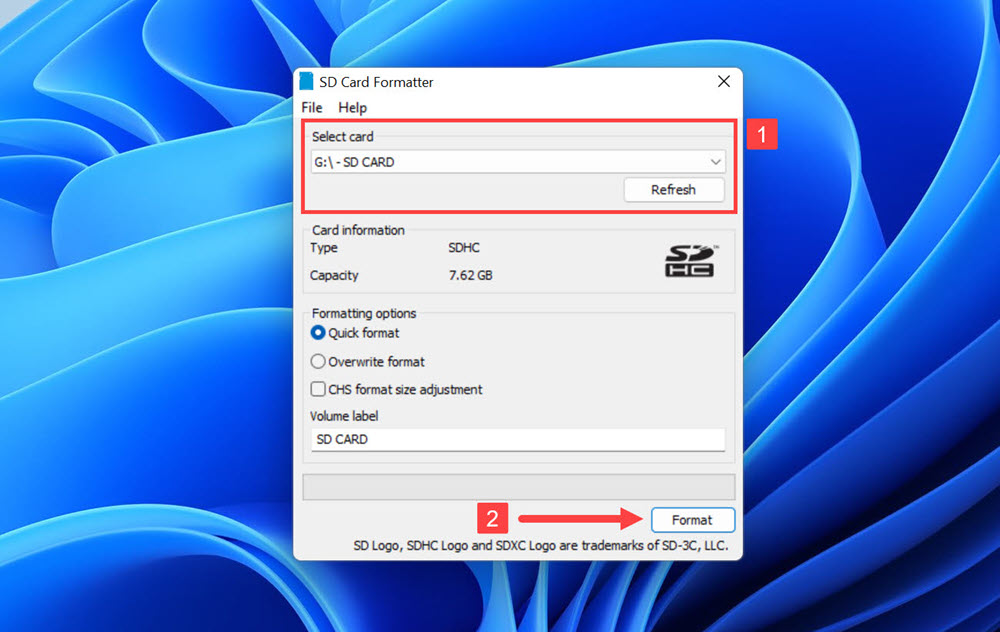
To format your SD card using the SD Memory Card Formatter tool:
- Download the SD Memory Card Formatter tool from its website.
- Open the downloaded file archive and launch the setup file inside.
- Follow the install wizard to install SD Memory Card Formatter on your computer.
- Launch the installed application and select your SD card.
- Choose between Quick and Overwrite format (we recommend the former because it’s faster and gets the job done just fine) and name your SD card.
- Click Format to begin.
Option D: Format SD Card Using CMD
Are you the type of person who prefers command-line applications to their graphical counterparts because of their straightforward nature? If so, then you can format your SD card using CMD and the diskpart command.
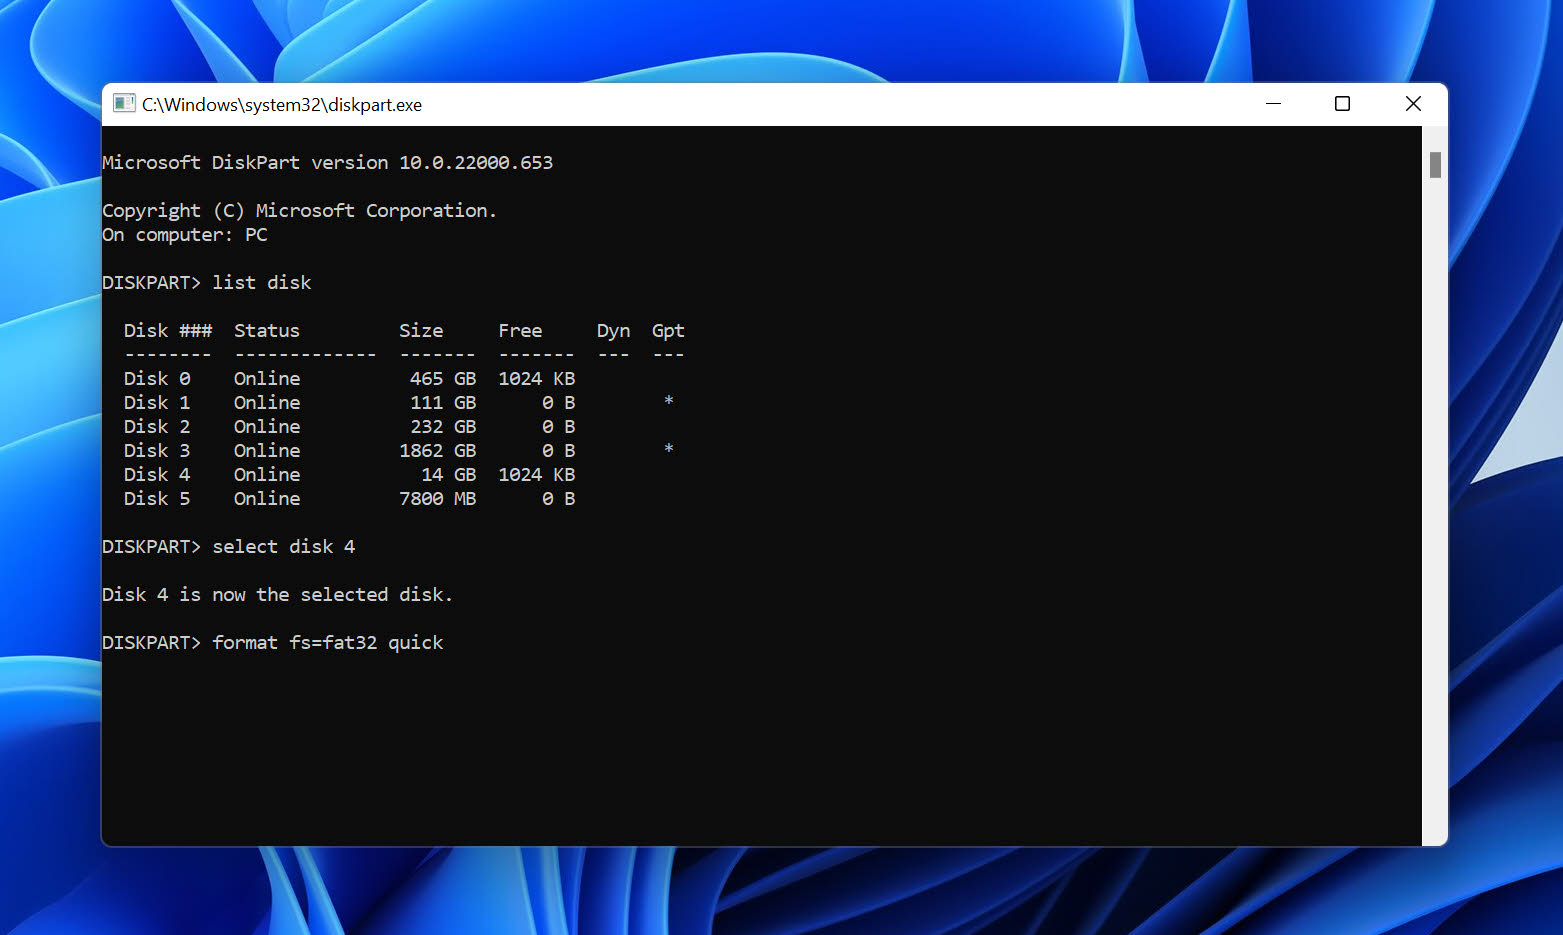
To format your SD card using CMD in Windows:
- Open the Start menu, type in cmd, and open Command Prompt as administrator.
- Type diskpart and press Enter.
- Type list disk and press Enter to see a list of all available storage devices.
- Determine which of the available storage devices is your SD card based on their sizes and remember its disk number.
- Type select disk X (replace X with the number assigned to your SD card)” and press Enter.
- Type format fs=fat32 quick and press Enter.
- Wait for the formatting process to finish.
Step 3: Copy Your Data Back to the SD Card
Finally, you can copy your backed-up data back to the formatted SD card. If you’ve created a memory card image using Disk Drill, then follow Option A. If you’ve used DiskGenius instead, then Option B is the right choice.
Option A: Disk Drill
Follow these steps to recover the backup contents of your SD card from its image using Disk Drill:
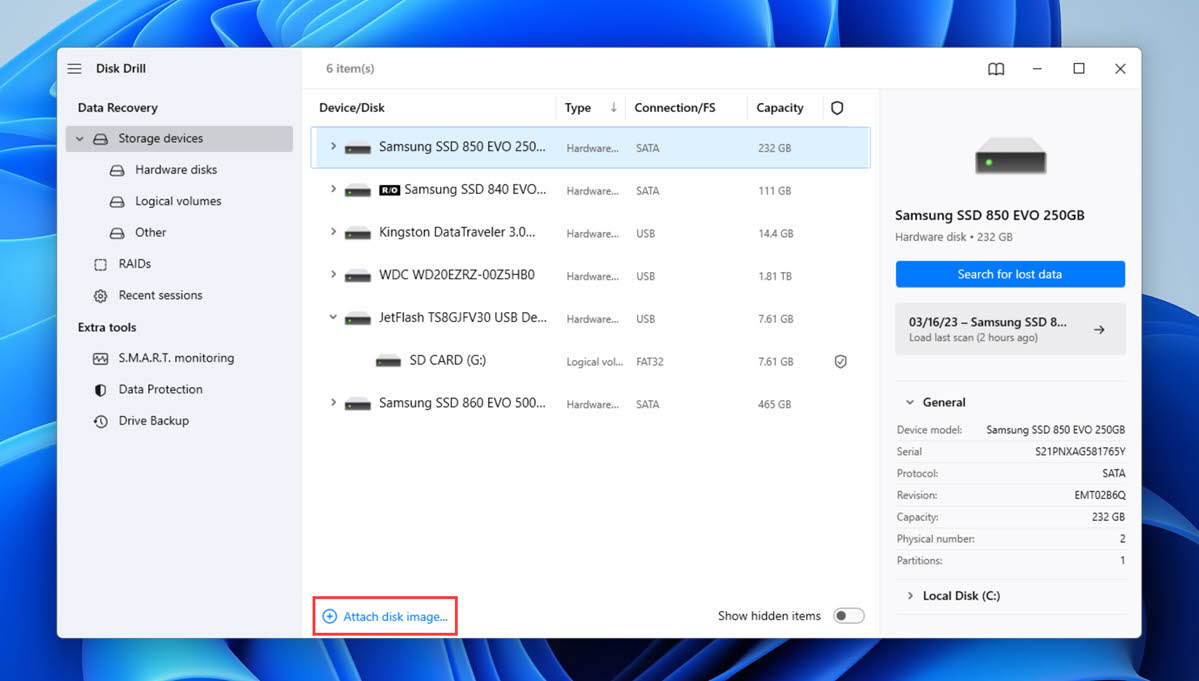
- Launch Disk Drill and click the Attach disk image button below the list of available storage devices (make sure the Storage devices tab is selected).
- Select the .dmg backup image of your SD card and click Open.
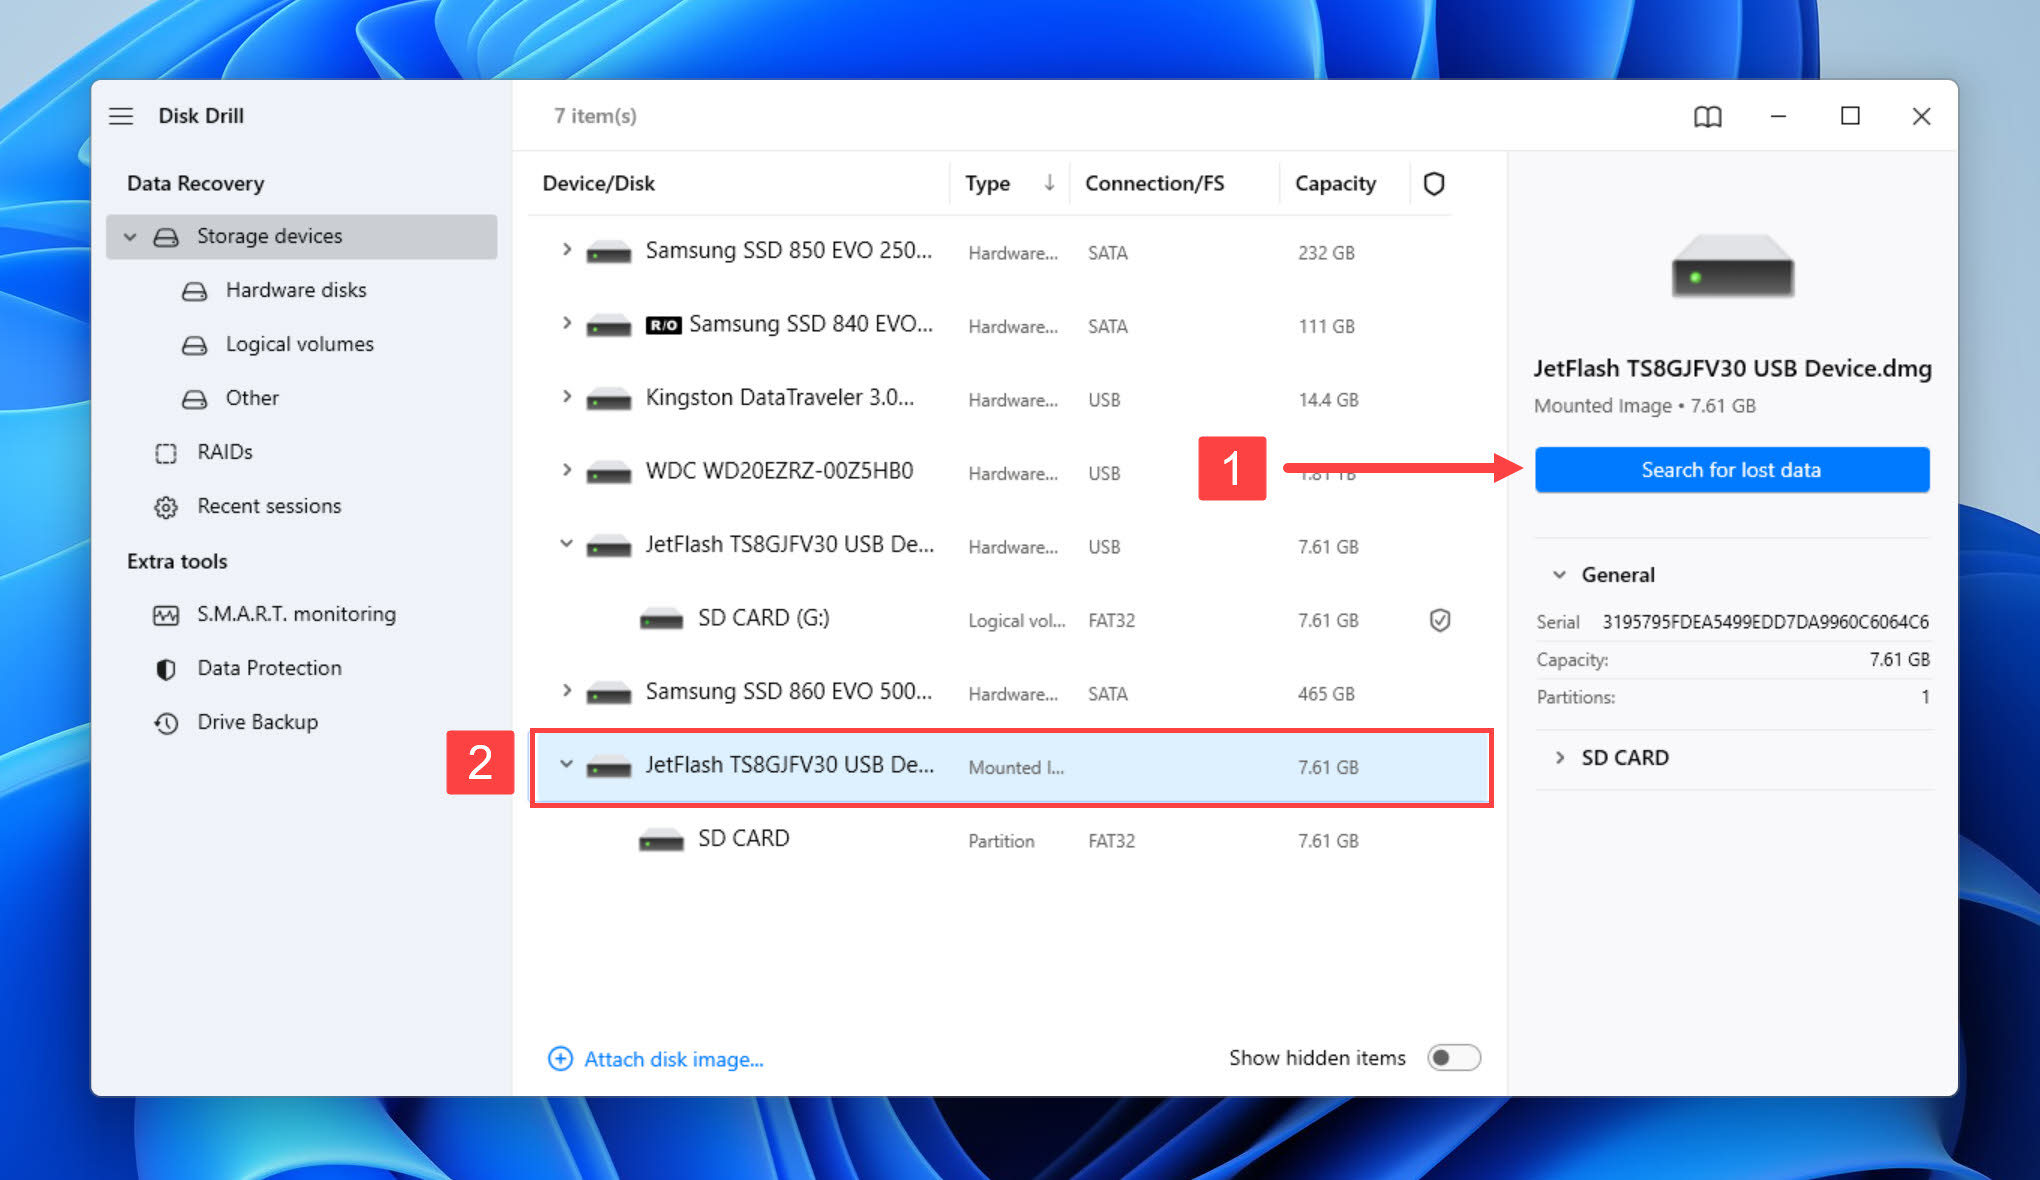
- Choose the SD card backup image you’ve just mounted from the list of available storage devices and click Search for lost data.
- Wait for Disk Drill to scan the backup image and then review the found files it contains.
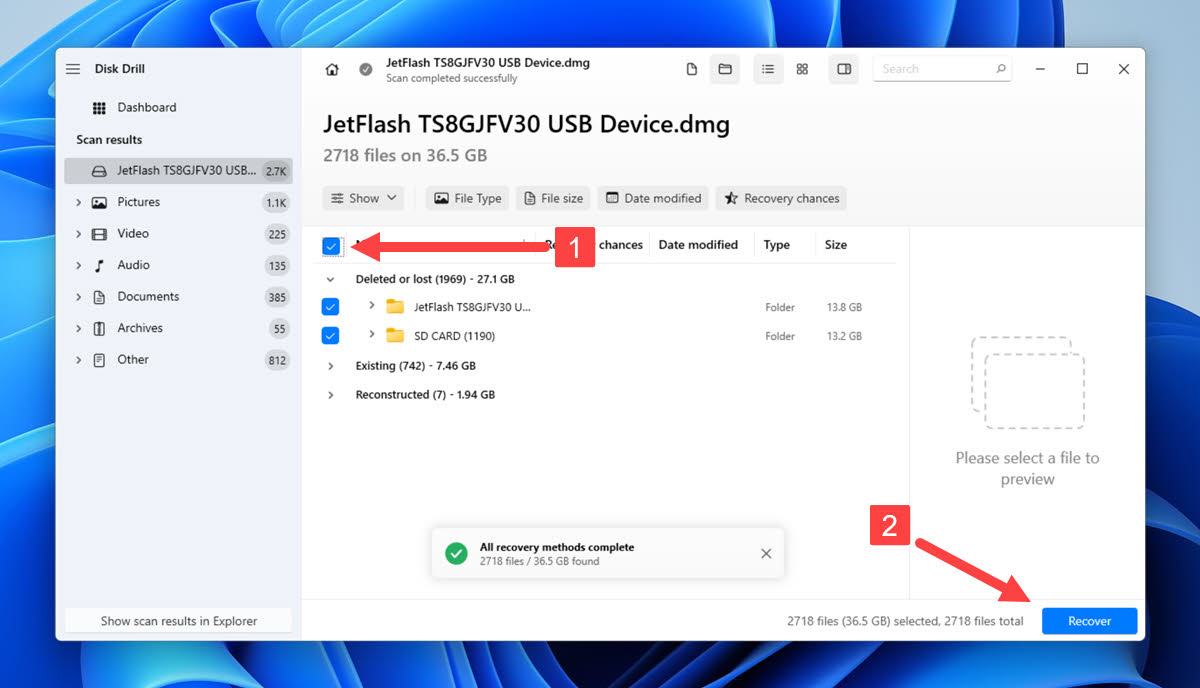
- Select all backed-up SD card files you want to recover and click the Recover button. Select the formatted SD card as your recovery location.
Option B: DiskGenius
Here’s how to copy the original SD card data from your DiskGenius backup image back to the SD card:
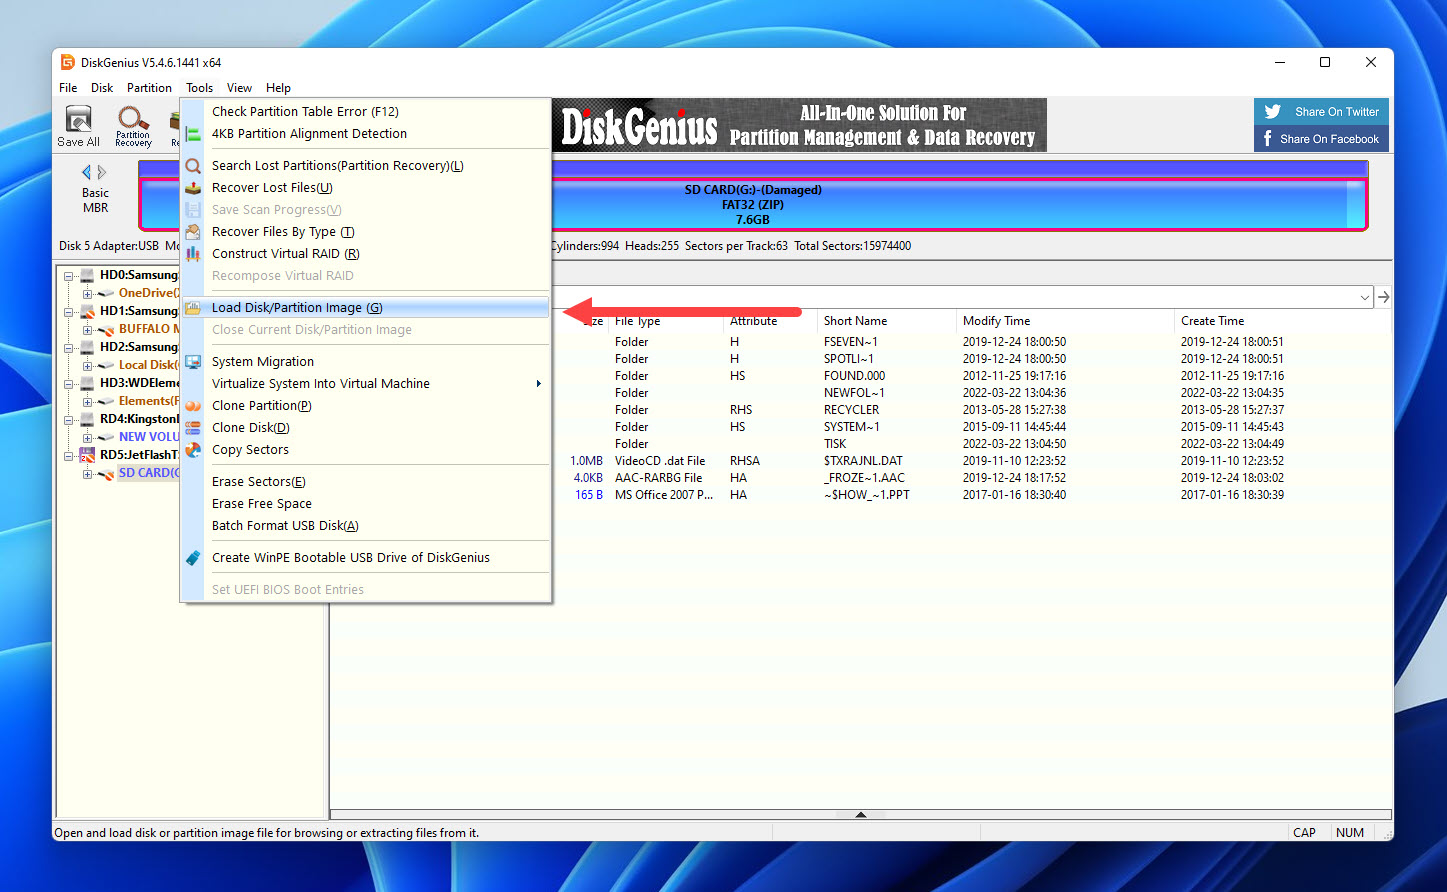
- Open DiskGenius and click the Tools menu. Select Load Disk/Partition Image from the list of options presented.
- Navigate to the folder where you have stored the backup image of your corrupted hard drive. Select the image and click the Open button.
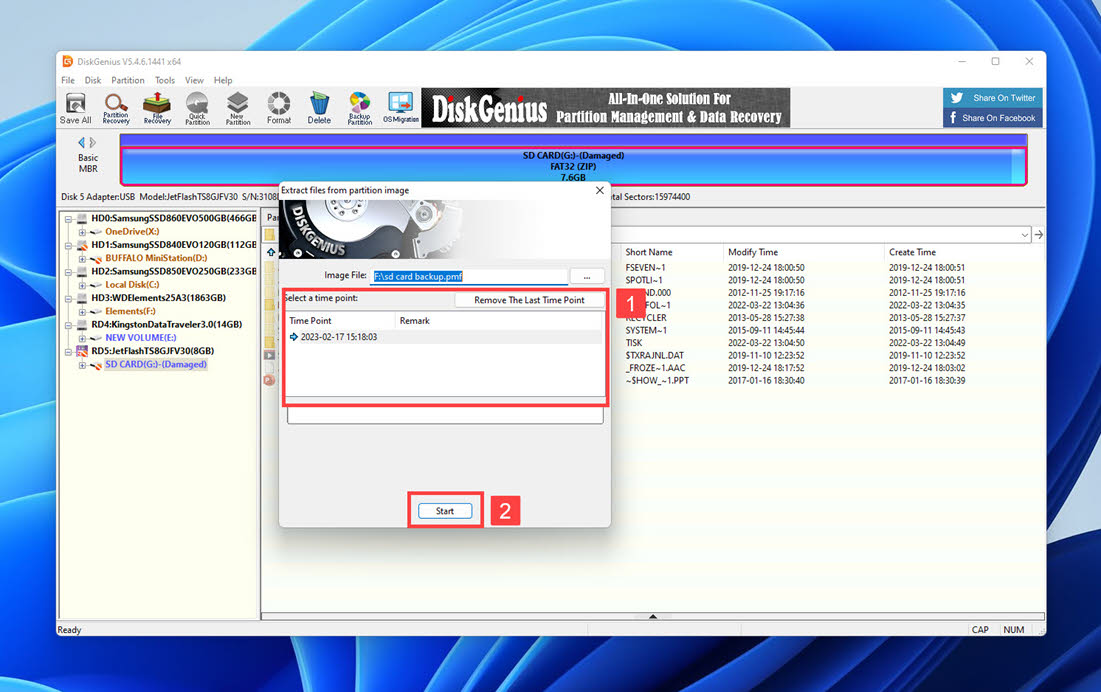
- Select the latest time point (only one should be available) and click Start.
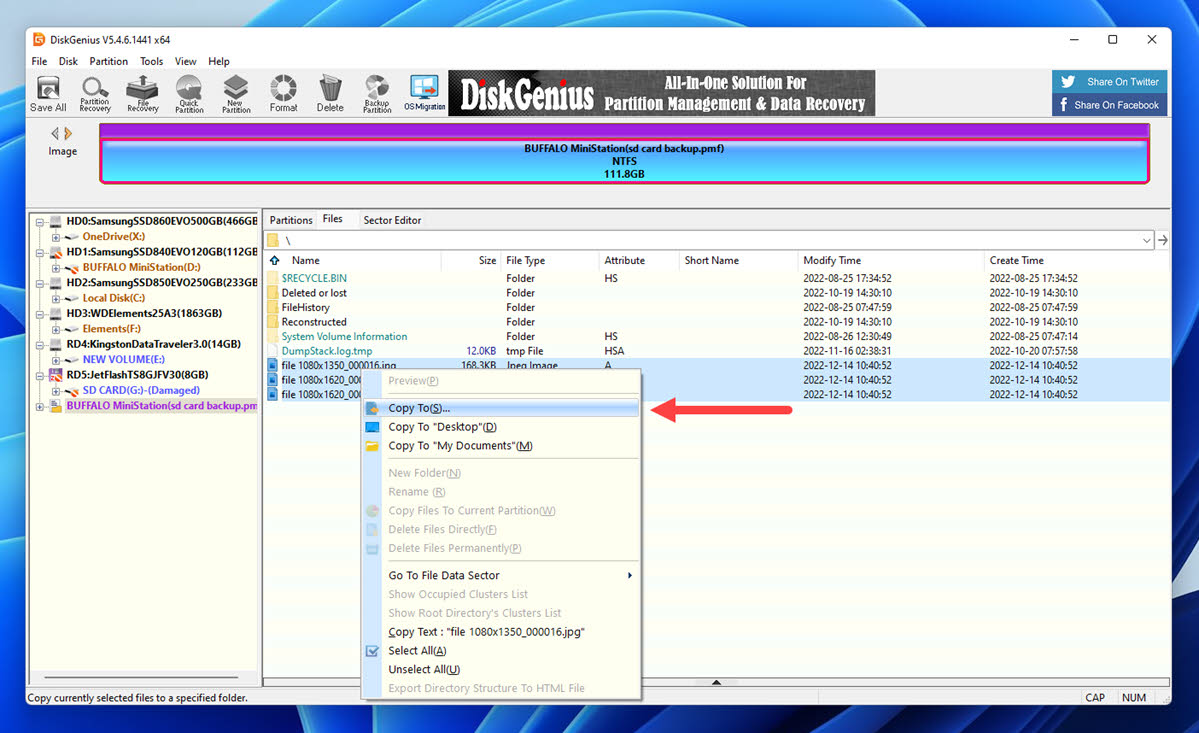
- Select the files that you want to retrieve from the backup image.
- Right-click on any of the selected files and use the Copy To option to copy them back to your SD card.
Conclusion
With proper knowledge and tools, it’s possible to format an SD card without losing data. In fact, it’s downright easy! We hope that the three-step process described in this article has helped you achieve the results you were looking for regardless of whether you needed to erase data in bulk, fix errors, switch to a different file system, or accomplish some other goal.
Frequently Asked Questions
Can you format an SD card without losing data?
Yes, it’s possible to format an SD card without losing data. Here’s what you need to do:
- Back up the contents of the SD card you want to format.
- Format your SD card.
- Transfer your data back to the newly formatted SD card.
How to format an SD card on Android without losing data?
If you have enough free internal storage space, then you can copy the files stored on your SD card there, format your memory card, and copy everything back.
Will formatting my SD card delete everything?
Yes and no. While formatting will free up all available storage space, it won’t necessarily overwrite your files with zeros or random data unless you choose to perform a Full or Secure format.
How do I save my SD card before formatting?
The best way to save your SD card before formatting is to create a full backup using a tool like Disk Drill’s Drive Backup.
Can I format an SD card on my Android phone?
Definitely! All Android phones with a microSD card slot give you the option to format your memory card directly from the Android operating system.
David Morelo is a professional content writer with a specialization in data recovery. He spends his days helping users from around the world recover from data loss and address the numerous issues associated with it.
When not writing about data recovery techniques and solutions, he enjoys tinkering with new technology, working on personal projects, exploring the world on his bike, and, above all else, spending time with his family.
- Klennet Recovery Review (Formerly Zero Assumption Recovery)
- iBeesoft Data Recovery Review – A Likable Clone With Limited Features
- DMDE Review – A Data Recovery Powerhouse or a Usability Nightmare?
- Cisdem Data Recovery for Mac Review – A Clone in Disguise
- Tenorshare 4DDiG Review – All That Glitters Is Not Gold
- Frisco, Texas, United States
Yevgeniy Tolkunov is Hardware Engineer at ACE Data Recovery. Yevgeniy has a Master's Degree in Physics, Information Technology; 15+ years of experience.